Table des Matières
Publicité
Les langues disponibles
Les langues disponibles
Liens rapides
RainSensor™ Model RS500
User's Guide
Introduction
ongratulations on your purchase of the
C
Irritrol RainSensor. The RainSensor is
designed for easy installation, so your
sensor-controlled irrigation system will be up
and running in minutes.
Before attempting to install the RainSensor,
please read through these instructions in their
entirety, and refer to the instructions provided
with your irrigation system controller/timer
regarding connection and use of a rain
sensor or rain switch. The RainSensor is
designed to work with either Normally Open
or Normally Closed sensor circuits.
Important: Please note the following
information regarding installation and use of the RainSensor.
• The RainSensor is designed to operate with 24 VAC power only.
Connecting the sensor control wiring to 120/240 VAC power may
result in severe equipment damage.
• Installation methods must comply with all applicable national and
local building codes. If you are unsure about proper wiring prac-
tices, have a qualified contractor perform the installation for you.
• The RainSensor unit should never be submerged in water or
installed inside a rain gutter.
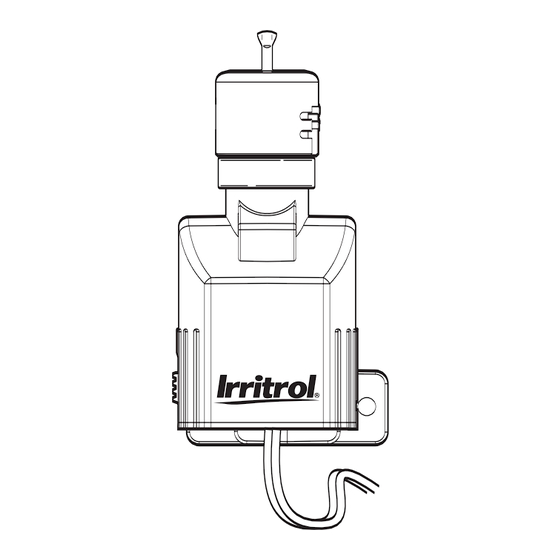
RainSensor Components (Figure 1)
1- Spindle - Press down to manually test sensor operation.
2- Rainfall Adjustment Cap - Enables
sensor to be easily adjusted for
Figure 1
detection of rainfall from 1/8" to
3/4" (3mm to 19mm).
4
3- Vent Ring - Adjust "dry-out" rate.
4- Universal Mounting Bracket with
Quick-Clip
TM
- Simplifies installa-
tion on rain gutter or roof
eaves/fascia. RainSensor adjusts
easily to the vertical position.
6
5- 25' (7.5m) control wire provided.
6- Conduit adapter - Alternative
mounting option for conduit
mount.
Quick Start Installation Instructions
For the experienced installer, the following instructions can be used.
1. Select a location to mount the RainSensor as close to the con-
troller as possible (25' [7.5m] cable provided). The location must
be away from sprinkler spray, exposed to unobstructed rainfall
and have similar sun exposure as the landscape being watered.
2. Adjust the Rainfall Adjustment Cap to the desired rainfall
activation amount. See Figure 2.
3. Adjust the Vent Ring to the desired dry-out rate.
4. Mount the RainSensor using the provided rain gutter clip,
stainless steel screws or conduit adapter.
5. Route control wire back to the controller.
6. Disconnect power to the controller.
7. Attach the sensor wires in either order to the controller Sensor
input terminals (if equipped). OR, to connect without Sensor
terminals:
A. Disconnect valve common wire and pump start relay/master
valve common (if present) from the common terminal(s).
B. Attach one wire to the common wire(s) using the supplied
wire nut.
C. Attach the remaining wire to the common terminal.
Detailed Installation Instructions
Rainfall Adjustment (Figure 2)
The RainSensor can be adjusted
to respond when it has detected
nominal rainfall in the following
amounts: 1/8" (3mm), 1/4" (6mm),
1/2" (12mm) or 3/4" (19mm).
Carefully rotate the Rainfall
Adjustment Cap so the pins are
positioned in the desired slots. Be
sure to align the slots and pins
properly, as this adjustment does
not require excessive force.
1
Note: Avoid using the 1/8" setting in high humidity conditions.
2
Vent Adjustment (Figure 2)
Closing the vent holes will slow the sensor dry-out rate, uncovering
3
the holes will accelerate the dry-out rate. For most installations, a fully
closed vent is appropriate.
Mounting the RainSensor
Note: The RainSensor is designed to work with Normally Closed or
Normally Open sensor circuits. If connecting the RainSensor to the
controller's sensor terminals, first verify which type of sensor circuit
is required by referring to the controller's user guide. The
RainSensor is set for Normally Closed sensor operation. If Normally
5
Open operation is required, refer to "Changing RainSensor
Configuration" on page 2 before mounting the RainSensor.
Select a mounting location for the RainSensor as close to the con-
troller as possible. If the 25' (7.5m) connection cable will not reach
the controller, it can be extended up to 100' (30.5m) using 18 AWG
(1mm
from sprinkler spray, exposed to unobstructed rainfall and have
similar sun exposure as the landscape being watered.
A rain gutter is an ideal
location for the RainSensor.
Simply position the bracket
with the thumbscrew under
the gutter lip and tighten to
secure (do not over-tighten).
See Figure 3.
The RainSensor can also
be mounted on any suitable
solid structure such as the
pitched edge of the roof,
a shed or fence using the
two supplied stainless steel
screws. See Figure 4
As an added feature, a
conduit adapter is included
Figure 2
for 1/2" PVC pipe mounting.
Simply remove the Quick-
Clip
TM
1/8" (3mm)
with the provided conduit
1/4" (6mm)
adapter. To provide friction
1/2" (12mm)
3/4" (19mm)
between the components,
ensure the star washer is
Vent Hole
installed between the adapter
and housing tab. Feed the
wires through the top of the
conduit adapter cap and
secure the adapter to the
conduit. See Fig. 4.
Once fastened securely,
adjust the RainSensor as
needed to align the housing
vertically.
Routing the Control Wire
After mounting the RainSensor in a suitable location, carefully route
the sensor wire back to the controller. Avoid routing the wire over
sharp edges where abrasion may occur. For best results, hide the
wire where possible by it tucking it under shingles and/or moldings.
Seal any drill holes made with an appropriate sealant.
2
) outdoor-rated wire. The RainSensor location must be away
Figure 3
Do not over-tighten
thumbscrew
Rain gutter
(cross section view)
Figure 4
bracket and replace
To Controller
ENGLISH
To Controller
Pole
Mount
Stainless
Steel
Screws
Publicité
Table des Matières

Sommaire des Matières pour Irritrol RainSensor RS500
- Page 1 2. Adjust the Rainfall Adjustment Cap to the desired rainfall Irritrol RainSensor. The RainSensor is A rain gutter is an ideal activation amount. See Figure 2.
- Page 2 U.S.A. Europe Australia Common From Valves and the strain-relief knot in (800) 634-8873 or (39) 0765 40191 (08) 8300 3633 the control wire is inside of (951) 785-3623 Wire Nut the housing. © 2005 Irritrol Form Number 373-0288 Rev. C...
- Page 3 Gracias por haber adquirido el sensor de lluvia donde puedan registrarse las precipitaciones sin impedimentos y con RainSensor de Irritrol. El RainSensor está pensado una exposición al sol similar a la del terreno de irrigación. Una canaleta de lluvia es una para que su instalación resulte sencilla, de forma que...
- Page 4 Tel: (800) 634-8873 o Tel: (08) 8300 3633 Tel: (39) 0765 40191 Tuerca para alambre tirones del cable de mando se (951) 785-3623 encuentra dentro de la carcasa. © 2005 Irritrol Número de documento 373-0288 Rev. C...
-
Page 5: Éléments Du Rainsensor (Figure 1)
Nous vous félicitons d’avoir fait l’acquisition du arrosé. Les gouttières sont idéales pour le montage du RainSensor. Il suffit de RainSensor d’Irritrol. Le RainSensor étant conçu 2. Réglez le capuchon de réglage pluie au niveau de précipitation devant positionner le support en pour s’installer facilement, votre système... -
Page 6: Fonctionnement
Tél : (800) 634-8873 ou Tél : (39) 0765 40191 Tél : (08) 8300 3633 de commande se trouve à (951) 785-3623 Raccord à écrou l’intérieur du boîtier. © 2005 Irritrol Document n° 373-0288 rév. C... - Page 7 Regnerstrahl liegen und unbehindertem Regenfall ausgesetzt Einführung unbehindertem Regenfall ausgesetzt sein sowie eine ähnliche sein sowie eine ähnliche Sonneneinstrahlung wie die bewässerte Fläche Vielen Dank für den Kauf des Irritrol RainSensor. Sonneneinstrahlung wie die bewässerte Fläche aufweisen. aufweisen. Der RainSensor ist für eine einfache Installation 2.
-
Page 8: Technische Daten
Technische Unterstützung: korrekt eingeschoben wird und dass sich der Europa Nullleiter von den Ventilen Australien Spannungsentlastungsknoten im Tel.: (800) 634-8873 Tel.: (39) 0765 40191 Tel.: (08) 8300 3633 Drahtmutter Gehäuseinneren befindet. oder (951) 785-3623 © 2005 Irritrol Formular-Nr. 373-0288 Rev. C... - Page 9 Congratulazioni per aver acquistato il RainSensor senza ostruzioni alla precipitazione piovosa e con un’esposizione al di Irritrol. Il RainSensor è stato progettato per sole simile a quella dell'ambiente irrigato. Una grondaia offre una...
-
Page 10: Dati Tecnici
Comune proveniente dalle valvole U.S.A. Europe Australia antitensione del conduttore Tel.: (800) 634-8873 o Tel.: (39) 0765 40191 Tel.: (08) 8300 3633 di controllo sia all’interno Morsetto a cappellotto (951) 785-3623 dell’involucro. © 2005 Irritrol Modulo numero 373-0288 Rev. C... - Page 11 Parabéns por haver comprado um RainSensor exposto a precipitação sem obstrução e contar com exposição ao sol obstrução, além de contar com exposição ao sol similar àquela da Irritrol. O RainSensor foi projetado para ser similar àquela do terreno a do terreno a ser irrigado.
-
Page 12: Especificações
Estados Unidos Europa Austrália Comum das válvulas Tel: (800) 634-8873 ou Tel: (08) 8300 3633 Tel: (39) 0765 40191 Porca do fio (951) 785-3623 © 2005 Irritrol Número de formulário 373-0288 Rev. C...