Greentouch 1040IM-28-208 Instructions D'utilisation, D'assemblage Et De Maintenance

Greentouch 1040IM-28-208 Instructions D'utilisation, D'assemblage Et De Maintenance

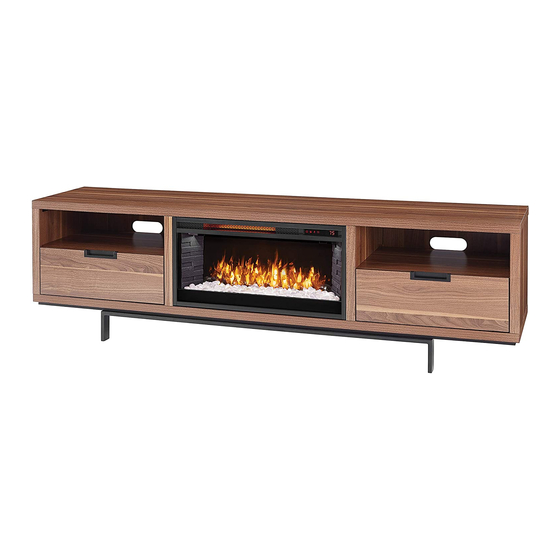
Console interchangeable de 78 po pour foyer et médias

Publicité

Les langues disponibles

Les langues disponibles

Liens rapides

78" Interchangeable
Fireplace/Media Console
ASSEMBLY, CARE & USE INSTRUCTIONS
MODEL # 1040IM-28-208; 1040IM-28-254;
1040IM-28-256
A separate Instruction Manual for the
Insert (Model 2803-FG-M2) and Remote
Control is included with this unit.
Date Purchased _______________________
Questions, problems, missing parts? Before returning to your retailer, call our customer service
department at 1-704-461-2414 8:30 a.m. - 5 p.m., EST, Monday - Friday.
www.greentouchhome.com
Français p. 13
Español p. 25

Publicité

Table des Matières
loading

Sommaire des Matières pour Greentouch 1040IM-28-208

  • Page 1 78” Interchangeable Français p. 13 Español p. 25 Fireplace/Media Console ASSEMBLY, CARE & USE INSTRUCTIONS MODEL # 1040IM-28-208; 1040IM-28-254; 1040IM-28-256 A separate Instruction Manual for the Insert (Model 2803-FG-M2) and Remote Control is included with this unit. Date Purchased _______________________ Questions, problems, missing parts? Before returning to your retailer, call our customer service department at 1-704-461-2414 8:30 a.m.
  • Page 2: Package Contents

    PACKAGE CONTENTS PART DESCRIPTION QUANTITY PART DESCRIPTION QUANTITY Base Left Outer Wall Drawer Front Panel Right Outer Wall Drawer Left Panel Left Middle Wall Drawer Right Panel Right Middle Wall Drawer Back Panel Left Shelf Drawer Bottom Panel Right Shelf Center Media Shelf Back Panel Center Back Panel...
  • Page 3: Table Des Matières

    HARDWARE CONTENTS (NOT SHOWN ACTUAL SIZE) PART DESCRIPTION QUANTITY Bolt Wooden Dowel Back Panel Screw Screw Connecting Rod Locknut Shelf Pin Insert Bracket Bracket Screw Touch-up Pen...
  • Page 4: Preparation

    PREPARATION Before beginning assembly of product, make Estimated Assembly Time: 45 minutes sure all parts are present. Compare parts with Tools Required for Assembly (not included): package contents list and hardware contents list. If any part is missing or damaged, do not attempt Phillips screwdriver to assemble the product.
  • Page 5: Cabinet Installation

    CABINET INSTALLATION 1035IM-28-225-1 1. Attach left shelf (F) to left middle wall (D), Secure with two bolts (AA). Repeat for left outer wall (B). Hardware Used Bolt 1035IM-28-225-1 2. Attach right shelf (G) to right outer wall (C), Secure with two bolts (AA).
  • Page 6: Cc Back Panel Screw

    CABINET INSTALLATION 4. Insert two wooden dowels (BB) into the top holes on left outer wall (B), left middle wall (D), right middle wall (E) and right outer wall (C), carefully place the top (A) onto the mantel assembly, and flip the locking mechanisms to secure the top (A) with the mantel Lock assembly and secure from underneath with four...
  • Page 7: Ee Connecting Rod

    CABINET INSTALLATION 7. Insert the bottom panel into the groove of assembly from Step 6. 8. Screw four connecting rods (EE) into the hole on the back of the front panel of drawer . Hardware Used Connecting Rod 9. Insert two locknuts (FF) into the holes of left side and right side of drawer, insert the wooden dowels (BB) into the top hole so left side and right side of drawer, align the dowels on the left side and...
  • Page 8: Gg Shelf Pin

    CABINET INSTALLATION 10. Slide glide roller (on track inside cabinet) to front, Carefully align drawer box glide track (attached to sides of drawer box ) with glide track (attached to inside of cabinet ). Making sure drawer is aligned and centered onto glides, gently push drawer. CAUTION DO NOT force drawer or damage to glide may occur.
  • Page 9 ELECTRICAL FIREPLACE ASSEMBLY INSTRUCTIONS (OPTIONAL) 1035IM-28-225 1. Take out the center media shelf (H). 1035IM-28-225 2. From behind the assembly, remove the center back panel (J) by unscrewing those screws on back panel.
  • Page 10: Hh Insert Bracket

    ELECTRICAL FIREPLACE ASSEMBLY INSTRUCTIONS (OPTIONAL) 1035IM-28-225 Note: Before proceeding to the next step, with the help of another person, move the mantel close to the final desired location. 3. With the help of another person, position insert into opening of mantel assembly. CAUTION: DO NOT slide insert on top of wood to avoid scratching wood surface.
  • Page 11 ONE-YEAR LIMITED WARRANTY The manufacturer warrants that your new Electric fireplace is free from manufacturing and material defects for a period of one year from date of purchase, subject to the following conditions and limitations. Install and operate this Electric fireplace in accordance with the installation and operating instructions furnished with the product at all times.
  • Page 12: Replacement Parts

    For replacement parts, call our customer service department at 1-704-461-2414, 8:30 a.m. - 5 p.m., EST, Monday - Friday. PART DESCRIPTION PART # Hardware Pack PH-1040IM-28-208 (AA, BB, CC, DD, EE, FF, HARDWARE PACK GG, HH, II and JJ (OX-0520)) Hardware Pack...
  • Page 13: Console Interchangeable De 78 Po Pour Foyer Et Médias

    Español p. 25 de 78 po pour foyer et médias INSTRUCTIONS D’UTILISATION, D’ASSEMBLAGE ET DE MAINTENANCE MODÈLE # 1040IM-28-208; 1040IM-28-254; 1040IM-28-256 Un manuel d’instructions distinct pour l’insert (modèle 2803-FG-M2) et la télécommande est inclus dans cette unité. Date d’achat _______________________ Des questions, des problèmes, des pièces manquantes? Avant de retourner l’article au détaillant,...
  • Page 14: Contenu De L'emballage

    CONTENU DE L’EMBALLAGE PIÈCE DESCRIPTION QUANTITÉ PIÈCE DESCRIPTION QUANTITÉ Dessus Base Paroi Extérieure Gauche Panneau Avant Du Tiroir Panneau Gauche Du Tiroir Paroi Extérieure Droite Cloison Centrale Gauche Panneau Droit Du Tiroir Panneau Arrière Du Tiroir Cloison Centrale Droite Panneau Inférieur Du Tiroir Étagère De Gauche Étagère De Droite Étagère Centrale Pour...
  • Page 15 CONTENUS MATÉRIELS (NON REPRÉSENTÉS EN TAILLE RÉELLE) PIÈCE DESCRIPTION QUANTITÉ Boulon Groujon En Bois Vis Pour Le Panneau Arrière Tige De Connexion Contre-écrou Goupille à Tablette Insérer un Support Vis de Support Crayon à Retouche...
  • Page 16 PRÉPARATION Avant de commencer l’assemblage de l’article, Temps d’assemblage approximatif : assurez-vous d’avoir toutes les pièces. Comparez 45 minutes. le contenu de l’emballage avec la liste des pièces et celle de la quincaillerie incluse. S’il y a des Outil nécessaire pour l’assemblage pièces manquantes ou endommagées, ne tentez (non inclus) : tournevis cruciforme.
  • Page 17: Installation Du Coffret

    INSTALLATION DU COFFRET 1035IM-28-225-1 1. Attachez la étagère de gauche (F) à la cloison centrale gauche (D), fixez avec deux boulons (AA). Répétez l'opération précédente pour la paroi extérieure gauche (B). Quincallerie Utilisée Boulon 1035IM-28-225-1 2. Attachez la étagère de droite (G) à la paroi extérieure droite (C), fixez avec deux boulons (AA).
  • Page 18: Cc Vis Pour Le Panneau Arrière

    INSTALLATION DU COFFRET 4. Insérer deux chevilles en bois (BB) dans les trous supérieurs de la paroi extérieure gauche (B), de la paroi centrale gauche (D), de la paroi centrale droite (E) et de la paroi extérieure droite (C), placer soigneusement le dessus (A) sur l'ensemble du manteau de cheminée et Lock retourner les mécanismes de verrouillage pour fixer le...
  • Page 19: Ee Tige De Connexion

    INSTALLATION DU COFFRET 7. Insérer le panneau inférieur dans la rainure de l'assemblage de l'étape 6. 8. Visser quatre tiges de connexion (EE) dans le trou situé à l'arrière du panneau avant du tiroir. Quincallerie Utilisée Tige de connexion 9. Insérer deux contre-écrous (FF) dans les trous des côtés gauche et droit du tiroir, insérer les chevilles en bois (BB) dans le trou supérieur du côté...
  • Page 20: Gg Goupille À Tablette

    INSTALLATION DU COFFRET 10. Slide glide roller (on track inside cabinet) to front, Carefully align drawer box glide track (attached to sides of drawer box ) with glide track (attached to inside of cabinet ). Making sure drawer is aligned and centered onto glides, gently push drawer.
  • Page 21 INSTRUCTIONS DE MONTAGE DU FOYER ÉLECTRIQUE (OPTIONNEL) 1035IM-28-225 1. Sortez les étagère centrale pour média (H). 1035IM-28-225 2. De l'arrière de l'assemblage, enlever le panneau arrière central (J) en dévissant les vis sur le panneau arrière.
  • Page 22: Hh Insérer Un Support

    INSTRUCTIONS DE MONTAGE DU FOYER ÉLECTRIQUE (OPTIONNEL) 1035IM-28-225 Remarque: Avant de passer à l’étape suivante, et avec l’aide d’une autre personne, placez lemeuble à proximité de l’emplacement final désiré 3. Avec l’aide d’une autre personne, placez le foyer encastrable dans l’ouverture centrale du meuble. ATTENTION : Ne faites PAS glisser le foyer encastrable sur une surface en bois afin de prévenir les égratignures.
  • Page 23: Garantie

    GARANTIE Cet article est garanti par le fabricant contre les défauts de matériaux et de fabrication pour une période de un an à compter de la date d’achat. La présente garantie est assujettie aux restrictions et aux conditions suivantes : Ce meuble doit être installé...
  • Page 24: Liste Des Pièces De Rechange

    Pour obtenir des pièces de rechange, communiquez avec notre service à la clientèle au 1-704-461-2414, entre 8h30 et 17 h (HNE), du lundi au vendredi. PIÈCE DESCRIPTION Nº DE PIÈCE Paquet De Matériel PH-1040IM-28-208 (AA, BB, CC, DD, EE, FF, HARDWARE PACK GG, HH, II and JJ (OX-0520)) Paquet De Matériel...
  • Page 25 Français p. 13 multimedia intercambiable de 78 pulg. INSTRUCCIONES DE ENSAMBLAJE, CUIDADO Y USO MODELO # 1040IM-28-208; 1040IM-28-254; 1040IM-28-256 Esta unidad incluye un manual de instrucciones por separado para el inserto (Modelo 2803-FG-M2) y el control remoto. Fecha de compra _______________________ ¿Preguntas, problemas, piezas faltantes? Antes de volver a la tienda, llame a nuestro...
  • Page 26: Contenido Del Paquete

    CONTENIDO DEL PAQUETE PIEZA DESCRIPCIÓN CANTIDAD PIEZA DESCRIPCIÓN CANTIDAD Cubierta Base Panel Exterior Izquierdo Panel Frontal Del Cajón Panel Izquierdo Del Cajón Panel Exterior Derecho Pared Central Izquierda Panel Derecho Del Cajón Panel Posterior Del Cajón Pared Central Derecha Panel Inferior Del Cajón Estante Izquierdo Estante Derecho Estante Central...
  • Page 27: Contenido De Hardware

    CONTENIDO DE HARDWARE (NO SE MUESTRAN EN TAMAÑO REAL) PIEZA DESCRIPCIÓN CANTIDAD Perno Espiga De Madera Tornillo Del Panel Posterior Tornillo Varilla Conectora Contratuerca Pasador De Repisa Insertar Soporte Tornillo de Soporte Aplicador De Retoque...
  • Page 28 PREPARACIÓN Antes de comenzar a ensamblar el producto, Tiempo Estimado De Ensamblaje: 45 minutos asegúrese de tener todas las piezas. Compare Herramientas necesarias para el ensamblaje las piezas con la lista del contenido del (no se incluyen): Destornillador Phillips paquete y la lista de aditamentos. No intente ensamblar el producto si falta alguna pieza o si estas están dañadas.
  • Page 29: Instalación Del Gabinete

    INSTALACIÓN DEL GABINETE 1035IM-28-225-1 1. Una la estante izquierdo (F) al pared central izquierda (D) con dos perno largo (AA). Repita el procedimiento para el panel exterior izquierdo (B). Aditamentos utilizados Perno 1035IM-28-225-1 2. Una la estante derecho (G) al panel exterior derecho (C) con dos perno largo (AA).
  • Page 30: Cc Tornillo Del Panel Posterior

    INSTALACIÓN DEL GABINETE 4. Inserte dos taquetes de madera (BB) en los orificios superiores de la pared exterior izquierda (B), la pared central izquierda (D), la pared central derecha (E) y la pared exterior derecha (C), coloque con cuidado la parte superior (A) sobre el ensamble de la repisa, gire Lock los mecanismos de bloqueo para fijar la parte superior...
  • Page 31: Ee Varilla Conectora

    INSTALACIÓN DEL GABINETE 7. Inserte el panel inferior en la ranura del ensamblaje del Paso 6. 8. Atornille cuatro varillas conectoras (EE) en el orificio de la parte posterior del panel frontal del cajón. Aditamentos utilizados Varilla Conectora 9. Inserte dos contratuercas (FF) en los orificios del lado izquierdo y del lado derecho del cajón, inserte los taquetes de madera (BB) en el orificio superior del lado izquierdo y el lado derecho del cajón, alinee los taquetes...
  • Page 32: Gg Pasador De Repisa

    INSTALACIÓN DEL GABINETE 10. Deslice el rodillo de deslizamiento (en la guía dentro del gabinete) hacia el frente, alinee cuidadosamente la guía de deslizamiento de la base del cajón (unida a los lados de la base del cajón) con la guía de deslizamiento (unida al interior del gabinete).
  • Page 33 INSTRUCCIONES DE MONTAJE DE LA CHIMENEA ELÉCTRICA (OPCIONAL) 1035IM-28-225 1. Retire los repisa (H). 1035IM-28-225 2. Desde detrás del conjunto, retire el panel posterior central (J) destornillando los tornillos del panel trasero.
  • Page 34: Hh Insertar Soporte

    INSTRUCCIONES DE MONTAJE DE LA CHIMENEA ELÉCTRICA (OPCIONAL) 1035IM-28-225 Nota: Antes de seguir con el próximo paso, con la ayuda de otra persona, mueva la repisa a la ubicación final deseada 3. Con ayuda de otra persona, ubique el accesorio en la abertura central del ensamble de la repisa.
  • Page 35 GARANTÍA El fabricante garantiza que este producto no presentará defectos de materiales o de fabricación por un período de un año a partir de la fecha de compra original. Esta garantía está sujeta a las siguientes condiciones y limitaciones: Esta repisa se debe instalar y operar de acuerdo con las instrucciones de instalación y operación proporcionadas con el producto.
  • Page 36: Lista De Piezas De Repuesto

    Para obtener piezas de repuesto, llame a nuestro Departamento de Servicio al Cliente all 1-704-461-2414, de lunes a viernes de 8:30 a.m. a 5:00 p.m., hora del Este. PIEZA DESCRIPCIÓN PIEZA # Paquete de Hardware PH-1040IM-28-208 (AA, BB, CC, DD, EE, FF, HARDWARE PACK GG, HH, II and JJ (OX-0520)) Paquete de Hardware...

Ce manuel est également adapté pour:

1040im-28-2541040im-28-256

Table des Matières