Table des Matières

Publicité

Les langues disponibles

Les langues disponibles

Liens rapides

Publicité

Table des Matières
loading

Sommaire des Matières pour Fantec MM-FHDL

  • Page 2 ENGLISH...
  • Page 3: Table Des Matières

    Table of Contents 1. Introduction .......................... 3 1.1 Preface ........................3 1.2 Packing List ......................... 4 1.3 Cautions ........................4 1.4 Connection ........................6 1.5 Power On / Off ......................11 1.6 Menu Language ......................11 1.7 HDD Format ......................12 2.
  • Page 4: Introduction

    1. Introduction 1.1 Preface Thank you very much for purchasing FANTEC MM-FHDL. We hope you will enjoy using it as a great home entertainment partner. This player has the following functionality. A/V Output • HDMI V1.3 for high-definition video and digital audio •...
  • Page 5: Packing List

    The actual contents in the package might be different from the packing list in this manual. 1.3 Cautions The FANTEC MM-FHDL design and manufacture has your safety in mind. In order to safely and effectively use this player, please read the following before usage.
  • Page 6 1.3.4 Repair If the player has a problem, you should take it to an appointed repair center and let the specialists do the repair, never repair the player yourself, you might damage the player or endanger yourself or your data. 1.3.5 Disposing of the Player When you dispose of the player, be sure to dispose it appropriately.
  • Page 7: Connection

    1.4 Connection 1.4.1 Connecting the Power Supply (1) Follow the picture and connect the AC adaptor to the player’s DC IN jack; (2) Follow the picture and plug in the AC adaptor to the power outlet. 1.4.2 Connecting to a PC (1) Make sure the player is powered on;...
  • Page 8: Connecting A Usb Device

    1.4.3 Connecting a USB Device (1) Make sure the player is powered on; (2) Plug in the USB stick or USB HDD etc. to the USB HOST port of this player. In this way, you can browse contents on the USB device. 1.4.4 Connecting to a TV 1.4.4.1 A/V OUT (1) Follow the picture and plug in the 3 color connector to the player’s A/V OUT jack;...
  • Page 9 1.4.4.2 SCART OUT (1) Follow the picture and plug one connector on the SCART cable to the player’s SCART socket; (2) Follow the picture and plug the other connector on the SCART cable to the TV’s SCART socket. 1.4.4.3 Y/Pb/Pr Component OUT (1) Follow the picture and plug in the 3 color connector to the player’s Y/Pb/Pr jack;...
  • Page 10 1.4.4.4 HDMI OUT (1) Follow the picture and plug one connector on your HDMI cable to the player’s HDMI jack; (2) Follow the picture and plug the other connector on your HDMI cable to the TV’s HDMI jack. Note: The HDMI cable is an optional accessory sold separately. In this way, you can have the highest quality video and audio via a single cable.
  • Page 11: Connecting To A Lan

    1.4.6 Connecting to a LAN To connect to a LAN (Local Area Network) you require a cat5, cat5e or cat6 network cable (not supplied). (1) Connect one of the crystal plugs on the cable to the player’s RJ45 LAN socket; (2) Connect the other crystal plug on the cable to a RJ45 LAN port on your router, switch, or hub devices.
  • Page 12: Power On / Off

    1.5 Power On / Off Power On After connecting the DC IN jack and press the power button on the front panel, the player will soon enter the home screen, and the power indicator will turn blue. Power Off Press the power button on the front panel, the player will soon enter standby mode, and the power indicator will turn red.
  • Page 13: Hdd Format

    1.7 HDD Format For users who wish to install a new SATA HDD into the player, please refer to the following procedures to format the hard disk on the player before usage. Note: This page can be also accessed via Setup->System->HDD Format menu. Step 1: Select OK on the Warning page, press ENTER to confirm.
  • Page 14: About The Player

    2. About the Player 2.1 Remote Control All procedures in this manual can be carried out using the remote control buttons. See the following for details on each button and its function: 1. STANDBY 2. MUTE 3. TV SYSTEM 4. BROWSER 5.
  • Page 15 Press to fast rewind the current playback. Press repeatedly to select speeds. Press to decrease the volume. VOL- Press to fast forward the current playback. Press repeatedly to select speeds. PLAY Press to begin playback. HOME Press to enter the home screen. Press the arrow buttons to select menu options, and the ENTER Navigational buttons...
  • Page 16: Front Panel

    GOTO Press to jump to a specific point on a title. Specify the point using Title, Chapter and Time. Press to enter the file copy menu. COPY MUSIC Press to start playing music in the music playlist. INFO Press to hide or display the information bar during playback. 2.2 Front Panel 1.
  • Page 17: Setup Menu

    3. Setup Menu The Setup menu allows you to personalize and configure the preferences for your player. To select a Setup option: Select the Setup icon on the home screen, or press the SETUP button on the remote control. Use the LEFT/RIGHT navigational buttons to select an option, and then press ENTER. There are five Setup options, including Audio, Video, Network, System, and MISC.
  • Page 18: Changing Video Settings

    Digital Output Choose between HDMI LPCM / HDMI RAW / SPDIF LPCM / SPDIF RAW. In raw mode, Dolby Digital or MPEG sound can be bypassed to the HDMI TV or Digital amplifier. 3.2 Changing Video Settings Use this menu to configure video settings. Aspect Ratio Pan Scan 4:3: Display a wide picture on the entire screen and cuts off the redundant portions.
  • Page 19: Changing Network Settings

    3.3 Changing Network Settings Use this menu to configure Ethernet and WLAN (Wireless Local Area Network) settings. Wired LAN Setup DHCP IP (AUTO) Select to obtain IP address automatically. FIX IP (MANUAL) Select to manually input the IP Address, Subnet Mask, Default Gateway, and DNS Server IP Address.
  • Page 20 Get Connection Mode Choose between Infrastructure (AP) and Peer to Peer (Ad Hoc). Press ENTER to go to next step, and press RETURN to cancel. Infrastructure (AP) Infrastructure mode is used to connect computers with wireless network adapters, also known as wireless clients, to an existing wired network with the help from wireless router or access point.
  • Page 21 Encryption keys can be inputted via the virtual keyboard. Press the navigational buttons to select, ENTER to input, CAPS to switch between uppercase and lowercase, <- to delete a character, -> to insert a space, shift to make more symbols available, and OK to confirm. Test connection The testing process will take for a while, please be patient to wait.
  • Page 22: Changing System Settings

    Ad-Hoc Setup Press ENTER to go to next step, press RETURN to cancel, and press PLAY to connect. 3.4 Changing System Settings Use this menu to configure system settings. Menu Language Select to choose the OSD (On-Screen Display) language. Text Encoding Select to set the text encoding option (subtitle display).
  • Page 23 Install / Upgrade 1) Copy the .ipk files (e.g., btpd_0.0.1_mipsel.ipk, samba_3.0.23c_mipsel.ipk, and unicgi_0.0.1_mipsel.ipk) to the root directory of a USB stick, and insert it to the USB HOST port on the player. 2) Select Install / Upgrade and press ENTER to confirm. Uninstall Select Uninstall and press ENTER to confirm.
  • Page 24: Miscellaneous

    3.5 Miscellaneous Use this menu to adjust miscellaneous settings. Slide Show Timing Select to set the interval time for photo slide show. Transition Effect Select to set the transition effect for photo slide show. Background Music Select to set the background music options while view pictures: Off / Folder / Playlist. Screen Saver Select to turn on / off screen saver.
  • Page 25: Browser Menu

    4. Browser Menu The browser menu allows you to browse and play media files stored on USB devices, Local HDD, Network, UPnP-server, and Playlist. To enter the menu, select the Browser icon on the home screen, or press the BROWSER button on the remote control. The following buttons can be used while navigating the browser menu.
  • Page 26: Browsing Music

    4.2 Browsing Music In this mode, all folders and supported audio files in current directory will be displayed. The following buttons can be used to control music playback. Button Function PLAY Begin playback. Pause playback. PAUSE / STEP Fast rewind or fast forward. Press repeatedly to select the speed. FR / FF REPEAT Set repeat options: One, All, and Shuffle.
  • Page 27: Browsing Photos

    4.3 Browsing Photos In this mode, all folders and supported image files in current directory will be displayed. The following buttons can be used to control music playback. Button Function PLAY Begin playback. View the previous or next photo. PREV / NEXT Rotate a photo in any angle.
  • Page 28: Browsing Movies

    4.4 Browsing Movies In this mode, all folders and supported video files in current directory will be displayed. The following buttons can be used to control video playback. Button Function PLAY Begin playback. Pause playback; Press again to step to next frame. PAUSE / STEP Play video in slow motion.
  • Page 29: A/V Streaming Via Network

    4.5 A/V Streaming via Network You can stream the media files shared on the home network (Ethernet or WLAN). Please refer to ’3.3 Changing Network Settings’ for details about network settings. There are two ways to locate media files shared on your local network in the Network menu. One is to browse through Workgroup;...
  • Page 30 4.5.2 Browsing through ‘My_Shortcuts’ You can also set ‘Specific File Server IP’ and access it from ‘My_Shortcuts’ in the menu. Press the MENU button and a popup menu appears. Select Add to open a popup menu where you can input Net User ID (Username), Net Password, Domain, Host Name, and Specific File Server IP of destination PC.
  • Page 31: A/V Streaming Via Upnp-Server

    4.6 A/V Streaming via UPnP-server A built-in UPnP (Universal Plug and Play) client has been integrated on the system, which enables the player to auto-detect UPnP Media Servers on the network to browse and stream media files from them. 4.6.1 Installing UPnP Media Server on your PC There’re a lot of free and commercial UPnP Media Server software, such as Windows Media Connect, Windows Media Player 11, XBMC Media Center (Linux/Mac/Windows), MediaTomb (Linux), etc.
  • Page 32 4.6.3 Streaming Media on your Player Connect your player to the home network (LAN or WLAN). Visit Browser - > UPnP menu on the player, select the UPnP-server, and press ENTER. Then you can browse the media library shared by Windows Media Player 11. Note: •...
  • Page 33: Renaming / Deleting Files

    4.7 Renaming / Deleting Files When navigating in the browser menu, you can press the MENU button to activate a popup menu where you can rename and delete files or folders. Press the UP / DOWN buttons to select from Return, Rename, and Delete. And press ENTER to confirm.
  • Page 34 4.8.2 Browsing the playlist Press the UP / DOWN buttons to select Play List in the browser menu. Press the LEFT / RIGHT buttons to select between All, Music, Photos, and Movies. And press the ENTER button to confirm. Then you will enter the playlist. If you wish to delete a file from the playlist, press the SELECT button to select, and then press the CONFIRM button to confirm.
  • Page 35: File Copy Menu

    5. File Copy Menu Select the File Copy icon from the home screen to enter the File Copy menu, which allows you to copy files between USB devices, Local HDD, and Network. The following buttons can be used under the file copy menu. Button Function UP / DOWN...
  • Page 36: Internet Radio

    6. Internet Radio This player integrates the SHOUTcast free Internet radio function. Select the Internet Radio icon on the main interface to enter this menu. Note: • Make sure the player is connected properly to a LAN or WLAN with Internet access, please refer to ‘3.3 Changing Network Settings’...
  • Page 37: Web Server & Bittorrent

    7. Web Server & BitTorrent 7.1 Web Server (unicgi) A Web server called ‘Neighbor Web’ has been integrated into the player. Connect the player to your home network (LAN or WLAN). Get the IP address of the player under SETUP -> NETWORK menu. Type the IP address (e.g., 192.168.3.15) in the address bar of Internet Explore on your PC.
  • Page 38: Account Management

    7.2 Account Management Click Account Management on the home page of Neighbor Web. This page allows you to set a password for accessing Neighbor Web. Note: • Password will become effective when Login Control is turned on. (Please refer to Login Control in chapter ‘3.4 Changing System Settings’...
  • Page 39: Bittorrent Download (Btpd)

    7.4 BitTorrent Download (btpd) BitTorrent is a peer-to-peer file sharing protocol used for distributing large amounts of data on the Internet. A BitTorrent utility (btpd – BitTorrent Protocol Daemon) has been integrated into the player (Please refer to Extension Info in chapter ‘3.4 Changing System Settings’ for more details about installing and uninstalling btpd).
  • Page 40 7.4.2 Managing the downloads The BitTorrent Download page also allows you to start, stop, delete torrents, and set priorities for torrents, as well as view the status of current torrents. Click Start to begin download. Click Stop to stop download. Click Delete to delete the selected torrent.
  • Page 41 7.4.3 Settings Click Setting on the BitTorrent Download page to enter the BitTorrent Setting page. In the BitTorrent Setting page, you can configure the following settings. Set the maximum download rate. Set the maximum upload rate. Set the idle hours to start the next download automatically. Set the seeding hours.
  • Page 42: Upgrading The Firmware

    8. Upgrading the Firmware The firmware is the operating system (OS) installed on the device. Firmware upgrades can bring new features, improvements and bug fixes. Please refer to System Update and Extension Info in chapter ‘3.4 Changing System Settings’ for more details. You can also use the following method to upgrade the firmware: Copy ‘install.img’...
  • Page 43: Appendixes

    9. Appendixes 9.1 Specifications I/O INTERFACES SUPORTED: Built-in 3.5” SATA HDD USB 2.0 HOST port x 2 (compatible to USB 1.1) USB 2.0 DEVICE port (connecting to PC) Composite (CVBS) A/V jack Component Y/Pb/Pr jack Euro SCART jack HDMI V1.3 interface S/PDIF coaxial &...
  • Page 44: Frequently Asked Questions

    9.2 Frequently Asked Questions Question 1. When I try to disconnect the USB device, I keep on getting “The device ‘Generic volume’ cannot be stopped right now. Try stopping the device again later.” message, what should I do? Answer: Close any program that might be accessing data on the player, including Windows® Explorer. If it does not work, close all programs and wait for another 20 seconds, then try the green arrow icon again.
  • Page 45 Answer: Please check if your TV supports Y/Pb/Pr 480p, 576p, 720p, 1080i, and 1080p output, if your TV does not support, please use the A/V signal display instead, press the TV SYSYEM button on the remote control, then switch the TV’s video input to NTSC or PAL. Question 7.
  • Page 46: Copyrights And Trademarks

    unicast cipher. If you use these encryption methods (e.g. WEP, WPA-TKIP), your data rate will drop to 54 Mbps. You may contact the Access Point or router manufacturer to download the latest firmware, or try other encryption methods (WPA2-AES or WPA2-TKIP), or choose to configure an unsecured profile, but this option is not recommended.
  • Page 47 software that is used in this product. If you contact our Support Center, we will provide you with a CD-ROM of the source code that is used, charging only the actual expensed involved. However, please be noted that we can not provide guarantee with the source code, and there is also no technical support for the source code from us.
  • Page 48 Also, for each author's protection and ours, we want to make certain that everyone understands that there is no warranty for this free software. If the software is modified by someone else and passed on, we want its recipients to know that what they have is not the original, so that any problems introduced by others will not reflect on the original authors' reputations.
  • Page 49 c) If the modified program normally reads commands interactively when run, you must cause it, when started running for such interactive use in the most ordinary way, to print or display an announcement including an appropriate copyright notice and a notice that there is no warranty (or else, saying that you provide a warranty) and that users may redistribute the program under these conditions, and telling the user how to view a copy of this License.
  • Page 50 accompanies the executable. If distribution of executable or object code is made by offering access to copy from a designated place, then offering equivalent access to copy the source code from the same place counts as distribution of the source code, even though third parties are not compelled to copy the source along with the object code.
  • Page 51 willing to distribute software through any other system and a licensee cannot impose that choice. This section is intended to make thoroughly clear what is believed to be a consequence of the rest of this License. 8. If the distribution and/or use of the Program is restricted in certain countries either by patents or by copyrighted interfaces, the original copyright holder who places the Program under this License may add an explicit geographical distribution limitation excluding those countries, so that distribution is permitted only in or among countries not thus excluded.
  • Page 52 DAMAGES, INCLUDING ANY GENERAL, SPECIAL, INCIDENTAL OR CONSEQUENTIAL DAMAGES ARISING OUT OF THE USE OR INABILITY TO USE THE PROGRAM (INCLUDING BUT NOT LIMITED TO LOSS OF DATA OR DATA BEING RENDERED INACCURATE OR LOSSES SUSTAINED BY YOU OR THIRD PARTIES OR A FAILURE OF THE PROGRAM TO OPERATE WITH ANY OTHER PROGRAMS), EVEN IF SUCH HOLDER OR OTHER PARTY HAS BEEN ADVISED OF THE POSSIBILITY OF SUCH DAMAGES.
  • Page 53 DEUTSCH...
  • Page 54 Inhaltsverzeichnis 1. Einführung ..........................3 1.1 Vorwort ......................3 1.2 Verpackungsinhalt .................... 4 1.3 Warnungen ....................... 4 1.4 Anschluss ......................6 1.5 Ein-/Ausschalten .................... 11 1.6 Menü-Sprache ....................11 1.7 Festplattenformatierung ................. 12 2. Über das Gerät ........................13 2.1 Fernbedienung ....................13 2.2 Frontblende ....................
  • Page 55: Einführung

    1. Einführung 1.1 Vorwort Vielen Dank, dass Sie sich für den FANTEC MM-FHDL entschieden haben. Wir hoffen, dass Sie mit diesem Gerät zur Heimunterhaltung viel Freude haben werden. Dieser Player besitzt folgende Funktionalität. A/V Ausgang • HDMI V1.3 für hochauflösendes Video und digitales Audio.
  • Page 56: Verpackungsinhalt

    1.2 Verpackungsinhalt Teil Menge Player A/V-Kabel Y/Pb/Pr Kabel USB-Kabel Fernbedienung Batterie Fernbedienung AC/DC Adapter Netzkabel des AC/DC Adapters Bedienungsanleitung (gedruckt) Treiber-CD (mit Bedienungsanleitung) Garantiekarte Hinweis: Der aktuelle Verpackungsinhalt könnte von dieser Liste abweichen. 1.3 Warnungen Um mit dem Player sicher und effizient nutzen zu können, lesen Sie sich bitte vor der ersten Benutzung, die folgenden Hinweise sorgsam durch.
  • Page 57 1.3.4 Reparatur Wenn es ein Problem mit dem Player geben sollte, sollten Sie es zu einer zertifizierten Reparaturwerkstatt bringen und Speziallisten die Reparatur durchführen lassen. Führen Sie die Reparatur niemals selbst durch. Sie könnten den Player beschädigen und sich selbst und ihre Daten gefährden.
  • Page 58: Anschluss

    1.4 Anschluss 1.4.1 Netzanschluss (1) Schließen Sie den AC Adapter wie in der Abbildung an die DC IN Buchse an; (2) Schließen Sie den AC Adapter wie in der Abbildung an die Steckdose an. 1.4.2 Anschluss an PC (1) Vergewissern Sie sich, dass der Player eingeschaltet ist; (2) Schließen Sie den quadratischen Stecker des USB-Kabels an den USB Device-Anschluss des Players an;...
  • Page 59: Anschluss Eines Usb-Geräts

    1.4.3 Anschluss eines USB-Geräts (1) Vergewissern Sie sich, dass der Player eingeschaltet ist; (2) Schließen Sie den USB-Stick oder die USB-Festplatte usw. an den USB HOST Anschluss des Players an. Auf diese Weise können Sie die Inhalte auf Ihrem USB-Gerät durchsuchen. 1.4.4 Anschluss an ein Fernsehgerät 1.4.4.1 A/V AUSGANG (1) Schließen Sie das 3-farbige Kabel wie in der Abbildung an die A/V OUT Buchse des...
  • Page 60 1.4.4.2 SCART-AUSGANG (1) Schließen Sie das SCART-Kabel wie in der Abbildung an den SCART-Anschluss des Players an. (2) Schließen Sie den anderen Stecker des SCART-Kabels wie in der Abbildung an den SCART-Anschluss des Fernsehgeräts an. 1.4.4.3 Y/Pb/Pr Component-AUSGANG (1) Schließen Sie das 3-farbige Kabel wie in der Abbildung an die Y/Pb/Pr Buchse des Players (2) Schließen Sie den das 3-farbige Kabel wie in der Abbildung an die Y/Pb/Pr Buchse des Fernsehgeräts an.
  • Page 61 1.4.4.4 HDMI-AUSGANG (1) Schließen Sie einen Stecker Ihres HDMI-Kabels wie in der Abbildung an die HDMI-Buchse des Players an. (2) Schließen Sie den anderen Stecker Ihres HDMI-Kabels an die HDMI-Buchse des TV-Geräts an. Hinweis: Das HDMI-Kabel gehört nicht zum Lieferumfang. Auf diese Weise können Sie mit nur einem einzigen Kabel höchste Audio- und Videoqualität erzielen.
  • Page 62 Auf diese Weise kommen Sie in den Genuss des leistungsstarken Dolby Digital oder MPEG Tons. (Siehe auch Kapitel ‘3.1 Audioeinstellungen ändern zur Konfiguration) 1.4.6 Anschluss an eine LAN-Verbindung Für den Anschluss an ein LAN (Local Area Network) benötigen Sie ein cat5, cat5e oder cat6 Netzwerkkabel (nicht im Lieferumfang enthalten).
  • Page 63: Ein-/Ausschalten

    1.5 Ein-/Ausschalten Einschalten Drücken Sie nach dem Anschluss an die DC IN Buchse die Betriebstaste an der Frontblende; das Startmenü wird angezeigt und die Betriebsanzeige leuchtet blau. Ausschalten Drücken Sie an der Frontblende die Betriebstaste; der Player schaltet um in Standby und die Betriebsanzeige leuchtet rot.
  • Page 64: Festplattenformatierung

    1.7 Festplattenformatierung Wenn Sie eine neue SATA-Festplatte in Ihrem Player installieren möchten, beachten Sie bitte folgende Anweisungen, um das Laufwerk des Players vor dem Erstgebrauch zu formatieren. Hinweis: Diese Seite können Sie auch über den Pfad Setup->System->HDD-Format aufrufen. Schritt 1: Bestätigen Sie den Warnhinweis über die Option OK. Schritt 2: Wählen Sie Format und drücken Sie ENTER;...
  • Page 65: Über Das Gerät

    2. Über das Gerät 2.1 Fernbedienung Alle Funktionen, die in dieser Bedienungsanleitung beschrieben sind, können mit Hilfe der Fernbedienung ausgeführt werden. Nachfolgend finden Sie Informationen zu jeder Taste und deren Funktion: 1. STANDBY 2. MUTE 3. TV SYSTEM 4. BROWSER 5.
  • Page 66 REPEAT Wiederholungsfunktion einstellen: 1, Alle, und Shuffle. Die aktuelle Wiedergabe zurückspulen. Wiederholt drücken, um verschiedene Geschwindigkeiten zu wählen. VOL- Lautstärke verringern. Die aktuelle Wiedergabe vorspulen. Wiederholt drücken, um verschiedene Geschwindigkeiten zu wählen. PLAY Wiedergabe starten. Hauptseite öffnen. HOME Navigational Zum Auswählen von Menüoptionen; ENTER-Taste für die buttons Bestätigung.
  • Page 67 SETUP Setup-Menü aufrufen. Während der Navigation der Menüs zur vorhergehenden RETURN Anzeige zurückkehren. STOP Wiedergabe beenden. NEXT Nächste Datei öffnen / Seite herunterscrollen. VOL+ Lautstärke erhöhen. PREV Vorhergehende Datei öffnen / Seite hochscrollen. GOTO Zu einer bestimmten Stelle innerhalb eines Titels springen. Bestimmen Sie die Stelle mit Hilfe von Titel, Kapitel und Zeit.
  • Page 68: Frontblende

    2.2 Frontblende 1. LCD-Bildschirm 2. Kontrollleuchte 3.Betriebsanzeige & -taste 2.3 Rückwand 1. Belüftungsöffnung 2. Anschluss USB-GERÄT 3. 2 x Anschlüsse USB HOST 4. KOAXIALE & OPTISCHE S/PDIF Buchse 5. RJ45 LAN Anschluss 6. HDMI-Buchse 7. Y/Pb/Pr OUT Buchse 8. A/V OUT Buchse 9.
  • Page 69: Setup-Menü

    3. Setup-Menü Über das Setup-Menü können Sie die Einstellungen Ihres Players personalisieren und konfigurieren. Auswahl einer Setup-Option: Wählen Sie in der Hauptseite das Icon Setup oder drücken Sie auf der Fernbedienung die Taste SETUP. Wählen Sie mit den Pfeiltasten LINKS/RECHTS eine Option aus; bestätigen Sie mit ENTER.
  • Page 70: Videoeinstellungen Ändern

    Digitaler Ausgang Wählen Sie zwischen HDMI LPCM / HDMI RAW / SPDIF LPCM / SPDIF RAW. Im RAW-Modus können Dolby Digital oder MPEG zum HDMI TV oder digitalen Verstärker umgeleitet werden. 3.2 Videoeinstellungen ändern Über dieses Menü können Sie die Videoeinstellungen ändern. Seitenverhältnis Pan Scan 4:3: Das Breitbildfernsehen wird über die gesamte Höhe des Bildschirms angezeigt.
  • Page 71: Netzwerkeinstellungen Ändern

    3.3 Netzwerkeinstellungen ändern Über dieses Menü können Sie die LAN- und WLAN-Einstellungen konfigurieren. Setup der LAN-Verbindung DHCP IP (AUTOMATISCH) Auswählen, um die IP-Adresse automatisch zu beziehen. Feste IP (MANUELL) Auswählen, um IP-Adresse, Subnet-Maske, Default Gateway und die IP-Adresse des DNS-Servers manuell einzugeben. WLAN Setup Ein Verbindungsprofil auswählen Dieser Player kann bis zu drei WLAN-Verbindungen verwalten.
  • Page 72 Verbindungs-Modus einstellen Wählen Sie zwischen Infrastruktur (AP) und Peer-to-Peer (Ad Hoc). Drücken Sie ENTER, um zum nächsten Schritt zu gelangen oder RETURN, um abzubrechen. Infrastruktur (AP) Der Infrastruktur Modus wird benutzt, wenn Sie das Gerät in eine bestehende WLAN Infrastruktur mit einem WLAN-Router oder einem Access-Point einfügen wollen. SSID-Name beziehen Drücken Sie ENTER, um zum nächsten Schritt zu gelangen, oder RETURN, um abzubrechen.
  • Page 73 WEP-/WPA-Schlüssel eingeben Schlüssel können mit Hilfe der virtuellen Tastatur eingegeben werden. Mit den Navigationstasten nehmen Sie eine Auswahl vor, mit der Taste ENTER nehmen Sie Eingaben vor, mit der Taste CAPS wechseln Sie zwischen Groß- und Kleinschreibung, mit <- können Sie Zeichen löschen, mit -> ein Leerzeichen einfügen, mit Shift weitere Symbole verfügbar machen, und mit OK Einstellungen bestätigen.
  • Page 74: Systemeinstellungen Ändern

    Ad-Hoc Setup Drücken Sie ENTER, um zum nächsten Schritt zu gelangen, oder RETURN, um abzubrechen. Drücken Sie PLAY, um die Verbindung herzustellen. 3.4 Systemeinstellungen ändern Über dieses Menü können Sie die Systemeinstellungen ändern. Menü-Sprache Die OSD-Sprache (On Screen Display) auswählen. Textencoding Die Option der Textencoding (Untertitelanzeige) festlegen.
  • Page 75 Installieren / Update 1) Kopieren Sie die Datei .ipk (z.B. btpd_0.0.1_mipsel.ipk, Samba_3.0.23c_mipsel.ipk, und unicgi_0.0.1_mipsel.ipk) in das Stammverzeichnis eines USB-Sticks, und stecken Sie diesen an den USB HOST Anschluss des Players. 2) Wählen Sie Installieren / Aktualisieren und bestätigen Sie mit ENTER. Deinstallieren Wählen Sie Deinstallieren und bestätigen Sie mit ENTER.
  • Page 76: Verschiedenes

    3.5 Verschiedenes Über dieses Menü können Sie verschiedene Einstellungen ändern. Programmierung Slide Show Die Intervallzeit für eine Bilder-SlideShow festlegen. Übergangseffekt Die Übergangseffekte für eine Bilder-SlideShow programmieren. Hintergrundmusik Hintergrundmusikoptionen für die Bilderanzeige einstellen: Aus / Ordner / Wiedergabeliste. Bildschirmschoner Den Bildschirmschoner ein-/ausschalten. Filmvorschau Die Filmvorschau im Browser-Menü...
  • Page 77: Browser-Menü

    4. Browser-Menü Im Browser-Menü können Sie Media-Dateien, die auf ihren lokalen Datenträgern und im Netzwerk gespeichert sind, abspielen. Um dieses Menü zu öffnen, wählen Sie im Hauptmenü das Icon Browser oder drücken Sie auf der Fernbedienung die Taste BROWSER. Mit den folgenden Tasten können Sie durch das Browser-Menü navigieren. Taste Funktion HOCH/RUNTER...
  • Page 78: Musik Durchsuchen

    4.2 Musik durchsuchen Hier werden alle Ordner und unterstützte Audiodateien im aktuellen Verzeichnis angezeigt. Mit den folgenden Tasten können Sie die Musikwiedergabe steuern. Taste Funktion PLAY Wiedergabe beginnen. Wiedergabe vorübergehend unterbrechen. PAUSE / STEP Zurück- oder vorspulen. Wiederholt drücken, um verschiedene FR / FF Geschwindigkeiten zu wählen.
  • Page 79: Bilder Durchsuchen

    4.3 Bilder durchsuchen Hier werden alle Ordner und unterstützten Bilddateien im aktuellen Verzeichnis angezeigt. Mit den folgenden Tasten können Sie die Bildwiedergabe steuern. Taste Funktion PLAY Wiedergabe beginnen Vorhergehendes oder nächstes Bild anzeigen. PREV / NEXT Bild in einem beliebigen Winkel drehen. LINKS/RECHTS Bild vergrößern oder verkleinern.
  • Page 80: Filme Durchsuchen

    4.4 Filme durchsuchen In diesem Modus werden alle Ordner und unterstützten Videodateien im aktuellen Verzeichnis angezeigt. Mit den folgenden Tasten können Sie die Videowiedergabe steuern. Taste Funktion PLAY Wiedergabe starten. PAUSE / STEP Wiedergabe unterbrechen; erneut drücken, um zum nächsten Frame zu springen.
  • Page 81: A/V Netzwerk-Streaming

    4.5 A/V Netzwerk-Streaming Sie können Media-Dateien, die auf dem Heimnetzwerk (LAN oder WLAN) gemeinsam genutzt werden, streamen. Nähere Informationen zu den Netzwerkeinstellungen finden Sie unter ’3.3 Netzwerkeinstellungen ändern’. Im Netzwerk-Menü gibt es zwei Wege, um auf ihre Media-Dateien, die im lokalen Netzwerk gemeinsam genutzt werden, zuzugreifen.
  • Page 82 4.5.2 ‘My_Shortcuts’ durchsuchen Sie können auch die ‘Spezifische Dateiserver-IP’ festlegen und über das Menü ‘My_Shortcuts’ zugreifen. Drücken Sie die Taste MENÜ; ein Pop-up Fenster wird geöffnet. Wählen Sie Hinzufügen, um ein Pop-up Menü öffnen, in dem Sie Benutzername, Passwort, Domain, Host-Name und Spezifische Dateiserver-IP des Zielcomputers eingeben können.
  • Page 83: A/V Streaming Per Upnp-Server

    4.6 A/V Streaming per UPnP-Server In dieses System wurde ein UPnP (Universal Plug & Play) Client integriert, welcher es dem Player ermöglicht, UPnP Mediaserver automatisch im Netzwerk zu finden, um von ihnen Media-Dateien zu suchen und abzuspielen. 4.6.1 UPnP Mediaserver auf Ihrem PC installieren Es gibt eine Vielzahl kostenloser und gewerblicher Mediaserver-Software, z.B.
  • Page 84 4.6.3 Medien auf Ihrem Player streamen Schließen Sie Ihren Player an das Heimnetzwerk (LAN oder WLAN an). Öffnen Sie Menü Browser - > UpnP, wählen Sie den UpnP-Server ; drücken Sie ENTER. Sie können nun die von Windows Media Player 11 freigegebene Medienbibliothek durchsuchen.
  • Page 85: Dateien Umbenennen/Löschen

    4.7 Dateien umbenennen/löschen Wenn Sie im Browser-Menü navigieren, können Sie durch Drücken von MENÜ ein Pop-Up Menü öffnen, in dem Sie Dateien oder Ordner umbenennen oder löschen können. Wählen Sie mit den Pfeiltasten HOCH/RUNTER die Einstellungen Zurück, Umbenennen oder Löschen. Bestätigen Sie mit ENTER. 4.8 Wiedergabeliste verwalten Dieser Player unterstützt eine Wiedergabeliste.
  • Page 86 4.8.2 Wiedergabeliste durchsuchen Wählen Sie im Browser-Menü mit den Tasten HOCH/RUNTER die Wiedergabeliste. Wählen Sie mit den Tasten LINKS/RECHTS zwischen den Einstellungen Alle, Musik, Bilder und Filme. Bestätigen Sie mit ENTER. Die Wiedergabeliste wird geöffnet. Wenn Sie eine Datei in der Wiedergabeliste löschen möchten, drücken Sie SELECT und bestätigen Sie mit CONFIRM.
  • Page 87: Kopier-Menü

    5. Kopier-Menü Wählen Sie in der Hauptseite das Icon Kopieren oder die Taste COPY auf der Fernbedienung, um das Menü Kopieren zu öffnen, über welches Sie Dateien zwischen USB-Geräten, lokaler Festplatte und dem Netzwerk kopieren können. Mit den folgenden Tasten können Sie durch das Kopieren-Menü navigieren. Taste Funktion HOCH/RUNTER...
  • Page 88: Internet-Radio

    6. Internet-Radio Dieser Player ist mit der kostenlosen Funktion SHOUTcast Intenet-Radio ausgerüstet. Wählen Sie in der Hauptseite das Icon Internet-Radio, um das Menü zu öffnen. Hinweis: • Vergewissern Sie sich, dass der Player ordnungsgemäß mit LAN- oder WLAN verbunden ist. Nähere Information finden Sie unter ‘3.3 Netzwerkeinstellungen ändern’; •...
  • Page 89: Webserver & Bittorrent

    7. Webserver & BitTorrent 7.1 Webserver (unicgi) Der Player verfügt über einen Webserver mit dem Namen ‘Neighbor Web’. Verbinden Sie Ihren Player mit dem Heimnetzwerk (LAN oder WLAN). Suchen Sie im Menü SETUP -> NETZWERK nach der IP-Adresse. Geben Sie in der Addresszeile des Internet Explorers auf Ihrem PC die IP-Adresse (z.B. 192.168.3.15) ein.
  • Page 90: Kontoverwaltung

    7.2 Kontoverwaltung Klicken Sie auf der Homepage von Neighbor Web auf Kontoverwaltung. Auf dieser Seite können Sie ein Passwort für den Zugang zum Neighbor Web festlegen. Hinweis: • Das Passwort wird aktiv, wenn die Login-Kontrolle eingeschaltet ist. (Siehe Login-Kontrolle im Kapitel ‘3.4 Systemeinstellungen ändern’) •...
  • Page 91: Bittorrent Herunterladen (Btpd)

    7.4 BitTorrent herunterladen (btpd) BitTorrent ist ein Peer-to-Peer Dateizugriffsprotokoll für die Verteilung großer Datenmengen im Internet. Auf dem Player wurde ein BitTorrent Programm (btpd – BitTorrent Protokoll-Daemon) integriert (Nähere Informationen zum Installieren und Deinstallieren von btpd finden Sie unter Erweiterte Informationen im Kapitel ‘3.4 Systemeinstellungen ändern’). Der BitTorrent Client btpd läuft im Daemon-Modus (Prozess im Hintergrund);...
  • Page 92 7.4.2 Die Downloads verwalten Die Seite BitTorrent Download ermöglicht Ihnen auch, Torrents zu starten, zu beenden oder zu löschen, Prioritäten für Torrents einzustellen, oder den Status aktueller Torrents anzuzeigen. Klicken Sie auf Start, um mit dem Herunterladen zu beginnen. Klicken Sie auf Stop, um den Download zu beenden. Klicken Sie auf DEL, um den ausgewählten Torrent zu löschen.
  • Page 93 7.4.3 Einstellungen Klicken Sie auf der Seite zum Herunteladen von BitTorrent die Option Einstellung, um die Seite BitTorrent Einstellungen zu öffnen. Auf der Seite BitTorrent Einstellungen können Sie folgende Parameter konfigurieren. Die maximale Rate zum Herunterladen festlegen. Die maximale Rate zum Hochladen festlegen. Legen Sie die Leerlaufstunden fest, nach Ablauf derer der nächste Download automatisch beginnt.
  • Page 94: Aktualisierung Der Firmware

    8. Aktualisierung der Firmware Die Firmware ist das auf dem Gerät installierte Betriebssystem (OS). Aktualisierungen der Firmware können neue Funktionen und Verbesserungen bringen und Programmfehler beheben. Nähere Informationen finden Sie unter System aktualisieren und Erweiterte Informationen im Kapitel ‘3.4 Systemeinstellungen ändern’. Sie können Ihre Firmware wie folgt aktualisieren: Kopieren Sie die Datei ‘install.img’...
  • Page 95: Anhang

    9. Anhang 9.1 Technische Daten I/O UNTERSTÜTZTE SCHNITTSTELLEN: Integrierte 3.5” SATA Festplatte USB 2.0 HOST Anschluss x 2 (kompatibel mit USB 1.1) USB 2.0 GERÄT Anschluss (Anschluss an PC) Composite (CVBS) A/V Buchse Component Y/Pb/Pr Buchse Euro SCART Buchse HDMI V1.3 Schnittstelle Koaxiale &...
  • Page 96: Häufig Gestellte Fragen

    9.2 Häufig gestellte Fragen Frage 1. Wenn ich das USB-Gerät trennen möchte, erscheint ständig die Nachricht “Das Gerät ‘Allgemeiner Datenträger’ kann momentan nicht getrennt werden. Versuchen Sie es später erneut.”; was kann ich tun? Antwort: Schließen Sie alle Programme, die eventuell auf die Daten des Players zugreifen, einschließlich Windows®...
  • Page 97 resultiert. Frage 6: Warum zeigt der Fernsehbildschirm ein völlig schlechtes Bild, wenn ich zu Y/Pb/Pr 480p, 576p, 720p, 1080i, oder 1080p umschalte? Antwort: Bitte überprüfen Sie, ob Ihr Fernsehgerät die Formate Y/Pb/Pr 480p, 576p, 720p, 1080i, und 1080p unterstützt. Falls nicht, verwenden Sie stattdessen bitte die A/V Signalanzeige. Drücken Sie auf der Fernbedienung die Taste TV-SYSTEM, schalten Sie den Videoeingang des Fernsehers auf NTSC oder PAL.
  • Page 98: Copyrights And Trademarks

    Wenn Sie einen Firewall verwenden, muss dieser eventuell konfiguriert werden bzw. erfordert Ausnahmen, um Ihnen die Sicht und die Kommunikation mit dem Player im Netzwerk zu ermöglichen. Um zu überprüfen, ob Ihre Firewall die Netzwerkkommunikation (einschließlich PING und Dateizugriff) behindert, unterbrechen Sie die Verbindung. Wenn Sie mit dem deaktivierten Firewall eine Verbindung herstellen können, müssen Sie den Player eventuell zur ‘Zuverlässigen Liste’...
  • Page 99: Gpl Statement

    9.5 GPL Statement Einige Teile der auf diesem Gerät verwendeten Software stehen unter der GNU General Public License. Sie finden den Quellcode dieser Software auf der beiligenden CD. Sie können den Quellcode unter den Bediengungen der GPL/LGPL-Lizenz verändern und vertreiben. Wir übernehmen keinen technischen Support für Änderungen am Quellcode! DEUTSCH 47 / 47...
  • Page 100 FRANÇAIS...
  • Page 101 Table des matières 1. Introduction .......................... 3 1.1 Préface ......................3 1.2 Contenu de l'emballage ..................4 1.3 Mise en Garde ....................4 1.4 Branchements ....................6 1.5 Marche / Arrêt ....................11 1.6 Langue du menu ..................... 11 1.7 Formatage du disque dur ................12 2.
  • Page 102: Introduction

    1. Introduction 1.1 Préface Nous vous remercions d'avoir choisi d'acheter ce FANTEC MM-FHDL. Nous espérons que vous serez satisfait de l'utilisation de cet outil de divertissement. Ce lecteur dispose des fonctionnalités suivantes. Sortie A/V • HDMI V1.3 pour un système vidéo haute-définition et un système audio numérique •...
  • Page 103: Contenu De L'emballage

    Note : Le contenu réel de l’emballage peut différer légèrement.de la liste de ce manuel. 1.3 Mise en Garde La fabrication et le design du FANTEC MM-FHDL ont étés réalisés en tenant compte de votre sécurité. Pour assurer une utilisation sûre et efficace, nous vous invitons à lire les pages suivantes avant toute utilisation.
  • Page 104: Réparation

    1.3.4 Réparation Si le lecteur a un problème, vous devez l’amener a un centre de réparation ou les spécialistes régleront le problème, n’essayez jamais de réparer le lecteur vous-même, vous pourriez alors endommager celui-ci ou vos données ou vous mettre vous même en danger. 1.3.5 Utilisation du Lecteur Quand vous utilisez le lecteur, assurez-vous de le faire de façon appropriée.
  • Page 105: Branchements

    1.4 Branchements 1.4.1 Branchement électrique (1) Procédez comme sur l'illustration et branchez l'adaptateur secteur sur la prise DC-IN du lecteur. (2) Procédez comme sur l'illustration et branchez l'adaptateur secteur sur la prise secteur. 1.4.2 Connexion avec un PC (1) Vérifiez que le lecteur sous tension. (2) Branchez la prise carrée du câble USB sur le port périphérique USB de ce lecteur.
  • Page 106: Connexion D'un Périphérique Usb

    1.4.3 Connexion d'un périphérique USB (1) Vérifiez que le lecteur sous tension. (2) Branchez la clé USB, le disque dur externe etc. sur le port HÔTE USB de ce lecteur. Vous pouvez ainsi parcourir le contenu du périphérique USB. 1.4. 4 Connexion sur un téléviseur 1.4.4.1 SORTIE A/V (2) Procédez comme sur l'illustration et branchez la prise tricolore sur la prise A/V OUT du lecteur.
  • Page 107 1.4.4.2 SORTIE PERITEL (1) Procédez comme sur l'illustration et branchez l'un des connecteurs du câble PERITEL sur la prise PERITEL du lecteur. (2) Procédez comme sur l'illustration et branchez l'autre connecteur du câble PERITEL sur la prise PERITEL du téléviseur. 1.4.4.3 Sortie composant Y/Pb/Pr (2) Procédez comme sur l'illustration et branchez la prise tricolore sur la prise Y/Pb/Pr du lecteur.
  • Page 108: Connexion D'un Amplificateur Numérique

    1.4.4.4 SORTIE HDMI (1) Procédez comme sur l'illustration et branchez l'un des connecteurs de votre câble HDMI sur la prise HDMI du lecteur. (2) Procédez comme sur l'illustration et branchez l'autre connecteur de votre câble HDMI sur la prise HDMI du téléviseur. Remarque : Le câble HDMI est un accessoire facultatif vendu séparément.
  • Page 109: Connexion À Un Réseau Local (Lan)

    Vous pouvez ainsi profiter de la puissance du son Dolby Digital ou MPEG. (Pour la configuration, veuillez consulter la section ‘3.1 Modification des réglages audio’) 1.4. 6 Connexion à un réseau local (LAN) Vous pouvoir effectuer un branchement sur un LAN (réseau local), il vous faut un câble réseau cat5, cat5e ou cat6 (non fourni).
  • Page 110: Marche / Arrêt

    1.5 Marche / Arrêt Mise en Marche Après avoir branché la prise DC IN et appuyé sur la touche de mise en marche de la façade, le lecteur ne tardera pas à afficher l'écran d'accueil et le voyant marche/arrêt deviendra bleu. Arrêt Appuyez sur la touche marche/arrêt de la façade, le lecteur ne tardera pas à...
  • Page 111: Formatage Du Disque Dur

    1.7 Formatage du disque dur Pour installer un nouveau disque dur SATA sur le lecteur, veuillez suivre les procédures suivantes pour formater le disque dur sur le lecteur avant utilisation. Remarque : Vous pouvez également accéder à cette page à partir du menu Configuration->Système->Formatage disque dur Etape 1 : Sélectionnez OK sur la page Avertissement, appuyez sur ENTER pour confirmer.
  • Page 112: A Propos Du Lecteur

    2. A propos du lecteur 2.1 Télécommande Toutes les manipulations décrites dans ce mode d'emploi peuvent être effectuées à partir des touches de la télécommande. La section ci-dessous donne une description détaillée de chaque touche et de sa fonction : 1.
  • Page 113 MUTE Appuyez sur cette touche pour couper le son. Appuyez de nouveau pour le rétablir. Appuyez sur cette touche pour sélectionner NTSC, PAL, 480P, SYSTEME TELE 576P, 720P, 1080I et 1080P. NAVIGATEUR Appuyez sur cette touche pour accéder au menu de navigation. Touches chiffrées Appuyez sur ces touches pour saisir un numéro lors de modification de réglages.
  • Page 114 SELECTION Appuyez sur cette touche pour sélectionner les fichiers dans le menu de navigation et de copie de fichiers. Appuyez sur cette touche pour confirmer et ajouter vos CONFIRMATION sélections à la liste d'écoute. AUDIO Appuyez sur cette touche pour sélectionner une piste audio. SOUS-TITRAGE Appuyez sur cette touche pour configurer les options de sous-titrage.
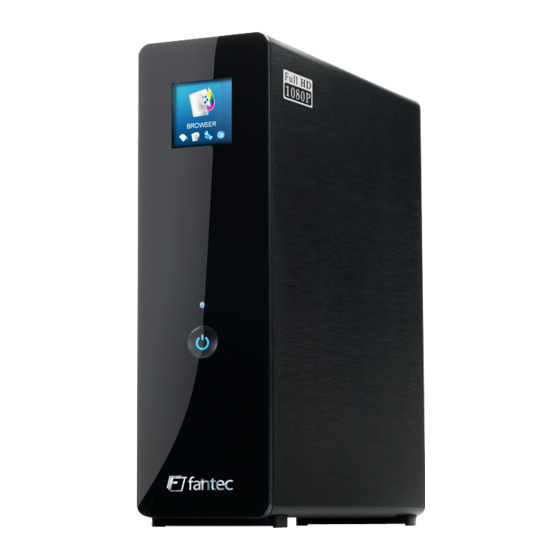
  • Page 115: Panneau Avant

    2.2 Panneau avant 1. Ecran LCD 2. Voyant de fonctionnement 3. Témoin et touche alimentation 2.3 Panneau arrière 1. Orifice de ventilation 2. Port PERIPHERIQUE USB 3. Port HÔTE USB x 2 4. Prise COAXIALE et OPTIQUE S/PDIF 5. Prise LAN RJ45 6.
  • Page 116: Menu De Configuration

    3. Menu de configuration Le menu de configuration vous permet de personnaliser votre lecteur et de configurer vos préférences. Pour sélectionner une option de configuration : Sélectionnez l'icone Configuration sur l'écran d'accueil, ou appuyez sur la touche CONFIGURATION de la télécommande. Utilisez les touches de navigation LEFT/RIGHT pour sélectionner une option, et appuyez sur ENTER.
  • Page 117: Modification Des Réglages Vidéo

    Sortie numérique Vous avez le choix entre HDMI LPCM / HDMI RAW / SPDIF LPCM / SPDIF RAW. En mode raw, le son Dolby Digital ou MPEG pour être redirigé vers le téléviseur HDMI ou l'amplificateur numérique. 3.2 Modification des réglages vidéo Ce menu permet de configurer les réglages vidéo.
  • Page 118: Modification Des Réglages Réseau

    3.3 Modification des réglages réseau Ce menu permet de configurer les réglages Ethernet et WLAN (réseau local sans fil). Configuration LAN avec câble IP DHCP (AUTO) Sélectionnez cette option pour obtenir automatiquement l'adresse IP. FIX ¨IP (MANUEL) Sélectionnez cette option pour saisir manuellement l'adresse IP, le masque sous-réseau, la passerelle par défaut, et l'adresse IP du serveur DNS.
  • Page 119 Mode de connexion Vous avez le choix entre Infrastructure (AP) et Point à Point (Ad Hoc). Appuyez sur ENTER pour passer à l'étape suivante, ou sur RETURN pour annuler. Infrastructure (AP) Le mode Infrastructure permet de relier des ordinateurs disposant d'adaptateurs réseau sans fil, ou clients sans fil, à...
  • Page 120 Saisie de la clé WEP / WPA Vous pouvez saisir des clés de chiffrement sur le clavier virtuel. Appuyez sur les flèches de navigation pour sélectionner, sur ENTER pour saisir le code, sur CAPS pour permuter entre majuscules et minuscules, sur <- pour effacer un caractère, sur -> pour insérer un espace, sur shift pour obtenir davantage de symboles, et sur OK pour confirmer.
  • Page 121: Modification Des Réglages Du Système

    Configuration Ad Hoc Appuyez sur la touche ENTER pour passer à l'étape suivante, sur RETURN pour annuler, et sur PLAY pour connecter. 3.4 Modification des réglages du système Ce menu permet de configurer les réglages du système. Langue du menu : Permet de sélectionner la langue de l'OSD (affichage à...
  • Page 122 Installation / Mise à jour 1) Copiez les fichiers .ipk (par ex. btpd_0.0.1_mipsel.ipk, samba_3.0.23c_mipsel.ipk, et unicgi_0.0.1_mipsel.ipk) sur le répertoire racine d'une clé USB, et installez-la sur le port HÔTE USB du lecteur. 2) Sélectionnez Installation / Mise à jour et appuyez sur ENTER pour confirmer. Désinstallation Sélectionnez Désinstaller et appuyez sur ENTER pour confirmer.
  • Page 123: Divers

    3.5 Divers Ce menu permet d'ajuster les autres réglages. Cadence du diaporama Sélectionnez cette option pour définir la durée d'intervalle entre chaque photo d'un diaporama. Effet de transition Sélectionnez cette option pour définir l'effet de transition entre chaque photo d'un diaporama.
  • Page 124: Menu De Navigation

    4. Menu de navigation Le menu de navigation vous permet de naviguer et de lire des fichiers media enregistrés sur des périphériques USB, un disque dur externe, un réseau, un serveur UPnP, et une liste d'écoute. Pour accéder au menu, sélectionnez l'icone Navigateur sur l'écran d'accueil, ou appuyez sur la touche Navigateur de la télécommande.
  • Page 125: Rechercher Les Fichiers Musicaux

    Remarque : • Pour plus de renseignements sur les formats pris en charge, consultez le chapitre ‘9.1 Caractéristiques techniques‘. • Il est possible que les morceaux musicaux ne puissent pas passer en continu si le filtre Tous est sélectionné. Choisissez plutôt le filtre Musique. 4.2 Rechercher les fichiers musicaux Sous ce mode (filtre Musique), tous les répertoires et fichiers audio pris en charge du répertoire choisi seront affichés.
  • Page 126: Rechercher Des Photos

    4.3 Rechercher des photos Sous ce mode, tous les sous-répertoires et fichiers photos pris en charge du répertoire racine choisi seront affichés. Vous pouvez utiliser les touches suivantes pour régler les options de lecture de photos. Touche Fonction PLAY Démarrage de la lecture. PREV / NEXT Pour visionner la photo précédente ou suivante.
  • Page 127: Rechercher Des Films

    4.4 Rechercher des films Sous ce mode, tous les répertoires et fichiers vidéo pris en charge du répertoire choisi seront affichés. Vous pouvez utiliser les touches suivantes pour régler les options de lecture vidéo. Touche Fonction PLAY Démarrage de la lecture. PAUSE / STEP Pause de la lecture.
  • Page 128: Flux A/V Sur Réseau

    4.5 Flux A/V sur réseau Vous pouvez faire passer les fichiers média mis en partage sur le réseau domestique (Ethernet ou WLAN). (Pour plus de renseignements sur la configuration réseau, veuillez consulter la section 3.3 Modification des réglages réseau’) A partir du menu Réseau, vous pouvez rechercher les fichiers média partagés sur votre réseau de deux manières.
  • Page 129: Parcourir Par 'Mes_Raccourcis'

    4.5.2 Parcourir par ‘Mes_raccourcis’ Vous pouvez également définir une adresse ‘IP de serveur fichiers précise’ et y accéder à partir de ‘Mes_raccourcis’ dans le menu. Appuyez sur la touche MENU pour qu'un menu contextuel apparaisse. Sélectionnez Ajouter pour ouvrir un menu contextuel à partir duquel vous pourrez saisir Net User ID (nom d'utilisateur), mot de passe internet, domaine, nom d'hôte, et l'adresse IP précise de serveur fichiers du PC de destination.
  • Page 130: Flux A/V Par Serveur Upnp

    4.6 Flux A/V par serveur UPnP Un client UPnP (Universal Plug and Play) est intégré au système, ce qui permet au lecteur de détecter automatiquement les serveurs média UPnP du réseau pour pouvoir rechercher et retransmettre les fichiers média à partir de ces serveurs. 4.6.1 Installation d'un serveur média UPnP sur votre PC Il existe de nombreux logiciels, gratuits ou non, de serveur média UPnP, tels que Windows Media Connect, Windows Media Player 11, XBMC Media Center (Linux/Mac/Windows),...
  • Page 131: Transmission Média Sur Votre Lecteur

    4.6.3 Transmission média sur votre lecteur Reliez votre lecteur à votre réseau domestique (LAN ou WLAN). Aller sur le menu Navigateur - > UPnP du lecteur, sélectionnez le serveur UPnP, et appuyez sur ENTER. Vous pouvez alors parcourir la bibliothèque média partagée par Windows Media Player 11. Remarque : •...
  • Page 132: Renommer / Effacer Des Fichiers

    4.7 Renommer / Effacer des fichiers Lorsque vous êtes dans le menu de navigation, vous pouvez appuyer sur la touche MENU pour activer un menu contextuel à partir duquel vous pouvez renommer et effacer des fichiers ou des répertoires. Appuyez sur les touches UP / DOWN pour sélectionner Retour, Renommer, ou Effacer. Appuyez sur ENTER pour confirmer.
  • Page 133: Parcourir La Liste D'écoute

    4.8.2 Parcourir la liste d'écoute Appuyez sur les touches UP / DOWN pour sélectionner Liste d'écoute dans le menu de navigation. Appuyez sur les touches LEFT / RIGHT pour choisir Tous, Musique, Photos, et Films. Appuyez sur ENTER pour confirmer. Vous pourrez alors accéder à la liste d'écoute. Si vous souhaitez effacer un fichier d'une liste d'écoute, appuyez sur la touche SELECT pour sélectionner, puis appuyez sur la touche CONFIRM pour confirmer.
  • Page 134: Menu De Copie De Fichiers

    5. Menu de copie de fichiers Sélectionnez l'icone Copie de fichiers à partir de l'écran d'accueil pour accéder au menu Copie de fichiers, pour pouvoir copier les fichiers entre périphériques USB, disque dur local et réseau. Sous le menu de copie de fichiers, vous pouvez utiliser les touches suivantes. Touche Fonction UP / DOWN...
  • Page 135: Radio Internet

    6. Radio Internet Ce lecteur dispose de la fonction radio internet gratuite SHOUTcast. Sélectionnez l'icone Radio Internet sur l'interface principale pour accéder à ce menu. Remarque : • Vérifiez que le lecteur est correctement relié à un réseau local ou réseau local sans fil avec accès internet.
  • Page 136: Serveur Web & Bittorrent

    7. Serveur Web & BitTorrent 7.1 Serveur Web (unicgi) Un serveur Web, ‘Neighbor Web’, est installé sur le lecteur. Reliez votre lecteur à votre réseau domestique (LAN ou WLAN). Recherchez l'adresse IP de votre lecteur dans le menu CONFIGURATION -> RESEAU. Saisissez l'adresse IP (par exemple 192.168.3.15) dans la barre d'adresse d'Internet Explorer sur votre PC.
  • Page 137: Gestion Du Compte

    7.2 Gestion du compte Cliquez sur Gestion du compte à partir de la page d'accueil de Neighbor Web. Cette page vous permet de définir un mot de passe pour accéder à Neighbor Web. Remarque : • Le mot de passe sera activé lorsque la commande de connexion est activée. (Pour plus de renseignements, veuillez consulter la section Commande de connexion du chapitre ‘3.4 Modification des réglages du système’) •...
  • Page 138: Téléchargement Bittorrent (Btpd)

    7.4 Téléchargement BitTorrent (btpd) BitTorrent est un protocole de partage de fichiers poste-à-poste pour la distribution de quantités importantes de données sur internet. Une fonctionnalité BitTorrent (btpd – BitTorrent Protocol Daemon) est installée sur le lecteur (Voir la section Info Extension du chapitre ‘3.4 Modification des réglages du système’...
  • Page 139: Gestion Des Téléchargements

    7.4.2 Gestion des téléchargements La page des téléchargements de BitTorrent vous permet également de démarrer, d'arrêter, ou d'effacer des torrents, de définir des priorités pour les torrents, et d'obtenir le statut des torrents en cours de téléchargement. Cliquez sur Démarrer pour commencer le téléchargement. Cliquez sur Stop pour arrêter le téléchargement.
  • Page 140 7.4.3 Réglages Cliquez sur Configuration sur la page des téléchargements BitTorrent pour accéder à la page de configuration de BitTorrent. Sur la page de configuration de BitTorrent, vous pouvez configurer les options suivantes : Définition du taux de téléchargement maximum. Définition du taux de téléchargement en amont maximum.
  • Page 141: Mise À Jour Du Logiciel

    8. Mise à jour du logiciel Le progiciel est le système d'exploitation installé sur l'appareil. Les mises à jour de logiciel permettent l'ajout de nouvelles fonctionnalités, des améliorations et des résolutions de bogues. Pour plus de renseignements, veuillez consulter les sections Mise à jour du système et Info Extension du chapitre ‘3.4 Modification des réglages du système’.
  • Page 142: Annexes

    9. Annexes 9.1 Caractéristiques techniques INTERFACES I/O PRISES EN CHARGE: Disque dur SATA 3,5 pouces installé Port HÔTE USB 2.0 x 2 (compatible avec USB 1.1) Port PERIPHERIQUE USB 2.0 (pour une connexion sur un PC) Prise A/V composite (CVBS) Prise composant Y/Pb/Pr Prise Péritel Euro Interface HDMI V1.3...
  • Page 143: Questions Fréquentes

    9.2 Questions fréquentes Question 1 : Lorsque j'essaye de déconnecter le périphérique USB, je reçois toujours le message “Le volume générique du périphérique ne peut être arrêté pour l'instant. Essayez d'arrêter ce périphérique ultérieurement.” Que dois-je faire ? Réponse : Fermez tout programme pouvant accéder aux données du lecteur, y compris Windows®...
  • Page 144 Question 6 : Lorsque je permute sur Y/Pb/Pr 480p, 576p, 720p, 1080i, et 1080p, pourquoi l'écran du téléviseur affiche-t-il une image non-regardable ? Réponse : Vérifiez que votre téléviseur prend bien en charge les sorties Y/Pb/Pr 480p, 576p, 720p, 1080i, et 1080p.
  • Page 145: Copyrights & Marques Déposées

    partagés), essayez de le désactiver pour voir si vous pouvez vous connecter. Si la connexion marche lorsque le pare-feu est désactivé, vous devrez peut-être ajouter le lecteur à la liste d'éléments acceptés ou de configurer le pare-feu pour autoriser un accès intranet local. Dans le pire des cas, désactivez votre pare-feu durant le temps d'utilisation du lecteur, puis remettez-le en marche lorsque vous avez terminé.
  • Page 146: Licence Gpl

    -Perte du logiciel du client, firmware ou tout autre perte d’informations ou de la mémoire des données -Improper handling or installation 9.5 Licence GPL Ce produit contient un logiciel libre qui est sous la licence GNU (General Public License). Après avoir acheté ce produit, vous pouvez vous procurer, modifier ou distribuer le code source du logiciel sous licence GPL utilisé...

Table des Matières