Table des Matières

Publicité

Les langues disponibles
  • FR

Les langues disponibles

Liens rapides

Distributed by Hama GmbH & Co KG
D-86652 Monheim
+49 9091 502-0
www.xavax.eu

Publicité

Table des Matières
loading

Sommaire des Matières pour Xavax MAX!

  • Page 1 Distributed by Hama GmbH & Co KG D-86652 Monheim +49 9091 502-0 www.xavax.eu...
  • Page 2 MAX! Cube LAN Gateway + Fensterkontakt + Wandtaster MAX! Cube LAN Gateway + wireless window sensor+ Pushbutton 00111932...
  • Page 3: Table Des Matières

    d Bedienungsanleitung Inhalt 1. MAX! Cube 1.1 Bestimmungsgemäßer Einsatz............3 1.2. Übersicht..................3 1.3. Montage ..................3 1.4. Anlernen von MAX! Komponenten ..........3 1.5. Stromversorgung................4 1.6. Installation der Gerätesoftware & Systemvoraussetzungen ... 4 1.7. Internetverbindung ................4 1.8. Werkseinstellungen wieder herstellen ..........4 1.9.
  • Page 4: Max! Cube

    Garantie- und Haftungsausschluss. Dies gilt auch für Umbauten und Veränderungen. Die Geräte sind aus- schließlich für den privaten Gebrauch gedacht. Weitere Informationen zum MAX! System und den verfügbaren Komponen- ten erhalten Sie unter www.xavax.eu/max. 1.2. Übersicht Oberseite: Power: Die LED zeigt an, ob eine Stromversorgung besteht und das Gerät betriebsbereit ist.
  • Page 5: Stromversorgung

    1.5. Stromversorgung Die Stromversorgung des MAX! Cube erfolgt mit dem mitgelieferten Steckernetzteil. • Stecken Sie das mitgelieferte USB-Netzteil in eine Steckdose. • Verbinden Sie den MAX! Cube und das Netzteil mit dem USB-Kabel. Verwenden Sie hierzu die seitlich angebrachte USB-Anschlussbuchse (2). Die Stromversorgung des MAX! Cube ist alternativ auch über den USB Anschluss eines Computers oder eines Routers möglich.
  • Page 6: Hinweise Zum Funkbetrieb

    1.10. Hinweise zum Funkbetrieb Die Funkübertragung wird auf einem nicht exklusiven Übertragungsweg realisiert, weshalb Störungen nicht ausgeschlossen werden können. Störeinflüsse können u. a. durch Schaltvorgänge, Elektromotoren oder auch defekte Elektrogeräte hervorgerufen werden. Die Reichweite in Gebäuden kann stark von der im Freifeld abweichen. Außer der Sendeleistung und den Empfangseigenschaften der Empfänger spielen Umwelteinflüsse wie Luftfeuchtigkeit neben baulichen Gegebenheiten eine wichtige Rolle.
  • Page 7: Montage

    2.3. Montage Der MAX! Fensterkontakt besteht grundlegend aus zwei Elementen, einem Magneten (1) und einer Elektronikeinheit (2). Ein Element muss am Rahmen montiert sein, das andere am Fenster. • Wählen Sie zuerst das Fenster aus, das oft zum Lüften verwendet wird und an dem der MAX! Fensterkontakt angebracht werden soll.
  • Page 8: Anlernen An Das Max! System

    • Legen Sie 2 neue LR03-Batterien (Micro/AAA) polungsrichtig in das Batteriefach ein. • Setzen Sie die Elektronikeinheit wieder auf die Halterung und lassen Sie diese einrasten. • Schieben Sie die Abdeckung zurück auf die Einheit. Achten Sie dabei darauf, dass die LED-Öffnung der Abdeckung über die LED der Elektronikeinheit gesetzt wird.
  • Page 9: Bestimmungsgemäßer Einsatz

    3. Eco Taster 3.1. Bestimmungsgemäßer Einsatz Der MAX! Eco Taster erfüllt im MAX! System eine spezielle Aufgabe. Wenn man das Haus oder die Wohnung verlässt, können alle Räume durch einen Tastendruck in den manuellen Modus und auf Absenktemperatur geschaltet werden. Wenn man das Haus oder die Wohnung wieder betritt, können ebenfalls auf Tastendruck alle MAX! Komponenten auf Au- to-Betrieb gestellt werden, um so die individuellen Wochenheizprogramme für die Räume zu starten.
  • Page 10: Ablernen/Reset

    3.5. Ablernen/Reset Der Auslieferungszustand des MAX! Eco Tasters kann manuell wieder hergestellt werden. Dabei gehen alle Einstellungen und Informationen über angelernte Geräte verloren. • Entnehmen Sie zunächst die Batterien aus dem Batteriefach. • Warten Sie 60 Sekunden. • Halten Sie die obere oder untere Taste gedrückt. •...
  • Page 11 g Operating instructions Table of contents 1. MAX! Cube 1.1 Intended use ................. 11 1.2. Overview ..................11 1.3. Mounting ..................11 1.4. Teaching-in MAX! Components ............ 11 1.5. Power supply ................12 1.6. Installation of device software & system requirements....12 1.7.
  • Page 12: Max! Cube

    This also applies to any conversion or modification work. This device is intended for private use only.For more information about the MAX! System and the available compo- nents, please go to www.xavax.eu/max. 1.2. Overview Top: Power: The LED indicates whether a power supply is present and if the device is ready for operation.
  • Page 13: Power Supply

    1.5. Power supply The MAX! Cube draws its power supply from the plug-in main adapter included in the scope of supply. • Plug the USB main adapter supplied into a socket outlet. • Connect the MAX! Cube and the main adapter with the USB cable. Use the USB port on the side of the device (2) for this purpose.
  • Page 14: Information About Radio Operation

    1.10. Information about radio operation Radio transmission is performed on a non-exclusive transmission path, which means that there is a possibility of inter- ference occurring. Interference can also be caused by switching operations, electrical motors or defective electrical de- vices. The range of transmission within buildings can differ greatly from that available in the open air. Besides the trans- mitting power and the reception characteristics of the receiver, environmental factors such as humidity in the vicinity have an important role to play, as do on-site structural/screening conditions.
  • Page 15: Mounting

    2.3. Mounting The MAX! Window Sensor essentially consists of two elements: a magnet (1) and an electronic unit (2). One of these must be mounted on the frame, the other on the window. • First select the window that is frequently used for ventilation and which the window sensor is to be attached to.
  • Page 16: Teaching-In On The Max! System

    • Insert 2 new LR03 (micro/AAA) batteries in the battery compartment (making sure that you insert them the right way round). • Place the electronic unit back onto the bracket, allowing it to latch into place. • Screw the cover back onto the unit. Make sure that the LED opening on the cover is positioned over the LED on the electronic unit.
  • Page 17: Intended Use

    3. Eco Switch Pushbutton 3.1. Intended use The MAX! Eco Switch has a special job to do in the MAX! System. When you leave your house or apartment, all rooms can be switched to manual mode and reduction temperature at the touch of a button. Similarly, when you return home, all MAX! Components can be set to automatic operation at the touch of a button, thereby starting the separate weekly hea- ting programs configured for each room.
  • Page 18: Teach-Out/Reset

    3.5. Teach-out/Reset The MAX! Eco Switch can be reset to the initial state manually. Restoring the initial state deletes all settings and information about taught-in devices. • First remove the batteries from the battery compartment. • Wait 60 seconds. • Press and hold down the button at the top or bottom. •...
  • Page 19 f Mode d'emploi Sommaire MAX! Cube Utilisation conforme....................19 1.2. Vue d’ensemble ..................... 19 1.3. Montage ........................ 19 1.4. Apprentissage des éléments MAX!................ 19 1.5. Alimentation électrique ..................20 1.6. Installation du logiciel d’appareils et configurations minimales des systèmes ..20 1.7.
  • Page 20: Max! Cube

    Ceci s’applique également aux modifications et trans- formations. Les appareils sont destinés exclusivement à une utilisation privée. Vous trouverez sous www.xavax.eu/max de plus amples informations concernant le système MAX! et les éléments correspondants disponibles.
  • Page 21: Alimentation Électrique

    1.5. Alimentation électrique L’alimentation électrique du MAX! Cube est réalisée au moyen du bloc d’alimentation fourni. • Branchez le bloc d’alimentation USB à une prise électrique. • Connectez le MAX! Cube et le bloc d’alimentation au câble USB. Utilisez à cet effet le connecteur USB disposé sur le côté...
  • Page 22: Remarques Au Sujet Du Fonctionnement Radio

    1.10. Remarques au sujet du fonctionnement radio La transmission radio est réalisée par une voie non exclusive, ce qui peut provoquer des interférences. Les perturbations peuvent être induites entre autres par des processus de commutation, des moteurs électriques ou également par des ap- pareils électriques défectueux.
  • Page 23: Montage

    2.3. Montage Par principe, le contact de fenêtre MAX ! se compose de deux éléments, d’un aimant (1) et d’un mo- dule électronique (2). Un des éléments est monté sur le dormant et l’autre sur la fenêtre. • Choisissez d’abord la fenêtre qui est utilisée généralement pour aérer la pièce et sur laquelle vous souhaitez installer le contact de fenêtre MAX!.
  • Page 24: Apprentissage Dans Le Système Max

    • Placez 2 piles LR03 (Micro/AAA) neuves dans le compartiment à piles. • Replacez le module électronique sur le support et enclenchez-le. • Glissez le cache de nouveau sur le module. Dans ce contexte, veillez à que l’orifice de DEL du cache soit repositionné...
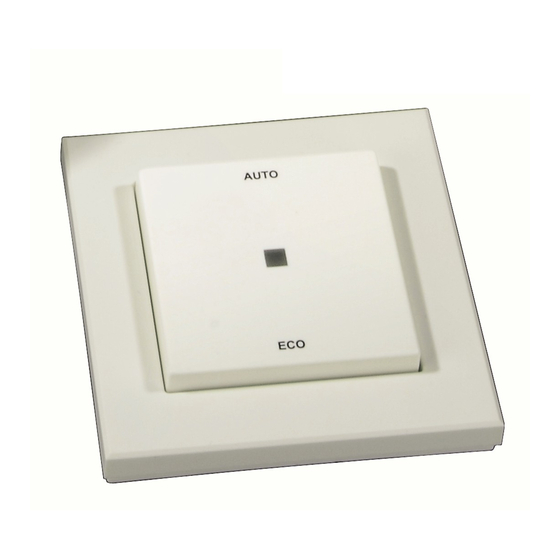
  • Page 25: Utilisation Conforme

    3. Eco Bouton mural 3.1. Utilisation conforme Dans le système MAX!, le bouton mural MAX! remplit une tâche spécifique. En quittant la maison ou l’appartement, tou- tes les pièces peuvent être commutées en mode manuel et éco en appuyant sur ce bouton. En rentrant dans la maison ou l’appartement, il suffit d’appuyer une nouvelle fois sur ce bouton pour commuter tous les éléments MAX! en mode auto- matique, afin de démarrer les programmes de chauffage hebdomadaires individuels pour les différentes pièces.
  • Page 26: Suppression / Réinitialisation

    3.5. Suppression / Réinitialisation L’état de livraison du bouton mural MAX! peut être rétabli manuellement. Les réglages et informations concernant les ap- pareils enregistrés sont alors perdus. • Retirez d’abord les piles du compartiment à piles. • Attendez 60 secondes. •...
  • Page 27 e Instrucciones de uso Índice MAX! Cube Uso adecuado ....................... 27 1.2. Vista general ......................27 1.3. Montaje........................27 1.4. Aprendizaje de componentes MAX! ..............27 1.5. Alimentación de corriente..................28 1.6. Instalación del software del aparato y requisitos del sistema....... 28 1.7.
  • Page 28: Max! Cube Uso Adecuado

    Ello tiene validez también para cambios y modificaciones. Los aparatos se han fabricado únicamente para el uso privado. Encontrará más información sobre el sistema MAX! y los componentes disponibles en www.xavax.eu/max 1.2. Vista general Lado superior: Power: El LED indica si hay alimentación de corriente y si el aparato está...
  • Page 29: Alimentación De Corriente

    1.5. Alimentación de corriente La alimentación de corriente del MAX! Cube se realiza con la fuente de alimentación suministrada. • Conecte el cable de corriente USB suministrado en una toma de corriente. • Conecte el MAX! Cube y la fuente de alimentación con el cable USB. Utilice para ello el puerto USB del lateral (2). De forma alternativa, la alimentación de corriente del MAX! Cube se puede realizar también mediante el puerto USB de un ordenador o de un router.
  • Page 30: Notas Sobre El Funcionamiento Inalámbrico

    1.10. Notas sobre el funcionamiento inalámbrico La transmisión inalámbrica se realiza en una vía de transmisión no exclusiva, por lo que no se pueden excluir interferen- cias. Las interferencias pueden venir causadas por procesos de conmutación, electromotores o también aparatos elé- ctricos defectuosos.
  • Page 31: Montaje

    2.3. Montaje El contacto de ventana MAX! se compone básicamente de dos elementos, un imán (1) y una unidad electrónica (2). Uno de los elementos se debe montar en el marco, el otro en la ventana. • Elija primero la ventana que se utilice frecuentemente para ventilar y en la que se vaya a montar el contacto de ventana MAX!.
  • Page 32: Aprendizaje En El Sistema Max

    • Coloque 2 pilas LR03 (Micro/AAA) nuevas en el compartimento de pilas con la polaridad correcta. • Coloque de nuevo la unidad electrónica en el soporte y encájela. • Vuelva a colocar la cubierta sobre la unidad. Al hacerlo, recuerde que la abertura para LED de la cubierta se debe colocar sobre el LED de la unidad electrónica.
  • Page 33: Uso Adecuado

    3. Eco tiene 3.1. Uso adecuado El pulsador MAX! Eco tiene una tarea especial en el sistema MAX!. Cuando se sale de la casa o de la vivienda, todas las habitaciones se pueden conmutar al modo manual y a la temperatura reducida pulsando una tecla. Cuando se vuelve a la casa o a la vivienda, se pueden conmutar todos los componentes MAX! al modo automático con solo pulsar una tecla para iniciar así...
  • Page 34: Desprogramar / Reset

    3.5. Desprogramar / Reset El estado de suministro del pulsador MAX! Eco se puede restablecer manualmente. Al hacerlo se pierden todos los ajustes e informaciones sobre los aparatos programados mediante aprendizaje. • Saque primero las pilas del compartimento de pilas. •...
  • Page 35 o Gebruiksaanwijzing Inhoudsopgave 1. MAX! Cube 1.1 Beoogd gebruik................35 1.2. Overzicht ..................35 1.3. Montage ..................35 1.4. Aanleren van MAX! Componenten ..........35 1.5. Voeding ..................36 1.6. Installatie van de apparaatsoftware & systeemvereisten ....36 1.7. Internetverbinding ................. 36 1.8.
  • Page 36: Max! Cube

    Elk ander gebruik dan in deze handleiding beschreven is, geldt als oneigenlijk en leidt tot de uitsluiting van garantie en aansprakelijkheid. Dit geldt ook voor verbouwingen en veranderingen. De apparaten zijn uitsluitend voor particulier gebruik bedoeld. Meer informatie over het MAX!-systeem en de verkrijgbare componenten vindt u onder www.xavax.eu/max. 1.2. Overzicht Bovenzijd Power: De led geeft aan of het apparaat onder spanning staat en bedrijfsklaar is.
  • Page 37: Voeding

    1.5. Voeding De elektrische voeding van de MAX! Cube gebeurt met de bijgeleverde adapter. • Steek de bijgeleverde USB-adapter in een stopcontact. • Verbind de MAX! Cube en de adapter met de USB-kabel. Gebruik hiervoor de USB-poort (2) aan de zijkant van het apparaat (2).
  • Page 38: Instructies Voor Het Draadloze Bedrijf

    1.10. Instructies voor het draadloze bedrijf De draadloze communicatie wordt via een niet-exclusief communicatiekanaal gerealiseerd, zodat storingen niet kunnen worden uitgesloten. Storende invloeden kunnen o.a. afkomstig zijn van schakelprocessen, elektromotoren of defecte elektrische apparaten. Het bereik in gebouwen kan sterk afwijken van het bereik in openlucht. Behalve het zendvermogen en de ontvangst-eigenschappen van de ontvanger spelen ook milieu-in-vloe-den zoals luchtvochtigheid, en de bouwkun- dige situatie een belangrijke rol.
  • Page 39: Montage

    2.3. Montage Het MAX! Raamcontact bestaat in wezen uit twee elementen: een magneet (1) en een elektronische eenheid (2). Een element moet aan het kozijn gemonteerd zijn, het andere aan het raam. • Kies eerst het raam dat voor het luchten wordt gebruikt en waaraan het raamcontact moet worden aangebracht.
  • Page 40: Aanleren Aan Het Max! Systeem

    • Plaats 2 nieuwe LR03-batterijen (micro/AAA) in het batterijvak. Let hierbij op de juiste polariteit. • Plaats de elektronische eenheid weer op de houder en klik hem vast. • Schuif de afdekking weer op de eenheid. Let erop dat de led-opening in de afdekking boven de led van de elektronische eenheid wordt geplaatst.
  • Page 41: Beoogd Gebruik

    3. Wandschakelaar 3.1. Beoogd gebruik De MAX! Wandschakelaar vervult in het MAX! Systeem een speciale rol. Als men zijn huis of appartement verlaat, kun- nen alle ruimten met één druk op de knop in de handmatige modus en op verlaagde temperatuur worden geschakeld. Als men zijn huis of appartement weer binnenkomt, kunnen eveneens met één druk op de knop alle MAX! Componenten in de automatische modus worden gezet, om zo de individuele weekverwarmingsprogramma’s voor de ruimten te starten.
  • Page 42: Afleren/Reset

    3.5. Afleren/reset De oorspronkelijke toestand van de MAX! Wandschakelaar kan handmatig worden hersteld. Hierbij gaan alle instellingen en informatie over aangeleerde apparaten verloren. • Neem eerst de batterijen uit het batterijvak. • Wacht 60 seconden. • Houd de bovenste of onderste toets ingedrukt. •...

Ce manuel est également adapté pour:

00111932

Table des Matières