Table des Matières

Publicité

Les langues disponibles

Les langues disponibles

Liens rapides

CARE & INSTRUCTIONS MANUAL
GUIDE D'UTILISATION ET D'ENTRETIEN
MANUAL DE INSTRUCIONES Y MANTENIMIENTO
WASHING MACHINE • LAVEUSE • LAVADORA
FA-5812 X • FA-5812
NOTE: To avoid accident and damage, please read these instructions carefully before operating the appliance.
NOTE: Veuillez lire ces instructions attentivement a fin d'éviter accidents et dommages.
NOTA: Por favor, lea este manual de instrucciones atentamente para evitar posibles daños o accidentes.

Publicité

Table des Matières
loading

Sommaire des Matières pour Fagor FA-5812 X

  • Page 1 MANUAL DE INSTRUCIONES Y MANTENIMIENTO WASHING MACHINE • LAVEUSE • LAVADORA FA-5812 X • FA-5812 NOTE: To avoid accident and damage, please read these instructions carefully before operating the appliance. NOTE: Veuillez lire ces instructions attentivement a fin d’éviter accidents et dommages.
  • Page 3: Table Des Matières

    washing machine table of contents WARNINGS AND SAFETY INSTRUCTIONS SPECIFICATIONS INSTALLATION AND SETUP MACHINE OPERATION AND USEFUL TIPS MAINTENANCE AND CLEANING SAFETY AND TROUBLESHOOTING ENVIRONMENTAL WARNINGS laveuse table des matières MISES EN GARDE ET CONSIGNES DE SÉCURITÉ SPÉCIFICATIONS INSTALLATION ET MONTAGE UTILISATION DE L’APPAREIL ET CONSEILS PRATIQUES ENTRETIEN ET NETTOYAGE...
  • Page 4 lavadora índice ADVERTENCIAS E INSTRUCCIONES DE SEGURIDAD ESPECIFICACIONES INSTALACIÓN Y MONTAJE USO DEL APARATO Y CONSEJOS PRÁCTICOS MANTENIMIENTO Y LIMPIEZA DEL APARATO SEGURIDAD Y SOLUCIÓN DE PROBLEMAS ADVERTENCIAS SOBRE EL MEDIO AMBIENTE...
  • Page 5 thank you for depositing your trust in us The new line of washing machines is designed to make your life easier: ALWAYS KEEPING YOUR COMFORT IN Faster cycles. MIND • Reduced cycle times give you more free Large door. time. Maximum opening.
  • Page 6: Safety Instructions

    warnings To avoid fire hazards, electric shocks, personal injury, or other types of damage, take the following precautions when using your washing machine: This washing machine comes with a Do not climb over the machine or lean on manual, which includes installation, operation, the open loading door.
  • Page 7: Washing Machine

    washing machine specifications Power supply cable Top surface Control Detergent panel dispenser Drain hose Door Stainless steel wash drum Filter Baseboard Leveling feet ACCESSORIES LOCATED INSIDE THE DRUM Open-end wrench Back plugs Drain tube bender Water inlet hose...
  • Page 8: Installation And Setup

    washing machine installation and setup UNPACKING AND UNLOCKING THE WASHING MACHINE UNPACKING a Remove the base, corner protectors, and the top cover. UNLOCKING a There are 3 locking screws located at the back of the washing machine. b Using the wrench provided, loosen the 3 screws and remove them completely, along with the metal washer and the black rubber and plastic tubes which...
  • Page 9 CONNECTING TO THE WATER AND DRAINAGE SYSTEM installation and setup CONNECTING TO THE WATER SYSTEM The water inlet tube is located inside the drum: a Connect the elbow end of the tube to the threaded intake of the electro valve located at the back of the machine.
  • Page 10: Electrical Connection

    LEVELING THE WASHING MACHINE AND CONNECTING TO THE POWER SYSTEM installation and setup LEVELING THE MACHINE a We recommend seating and leveling the back first. Once these are well seated, firmly fix the metal locknut to the top section. b Place the washing machine in the recess.
  • Page 11 SETTING THE CONFIGURATION MENU installation and setup CONFIGURATION MENU Now that you have successfully installed the washing machine, we recommend you set the configuration menu with a series of general functions, such as: - Language selection - Tone selection - Message end tone - Time setting a Press the ON/OFF button.
  • Page 12: Clock Time

    installation and setup MESSAGE END SETTING a “Message End Tone” appears on the display. b Turn the selector knob until the desired option is selected: - No tone - 1 min. tone message end tone - 5 min. tone - 10 min. tone - 15 min.
  • Page 13: Before Washing Clothes

    PRE-CLEANING installation and setup BEFORE WASHING CLOTHES We recommend that you pre-clean the washing machine. This is meant to check the installation, connections and drainage system, as well as 5.COTTON 60 to fully clean the inside of the machine before starting a wash cycle (see operation instructions on the following pages).
  • Page 14 washing machine operating the machine and useful tips CHECKING CLOTHES BEFORE WASHING PREPARING CLOTHES Before loading clothes into the drum, make sure that all pockets are empty. Small objects may obstruct the water discharge motor pump. SORTING CLOTHES a Sort clothes by fabric or type. Important! We recommend the use of gentle cycles for delicate garments.
  • Page 15: Environmental Notice

    USING DETERGENT AND ADDITIVES operating the machine and useful tips DETERGENT AND ADDITIVES a Your washing machine’s detergent dispenser has three compartments. WASHING SOFTENER PRE-WASHING b If you’re using liquid detergent, you should close the door to the washing compartment. Using two fingers, pick the blue tab that protrudes from the bottom of that compartment and pull outwards completely.
  • Page 16 SELECTING THE WASH CYCLE operating the machine and useful tips door display open button selector/ start/ menu button push stop button knob button Once you have programmed the configuration menu, you should follow these steps to select the wash cycle: a Using the ON/OFF button, start the machine.
  • Page 17 operating the machine and useful tips ➋ ➍ General functions When selecting the program, you will see the following information: ➊ Wash cycle stages: Wash Rinse Spin ➋ Number of revolutions 1.COTTON/COLD ➌ Cycle number ➍ Cycle duration ➌ ➊ Additional functions General functions:...
  • Page 18 Possible option buttons Programme Fabric type Cotton/Linen Cotton cold delicate colours very light soil Cotton/Linen Quick 30’ YES NO whites/colours 30ºC-85ºF very light soil Cotton/Linen Cotton delicate colours 30ºC-85ºF light soil Cotton/Linen Cotton fast colours 40ºC-105ºF light soil Cotton/Linen Cotton fast colours 60ºC-140ºF medium soil...
  • Page 19 Wash Max. Programme Approx. duration load of product description (minutes) clothes (kg/lb) compartment Normal wash, rinses, automatic additive absorption 7/15,43 if desired and long final spin SHORT wash, rinses, automatic additive absorption 2/4,41 if desired and final long spin 7/15,43 Normal wash, rinses, automatic additive 7/15,43...
  • Page 20: Selecting Options

    SELECTING OPTIONS operating the machine and useful tips Once you have selected the wash cycle, you may activate a series of options, depending on the chosen cycle. To activate options: - Push the selector knob. - Turn the selector knob to choose the desired option.
  • Page 21: Selecting Additional Functions

    SELECTING ADDITIONAL FUNCTIONS operating the machine and useful tips You may choose among several additional functions: - Anti-wrinkling - Easy ironing - Extra rinsing - Intensive washing Turn the selector knob to view the desired option. Once the option has been selected, push the selector knob to enable/disable it.
  • Page 22 LOCKING AND OPENING THE DOOR operating the machine and useful tips LOCKING Lock selection The lock is used to prevent handling of the various buttons from affecting the wash cycle. It’s used to prevent children from touching the buttons, etc. Enabling the lock a Enable the lock by pressing and holding the Start/Pause button for 2 seconds.
  • Page 23 EXECUTING THE WASH CYCLE operating the machine and useful tips ➋ ➏ ➐ ➎ ➑ EXECUTING THE ➊ WASH CYCLE All the information regarding the wash cycle appears on the display: ➊ Clock time: the current time. ➋ Time remaining until the wash cycle is over.
  • Page 24: Power Outages

    WASH CYCLE END POWER OUTAGES operating the machine and useful tips CYCLE When the wash cycle ends, “STOP” appears on the display and the remaining time is indicated as “0:00”, along with an audible tone, if the machine has been set up this way. You may now remove the clothes from the CYCLE END machine.
  • Page 25: Maintenance And Cleaning

    washing machine maintenance and cleaning MAINTENANCE After each wash cycle, leave open the load door for a while, to let air circulate freely inside the machine. It is a good practice to periodically run a full wash cycle using a lime-treating product, depending on the water hardness.
  • Page 26: Cleaning The Filter

    CLEANING THE ACCESSIBLE FILTER AND OUTER CLEANING maintenance and cleaning CLEANING THE FILTER Clean the accessible filter in case foreign matter is obstructing the drain pump. a Using a coin, open the baseboard cover by pulling it slightly. b To collect the water that will flow after detaching the drain tube, place a dish or container underneath it.
  • Page 27: Safety And Troubleshooting

    washing machine safety and troubleshooting If you experience any problem while using your washing machine, you might be able to solve it by following the instructions below. If you do not succeed, unplug the machine and contact TECHNICAL SUPPORT. Do not open the back of the machine under any circumstance.
  • Page 28 safety and troubleshooting Why is the machine not loading water? When water is not loading, the display shows the message “Not loading water!” for 4 seconds, and the following messages appear at 2-second intervals: Is the faucet turned off? Has the water been cut off? Water filter? Not loading water! The reason for water not loading may be...
  • Page 29 safety and troubleshooting Why is there no water in the drum during the wash cycle? This is because the washing machine has a system that adapts to the load of clothes and the type of fabric, and adjusts the water and energy consumption accordingly, in order to protect the environment.
  • Page 30: Environmental Warnings

    washing machine environmental warnings environmental notice INFORMATION ON THE CORRECT HANDLING OF WASTE OF ELECTRICAL AND ELECTRONIC EQUIPMENT (WEEE) When the machine reaches the end of its life, it To stress the obligation to cooperate with this should not be discarded along with general separate collection, a mark on the product warns domestic waste.
  • Page 31 merci de votre confiance La nouvelle gamme de laveuses a été pensée pour vous simplifier la vie : NOUS PENSONS PRATIQUE Lavage plus rapide. Hublot de grande taille. • La durée des programmes de lavage est Grande ouverture. plus courte, vous profitez ainsi de plus de temps libre.
  • Page 32: Mises En Garde Et Consignes

    mises en garde Pour éviter les risques d’incendie, de choc électrique, de blessure ou autres dommages lors de l’utilisation de votre laveuse, veuillez prendre les précautions suivantes : Cette laveuse est accompagnée d’un Ne pas monter sur la laveuse ni s’appuyer guide comprenant des instructions sur le sur la porte de chargement lorsqu’elle est fonctionnement, l’entretien et l’installation.
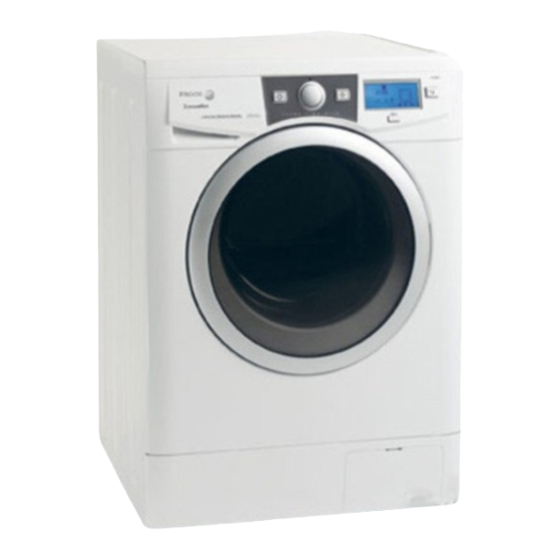
  • Page 33: Spécifications

    laveuse spécifications Câble d’alimentation Table de travail Panneau de Bac à commandes détergent Boyau de vidange Hublot Tambour en acier inoxydable Filtre Socle Pieds de mise à niveau ACCESSOIRES SITUÉS À L’INTÉRIEUR DU TAMBOUR Clé à extrémité ouverte Bouchons arrière Pièce pour courber le tuyau de vidange Tuyau d’entrée d’eau...
  • Page 34: Installation Et Montage

    laveuse installation et montage DÉBALLAGE ET DÉBLOCAGE DE LA LAVEUSE DÉBALLAGE a Retirer la base, les protège-coins et la couverture supérieure. DÉBLOCAGE a La partie arrière de la laveuse comprend 3 vis de blocage. b À l’aide de la clé fournie, dévisser et sortir complètement les 3 vis de même que la rondelle métallique et les cylindres de caoutchouc et de plastique noirs qui...
  • Page 35: Connexion Au Réseau D'aqueduc Et D'égout

    CONNEXION AU RÉSEAU D’AQUEDUC ET D’ÉGOUT installation et montage CONNEXION AU RÉSEAU D’AQUEDUC Vous trouverez le tuyau d’entrée d’eau à l’intérieur du tambour : a Connecter l’extrémité en coude du tuyau à l’entrée filetée de l’électrovalve située à l’arrière de l’appareil. b Connecter l’autre extrémité...
  • Page 36: Mise À Niveau

    MISE À NIVEAU DE LA LAVEUSE ET BRANCHEMENT AU RÉSEAU ÉLECTRIQUE installation et montage MISE À NIVEAU a Pour commencer, nous vous recommandons d’installer et de mettre à niveau les pieds arrière. Une fois bien installés, fixer solidement le contre-écrou métallique à...
  • Page 37: Réglage Du Menu De Configuration

    RÉGLAGE DU MENU DE CONFIGURATION installation et montage MENU DE CONFIGURATION Maintenant que la laveuse est bien installée, nous vous conseillons de régler le menu de configuration qui contient une série de fonctions générales, telles que : - la sélection de la langue - la sélection du son - l’avis de fin de message - le réglage de l’heure...
  • Page 38: Réglage De L'horloge

    installation et montage RÉGLAGE DE FIN DE MESSAGE a L’écran affichera "Avis de fin de message". b Tourner le sélecteur jusqu’à ce qu’apparaisse l’option désirée : - Sans sonnerie. - Sonnerie d’une 1 min. AVIS FIN MESs - Sonnerie de 5 min. - Sonnerie de 10 min.
  • Page 39: Nettoyage Préalable

    NETTOYAGE PRÉALABLE installation et montage NETTOYAGE PRÉALABLE Nous vous conseillons de faire un nettoyage préalable de la laveuse. Ce nettoyage a pour but de vérifier l’installation, les connexions et la vidange, en plus de 5.COTON 60 nettoyer complètement l’intérieur de la laveuse avant la réalisation d’un programme de lavage (voir les instructions d’utilisation aux pages suivantes).
  • Page 40: Utilisation De L'appareil Et Conseils Pratiques

    laveuse utilisation de l’appareil et conseils pratiques PRÉPARATION DES VÊTEMENTS AVANT LE LAVAGE PRÉPARATION Avant de mettre les vêtements dans le tambour, s’assurer que toutes les poches sont vides. Les petits objets peuvent obstruer la motopompe de vidange d’eau. TRI DES VÊTEMENTS a Trier les vêtements selon le tissu ou la confection.
  • Page 41: Remarque Concernant L'environnement

    UTILISATION DU DÉTERGENT ET DES ADDITIFS utilisation de l’appareil et conseils pratiques DÉTERGENT ET ADDITIFS a Le bac à détergent de votre laveuse dispose de trois compartiments. LAVAGE ASSOUPLISSEUR PRÉLAVAGE b Si vous utilisez un détergent liquide, vous devrez fermer la porte du compartiment de lavage.
  • Page 42: Sélection Du Programme De Lavage

    SÉLECTION DU PROGRAMME DE LAVAGE utilisation de l’appareil et conseils pratiques touche ouverture écran de la porte touche sélecteur touche touche menu et bouton mise en poussoir marche/pause Une fois le menu configuration programmé, vous devez suivre les étapes suivantes pour la sélection du programme de lavage : a Mettre l’appareil sous tension à...
  • Page 43 utilisation de l’appareil et conseils pratiques ➋ ➍ Fonctions générales Lorsque vous sélectionnerez le programme les renseignements suivants seront affichés : ➊ Phases du programme de lavage : Lavage Rinçage Essorage ➋ Nombre de tours 1.COTON FROID ➌ Nº du programme ➍...
  • Page 44 Touches options possibles Programme Type de textile Coton/Lin Coton froid couleurs délicates linge très peu sale Coton/Lin Rapide 30’ Blanc/couleur OUI NON 30ºC linge très peu sale Coton/Lin Coton couleurs délicates 30ºC linge peu sale Coton/Lin Coton couleurs résistantes 40ºC linge peu sale Coton/Lin Coton...
  • Page 45 Charge Durée approx. Bacs à Description de linge (minutes) produits du programme max. (kg/lb) Lavage normal, rinçages, absorption automatique d’additifs 7/15,43 le cas échéant et essorage final long Lavage COURT, rinçages, absorption automatique d’additifs 2/4,41 le cas échéant et essorage final long 7/15,43 Lavage normal, rinçages, absorption automatique...
  • Page 46: Sélection De Fonctions

    SÉLECTION DE FONCTIONS utilisation de l’appareil et conseils pratiques Une fois le programme de lavage sélectionné, il est possible d’activer une série de fonctions selon le programme choisi. Pour ce faire : - appuyer sur le sélecteur. - tourner le sélecteur pour choisir la fonction désirée.
  • Page 47: Sélection De Fonctions Supplémentaires

    SÉLECTION DE FONCTIONS SUPPLÉMENTAIRES utilisation de l’appareil et conseils pratiques Vous avez le choix de plusieurs fonctions supplémentaires : - Anti-froissement - Repassage facile - Rinçage extra - Lavage intensif Tourner le sélecteur jusqu’à la fonction désirée. Une fois la fonction sélectionnée, appuyer sur le sélecteur pour l’activer ou la désactiver.
  • Page 48: Verrouillage Et Ouverture Du Hublot

    VERROUILLAGE ET OUVERTURE DU HUBLOT utilisation de l’appareil et conseils pratiques VERROUILLAGE Sélection du verrouillage Grâce au verrouillage, vous vous assurez que le programme ne sera pas modifié par le fait d’appuyer sur les différentes touches. À utiliser pour éviter la manipulation par les enfants, etc. Activation du verrouillage a Activer le verrouillage en maintenant enfoncée la touche de mise en...
  • Page 49: Déroulement Du Lavage

    DÉROULEMENT DU LAVAGE utilisation de l’appareil et conseils pratiques ➋ ➏ ➐ ➎ ➑ DÉROULEMENT DU ➊ LAVAGE L’écran affiche tous les renseignements sur le lavage : ➊ Heure horloge : heure réelle. ➋ Temps restant avant la fin du programme de lavage.
  • Page 50: Panne D'alimentation Électrique

    FIN DU PROGRAMME DE LAVAGE PANNE D’ALIMENTATION ÉLECTRIQUE utilisation de l’appareil et conseils pratiques FIN DU PROGRAMME Une fois le programme de lavage terminé, l’écran affiche "ARRÊT" et le temps restant de 0:00, de même qu’un avertissement sonore si vous avez configuré...
  • Page 51: Entretien Et Nettoyage

    laveuse entretien et nettoyage ENTRETIEN Laisser la porte de chargement ouverte pendant un certain temps après chaque lavage pour permettre à l’air de circuler librement à l’intérieur de l’appareil. Tout dépendant de la dureté de l’eau, il est conseillé de faire, de temps à autre, un cycle de lavage complet à...
  • Page 52: Nettoyage Du Filtre

    NETTOYAGE DU FILTRE ACCESSIBLE ET NETTOYAGE DE L’EXTÉRIEUR entretien et nettoyage NETTOYAGE DU FILTRE Nettoyer le filtre lorsque la pompe de vidange est obstruée par des corps étrangers. a Ouvrir le couvercle du socle à l’aide d’une pièce de monnaie et en tirant doucement.
  • Page 53: Sécurité Et Dépannage

    laveuse sécurité et dépannage Si vous détectez un problème lié à l’utilisation de votre laveuse, vous pourrez probablement le résoudre en consultant les directives suivantes. Si non, débranchez l’appareil et communiquez avec le SERVICE DE SOUTIEN TECHNIQUE. Nous vous prions de ne jamais ouvrir l’appareil.
  • Page 54 sécurité et dépannage Pourquoi la laveuse ne se remplit-elle pas d’eau? Lorsque l’eau n’entre pas, l’écran affiche pendant 4 secondes Aucune entrée d’eau! et les messages suivants apparaissent toutes les 2 secondes : Robinet fermé? Panne d’eau? Filtre à eau? Aucune entrEe d’eau! L’absence d’eau est peut-être causée par une panne d’alimentation en eau, par la...
  • Page 55 sécurité et dépannage Pourquoi est-ce que je ne vois pas d’eau dans le tambour pendant le lavage? Ceci est attribuable au fait que la laveuse est munie d’un système qui s’adapte à la charge de vêtements et au type de tissu et qui règle la quantité...
  • Page 56: Mises En Garde Concernant L'environnement

    laveuse mises en garde concernant l’environnement remarque concernant l’environnement RENSEIGNEMENTS SUR LA BONNE GESTION DES RÉSIDUS D’APPAREILS ÉLECTRIQUES ET ÉLECTRONIQUES Après la durée de vie de l’appareil, il ne faut pas Pour souligner l’obligation de se conformer à la l’éliminer avec d’autres résidus ménagers ordinaires. collecte sélective, le produit affiche un marquage qui se veut une mise en garde contre l’utilisation Vous pouvez le remettre, sans aucun frais, à...
  • Page 57 gracias por confiar en nosotros La nueva línea de lavadoras está pensada para hacerte la vida más cómoda: SIEMPRE PENSANDO EN TU COMODIDAD Lavado en menos tiempo. Escotilla de gran tamaño. • La duración de los programas de lavado Máxima apertura. se reducen permitiéndole más tiempo libre.
  • Page 58: De Seguridad

    advertencias Para evitar riesgos de incendio, descargas eléctricas, daños personales u otros daños al utilizar su lavadora, tome las siguientes precauciones: Esta lavadora se suministra con un manual No subirse a la máquina ni apoyarse en que incluye instrucciones de funcionamiento, la puerta de carga abierta.
  • Page 59: Especificaciones

    lavadora especificaciones Cable de alimentación Encimera Panel de Cubeta de mandos detergente Manguera de desagüe Escotilla Tambor de lavado de acero Filtro inoxidable Zócalo Patas de nivelación ACCESORIOS UBICADOS DENTRO DEL TAMBOR Llave fija Tapones posteriores Curvador del tubo de desagüe Manguera de entrada del agua...
  • Page 60: Instalación Y Montaje

    lavadora instalación y montaje DESEMBALADO Y DESBLOQUEO DE LA LAVADORA DESEMBALADO a Retirar la base, cantoneras y la cubierta superior. DESBLOQUEO a En la parte posterior de la lavadora se encuentran los 3 tornillos de bloqueo. b Con la llave que se suministra suelte los 3 tornillos y extráigalos completamente junto con la arandela metálica y los tubos negros de goma y plástico que...
  • Page 61: Conexión A La Red De Aguay Desagüe

    CONEXIÓN A LA RED DE AGUA Y DESAGÜE instalación y montaje CONEXIÓN A LA RED DE AGUA En el interior del tambor encontrará el conducto de entrada de agua: a Conecte el extremo acodado del conducto en la entrada roscada de la electroválvula situada en la parte posterior del aparato.
  • Page 62: Conexión A La Red Eléctrica

    NIVELACIÓN DE LA LAVADORA Y CONEXIÓN A LA RED ELÉCTRICA instalación y montaje NIVELACIÓN a Primero, le recomendamos asentar y nivelar las patas traseras. Cuando estén bien asentadas fije la contratuerca metálica con fuerza a la parte superior. b Sitúe la lavadora en el nicho. Humedecer el suelo le ayudará...
  • Page 63: Menú Configuración

    AJUSTE DEL MENÚ CONFIGURACIÓN MENÚ CONFIGURACIÓN Ahora que ha instalado satisfactoriamente la lavadora, le aconsejamos que ajuste el menú configuración con una serie de funciones generales, tales como: - selección de idioma - selección de sonido - aviso fin mensaje - ajuste de hora.
  • Page 64 instalación y montaje AJUSTE FIN DE MENSAJE a En la pantalla aparecerá “Aviso Fin Mensaje”. b Gire el mando selector hasta seleccionar la opción deseada: - Sin pitido. - Pitido durante 1 min. AVISO FIN MEN - Pitido durante 5 min. - Pitido durante 10 min.
  • Page 65: Limpieza Previa

    LIMPIEZA PREVIA instalación y montaje LIMPIEZA PREVIA Le aconsejamos que haga una limpieza previa de la lavadora. Esto sirve para comprobar la instalación, las conexiones y el desagüe, además de limpiar 5.ALGODON 60 completamente el interior antes de llevar a cabo un programa de lavado en la lavadora (ver instrucciones de uso en hojas siguientes).
  • Page 66: Uso Del Aparatoy Consejos Prácticos

    lavadora uso del aparato y consejos prácticos PREPARACIÓN DE LA ROPA ANTES DEL LAVADO PREPARACIÓN Antes de introducir la ropa en el tambor, asegúrese de que todos los bolsillos están vacíos. Los pequeños objetos pueden obstruir la motobomba de descarga de agua. CLASIFICACIÓN ROPA a Clasifique la ropa por su tejido o por Importante...
  • Page 67 UTILIZACIÓN DEL DETERGENTE Y LOS ADITIVOS uso del aparato y consejos prácticos DETERGENTE Y ADITIVOS a La cubeta de detergente de su lavadora dispone de tres compartimentos. LAVADO SUAVIZANTE PRELAVADO b Si va a usar detergente líquido deberá cerrar la compuerta del compartimiento de lavado.
  • Page 68: Selección Del Programa De Lavado

    SELECCIÓN DEL PROGRAMA DE LAVADO uso del aparato y consejos prácticos tecla pantalla apertura puerta tecla mando tecla tecla menú selector y arranque/ pulsador pausa Para seleccionar el programa de lavado debe seguir los siguientes pasos una vez haya programado el menú configuración: a Encienda la máquina con la tecla ON / OFF.
  • Page 69 uso del aparato y consejos prácticos ➋ ➍ Funciones generales Al seleccionar el programa visualizará la siguiente información: ➊ Fases del programa de lavado: Lavado Aclarado Centrifugado ➋ Nº de revoluciones 1.ALGODON FRIO ➌ Nº de programa ➍ Duración del programa ➌...
  • Page 70 Teclas de opciones posibles Programa Tipo de tejido Algodón/Lino Algodón frío colores delicados suciedad muy ligera Algodón/Lino Rápido 30’ blanco/color 30ºC suciedad muy ligera Algodón/Lino Algodón colores delicados 30ºC suciedad ligera Algodón/Lino Algodón colores sólidos 40ºC suciedad ligera Algodón/Lino Algodón colores sólidos 60ºC suciedad normal...
  • Page 71 Carga Compartimento Descripción Duración aprox. de ropa productos del programa (minutos) máx (Kg/lb) de lavado Lavado normal, aclarados, absorción automática de aditivos si 7/15,43 se desean y centrifugado final largo Lavado CORTO, aclarados, absorción automática de aditivos si 2/4,41 se desean y centrifugado final largo 7/15,43 Lavado normal, aclarados, 7/15,43...
  • Page 72: Selección De Opciones

    SELECCIÓN DE OPCIONES uso del aparato y consejos prácticos Una vez seleccionado el programa de lavado, es posible activar una serie de opciones dependiendo del programa elegido. Para ello: - pulse el mando selector. - gire el mando selector para elegir la opción deseada.
  • Page 73: Aclarado Extra

    SELECCIÓN DE FUNCIONES ADICIONALES uso del aparato y consejos prácticos Podrá elegir entre varias funciones adicionales: - Antiarrugas. - Fácil plachado - Aclarado extra - Lavado intensivo. Gire el mando selector y podrá visualizar la opbión deseada. Una vez seleccionada la opción, se activa/desactiva pulsando el mando selector.
  • Page 74 BLOQUEO Y APERTURA DE ESCOTILLA uso del aparato y consejos prácticos BLOQUEO Selección del bloqueo Mediante el bloqueo se asegura que las manipulaciones de las diferentes teclas no van a afectar al programa . Se usa para evitar manipulaciones por parte de niños, etc. Accionar el bloqueo a El bloqueo se acciona manteniendo pulsada la tecla de arranque/pausa...
  • Page 75 DESARROLO DEL LAVADO uso del aparato y consejos prácticos ➋ ➏ ➐ ➎ ➑ DESARROLLO DEL ➊ LAVADO En la pantalla aparece toda la información sobre el lavado: ➊ Hora reloj: la hora actual. ➋ Tiempo que resta para que acabe el programa de lavado.
  • Page 76 FIN DEL PROGRAMA DE LAVADO CORTE EN EL SUMINISTRO ELÉCTRICO uso del aparato y consejos prácticos FIN DEL PROGRAMA Al finalizar el programa de lavado aparece en la pantalla "STOP" y el tiempo restante queda "0:00" acompañado de sonido si se ha configurado la lavadora de esta manera.
  • Page 77: Mantenimiento Y Limpieza

    lavadora mantenimiento y limpieza MANTENIMIENTO Después de cada lavado deje abierta la puerta de carga durante un tiempo con el fin de que el aire circule libremente por el interior de la máquina. Es aconsejable realizar de vez en cuando, dependiendo de la dureza del agua, un ciclo de lavado completo empleando un producto descalcificante.
  • Page 78: Limpieza Exterior

    LIMPIEZA DEL FILTRO ACCESIBLE Y LIMPIEZA EXTERIOR mantenimiento y limpieza LIMPIEZA FILTRO Limpie el filtro accesible en caso de que haya quedado bloqueada la bomba de desagüe por objetos extraños. a Abra la tapa del zócalo con la ayuda de una moneda y tirando ligeramente de ella.
  • Page 79: Seguridad Y Solución De Problemas

    lavadora seguridad y solución de problemas En el caso de detectarse algún problema en el uso de su lavadora, probablemente usted pueda resolverlo tras la consulta de las indicaciones que siguen. De no ser así, desenchufe el aparato y póngase en contacto con el SERVICIO DE ASISTENCIA TÉCNICA.
  • Page 80 seguridad y solución de problemas ¿Por qué no carga agua la lavadora? Cuando no entra agua se visualiza en la pantalla durante 4 segundos No entra agua! y durante intervalos de 2 segundos van apareciendo los siguientes mensajes: Grifo cerrado?, Corte de Agua?, Fitro de Agua? NO ENTRA AGUA! El falta de entrada de agua, puede ser...
  • Page 81 seguridad y solución de problemas ¿Por qué no veo agua en el tambor durante el lavado? Esto es debido a que la lavadora está dotada de un sistema que tiene la capacidad de adaptarse a la carga de la ropa y a la naturaleza del tejido, ajustando el nivel de agua y energía utilizados, con el fin de preservar el medio ambiente.
  • Page 82: Advertencias Sobre El Medio Ambiente

    lavadora advertencias sobre el medio ambiente nota ecológica INFORMACIÓN PARA LA CORRECTA GESTIÓN DE LOS RESIDUOS DE APARATOS ELÉCTRICOS Y ELECTRÓNICOS Al final de la vida útil del aparato, éste no debe Para subrayar la obligación de colaborar con una eliminarse mezclado con los residuos domésticos recogida selectiva, en el producto aparece el generales.
  • Page 83: Customer Service

    Write the model and serial number on the lines below, you’ll need them in the event of a service call. The model and serial number are located in the hatch. Model: Serial: Date Purchased: Store: Should you need service or have any questions about this product, don’t hesitate to contact FAGOR AMERICA Customer Service at 1-800-207-0806.
  • Page 84: Product Warranty

    For one year from the date of purchase, provided this product is operated and maintained in accordance with the instructions attached to or furnished with the product, Fagor America Inc. will replace parts and provide labor to correct defects in materials or workmanship.
  • Page 88 FAGOR AMERICA, INC. PO BOX 94 LYNDHURST, NJ 07071 Toll Free: 1.800.207.0806 Email: infoappliances@fagoramerica.com www.fagoramerica.com The manufacturer reserves the right to modify the items described in this manual. Le producteur se réserve le droit de modifier les articles décrits dans cette guide.

Ce manuel est également adapté pour:

Fa-5812

Table des Matières