Table des Matières

Publicité

Les langues disponibles

Les langues disponibles

Liens rapides

BEDIENUNGSANLEITUNG
DVD PLAYER mit DVB-T
DPP 1126-070

Publicité

Table des Matières
loading

Sommaire des Matières pour SEC DPP 1126-070

  • Page 1 BEDIENUNGSANLEITUNG DVD PLAYER mit DVB-T DPP 1126-070...
  • Page 2 Sicherheitshinweise und Informationen zum bestimmungsgemäßen Gebrauch Lesen Sie sich die folgenden Sicherheitshinweise sorgfältig vor der Inbetriebnahme Ihres Produktes durch, und befolgen Sie sie stets. • Bestimmungsgemäßer Gebrauch: Dieses Produkt wurde zur Wiedergabe von DVD- und CD-Disks entwickelt, sowie zum fernsehen. Wenn es nicht gemäß der Anweisungen benutzt wird, ist die Sicherheit des Benutzers und anderer Personen nicht gewährleistet, und evtl.
  • Page 3 (z.B. nach dem Transport), kann im Gehäuseinnern Kondensflüssigkeit entstehen. Um das Gerät vor Schäden und Ausfall zu schützen, warten Sie mindestens 2 Stunden, bevor Sie es benutzen. • Gesundheitsschäden: Hohe Lautstärken können dauerhafte Gehörschäden hervorrufen. Regeln Sie die Lautstärke daher behutsam. Schließen Sie die Kopf- bzw.
  • Page 4 • Legen Sie dieses Gerät auf eine stabile Oberfläche, bevor Sie es in Betrieb nehmen. Stellen Sie es nicht auf weiche Oberflächen. • Das Gerät ist nach dem Ausschalten nicht stromlos. Um es vollständig stromlos zu machen, ziehen Sie den Netzstecker aus der Steckdose. •...
  • Page 5: Table Des Matières

    Inhaltsverzeichnis Einführung………………………………………………………………………….6 Eigenschaften………………………………………………………………….8 Vorderseitiges Bedienfeld……………………………………………….9 Fernbedienung……………………………………………………………….11 Seite………………………………………………………………………..13 Anschlüsse…………………………………………………………………….13 Wiedergabe verschiedener Datenträger………………………..16 Bedienung des DVD-Teils………………………………………………16 USB-/SD-Wiedergabe……………………………………………………21 Bedienung des DVBT-Teils……………………………………………….21 Erstinstallation………………………………………….…………..21 Hauptmenü……………………………………………………..……….…..22 Elektronischer Programmführer (EPG)………………………...27 Videotext………………………………………………………………….…...27 Sprache für Untertitel/Synchronsprache auswählen…….27 Fehlerbehebung……………………………………………………..……..28 Technische Daten………………………………………………………..…..29...
  • Page 6: Einführung

    Umwelt Umwelt Umwelt Umwelt Batteri Batterien dürfen nicht in den Hausmüll! Batteri Batteri en dürfen nicht in den Hausmüll! en dürfen nicht in den Hausmüll! en dürfen nicht in den Hausmüll! Viele unserer Produkte sind mit Batterien oder/und Akkus ausgestattet; mehr zu diesem Thema finden Sie im entsprechenden Kapitel dieser Anleitung.
  • Page 7 2. IHR DVD-PLAYER Lieferumfang Zu diesem Produkt gehören die folgenden Zubehörteile. Falls etwas fehlen sollte, wenden Sie sich an Ihren Händler. Haupteinheit Bildschirm Fernbedienung Kfz-Adapter Netzteil Ohrhörer x 2 Audio-/Videokabeladapter Verbindungskabel Kfz-Antenne DVB-T-Antenne Diese Bedienungsanleitung Taschen für Kopfstützen...
  • Page 8 Hauptgerät (DVD-Player) Vorderseitige Ansicht Seitenansicht...
  • Page 9: Vorderseitige Ansicht

    10. ABWÄRTS/NÄCHSTES 1. LCD-Monitor (7 Zoll) Bei Multimediawiedergabe: 2. DVD/DVB springt zum folgenden Stück. Drücken Sie diese Taste, um zwischen DVD- und DVB-Betrieb (Digitalfernsehen) umzuschalten. Bei geöffnetem Menü: bewegt 3. AUFWÄRTS/VORIGES die Markierung nach unten. Bei Multimediawiedergabe: springt zum vorigen Stück. 11.
  • Page 10 Seitenansicht 1. LCD-Monitor (7 Zoll) 12. AV-Eingangsbuchse 2. Lautsprecher 13. Stromausgangsbuchse 3. STUMM 14. Ein-/Aus-Schalter 4. AUFWÄRTS 15. Stromeingangsbuchse 5. LINKS/VOL- 16. Kopfhöreranschluss 6. TFT EIN/AUS 17. Betriebsanzeige 7. RECHTS/VOL+ 8. ABWÄRTS 9. EINRICHTUNG 10&11. Montagebügel...
  • Page 11: Fernbedienung

    Fernbedienung Tasten der Fernbedienung: 1. Taste TFT EIN/AUS: Zum Aus- oder Einschalten des TFT-Bildschirms. 2. Taste DVD/DVB: Drücken Sie diese Taste, um zwischen DVD- und DVB-Betrieb (Digitalfernsehen) umzuschalten. 3. DISPLAY: Zeigt den aktuellen Wiedergabestatus oder die Disk-Informationen an. 4. Taste MUTE: Drücken Sie diese Taste, um die Tonwiedergabe aus- bzw. wieder einzuschalten. 5.
  • Page 12 empfangen. Bewegt den Cursor bei eingeblendetem Menü auf- bzw. abwärts. Wird im Handbuch auch als Auf-/Abwärts bezeichnet. ( FAV-) / (FAV+): Bewegt den Cursor bei eingeblendetem Menü nach links bzw. rechts. Wird im Handbuch auch als Links/Rechts bezeichnet. Drücken Sie diese Taste bei DVB-T-Empfang, um die Liste Ihrer Lieblingssender (Favoriten) anzuzeigen.
  • Page 13: Anschlüsse

    Anschlüsse A. Heimbetrieb (Hauptgerät) Auf der Rückseite befindet sich ein Bügel. Ziehen Sie den Bügel heraus, um das Hauptgerät aufzustellen. An Steckdose anschließen Verbinden Sie den kleinen Stecker mit der Stromeingangsbuchse seitlich am Gerät und das Netzteil mit einer Steckdose. Daraufhin ist der DVD-Player betriebsbereit.
  • Page 14 Maximal unterstützte Kapazität für Speicherkarten/USB-Speichersticks: 8GB / 16GB Hinweise: Es ist möglich, dass einzelne Speicherkarten bzw. USB-Speichergeräte nicht kompatibel sind. B. Kfz-Betrieb (Hauptgerät mit Zweitmonitor) Auf der Rückseite des Hauptgerätes und des Zweitmonitors befinden sich je zwei Montagebügel. Diese Bügel dienen zum Befestigen des Gerätes an der Kopfstütze im Fahrzeug. So können die Mitfahrer auf dem Rücksitz die abgespielten Inhalte genießen.
  • Page 15 Kfz-Antenne anschließen Das Gerät besitzt einen eingebauten Digitalfernseh-Tuner für DVB-T. Um terrestrische Fernseh- und Rundfunkprogramme empfangen zu können, verbinden Sie den Player mit der Antenne: Antenne im Fahrzeug installieren: Befestigen Sie die Antenne innen an der Kfz-Heckscheibe bzw. einer hinteren Seitenscheibe (siehe Abb. 1). Hinweise: Während das Fahrzeug in Bewegung ist, ist ein einwandfreier Empfang nicht immer gewährleistet, insbesondere, wenn Sie schneller als 60 km/h fahren.
  • Page 16: Wiedergabe Verschiedener Datenträger

    WIEDERGABE VERSCHIEDENER DATENTRÄGER Dieses Gerät unterstützt die Wiedergabe von Disk, von USB-Speichergeräten und von Speicherkarte. Drücken Sie die Taste USB/CARD auf der Fernbedienung oder am Gerät, um auf DVD-Wiedergabe umzuschalten. Drücken Sie nach dem Umschalten auf DVD-Betrieb die Taste USB/CARD auf der Fernbedienung, um das Bild anzuzeigen.
  • Page 17: Schneller Vor- Und Rücklauf

    Drücken Sie die Taste auf der Fernbedienung, um die Wiedergabe vorübergehend anzuhalten. Drücken Sie , um zur normalen Wiedergabe zurückzukehren. ※ SCHNELLER VOR- UND RÜCKLAUF Drücken Sie während der Wiedergabe die Tasten auf der Fernbedienung oder die Tasten am Gerät. Mit jedem Tastendruck ändert sich die Wiedergabegeschwindigkeit (vor-/rückwärts) wie folgt: Normale Wiedergabe ※...
  • Page 18: Zoom-Funktion

    3) Drücken Sie die Taste A-B ein weiteres Mal, um die Abschnittswiederholung auszuschalten. Daraufhin erscheint die Nachricht „A-B CANCEL“. ※ ZOOM-FUNKTION Mit dieser Funktion können Sie die Bildansicht vergrößern. Drücken Sie die Taste ZOOM auf der Fernbedienung, um zwischen den Vergrößerungsfaktoren 2x, 3x, 4x, 1/2, x, 1/3x und 1/4x umzuschalten.
  • Page 19 1) SYSTEMEINSTELLUNG Wenn Sie das Einrichtungsmenü öffnen, wird standardmäßig die Seite „Systemeinstellungen“ angezeigt (siehe unten): * TV SYSTEM: Wählen Sie unter „TV System“ eine der Optionen NTSC, PAL oder AUTO. * BILDSCHIRMSCHONER: Sie können den Bildschirmschoner ein- bzw. ausschalten. Bei eingeschaltetem Bildschirmschoner geschieht Folgendes: wird die Wiedergabe gestoppt, die Disk-Lade geöffnet, keine Disk eingelegt oder ist ein Standbild für mehr als 60 Sekunden sichtbar, wird der Bildschirmschoner eingeblendet.
  • Page 20: Digitaleinstellung

    Französisch. * Sie können die Synchronsprache ändern. Englisch, Deutsch, Italienisch und Französisch. * Sie können die Untertitelsprache ändern. Englisch, Deutsch, Italienisch und Französisch und AUS. * Sie können die Menüsprache ändern. Englisch, Deutsch, Italienisch und Französisch. * Sie können das Font Setup änder. 3) AUDIOEINSTELLUNG Wenn Sie das AUDIOEINSTELLUNGSMENÜ...
  • Page 21 WIEDERGABE VON USB-GERÄT/SPEICHERKARTE Die Bedienung in der Betriebsart USB / CARD ist mit der für Disks identisch. Wenn Sie beispielsweise die USB-Betriebsart öffnen, erscheint folgender Bildschirm. Wählen Sie eine der Optionen audio/photo/video/E-book zur Wiedergabe aus. DIGITALER FERNSEHEMPFANG (DVB-T) Drücken Sie die Taste FUNCTION auf der Fernbedienung oder am Gerät, um auf DVB-T-Empfang umzuschalten.
  • Page 22 2. Hauptmenü Drücken Sie die Taste SETUP, um das Hauptmenü aufzurufen. Drücken Sie die Taste SETUP erneut oder die Taste RETURN, um das Menü zu verlassen. Es stehen die vier Optionen Programmführer, Sys. konfiguration (Systemeinstellung), Installation und Spiel zur Verfügung. 2.1 Programmführer 2.1.1 TV-Kanäle Wählen Sie die Option „TV Kanäle“...
  • Page 23: Kanäle Bearbeiten

    Zum Umschalten zwischen Fernseh- und Radiosendern drücken Sie TV/RADIO. Hinweis: Dieses Menü ist nicht anwählbar, wenn noch keine Sender gesucht und gespeichert wurden. 2.1.4 Kanäle bearbeiten Um den Namen eines Senders zu bearbeiten, wählen Sie den gewünschten Sendernamen aus und drücken ENTER bzw.
  • Page 24: Video-Einstellungen

    2.2.1 TV-Einstellungen * TV-SYSTEM: Wählen Sie unter „TV-System“ eine der Optionen NTSC/PAL/AUTO. * TV-TYPE: Hier stellen Sie das gewünschte Bildseitenverhältnis ein: 4:3 PS, 4:3 LB oder 16:9. 2.2.2 Video-Einstellungen Wählen Sie die Option „Video-Einstellu.“ (Bildeinstellungen), und drücken Sie die Taste ENTER, um das Menü...
  • Page 25: Systeminfo

    Um die Sendersperre zu bearbeiten, müssen Sie zuerst das richtige Kennwort eingeben, um das Menü für die Sendersperre anzuzeigen. Wählen Sie den gewünschten Sender mithilfe der Tasten aus, und drücken Sie die Taste ENTER, um ihn zu sperren bzw. zu entsperren. Zum Umschalten zwischen Fernseh- und Radiosendern drücken Sie TV/RADIO.
  • Page 26: Manuelle Suche

    Sendersuche wird nach Auswahl der Option “yes” (ja) gestartet. 2.3.2 Manuelle Suche Sie können eine Sendersuche nach dem Festlegen der folgenden Parameter durchführen: Land, Suchmodus, Startkanal, Startfrequenz, Endkanal, Frequenzband. Wenn Sie als Suchart einen einzigen Kanal wählen, können Land und Startkanal festgelegt werden. Wenn Sie als Suchart eine Kanalgruppe wählen, können Land, Start- und Endkanal festgelegt werden.
  • Page 27: Elektronischer Programmführer (Epg)

    3. Elektronischer Programmführer (EPG) Drücken Sie die Taste EPG auf der Fernbedienung, um weitere Informationen zu den Sendungen des aktuellen Senders zu erhalten (nicht alle Sender strahlen EPG aus). Siehe folgende Abbildung. 4. Videotext Drücken Sie die Taste TITLE/TTX auf der Fernbedienung, um den Videotext anzuzeigen. Nicht alle Sender strahlen Videotextseiten aus.
  • Page 28 PROBLEMLÖSUNG Für DVD-Wiedergabe Kein Strom   Stellen Sie sicher, dass das Netzteil fest und sicher angeschlossen ist. Drücken Sie die Taste Power, um das Gerät einzuschalten. Keine Tonwiedergabe   Überprüfen Sie die Kabelverbindungen zwischen den Geräten. Stellen Sie sicher, dass sich auf der Disk eine Tonspur befindet. Überprüfen Sie die Lautstärke.
  • Page 29: Technische Daten

    TECHNISCHE DATEN Technische Daten [Audio] 90 dB (typisch) 210 x 150 x 30 mm Abmessungen des Gerätes 0,3 V +/-1,2 V Effektiv, 1 KHz 0 dB, 3,5mm Klinkenbuchse x1 Audio-Ausgang Auflösung 480 X 3 (RGB) x 234 Temp. 0 – 35 °C, Betriebsstatus: Horizontal Betriebsumgebung 17,78 cm Bildschirmgröße...
  • Page 30 INSTRUCTION MANUAL DVD/DVB-T PLAYER DPP 1126-070...
  • Page 31 Safety Instructions and Important Information About Intended Use Please read the following instructions and safety notes thoroughly before starting to use your product! • Intended Use: this device has been designed for playing back DVD/CD discs and watching TV. If the product is not used according to the instructions, the user’s and other persons’ safety is not guaranteed and the warranty will be void.
  • Page 32 Connect the headphones or earphones to the device prior to powering it on, as connecting it when already powered on can produce high sound levels causing damage to your hearing. • Children: Do not allow children to play with electrical devices. Children may not be able to comprehend the presence of potential risks.
  • Page 33 • Where the power plug is used as the disconnect device, the disconnect device shall remain readily operable. • The apparatus shall not be exposed to dripping or splashing and objects filled with liquids, such as vases, shall not be placed on the apparatus. •...
  • Page 34 TABLE OF CONTENTS Introduction………………………………………………………………………….6 Features……………………………………………………………………………8 Front panel……………………………………………………………………….9 Remote control…………………………………………………………………11 Side panel………………………………………………………………………..13 Connections……………………………………………………………………..13 Media Play Operation…………………………………………………………..16 DVD operation…………………………………………………………………..16 USB/SD operation…………………………………………………………….21 DVBT Operation………………………………………………………..…………21 First time installation………………………………………….…………..21 The main menu……………………………………………………..…………22 Electronic programs guide (EPG)…………………………..…………27 Teletext……………………………………………………………………..…….27 Subtitle/audio function……………………………………..……………..27 Troubleshooting……………………………………………………..…………..28 Specifications………………………………………………………..……………29...
  • Page 35: Introduction

    Environment Environment Environment Environment Old batteries do not belong in with the domestic waste! Old batteries do not belong in with the domestic waste! Old batteries do not belong in with the domestic waste! Old batteries do not belong in with the domestic waste! Consumers are obliged by law to return any old batteries and rechargeable batteries to the corresponding local and/or public collection centres or to return them to the retail shops.
  • Page 36 2. YOUR DVD PLAYER In the box The following accessories are including in this product. If anything is missing, contact your dealer. Main Unit Monitor Remote Control Car Adapter Power Adaptor Earphones x 2 Video/Audio Cable adaptor Connection Cable car antenna DVB-T Antenna This Menu Headrest bag...
  • Page 37 Main unit (DVD player) Front View Side View...
  • Page 38: Front View

    1. 7 inch LCD monitor 2. DVD/DVB 10. DOWN/NEXT Press to select DVD or DVB mode. On media play, press to select 3. UP/PREV the next track. In menu interface, press to On media play, press to select the previous track. select item down.
  • Page 39: Side View

    Side View 1. 7 inch LCD monitor 12. AV IN jack 2. Speaker 13. DC OUT jack 3. MUTE 14. POWER OFF/ON Switch 4. UP 15. DC IN jack 5. LEFT/VOL- 16. Earphone jack 6. TFT ON/OFF 17. Power indicator 7.
  • Page 40: Remote Control

    Remote Control Buttons of the Remote Control: 1. TFT ON/OFF button: press to turn the TFT display on or off. 2. DVD/DVB button: press to select DVD or DVB mode. 3. DISPLAY: For disc, display the current status or disc information. 4.
  • Page 41 Moves the cursor up/down in the on-screen menu. Also referred to as Up/Down keys throughout the manual. ( FAV-) / (FAV+): Moves the cursor left/right in the on-screen menu. Also referred to as Left/Right keys throughout the manual. In DVBT mode, Press to enter the favorite channels list. : in media play mode, press it to activate fast reverse/forward function.
  • Page 42: Connections

    Connections A. For home use (the main unit) On the back of the unit there is a bracket. When you pull out the bracket, you can place the main unit on the flat position to operate it. Connect to power outlet Connect the one terminal of the power cord to the DC IN jack on the side of the unit and the plug to the power outlet.
  • Page 43 Card/USB Max.storage size : 8GB/16GB Notes: The USB-host function and SD/MMC-card reader function of this product does not guarantee the compatibility with all of USB or SD/MMC memory devices. B. For car use (the main unit with the vice monitor) On the back of the main unit and the second monitor are two mounting bracket.
  • Page 44 Connect to antenna for car The unit has integrated a DVB-T TV tuner. To receive the terrestrial broadcast, you need to connect the player with an antenna: picture 1. Antenna installation in the car: fix the antennas on the car in the rear (or side) of the glass Notes:“A flawless TV function can´t be guaranteed due to connection issues while the vehicle is moving, especially when speed is more than 60km/h”.
  • Page 45: Media Play Operation

    MEDIA PLAY OPERATION The unit supports disc play, USB play and card play. Press the USB/CARD button on the unit or on the remote control to select DVD mode. When entering into the DVD mode, press USB/CARD button on the remote control, the picture will appear on the screen. If you have play the disc on the unit and a card or USB device on the unit, you can select the DISC or CARD or USB device to play.
  • Page 46 normal playback, press button. ※ RAPID FORWARD/RAPID REVERSE Press on the remote control or press on the unit during playback. Each time the button is pressed, the speed of rapid forward /reverse changes according to the disc. Normal playback ※ ON-SCREEN DISPLAY FUNCTION Press the OSD button on the remote control during playback to display the console information of the current disc on the screen.
  • Page 47: Zoom Function

    ※ ZOOM FUNCTION Allows the picture to be increased in size. Press ZOOM button on the remote control to toggle among 2 scale, 3 scale and 4 scale, 1/2 scale,1/3 scale, 1/4 scale. When the scale is 1/4 times, press ZOOM button again to cancel the zoom function. ZOOM 2 →...
  • Page 48: System Setup

    1) SYSTEM SETUP When you open the setup menu, you will see the system setup page at first, see below: * TV SYSTEM: Change the TV SYSTEM among NTSC and PAL. * SCREEN SAVER: Change the SCREEN SAVER between ON and OFF. If the screen saver is on, when your DVD player is in Stop, Open or No Disc state, or there is a frame frozen for more than 60sec, the screen saver will be displayed;...
  • Page 49: Audio Setup

    *You can change the SUBTITLE LANGUAGE among: English, German, Spanish, French, Italian and Portuguese and OFF. *You can change the MENU LANGUAGE among: English, German, Spanish, French, Italian and Portuguese. 3) AUDIO SETUP When you open the AUDIO menu, you will see the following picture: * KEY: Change the tone within a certain range.
  • Page 50: Usb/Sd Operation

    USB/CARD OPERATION When you select the USB or CARD mode, the operation is the same with DISC operation. For example, when entering into the USB mode, the picture will appear. You can select the audio/photo/video/E-book item to play. DVBT OPERATION Press FUNCTION button on the remote control or on the unit to select DVB-T mode.
  • Page 51: The Main Menu

    2. The Main Menu Press the SETUP button to enter the main menu. Press the SETUP button again or press RETURN button to exit the menu. There are Channel Guide, System Config, Installation and Game four items to be selected and set. 2.1 Channel Guide 2.1.1 TV Channels When select TV channels item and press ENTER or OK button enter the menu.
  • Page 52: System Config

    corresponding function. Press TV/RADIO button to alternate between TV channels and radio channels. Note: When there are not any channels, the user can not be able to enter the menu. 2.1.4 Channels Class To change the name of a channel, you can select the channel and press ENTER or OK button. Use buttons to select a character and buttons to change a character.
  • Page 53: Video Setting

    2.2.1 TV Setting * TV SYSTEM: Change the TV SYSTEM among NTSC, PAL and AUTO. * TV TYPE: Change the TV TYPE among 4:3 PS, 4:3 LB and 16:9. 2.2.2 Video Setting Select the Video Setting item and press ENTER to enter the menu. You can use the buttons to select the Brightness, Contrast, HUE and Saturation to adjust and use buttons to change the value then press ENTER button to confirm.
  • Page 54: Time Setting

    To change the channel lock, the user will first have to input the correct password to enter the channel lock menu. Then use the button to select a channel and press ENTER button to lock or unlock a channel. Use the TV/RADIO button to alternate between TV channels and radio channels.
  • Page 55: Manual Scan

    press ENTER button. Scanning will start after choosing “yes”. 2.3.2 Manual Scan A channel scan or search can be done establishing the following points: Country, type of search, Start with channel, Start with frequency…, Finish with frequency… and Wide band. If the search type is single channel, then the country and start channel can be set.
  • Page 56: Electronic Programs Guide (Epg)

    3. Electronic programs guide (EPG) Press EPG key on the remote controller to enter into the EPG page to know more information about the current channel. As shown in the figure below; 4. Teletext Press TITLE/TTX key on the remote control to enter the teletext page. Some local program providers do not provide services in this area and “No teletext information!”...
  • Page 57: Troubleshooting

    TROUBLESHOOTING FOR DVD No power   Check if AC adapter of power is connected securely. Switch the device On by pressing the power button. No sound   Ensure that the equipment is connected properly. Please make sure that the audio track exists on the disc. Control the volume.
  • Page 58: Specifications

    SPECIFICATIONS Specification DC 9V 2A Power supply Input :AC 100-240V~ 50Hz DC 9V 2A max Adaptor ≦ 18 W Power consumption DVD signal system NTSC / PAL TV signal system DVB-T, MPEG-2, ETSI EN 300 744 DVB-T Compliance Right, Left, Stereo Sound mode English, French, Germany, Italian OSD language...
  • Page 59 MANUEL D'UTILISATION LECTEUR DVD / TNT DPP 1126-070...
  • Page 60: Consignes De Sécurité Et D'utilisation Importantes De L'appareil

    Consignes de sécurité et d'utilisation importantes de l'appareil Veuillez lire attentivement les consignes de sécurité et d'utilisation suivantes avant d'utiliser votre produit pour la première fois. • Utilisation correcte : cet appareil a été conçu pour la lecture de disques DVD et de CD. Si le produit n'est pas utilisé...
  • Page 61 • Santé : l'utilisation de l'appareil à un volume trop élevé risque d'endommager votre audition de façon irréversible. Veillez par conséquent à régler le volume sur un niveau d'écoute raisonnable. Pensez à brancher le casque ou les écouteurs sur l'appareil avant d'allumer ce dernier afin d'éviter que le volume initial ne soit trop fort et n'endommage votre audition.
  • Page 62 l'appareil afin d'éviter tout risque d'électrocution et de blessures graves. • Conservez ce manuel d’utilisation afin de pouvoir le consulter ultérieurement. • Posez l’appareil sur une surface plane et sûre avant de le configurer. Ne le posez pas sur des surfaces molles.
  • Page 63 TABLE DES MATIÈRES Introduction…………………………………………………………………………6 Caractéristiques……………………………………………………………….8 Panneau avant………………………………………………….………………9 Télécommande……………………………………………………………….11 Panneau latéral………………………………………………….…………..13 Branchements………………………………………………………………..13 Lecture de contenus multimédia………………………………………..13 Fonctionnement du lecteur DVD……………………………………..16 Fonctionnement USB/SD…………………………………………………16 Fonctionnement de la TNT..………..……………………………………...21 Première installation……………………………………………………….21 Le menu principal……………………………………………………………22 Guide électronique des programmes (EPG)……………………..27 Télétexte……………………………………………………………………..….27 Fonction sous-titres/audio………………………………………………27 Résolution des problèmes…………………………………………..……..28 Spécifications du produit…………………………………………………….29...
  • Page 64: Environnement

    Environnement Environnement Environnement Environnement Les piles usées ne doivent jamais être jetées avec les ordures ménagères ! Les piles usées ne doivent jamais être jetées avec les ordures ménagères ! Les piles usées ne doivent jamais être jetées avec les ordures ménagères ! Les piles usées ne doivent jamais être jetées avec les ordures ménagères ! Conformément à...
  • Page 65: Votre Lecteur Dvd

    2. VOTRE LECTEUR DVD Dans la boîte Les accessoires ci-dessous sont inclus avec le produit. Veuillez contacter votre distributeur si un élément venait à manquer. Lecteur Moniteur Télécommande Adaptateur allume-cigare Adaptateur secteur 2 paires d’écouteurs Câble adaptateur audio/vidéo Câble de connexion Antenne de voiture Antenne TNT Ce manuel d’utilisation...
  • Page 66: Unité Principale (Lecteur Dvd)

    Unité principale (Lecteur DVD) Vue avant Vue latérale...
  • Page 67: Haut-Parleur

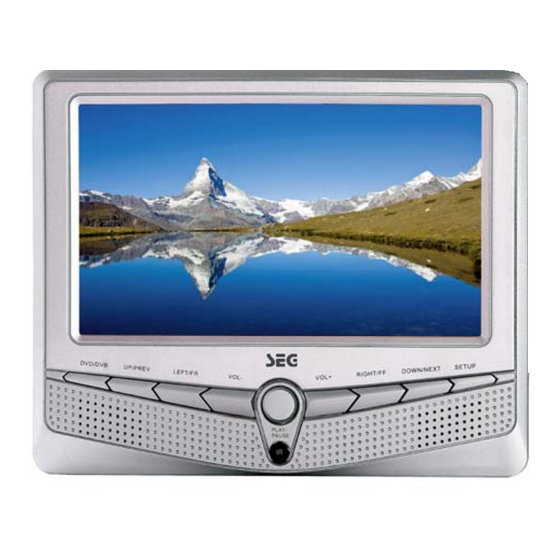
    1. Moniteur LCD 7 pouces 10. DOWN/NEXT (Bas/Suivant) En mode de lecture 2. DVD/DVB multimédia, appuyez sur cette Appuyez sur cette touche pour accéder au mode DVD ou au mode DVB (télévision numérique). touche pour passer à la piste suivante. 3.
  • Page 68: Vue Latérale

    Vue latérale 12. Prise d’entrée audio-vidéo 1. Moniteur LCD 7 pouces (AV IN) 2. Haut-parleur 13. Prise de sortie CC (DC OUT) 3. MUTE (Sourdine) 14. Commutateur OFF/ON 4. UP (Haut) (Marche/Arrêt) 5. LEFT/VOL- (Gauche/Vol -) 15. Prise d'entrée CC (DC IN) 6.
  • Page 69: Télécommande

    Télécommande Touches de la télécommande : 1. Touche TFT ON/OFF : appuyez sur cette touche pour allumer ou éteindre l’écran TFT. 2. Touche DVD/DVB : appuyez sur cette touche pour accéder au mode DVD ou au mode DVB (télévision numérique). 3.
  • Page 70 (CH+)/ (CH-) : Appuyez sur ces touches pour sélectionner la chaîne précédente/suivante. Ces touches permettent aussi de déplacer le curseur vers le haut/bas dans le menu à l’écran. Dans le reste du manuel, on les appelle également les touches Haut/Bas. ( FAV-) / (FAV+): Ces touches permettent aussi de déplacer le curseur vers la gauche/droite dans le menu à...
  • Page 71: Branchements

    Branchements A. Utilisation à la maison (unité principale) Un support se trouve à l’arrière de l’appareil. Si vous sortez le support, vous pouvez placer l’unité principale sur une surface plane pour l’utiliser. Branchement sur la prise de courant Raccordez la broche du cordon d’alimentation à la prise d’entrée CC (DC IN) située sur le côté...
  • Page 72: Utilisation En Voiture (Unité Principale Avec Moniteur Auxiliaire)

    Remarques : La fonction Port USB et lecteur de carte SD/MMC de ce produit ne garantit pas nécessairement une compatibilité totale avec l’ensemble des périphériques USB ou cartes SD/MMC. B. Utilisation en voiture (unité principale avec moniteur auxiliaire) L’unité principale et le second moniteur sont équipés, à l’arrière, de deux supports de montage. Ces supports sont utilisés pour les fixer sur les appuie-têtes du véhicule.
  • Page 73: Raccordement De L'unité Principale Au Moniteur Auxiliaire

    Connexion à l'antenne de voiture L’appareil est équipé d’un tuner TNT intégré. Pour recevoir la télévision numérique terrestre, vous devez brancher le lecteur à une antenne Installation de l’antenne dans le véhicule : fixez l’antenne sur la lunette arrière (voir figure 1) Remarques : nous ne pouvons pas garantir une réception parfaite de la télévision, étant donné...
  • Page 74: Lecture De Contenus Multimédia

    LECTURE DE CONTENUS MULTIMÉDIA Cet appareil peut lire des disques ainsi que le contenu de périphériques USB et de cartes mémoires. Appuyez sur la touche USB/CARD de l’appareil ou de la télécommande pour sélectionner le mode DVD. Une fois en mode DVD, appuyez sur la touche USB/CARD de la télécommande. L’image apparaît à...
  • Page 75: Fonction D'affichage À L'écran

    Appuyez sur la touche de la télécommande ou sur la touche de l’appareil pendant la lecture. À chaque pression de la touche, la vitesse de l’avance rapide/du retour rapide change selon la séquence suivante : Lecture normale FONCTION D’AFFICHAGE À L’ÉCRAN ※...
  • Page 76: Fonctions Spéciales En Mode Dvd

    Permet d’augmenter la taille de l’image. Appuyez sur la touche ZOOM de la télécommande pour basculer entre l’échelle 2, l’échelle 3, l’échelle 4, l’échelle ½, l’échelle 1/3 et l’échelle 1/4. Une fois arrivé à l’échelle ¼, si vous appuyez à nouveau sur la touche ZOOM, la fonction zoom est annulée.
  • Page 77: System Setup (Configuration Système)

    1) SYSTEM SETUP (CONFIGURATION SYSTÈME) Lorsque vous ouvrez le menu de configuration, la première page à apparaître est la page de configuration du système, telle que représentée ci-dessous : * TV SYSTEM (SYSTÈME TV) : Vous pouvez changer le système TV et choisir entre NTSC et PAL. * SCREEN SAVER (ÉCRAN VEILLE) : Vous pouvez activer ou désactiver l’écran de veille.
  • Page 78: Audio Setup (Configuration Audio)

    *Pour l’option AUDIO LANGUAGE (LANGUE AUDIO), vous avez le choix entre : English (Anglais), German (Allemand), Spanish (Espagnol), French (Français), Italian (Italien) et Portuguese (Portugais). *Pour l’option SUBTITLE LANGUAGE (LANGUE SS-TITRES), vous avez le choix entre : English (Anglais), German (Allemand), Spanish (Espagnol), French (Français), Italian (Italien), Portuguese (Portugais) et OFF (Désactivé).
  • Page 79: Utilisation De Périphériques Usb Et Cartes Mémoire

    UTILISATION DE PÉRIPHÉRIQUES USB ET CARTES MÉMOIRE Lorsque vous sélectionnez le mode USB ou CARTE, le fonctionnement est le même qu’en mode DISQUE. Par exemple, lorsque vous passez en mode USB, l’image ci-dessous apparaît. Vous pouvez alors sélectionner l’élément audio/photo/vidéo/livre électronique que vous souhaitez lire.
  • Page 80: Radio Channels (Stations De Radio)

    paramètres que vous pouvez sélectionner et configurer : Channel Guide (Guide des chaînes), System Config (Config système), Installation (Installation) et Game (Jeu). 2.1 Channel Guide (Guide des chaînes) 2.1.1 TV Channels (Chaînes TV) Sélectionnez l’élément TV Channels (Chaînes TV) et appuyez sur ENTER ou sur OK pour accéder au menu correspondant.
  • Page 81: Book List (Liste De Programmation)

    2.1.4 Channels Class (Catégories de chaînes) Pour renommer une chaîne, sélectionnez la chaîne et appuyez sur le bouton ENTER ou sur OK. Utilisez les touches pour sélectionner un caractère et les touches pour changer de caractère. Appuyez sur ENTER pour confirmer le nom que vous avez renseigné. Pour changer une chaîne de position, sélectionnez la colonne Move (Déplacer) et appuyez sur la touche ENTER ou sur OK.
  • Page 82: Tv Setting (Réglage Tv)

    2.2.1 TV Setting (Réglage TV) * TV SYSTEM (SYSTÈME TV) : Vous pouvez changer le système TV et choisir entre NTSC, PAL et AUTO. * TV TYPE (TYPE TV) : Vous pouvez changer le type TV et choisir entre 4:3 PS, 4:3 LB et 16:9. 2.2.2 Video Setting (Réglage vidéo) Sélectionnez l’élément Video Setting (Réglage vidéo) et appuyez sur ENTER pour accéder au menu correspondant.
  • Page 83: Time Setting (Réglage Heure)

    d’accéder au menu Channel lock (Verrouillage chaînes). Utilisez ensuite les touches pour sélectionner une chaîne et appuyez sur ENTER pour la verrouiller ou la déverrouiller. Appuyez sur la touche TV/RADIO pour basculer entre chaînes TV et stations de radio. 2.2.5 Time Setting (Réglage heure) Utilisez les touches pour sélectionner un point et les touches pour changer le...
  • Page 84: Default Setup (Configuration Par Défaut)

    2.3.2 Manual Scan (Recherche manuelle) Vous pouvez effectuer un balayage des chaînes ou une recherche en spécifiant les points suivants : Country (Pays), type of search (Type de recherche), Start with channel (Commencer à la chaîne), Start with frequency… (Commencer à la fréquence), Finish with frequency… (Terminer à la fréquence) et Wide band (Large bande).
  • Page 85: Guide Électronique Des Programmes (Epg)

    3. Guide électronique des programmes (EPG) Appuyez sur la touche EPG de la télécommande pour accéder à la page du guide électronique des programmes afin d’en savoir plus sur la chaîne en cours de diffusion. Le guide électronique des programmes apparaît tel que représenté ci-dessous. 4.
  • Page 86: Résolution Des Problèmes

    RÉSOLUTION DES PROBLÈMES Pour les DVD Le lecteur ne s'allume pas   Vérifiez si l’adaptateur secteur est correctement connecté. Allumez l’appareil en appuyant sur le bouton marche-arrêt. Aucun son n'est émis   Assurez-vous que l'équipement est correctement connecté. Assurez-vous qu’il y a bien une piste audio sur le disque. Réglez le volume.
  • Page 87: Spécifications Techniques

    SPÉCIFICATIONS TECHNIQUES Spécifications Alimentation 9 V CC, 2 A Entrée : CA 100-240 V, 50 Hz ; CC 9 V 2 A max Adaptateur 18 W Consommation électrique NTSC/PAL Système du signal DVD TNT, MPEG-2, conforme à la norme TNT ETSI EN 300 Système du signal TV Mode audio Droite, Gauche, Stéréo...
  • Page 88 MANUALE D’ISTRUZIONI LETTORE DVD/DVB-T DPP 1126-070...
  • Page 89 Istruzioni di sicurezza e informazioni importanti per l’utilizzo previsto Leggere attentamente le seguenti istruzioni e note di sicurezza prima di iniziare a utilizzare il dispositivo. • Utilizzo previsto: questo dispositivo è progettato per la riproduzione di DVD/CD. Nel caso in cui il prodotto non venga utilizzato secondo le istruzioni, non si garantisce la sicurezza dell’utente e di terze persone e la garanzia è...
  • Page 90 permanente. Di conseguenza, si consiglia di regolare attentamente il volume. Collegare le cuffie o gli auricolari al dispositivo prima di accenderlo, in quanto collegarle quando l’apparecchio è già acceso può produrre alti livelli di suono dannosi per l’udito. • Bambini: non consentire ai bambini di giocare con i dispositivi elettrici. I bambini potrebbero non comprendere i potenziali rischi.
  • Page 91 • Posizionare l'apparecchio su una superficie piana e stabile. Non appoggiarlo su superfici imbottite. • Quando la spina d'alimentazione è utilizzata per disconnettere il dispositivo, il dispositivo disconnesso rimane pronto all’uso. • Il dispositivo non deve essere raggiunto da gocce o schizzi di liquido e sul dispositivo non devono essere posti oggetti contenenti liquidi, come vasi da fiori.
  • Page 92 INDICE Introduzione…..…………………………………………………………………..6 Caratteristiche……………………………………………………………………8 Pannello anteriore……………………………………………………………...9 Telecomando…………………………………………………………………..11 Pannello laterale………………………………………………………………..13 Collegamenti……………………………………………………………………..13 Funzionamento………………………………………………………….....16 Funzionamento DVD ………………………………………………………….16 Funzionamento USB/SD …………………………………………………….21 Funzionamento DVBT ……………………………………………………………21 Installazione iniziale………………………………………….………..…..21 Il menu principale……………………………………………………..…….…22 Guida elettronica ai programmi (EPG)…………………………..……27 Televideo……………………………………………………………………..…….27 Sottotitoli/Funzione audio ……………………………………..………….27 Risoluzione dei problemi………………………………………………..…….28 Specifiche.........………………………………………………29...
  • Page 93: Introduzione

    Ambiente Ambiente Ambiente Ambiente Non smaltire le batterie usate con i rifiuti domestici! Non smaltire le batterie usate con i rifiuti domestici! Non smaltire le batterie usate con i rifiuti domestici! Non smaltire le batterie usate con i rifiuti domestici! I consumatori sono obbligati per legge a riportare le batterie e le batterie ricaricabili ai relativi centri di raccolta locale e/o pubblica o al negozio.
  • Page 94: Il Lettore Dvd

    2. IL LETTORE DVD Contenuto della confezione La confezione comprende i seguenti prodotti. Nel caso in cui qualche componente risultasse mancante, contattare il rivenditore. Unità principale Schermo Telecomando Adattatore per auto Alimentatore 2 auricolari Adattatore cavo video/audio Cavo di collegamento Antenna da auto Antenna DVB-T Questo Menu...
  • Page 95 Dispositivo principale (lettore DVD) Veduta anteriore Veduta laterale...
  • Page 96: Veduta Anteriore

    10. DOWN/NEXT 1. Schermo LCD da 7 pollici In modalità Media play 2. DVD/DVB (Riproduzione media) premere Premere per selezionare la modalità DVD o DVB. per selezionare la traccia 3. UP/PREV successiva. In modalità Media play (Riproduzione media) Nell’interfaccia Menu, premere premere per selezionare la traccia precedente.
  • Page 97 Veduta laterale 1. Schermo LCD da 7 pollici 12. Presa di entrata AV IN 2. Altoparlante 13. Presa d’uscita DC OUT 3. MUTE 14. Interruttore d’accensione 4. UP OFF/ON 5. LEFT/VOL- 15. DC IN (Presa d’ingresso CC) 6. TFT ON/OFF 16.
  • Page 98: Telecomando

    Telecomando Pulsanti del telecomando: 1. Pulsante TFT ON/OFF : premerlo per accedere o spegnere lo schermo TFT. 2. Pulsante DVD/DVB: premerlo per selezionare la modalità DVD o DVB. 3. DISPLAY: mostra le informazioni sullo stato attuale o sul disco. 4. Pulsante MUTE: premerlo per disattivare/attivare il sonoro. 5.
  • Page 99 ( FAV-) / (FAV+): Sposta il cursore verso sinistra/destra nel menu a video. Nel manuale si fa riferimento a questo tasto anche col nome di tasto Sinistra/Destra. In modalità DVBT, premerlo per accedere all’elenco dei canali preferiti. : in modalità Media play (Riproduzione media) premerlo per attivare la funzione indietro/avanti rapido.
  • Page 100: Collegamenti

    Collegamenti A. Utilizzo domestico (dispositivo principale) Sul retro del dispositivo è posizionata una staffa. Estraendola è possibile collocare l’apparecchio nella giusta posizione per adoperarlo su una superficie piana. Collegamento alla presa di alimentazione Collegare un’estremità del cavo d’alimentazione alla presa DC IN sul lato del dispositivo e inserire la spina nella presa di alimentazione di rete.
  • Page 101 Card/USB dimensioni max. di memorizzazione: 8GB / 16GB Note: La funzione USB host e lettore di card SD/MMC di questo prodotto non garantisce la compatibilità con tutti i dispositivi USB o card >SD/MMC. B. Utilizzo in auto (dispositivo principale con schermo aggiuntivo) Sul retro del dispositivo principale e dello schermo aggiuntivo sono collocate due staffe per il montaggio.
  • Page 102 Collegamento all’antenna per auto Il dispositivo è dotato di un sintonizzatore DVB-T TV integrato. Installazione dell’antenna sull’auto: fissare l’antenna sul vetro del lunotto posteriore (fig.1). Note: “a causa di possibili problemi di collegamento durante il movimento del veicolo, specialmente a velocità superiori ai 60km/h, non è possibile garantire un perfetto funzionamento della TV”. Avviso: la confezione contiene un’antenna standard a fissaggio magnetico e una per l'utilizzo in auto dotata di ventosa Collegamento all’alimentazione...
  • Page 103: Funzionamento

    MEDIA PLAY (RIPRODUZIONE MEDIA) Il dispositivo supporta la riproduzione di file da disco, USB e scheda. Per selezionare la modalità DVD, premere il pulsante USB/CARD sul dispositivo o sul telecomando. Una volta in modalità DVD, premere USB/CARD sul telecomando e sullo schermo apparirà l’immagine. A seconda che si intenda riprodurre file da un disco, da una scheda o da un dispositivo USB, è...
  • Page 104: Funzione Zoom

    ※ AVANTI/INDIETRO RAPIDO Premere sul telecomando o sul dispositivo durante la riproduzione. A ogni pressione del pulsante, la velocità cambia a seconda del disco. Riproduzione normale ※ FUNZIONE OSD (ON-SCREEN DISPLAY) Durante la riproduzione, premere OSD sul telecomando per visualizzare sullo schermo le informazioni sul disco in uso.
  • Page 105 ZOOM 2 ZOOM 3 ZOOM 4 ZOOM 1/2 ZOOM 1/3 ZOOM 1/4 ZOOM OFF → → → → → → sul telecomando per spostare In modalità Zoom, premere l’immagine verso l’alto, verso il basso, verso sinistra o verso destra. ※ FUNZIONI SPECIALI PER DVD Funzione lingua sottotitoli Premere il pulsante SUBTITLE sul telecomando durante la riproduzione.
  • Page 106 * SCREENSAVER: attiva/disattiva lo screensaver. Se lo screensaver è attivato, entrerà in funzione quando il lettore è in modalità Stop, Open o No Disc, o se un fotogramma rimane fermo per più di 60 sec.; ciò protegge lo schermo da possibili danni.
  • Page 107 (tedesco), Spanish (spagnolo), French (francese), Italian (italiano) e Portuguese (portoghese). * per SUBTITLE LANGUAGE (lingua sottotitoli) è possibile scegliere fra: English (inglese), German (tedesco), Spanish (spagnolo), French (francese), Italian (italiano), Portuguese (portoghese) e OFF (spento). * per MENU LANGUAGE (lingua menu) è possibile scegliere fra: English (inglese), German (tedesco), Spanish (spagnolo), French (francese), Italian (italiano) e Portuguese (portoghese).
  • Page 108: Funzionamento Usb/Sd

    Scegliendo FULL, il valore del picco del segnale audio sarà al minimo, mentre con OFF al massimo. * DUAL MONO: scegliere fra STEREO, MONO L, MONO R e MIX MONO. FUNZIONAMENTO USB/SCHEDA Selezionando la modalità USB o CARD (SCHEDA DI MEMORIA), il funzionamento sarà uguale a quello DISC.
  • Page 109: Il Menu Principale

    2. Il menu principale Premere il pulsante “SETUP” per accedere al menu principale. Premere nuovamente SETUP o RETURN per uscire dal menu. In questo menu è possibile selezionare e configurare quattro voci: Channel Guide (Guida canali), System Config (Configurazione sistema), Installation (Installazione) e Game (Giochi).
  • Page 110 funzione corrispondente. Premere TV/RADIO per spostarsi fra i canali TV e quelli radio. Nota: in mancanza di canali non sarà possibile accedere al menu. 2.1.4 Channels Class (Classificazione dei canali) Per cambiare il nome di un canale, selezionare il canale e premere ENTER od OK. Utilizzare per selezionare un carattere e per cambiarlo.
  • Page 111: Language (Lingua)

    2.2.1 TV Setting (Impostazioni TV) * TV SYSTEM (SISTEMA TV): cambia il sistema TV fra NTSC, PAL e AUTO. * TV TYPE (TIPO TV): cambia il tipo di TV fra 4:3 PS, 4:3 LB e 16:9 2.2.2 Video Setting (Impostazione video) Selezionare questa voce e premere ENTER per accedere al menu.
  • Page 112 2.2.5 Time Setting (Impostazione ora) Utilizzare per selezionare un punto e per cambiare le impostazioni; premere quindi ENTER per confermare. 2.2.6 System Info (Informazioni sul sistema) Questa schermata mostra: Update date (data di aggiornamento), Tuner information (informazioni sul sintonizzatore), Firmware version (versione del firmware) e Model version (versione del modello).
  • Page 113 2.3.2 Manual Scan (Scansione manuale) La scansione o la ricerca di un canale può essere eseguita impostando le seguenti voci: Country (paese), type of search (tipo di ricerca), Start with channel (canale d’inizio), Start with frequency… (frequenza d’inizio...), Finish with frequency… (frequenza di fine...) e Wide band (banda larga). Se il tipo di ricerca scelto è...
  • Page 114: Guida Elettronica Ai Programmi (Epg)

    3. Guida elettronica ai programmi (EPG) Premere EPG sul telecomando per accedere alla pagina dell’EPG e conoscere maggiori informazioni sul canale in uso. Vedere figura successiva. 4. Televideo Premere TITLE/TTX sul telecomando per accedere alla pagina del televideo. Alcune emittenti locali non forniscono questo tipo di servizio; in questo caso apparirà il messaggio “No teletext information!”.
  • Page 115: Risoluzione Dei Problemi

    RISOLUZIONE DEI PROBLEMI Il dispositivo non si accende.   Controllare che l’alimentatore CA sia collegato correttamente. Accendere il dispositivo premendo il pulsante d’accensione. Assenza di suoni   Assicurarsi che l’apparecchio sia collegato correttamente. Assicurarsi che sul disco sia presente la traccia audio. Controllare il volume.
  • Page 116: Specifiche

    SPECIFICHE TECNICHE Specifiche tecniche Alimentazione DC 9V 2A Entrata: CA 100-240 V~ 50 Hz CC 9 V 2 A max Alimentatore ≦ 18 W Consumo elettrico Sistema del segnale DVD NTSC/PAL Conformità DVB-T, MPEG-2, ETSI EN 300 744 DVB-T Sistema del segnale TV Modalità...
  • Page 117 Herstellergarantie Wir freuen uns, dass Sie sich für den Kauf eines modernen Gerätes unseres Hauses ent- schieden haben und wünschen Ihnen viel Spaß mit diesem Produkt. Die Fertigung von solchen Geräten ist ein komplexer Vorgang, den wir durch ständige Qualitätskontrollen begleiten.
  • Page 118 geben Sie bitte einem Paketzusteller „Deutsche Post“ bzw. einer Abgabestelle „Deutsche Post“. Um das Produkt auf dem Transport optimal zu schützen, sollten Sie möglichst die Originalverpackung nutzen. Erkennbar nicht transportsicher verpackte Geräte können wir leider nicht annehmen. Mit dem Retourenaufkleber ist die Einsendung für Sie kostenlos. Die Kosten für die Rücklieferung des Gerätes übernehmen wir für Sie.
  • Page 119 Herstellergarantie Wir freuen uns, dass Sie sich für den Kauf eines modernen Gerätes unseres Hauses ent- schieden haben und wünschen Ihnen viel Spaß mit diesem Produkt. Die Fertigung von solchen Geräten ist ein komplexer Vorgang, den wir durch ständige Qualitätskontrollen begleiten.
  • Page 120 der keine kostenlosen Garantieleistungen erbringen. Geht uns ein Gerät ohne Kaufnach- weis zu, erhalten Sie von uns einen Kostenvoranschlag für die Reparatur. Entscheiden Sie sich gegen eine Reparatur, so liefern wir das Gerät an Sie zurück. Für den Transport und die Ausarbeitung des Kostenvoranschlags müssen wir Ihnen in diesem Falle eine Pau- schale in Rechnung stellen.
  • Page 121 Herstellergarantie Wir freuen uns, dass Sie sich für den Kauf eines modernen Gerätes unseres Hauses ent- schieden haben und wünschen Ihnen viel Spass mit diesem Produkt. Die Fertigung von solchen Geräten ist ein komplexer Vorgang, den wir durch ständige Qualitätskontrollen begleiten.
  • Page 122 der keine kostenlosen Garantieleistungen erbringen. Geht uns ein Gerät ohne Kaufnach- weis zu, erhalten Sie von uns einen Kostenvoranschlag für die Reparatur. Entscheiden Sie sich gegen eine Reparatur, so liefern wir das Gerät an Sie zurück. Für den Transport und die Ausarbeitung des Kostenvoranschlags müssen wir Ihnen in diesem Falle eine Pau- schale in Rechnung stellen.
  • Page 123: Garantie Du Fabricant

    Garantie du fabricant nous vous remercions d’avoir choisi un appareil de notre marque et espérons qu’il vous apportera entière satisfaction. La fabrication de ce type d’appareils est un processus complexe que nous complétons par des contrôles qualité continus – une démarche qui nous permet de garantir la qualité...
  • Page 124 pas faire réparer l’appareil, il vous sera retourné. Les frais de devis ainsi que les frais de transport (tarif forfaitaire) de l’appareil seront alors à votre charge. 7. Les pièces remplacées seront conservées par notre centre de services et détruites à son entière discrétion.
  • Page 125: Garanzia Del Produttore

    Garanzia del produttore La ringraziamo per aver acquistato uno dei nostri moderni apparecchi e Le auguriamo un piacevole utilizzo di questo prodotto. La produzione di tali apparecchi è un processo comp- lesso, sottoposto a costanti controlli qualitativi. Per questo possiamo garantire che i nostri prodotti sono conformi a elevati standard di qualità.
  • Page 126: Limitazioni Di Responsabilità

    sitivo venga spedito senza questa prova, la riparazione avverrà a pagamento. In questo caso, se si dovesse decidere di non far riparare il dispositivo, l’apparecchio verrà restituito al mittente. Inoltre, verrà richiesto il pagamento di una tariffa fissa per il trasporto e il preventivo.
  • Page 127 Product of : Schmid Electronics GmbH D-66780 Rehlingen-Siersburg Germany www.seg-tv.eu...

Table des Matières