Table des Matières
Publicité
Les langues disponibles
Les langues disponibles
Liens rapides
Portable Airconditioning
Mobiles Klimagerät – Portable air conditioner –
Mobiele airconditioner – Climatiseur mobile
804.078
Gebrauchsanleitung - Instruction manual – Gebruiksaanwijzing - Manuel d'instructions
Bitte lesen Sie diese Gebrauchsanleitung vor Inbetriebnahme des Gerätes aufmerksam durch und bewahren
Sie diese zum späteren Nachlesen auf.
Before using this appliance, read the safety instructions carefully.
Lees deze gebruiksaanwijzing zorgvuldig voordat u het apparaat in gebruik neemt.
Avant d'utiliser cet appareil, lisez soigneusement les instructions concernant la sécurité
Publicité
Table des Matières

Sommaire des Matières pour Mesa Living 804.078
- Page 1 Portable Airconditioning Mobiles Klimagerät – Portable air conditioner – Mobiele airconditioner – Climatiseur mobile 804.078 Gebrauchsanleitung - Instruction manual – Gebruiksaanwijzing - Manuel d’instructions Bitte lesen Sie diese Gebrauchsanleitung vor Inbetriebnahme des Gerätes aufmerksam durch und bewahren Sie diese zum späteren Nachlesen auf.
- Page 2 Sicherheitsmaßnahmen Warnung: Das Klimagerät an einem ebenen und trockenen Standort aufstellen. Das Klimagerät in einem Abstand von mindestens 50 cm zu umliegenden Objekten aufstellen. Die Stromversorgung des Klimageräts sollte den Sicherheitsvorschriften des Landes entsprechen, in dem es betrieben wird, und eine verlässliche Erdung gewährleisten. ...
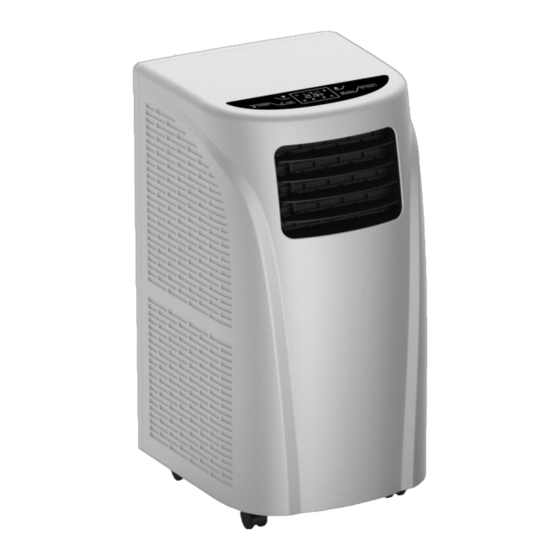
- Page 3 Bezeichnung der Teile: 1. Luftauslass 2. Bedienfeld 3. Lufteinlass 4. Auslassschlauch 5. Schwenkräder 6. Griff 7. Filter 8. Ablaufrohr 9. Stromkabel mit Stecker 10. Stromkabelführung 11. Abluftauslass Bedienfeld Vorsicht: wenn das Klimagerät während des Betriebs im COOL- oder im HEAT-Modus ausgeschaltet und umgehend neugestartet wird, wird die 3-Minuten-Schutzfunktion vor dem automatischen Start aktiviert.
- Page 4 Fernbedienung POWER: Zum EIN- oder AUSschalten des Klimageräts diese Taste drücken. TIMER Diese Taste zum Einstellen des Timers drücken. TEMPERATURUMRECHNUNGSTASTE Temperatur wird von ℃ in ℉ umgerechnet. COOL Diese Taste zum Auswählen des KÜHL-Modus drücken. DRY Diese Taste zum Auswählen des ENTFEUCHTER-Modus drücken.
-
Page 5: Lüfter-Modus
Betriebsarten Timereinstellung Timer AUSschalten Wenn das Klimagerät läuft, die Taste TIMER drücken, die TIMER-LED leuchtet. Währenddessen blinkt im Display fünf Mal „ “ auf. Nun kann mit den Tasten HOCH und RUNTER die Zeit von 30 Minuten bis zu 24 Stunden eingestellt werden. -
Page 6: Aufstellort Wählen
Vorsichtshinweise: Wenn die LED für den Wasserstand leuchtet, stellt das Klimagerät den Betrieb ein und Sie sollten zeitnah das Wasser ablassen. Nach dem Ablassen startet das Klimagerät automatisch. Im ENTFEUCHTER- und LÜFTER-Modus müssen Sie den Ablassschlauch nicht verwenden. ... - Page 7 Darstellung des Aufbaus Wandmontage Bogenausrichtung III) Unerwünschte Krümmung...
-
Page 8: Drainagesystem
Drainagesystem Drainage Wenn bei feuchtem Wetter der KÜHL- oder ENTFEUCHTER-Modus betrieben wird, entsteht mehr Kondenswasser. Der Wasserstandalarm wird ausgelöst, wenn im Wassertank ein bestimmtes Niveau erreicht wird, der Kompressor stoppt. Der Wasserstandalarm erscheint auf dem Display und ein akustischer Alarm ertönt zehn Mal in den folgenden fünf Minuten, bis der Wasserstand im Auffangbehälter unter Alarmniveau ist. -
Page 9: Lieferumfang
Wartung Reinigung Filtereinheit 2 Filtereinheit 1 Vorsicht: Das Klimagerät vor dem Reinigen ausschalten und vom Stromnetz trennen. Oberflächenreinigung Die Oberflächen des Klimageräts mit einem Staubwedel oder einem feuchten und weichen Tuch reinigen. Keine chemischen Mittel verwenden, wie Benzol, Alkohol, Benzin usw. Dies könnte zu einer Beschädigung der Oberflächen oder des Klimageräts führen. - Page 10 Fehlerbehebung Bitte überprüfen Sie Folgendes, bevor Sie einen Elektriker kontaktieren: : Fehler Überprüfung Lösungen Das Klimagerät Abgeschaltet? Gerät einschalten. funktioniert nicht Stecker nicht eingesteckt? Stecker richtig einstecken. Sicherung durchgebrannt oder Strom Sicherung austauschen oder abgestellt? Strom anstellen. Zeit richtig eingestellt? Zeiteinstellung Wasserstandalarm? ändern.
- Page 11 Safety Precautions Warning: Ensure that the unit is always placed on a sturdy, flat and horizontal surface. Ensure that the unit has a free space of at least 50 cm on each side. Only connect the device to an earthed socket! Before use, check whether the socket is not damaged and the voltage that you will be using corresponds to the specification plate on the unit.
- Page 12 Name of parts: 1. Air outlet 2. Control panel 3. Air inlet 4. Exhaust pipe 5. Swivel Wheels 6. Handle 7. Filter 8. Drain pipe 9. Power line with plug 10. Buckle of powerline 11. Exhaust outlet Control panel Attention: if the air conditioner is restarted immediately after shutdown in COOL mode, 3 min protection time is necessary before automatic start.
- Page 13 Remote control POWER Press this button to turn ON/OFF the air conditioner. TIMER Press this button to set timer. TEMPERATURE CONVERSION BUTTON is converted from ℃ to ℉. Temperature COOL Press this button to select COOL mode. DRY Press this button to select dry/dehumidify mode. Cool remote control FAN Press this button to select ventilator mode.
-
Page 14: Operating Methods
Operating methods Timer setting Setting timer ON When the air conditioner is in standby state, press the button TIMER, the timer LED lamp is on. Meanwhile the display will flicker “ ” for 5 times. At this moment press UP or DOWN to adjust time from 0.5h to 24h. Within 3 hours , the time changes 0.5h by pressing UP or DOWN. - Page 15 Installation Select mounted place Install the air conditioner in a flat and dry room. 50cm must be left around the air conditioner for air circulation, as shown in Fig.1 (before connection of exhaust pipe). Assembly method of exhaust pipe Connect exhaust pipe assembly with the round joint (as shown in Fig.2).
- Page 16 Illustration of installation Wall mounted Bow alignment Incorrect bending...
- Page 17 Drainage system Drainage When COOL or DRY is running in humid weather, more condensate will be produced. The water full alarm will be issued if the water reaches a certain level in the water tank, the compressor stops working. Water full indication on display screen will light up and an audible alarm will ring simultaneously for 10 times per 5min, till the level in water tank is lower than alarm level.
- Page 18 Maintenance Cleaning Filter Unit 2 Filter Unit 1 Caution: Before cleaning please turn off the air conditioner and pull out the plug. Cleaning surface Clean the surface of the air conditioner with a duster or a semi-wet soft cloth. ...
- Page 19 Fault removal Please check the following before contacting professional electricians: Faults Check Solutions The air conditioner Power off? Turn the power on. does not work Plug not inserted? Insert power plug steadily. Fuse burnt out or power supply turned Replace fuse or turn on off? power supply.
- Page 20 Veiligheidsmaatregelen Waarschuwing: Zorg ervoor dat hij op een stevige, vlakke en horizontale ondergrond staat. Zorg ervoor dat het apparaat tijdens de werking aan alle zijden minstens 50 cm. vrije ruimte heeft. Het apparaat dient volgens de geldende lokale- regionale en landelijke regels te worden. aangesloten.Zorg ervoor dat de stekker na het installeren van de airconditioner intact is en stevig in de stopcontact zit.
- Page 21 Onderdelen: 1. Lucht uitlaat 2. Controlepaneel 3. Luchtinlaat 4. Afvoerslang 5. Draaiwieltjes 6. Handvat 7. Filter 8. Afvoer 9. Stroomkabel met stekker 10. Opwindhaakjes voor stroomkabel 11. Lucht afvoer Controle paneel Opgelet: Als de airconditioner onmiddellijk wordt gestart, na het afsluiten van de KOEL-stand, dan start de automatische beveiliging voor 3 minuten.
- Page 22 Afstandsbediening POWER Druk op de knop om de airconditioner AAN of UIT te zetten. TIMER Druk op deze knop om de timer in te stellen TEMPERATURE CONVERSION BUTTON Met deze knop kunt u kiezen voor ℃ to ℉. COOL Druk op deze KOEL-stand te selecteren. DRY Druk deze knop om de ONTVOCHTIGINGS stand te starten.
- Page 23 Werkwijze Timer instelling Setting timer ON Als de airconditioner in de stand-by stand staat, drukt u op de toets TIMER, het timer LED-lampje branden. Intussen zal het display 5 keer “ ” flikkeren. Druk op dit moment op UP of DOWN om de tijd van 0,5 uur tot 24 uur aan te passen.
-
Page 24: Installatie
Installatie Plaatsing Plaats de airconditioner op vlakke en droge plaatsen. Houd de airconditioner 50cm weg van omliggende objecten voor de luchtcirculatie. Zie Fig.1 (voor het aansluiten van de afvoerslang). Aansluiten van de afvoerslang Bevestig de ronde verbindingsstuk aan de afvoerslang (zie Fig.2). ... - Page 25 Illustratie van de installatie VII) Muurmontage VIII) Boog opstelling Onjuiste buiging...
- Page 26 Drainage systeem Drainage/waterafvoer Tijdens het gebruik van COOL of DRY-stand in vochtig weer, wordt er meer water uit de lucht onttrokken. Het waterniveau alarm word geactiveerd wanneer het water een bepaald niveau in de watertank bereikt, de compressor stopt dan met werken. Het waterniveau alarm verschijn op de en een hoorbaar alarm zal 10 keer per 5 minuten afgaan, tot het niveau in de watertank onder niveau is.
- Page 27 Onderhoud Reinigen Filter Unit 2 Filter Unit 1 Waarschuwing: Zet de airconditioner uit en trek de stekker uit het stopcontact voor het reinigen. Oppervlaktereiniging Reinig het oppervlak van de airconditioner met een stofdoek of een semi-natte zachte doek. Gebruik geen chemische middelen, zoals benzol, alcohol etc.
- Page 28 Problemen oplossen: Controleer de volgende punten voordat u contact opneemt met een elektricien. Problemen Check Oplossing De airconditioner Uitgeschakeld? Zet het apparaat aan. werkt niet Stekker niet in het stopcontact? Stekker goed in het stopcontact steken. Zekering uitgevallen of stroomtoevoer Controleer de zekering en de uitgeschakeld? stroomtoevoer.
-
Page 29: Précautions De Sécurité Avertissement
Précautions de sécurité Avertissement : Veuillez placer le climatiseur sur des surfaces planes et sèches. Gardez le climatiseur à 50 cm des objets environnants. L'alimentation électrique du climatiseur doit être conforme aux consignes de sécurité de l'endroit où il est utilisé... -
Page 30: Panneau De Contrôle
Nom des pièces : 1. Sortie d’air 2. Panneau de contrôle 3. Entrée d’air 4. Tuyau d'échappement 5. Roues pivotantes 6. Poignée 7. Filtre 8. Tuyau d'évacuation 9. Ligne électrique avec fiche 10. Boucle de ligne électrique 11. Sortie d'échappement Panneau de contrôle Attention : si le climatiseur est redémarré... - Page 31 Télécomma POWER Appuyez sur ce bouton pour allumer/éteindre le climatiseur. TIMER Appuyez sur ce bouton pour régler le minuteur. TEMPERATURE CONVERSION BOUTON La température est convertie de ℃ à ℉. COOL Appuyez sur ce bouton pour sélectionner le mode COOL. DEHUMIDIFY Appuyez sur ce bouton pour sélectionner le mode DEHUMIDIFY.
-
Page 32: Méthodes De Fonctionnement Réglage Du Minuteur
Méthodes de fonctionnement Réglage du minuteur Réglage du minuteur sur OFF Lorsque le climatiseur est en cours d'exécution, appuyez sur la touche TIMER, la lampe LED du minuteur est Pendant ce temps, l'affichage clignotera allumée. « » 5 fois. Pendant ce temps, appuyez sur UP ou DOWN pour régler la durée de 0,5 heure à... - Page 33 Installation Sélectionnez le lieu du support Installez le climatiseur sur une surface plane et sèche. 50 cm doivent être laissés autour du climatiseur pour la circulation de l'air, comme le montre la figure 1 (avant la connexion du tuyau d'échappement). Méthode de montage du tuyau d'échappement ...
- Page 34 Illustration de l’installation Montage sur mur Alignement en arc XII) Courbe incorrecte...
- Page 35 Système de vidange Vidange Lorsque COOL ou SEC fonctionne par temps humide, plus de condensat sera produit. L'alarme d'eau pleine sera émise si l'eau atteint un certain niveau dans le bac à eau, le compresseur cesse de fonctionner. L'indication d'eau pleine sur l'écran d'affichage s'allume et une alarme sonore retentira simultanément 10 fois par minute jusqu'à...
- Page 36 Entretien Nettoyage Filtre Unité 2 Filtre Unité 1 Mise en garde : Avant de nettoyer, éteignez le climatiseur et retirez la fiche. Surface de nettoyage Nettoyez la surface du climatiseur avec un chiffon à poussière ou un chiffon doux semi- humide.
-
Page 37: Dépannage
Dépannage Veuillez vérifier les points suivants avant de contacter les électriciens professionnels : Pannes Vérification Solutions Le climatiseur ne L’alimentation est-elle coupée ? Mettez l'appareil sous tension. fonctionne pas La prise est-elle branchée ? Insérez la fiche d'alimentation de manière constante. Remplacez le fusible ou allumez Le fusible est-il brûlé...