Publicité

Les langues disponibles
  • FR

Les langues disponibles

  • FRANÇAIS, page 1

Liens rapides

FR
K
O
IT
UTIL
Manuel d'instructions et d'utilisation
EN
C
OMPACT
User and maintenance manual
IT
K
M
T
IT
INI
RAPANO
Manuale di istruzioni e di manutenzione
DE
K
OMPAKTWERKZEUG
B
EDIENUNGS
ES
H
ERRAMIENTA
MANUAL DE INSTRUCCIONES Y MANTENIMIENTO
Réf. / Atr. Nr. : PROMKIT300 / 570970
M
135W
ULTI USAGES
H
T
S
135W
OBBY
OOL
ET
M
ULTIUTENSILE
135W
-
W
UND
ARTUNGSANLEITUNG
C
M
U
OMPACTA
ULTI
135W
135W
SO

Publicité

Table des Matières
loading

Sommaire des Matières pour Ribitech PROMKIT300

  • Page 1 Manuel d’instructions et d’utilisation 135W OMPACT OBBY User and maintenance manual 135W RAPANO ULTIUTENSILE Manuale di istruzioni e di manutenzione 135W OMPAKTWERKZEUG EDIENUNGS ARTUNGSANLEITUNG 135W ERRAMIENTA OMPACTA ULTI MANUAL DE INSTRUCCIONES Y MANTENIMIENTO Réf. / Atr. Nr. : PROMKIT300 / 570970...
  • Page 2 AVERTISSEMENT: Lire et assimiler ce manuel avant d’assembler ou d’utiliser ce produit. Une utilisation incorrecte du produit pourrait causer de graves blessures et des dommages. Conserver ce manuel pour pouvoir le consulter ultérieurement. WARNING: Carefully read this instruction manual before operating this appliance. Incorrect operation may cause injury and/or damages.
  • Page 3: Caracteristiques

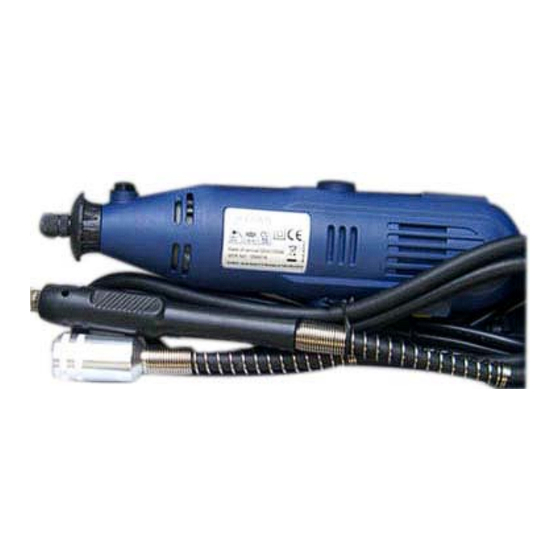
    5- Porte balais 6- Interrupteur Marche/Arrêt Fig.1 7- Câble d’alimentation 8- Crochet 9- Molette variateur de vitesse II. CARACTERISTIQUES Référence PROMKIT300 / 570970 Modèle / Type S1J-ZX1-3.2 Alimentation 230V ~ 50Hz Puissance 135W Classe de protection Vitesse à vide n...
  • Page 4: Consignes De Sécurité

    Symboles Ne pas exposer aux intempéries, à l’humidité (ex. : à la pluie, à la neige…) Ne pas utiliser dans des locaux humides ou mouillés Signale un risque de blessures graves et/ou dommages et/ou de détérioration de l’outil en cas de non respect des consignes Lire le mode d’emploi.
  • Page 5 Ne pas laisser les spectateurs toucher l'outil ou son câble d'alimentation ou la rallonge. Il est recommandé de maintenir tous les spectateurs (spécialement les enfants) éloignés de l’outil et de l'aire de travail. L’appareil ne doit pas être laissé à la portée des enfants ou dans l’environnement des enfants. Ne laissez jamais des enfants l’utiliser.
  • Page 6: Consignes Importantes Sur L'utilisation

    S'assurer que l'interrupteur est en position arrêt avant de brancher à la source d’alimentation. 17. Utilisation de rallonge Lorsque l'outil est utilisé avec une rallonge, n'utiliser que des rallonges conçues et prévues pour supporter le courant alimentant l’outil. 18. Rester vigilant Surveiller ce que vous faites.
  • Page 7 - meules pour détecter des éclats et des fissures, - les plateaux de ponçage pour détecter des fissures, une certaine usure ou des signes de forte usure, - les brosses métalliques pour détecter des fils détachés ou cassés. Si l’outil ou l’accessoire est tombé, contrôler s’il est endommagé ou bien changer pour un accessoire intact.
  • Page 8: Mise En Route

    27. Utilisez des supports pour les panneaux ou toute pièce de grandes dimensions, afin de réduire le risque de blocage de la meule et de contrecoup. 28. Si un capot de protection est recommandé pour le brossage métallique, évitez tout contact entre ce capot et la brosse métallique.
  • Page 9: Utilisation

    - Vérifier que l’arbre flexible [f] est bien inséré, centré et maintenu. - Placer la bague de serrage [g] du flexible sur l’appareil, puis serrer dans le sens des aiguilles d’une montre. - A l’autre extrémité du flexible, insérer la pince et l’accessoire adaptés au travail à réaliser. Reportez-vous au paragraphe 4.2 et 4.3 pour le changement de pince et d’accessoire.
  • Page 10: Entretien Et Entreposage

    Rappel : Ne pas forcer des outils ou accessoires légers à effectuer des travaux normalement réalisés avec des outils plus lourds. - Ne pas utiliser le produit et/ou accessoires sur les personnes et/ou les animaux. 5.2- Utilisation : 1. Porter les équipements de protection adéquats au travail à réaliser (lunette, masque, casque...) 2.
  • Page 11: Parts List

    4- Ventilation openings 5- Carbon brush holder 6- On/Off switch Fig.1 7- Power cord 8- Hook 9- Variable speed selector II. CHARACTERISTICS Reference PROMKIT300 / 570970 Model / Type S1J-ZX1-3.2 Power 230V ~ 50Hz Motor 135W Protection Class No load speed n...
  • Page 12: Safety Instructions

    Symbols Do not expose to weather conditions (ex.: storm, rain, snow …) or moisture. Do not use in damp or wet areas. Caution! Risk of injury and/or damage and/or deterioration of product in case of non compliance to safety requirements Read the instructions manual.
  • Page 13 All bystanders (esp. children) should be kept away from tool and work area. Keep the product away from children or from their environment. Never allow children to operate the appliance. Children should be supervised to ensure that they do not play with the appliance. 5.
  • Page 14 Before further use or reuse of the tool, tool should be carefully checked to determine that it will operate properly and perform its intended function. Check for alignment of moving parts, free running of moving parts, breakage of parts, mounting and any other conditions that may affect its operation.
  • Page 15: Getting Started

    If the power cable or extension cord is damaged or cut during operation, immediately disconnect plug from its main power source. Do not touch the cable or extension cord before unplugging from main power. 10. The use of this tool may create dust and projection of debris. Wear appropriate protective equipment (dust mask, safety goggles…).
  • Page 16 - Remove and/or insert a collet [b] in shaft [a] (different sizes of collets are available). - Press shaft lock button [3]. - Replace and then screw collet nut [1] (by hand or with wrench [c]. Note: Keep shaft lock engaged when you screw or unscrew the collet nut. 1- Collet nut 1- Collet nut 2- Housing cap...
  • Page 17 4.5- Switching on and off [6] To start tool: place ON / OFF switch [6] on “1”. To stop tool: place ON / OFF switch [6] on “0”. 4.6- Variable speed control [9] This tool is fitted with speed control selector [9]. You can adjust the speed by rotating the selector from position 1 to 6 to adjust best speed (from 8000 to 32500 rotations/minute).
  • Page 18: Maintenance And Storage

    - Do not put pressure on the shaft. Apply light force and guide tool. Increasing the pressure on tool is not the answer to enhance the performance of the tool. Apply light pressure and guide the accessory. - Do not hold tool close to face and body. - Small parts may fly apart as they come out with speed, wear appropriate protective equipment.
  • Page 19: Elenco Componenti

    4- Aperture 5- Porta spazzola 6- Interrutore avvio/arresto (On/Off) Fig.1 7- Cavo di alimentazione 8- Gancio 9- Regolatore della velocita II. CARATTERISTICHE Articolo PROMKIT300 / 570970 Modello S1J-ZX1-3.2 Tensione di Alimentazione 230V ~ 50Hz Potenza 135W Classe di protezione Velocità n...
  • Page 20: Istruzioni Di Sicurezza

    Simboli Non esporre a intemperie. (es.: pioggia, neve…) o umidita. Non utilizzare in locali umidi o bagnati. Attenzione! Rischio di lesioni e/o danni e/o deterioramento dell'attrezzo in caso di non conformità ai requisiti di sicurezza. Leggere il manuale d'istruzioni. Apparecchio di Classe di protezione II Indossare protezioni (maschera facciale, occhiali, tappi per orecchie) Indossare guanti protettivi e scarpe di protezione.
  • Page 21 5. Riporre gli utensili in un luogo sicuro. Gli utensili non utilizzati devono essere conservati in una stanza asciutta e chiusa a chiave, non accessibile ai bambini. 6. Non sovraccaricare l’utensile. Il lavoro sarà migliore e più sicuro, se si rispetta la gamma di applicazione specificata. 7.
  • Page 22 Non utilizzare l’utensile se non si è concentrati, si è stanchi o sotto l'influenza di alcol, medicinali o droghe. Mai trasportare l’elettroutensile mentre questo é ancora in funzione. 19. Controllare che il dispositivo non sia danneggiato. Prima di continuare ad utilizzare l’utensile, controllare attentamente che non ci siano danni e che i dispositivi di protezione funzionino correttamente.
  • Page 23 abbia subito nessun danno oppure utilizzare un accessorio intatto. Una volta controllato e montato l’accessorio, far funzionare l’elettroutensile per la durata di un minuto con il numero massimo di giri. 6. Sempre tenere l'attrezzo fermamente, afferrandolo sempre alle superfici di impugnatura isolate, in modo da evitare a colpi.
  • Page 24: Per Iniziare

    rimane bloccato. 28. Se impiega una calotta di protezione ascertarsi che la calotta di protezione e la spazzola metallica non possano toccarsi. IV. PER INIZIARE 4.1- Disimballagio Rimuovere il prodotto dal suo imballaggio. Controllare che l'attrezzo e gli accessori non siano danneggiati. 4.2- Per cambiare una pinza: (Fig.2&3) - Premere il pulsante di blocco dell'albero [3] - Svitare e smontare il dado di serraggio [1] della pinza (manualmente o con una chiave [c]).
  • Page 25 - D’altra parte, inserire una pinza e l’accessorio per il lavora da fare. - Verificare che l’accessorio sia bene inserite, centrato e avvitato. - Impugnare l’impugnatura addizionale [h] per lavorare. Nota: tenere il blocco dell'albero premito mentre si avvita e svita il dado della pinza. Fig.4 Fig.5 Fig.6...
  • Page 26: Pulizia E Conservazione

    Nota: Usare sempre la pinza che si adatta alle dimensioni dellalbero e dell’accessorio che si intende usare. Non forzare un accessorio con gambo di diametro superiore della pinza. 3. Preparare il materiale da lavorare. 4. Fissare fermamente il materiale (con tenute, vizio,...), se necessario. Non utilizzare il suo peso o corpo per mantenere il materiale.
  • Page 27 3- Schaft Feststellknopf Lüftungsschlitze 5- Kohlenbürsten-Kappe 6- Ein/Aus Schalter Fig.1 7- Stromkabel 8- Halterung 9 Elektronische Geschwindigkeitseinstellung II. TECHNISCHE DATEN Art.Nr. PROMKIT300 / 570970 Modell / Typ S1J-ZX1-3.2 Stromversorgung 230V ~ 50Hz Motor 135W Schutzklasse Geschwindigkeit ohne Belastung 8000-32500 min Spannfutter-Größe 3,2mm Maximale Schleifkörper-Abmessung...
  • Page 28 Symbole Nicht bei schlechtem Wetter verwenden (z.B. Sturm, Regen, Schnee …) und nicht der Feuchtigkeit aussetzen. Nicht in feuchter oder nasser Umgebung verwenden. Achtung! Bei Nichtbeachtung der Sicherheitsanforderungen besteht die Gefahr von Verletzungen und/oder Geräteschäden Bedienungsanleitung sorgfältig lesen. Gerät der Isolierstoffklasse II mit doppelter Isolierung Schutzkleidung tragen: Gesichtsmaske, Ohren- und Augenschutz Schutzhandschuhe und Sicherheitsschuhe tragen.
  • Page 29 Körperkontakt mit geerdeten Oberflächen vermeiden (z.B. Rohre, Heizung, Herd, Kühlschrank). 4. Gerät von Kindern fernhalten Lassen Sie keine Unbefugten das Gerät oder das Strom- bzw. Verlängerungskabel berühren. Unbefugte (vor allem Kinder) vom Gerät und von der Arbeitsumgebung fernhalten. Kinder vom Gerät fernhalten. Lassen Sie niemals Kinder das Gerät benutzen. Achten Sie darauf, dass Kinder nicht unbeaufsichtigt mit dem Gerät spielen.
  • Page 30 Der Hauptschalter muss ausgeschaltet sein, wenn das Gerät eingestöpselt wird. 17. Verwendung von Verlängerungskabeln Bei der Verwendung eines Verlängerungskabels darauf achten, dass das Kabel den Spezifizierungen des Gerätes entspricht. Bei Verwendung im Freien nur Verlängerungskabel verwenden, die dafür geeignet sind. 18.
  • Page 31 Kontrollieren Sie vor jeder Verwendung Zubehör wie : - Schleifscheiben auf Absplitterungen und Risse, - Schleifteller auf Risse, Verschleiß oder starke Abnutzung, - Drahtbürsten auf lose oder gebrochene Drähte. Wenn das Elektrowerkzeug oder das Zubehör herunterfällt, überprüfen Sie, ob es beschädigt ist, oder verwenden Sie ein unbeschädigtes Zubehör.
  • Page 32 27. Stützen Sie Platten oder große Werkstücke ab, um das Risiko eines Rückschlags durch eine eingeklemmte Trennscheibe zu vermindern. 28. Wird eine Schutzhaube empfohlen, verhindern Sie, dass sich Schutzhaube und Drahtbürste berühren können. IV. SO GEHT'S LOS Vor jedem Eingriff am Gerät Netzstecker ziehen. 4.1- Auspacken - Nehmen Sie das Gerät aus der Verpackung.
  • Page 33 - Prüfen Sie, ob die flexible schaft [f] ist sehr gut integriert, konzentriert und nachhaltig. - Stellen Sie den Spannring [g] Schlauch auf das Gerät, ziehen Sie dann in Richtung Uhrzeigersinn. - Insert Am anderen Ende des Schlauches, der muffe und das Zubehör für die geleistete Arbeit. Siehe 4.2 und 4.3 für die Änderung der Muffe-und zubehor - Prüfen Sie, ob das Zubehör eingefügt wird, konzentriert und nachhaltig.
  • Page 34: Wartung Und Lagerung

    V. INBETRIEBNAHME 5.1- Verwendungszweck - Das Gerät ist nur für den Hausgebrauch geeignet. - Das Gerät ist für leichte Arbeiten der Bohrungen vorgesehen, Schleifen, Schnitzen, Gravieren, Fräsen, Schneiden/Trennen, Reinigen/Säubern und Polieren auf Holz, Metall, Kunststoff oder Stein. Achtung : Kleine Geräte nicht für Arbeiten einsetzen, für die Hochleistungsgeräte benötigt werden. - Verwenden Sie nicht das Produkt und / oder Zubehör auf Einzelpersonen und / oder Tieren 5.2- Inbetriebnahme: 1.
  • Page 35: Lista De Piezas

    6- Interruptor (encendido/apagado) Fig.1 7- Cable de alimentación 8- Gancho 9- Control electrónico de velocidad variable 10- Mango auxiliar II. CARACTERÍSTICAS Referencia PROMKIT300 / 570970 Modelo / Tipo S1J-ZX1-3.2 Potencia 230V ~ 50Hz Motor 135W Clase de protección Velocidad en vacío n 8000-32500 min Tamaño de la pinza...
  • Page 36: Instrucciones De Seguridad

    Símbolos No exponer a la intemperie (ej.: tormenta, lluvia, nieve) o humedad. No utilizar en áreas húmedas o mojadas. ¡Precaución! Riesgo de lesiones y/o de daños y/o deterioro en la máquina si no se cumplen los requisitos de seguridad. Lea el manual de instrucciones. Herramienta de Clase II con aislamiento doble.
  • Page 37 de trabajo. Mantenga la herramienta fuera del alcance de los niños. Nunca permita que los niños utilicen la herramienta. Los niños deben ser supervisados para asegurarse de que no juegan con la herramienta. 5. La herramienta debe estar parada cuando se guarde. Cuando se no utilice, la herramienta se debe guardar en un lugar seco, alto y cerrado, fuera del alcance de los niños.
  • Page 38 Utilice un alargador diseñado para uso exterior. 18. Esté atento. Vigile lo que esté haciendo. Actúe con sentido común. No utilice la herramienta si está cansado o bajo la influencia del alcohol, medicación o drogas. No transportar la herramienta eléctrica mientras esté funcionando. 19.
  • Page 39 Una vez controlado y montado el acesorio, hacer funcionar la herramienta en vacío, a las revoluciones máximas, durante un minuto. 6. Sujéte siempre firmemente la herramienta, por las empuñaduras aisladas o boquilla, para evitar "retrocesos". Nota: Cuando sujete la herramienta, tenga cuidad en no cubrir los orificios de ventilación con la mano.
  • Page 40: Procedimientos Iniciales

    IV. PROCEDIMIENTOS INICIALES Antes de manipular la herramienta asegúrese de que está desconectada del suministro eléctrico. 4.1- Desembalaje - Saque el producto de su embalaje. - Compruebe que el producto y los accesorios no presenten daños. 4.2- Cambio de pinza [Fig.2+3] - Mantenga presionado el botón de bloqueo del eje [3].
  • Page 41 - Asegúrese de que el acesorio esté bien inserido, centrado y apretado. - Sujetar el eje flexible por la boquilla [h]. Nota: cuando atornille o desatornille la tuerca de retenciòn de la pinza, mantenga bloqueado el eje [a] insertando una varilla en el orificio [i] Fig.4 Fig.5 Fig.6...
  • Page 42: Mantenimiento Y Almacenamiento

    5.2- Funcionamiento: 1. Lleve equipo de protección adecuado. 2. Inserte el acesorio en la pinza. Nota: Utilice siempre la boquilla que coincida con el tamaño del vástago del accesorio que va a utilizar. No fuerze un vástago de gran diámetro en una boquilla de diámetro inferior. 3.

Ce manuel est également adapté pour:

570970

Table des Matières