DELTA DORE PoE SW4 Guide D'installation
Masquer les pouces Voir aussi pour PoE SW4:
Table des Matières

Publicité

Les langues disponibles
  • FR

Les langues disponibles

  • FRANÇAIS, page 1

Liens rapides

PoE SW4
Guide d'installation
FR
Installation guide
EN
Installationsanleitung
DE
Guida di installazione
IT
Manual de instalación
ES
Instrukcja instalacji
PL
Installatiegids
NL
Bruksanvisning
NO
Asennusopas
FI

Publicité

Table des Matières
loading

Sommaire des Matières pour DELTA DORE PoE SW4

  • Page 1 PoE SW4 Guide d’installation Installation guide Installationsanleitung Guida di installazione Manual de instalación Instrukcja instalacji Installatiegids Bruksanvisning Asennusopas...
  • Page 2: Caractéristiques Techniques

    Caractéristiques techniques Interfaces Port RJ45 10/100 Mbps Port prioritaire Port 1 Performance Stocker et transférer Supporté Table MAC Apprentissage MAC Auto-apprentissage Capacité de 1 Gbps commutation Puissance PoE PoE standard IEEE 802.3af, IEEE 802.3at Mode d’alimentation Prend en charge l’alimentation 8 broches, les broches 1,2,3,6 et les broches 4,5,7,8 peuvent être alimentées simultanément Port PoE...
  • Page 3: Table Des Matières

    Présentation 2 - Contenu de l’emballage 3 - Description 3.1 Face avant 3.2 Face arrière 4 - Préconisation d’installation 4.1 Pour assurer un fonctionnement optimal 4.2 Type de câble à utiliser 5 - Installation 5.1 Montage en coffret VDI 5.2 Raccordement 5.3 Mode étendu En raison de l’évolution des normes et du matériel, les caractéristiques indiquées par le texte et les images de ce document ne nous engagent qu’après confirmation par nos...
  • Page 4: Présentation

    La puissance maximale pour l’ensemble des 4 sorties est de 60 W . Le PoE SW4 prend en charge le mode Extend. Avec le mode étendu et un câble Ethernet de catégorie 6, la distance de transmission des données peut atteindre 300 mètres.
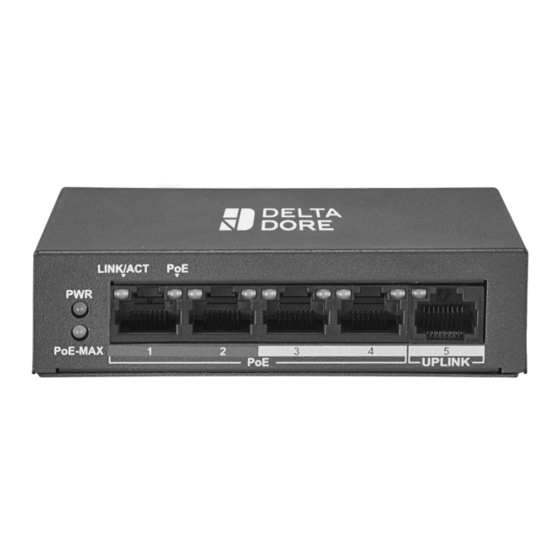
  • Page 5: Description

    Ports PoE - 1, 2, 3, 4. Port 5 (UPLINK) routeur 3.2 Face arrière Sélecteur mode étendu. Reportez-vous au § 5.3. Prise de terre: Connexion du boîtier PoE SW4 à la prise de terre. Prise alimentation: Utilisez l’adaptateur d’alimentation 230V fourni.
  • Page 6: Préconisation D'installation

    4 - Préconisation d’installation 4.1 Pour assurer un fonctionnement optimal • Installez le PoE SW4 en intérieur dans • Utilisez l’adaptateur d’alimentation un environnement sec, bien ventilé et inclus pour alimenter l’appareil. sans poussière. Assurez-vous que la tension d’entrée correspond à la valeur indiquée sur •...
  • Page 7: Installation

    5.1 Montage en coffret VDI Vous pouvez installer le PoE SW4 en coffret de communication VDI (Voix, Données, Image). - Respectez un espace de 10cm de chaque coté des grilles d’aération. - Raccordez le boîtier du PoE SW4 à la prise de terre. Routeur...
  • Page 8: Raccordement

    5.2 Raccordement Connectez le port 5 (UPLINK) à votre routeur à l’aide d’un câble Ethernet RJ45. Connectez votre caméra au port 1 (port PoE prioritaire) avec un câble Ethernet de catégorie 5 ou supérieur. Si besoin, vous pouvez connecter tout autre périphérique compatible (Caméra, Téléphone IP, Point d’accès sans fil, etc...) sur les ports 2, 3 et 4.
  • Page 10: Technical Characteristics

    Technical characteristics Interfaces 10/100 Mbps RJ45 port Priority port Port 1 Energy Store and transfer Supported MAC table MAC learning Automatic identification Switching capacity 1 Gbps PoE power PoE standard IEEE 802.3af, IEEE 802.3at PoE power supply mode Supports the 8-pin power supply, pins 1,2,3,6 and pins 4,5,7,8 can be supplied simultaneously PoE port...
  • Page 11 1 - Presentation 2 - Package contents 3 - Description 3.1 Front panel 3.2 Rear panel 4 - Installation recommendations 4.1 To achieve optimum operation: 4.2 Cable type to use 5 - Installation 5.1 Mounting in VDI unit 5.2 Connection 5.3 Extended mode Because of changes in standards and equipment, the characteristics given in the text and the illustrations in this document are not binding unless confirmed.
  • Page 12: Presentation

    1 - Presentation The PoE SW4 can supply power, via the Ethernet RJ45 link, to the TYCAM 1100 INDOOR and TYCAM 2100 OUTDOOR cameras or any PoE (Power over Ethernet) device (4 max.) compatible with standards PoE 802.3af and PoE 802.3at.
  • Page 13: Description

    PoE ports - 1, 2, 3, 4. Port 5 (UPLINK) router 3.2 Rear panel Extended mode selector. Refer to § 5.3. Earth connection: Connection of the PoE SW4 unit to the earth connection. Power outlet: Use the 230 V power supply adapter supplied.
  • Page 14: Installation Recommendations

    4 - Installation recommendations 4.1 To achieve optimum operation: • Install the PoE SW4 indoors in • Use the power supply adaptor a dry, well-ventilated, dust-free included to supply power to the environment. device. Ensure that the input voltage matches •...
  • Page 15: Installation

    5 - Installation 5.1 Mounting in VDI unit You can install the PoE SW4 in a VDI communication unit (Voice, Data, Image). - Respect a distance of 10 cm on each side of the ventilation slots. - Connect the PoE SW4 unit to the earth connection.
  • Page 16: Connection

    5.2 Connection Connect port 5 (UPLINK) to your router using an Ethernet RJ45 cable. Connect your camera to port 1 (PoE port has priority) with a category 5 or above Ethernet cable. If necessary, you can connect any other compatible peripheral device (camera, IP phone, wireless access point, etc.) to ports 2, 3 and 4.
  • Page 18: Technische Daten

    Technische Daten Schnittstellen RJ45-Anschluss 10/100 Mbps Prioritärer Port Port 1 Leistung Speichern und Unterstützt übertragen MAC-Tabelle MAC-Einlernen Automatisches Einlernen Schaltkapazität 1 Gbit/s PoE-Leistung Standard-PoE IEEE 802.3af, IEEE 802.3at PoE-Stromversorgung Unterstützt die 8-polige Stromversorgung, die Pins 1, 2, 3 und 6 sowie 4, 5, 7 und 8 können gleichzeitig versorgt werden.
  • Page 19 1 - Präsentation 2 - Packungsinhalt 3 - Beschreibung 3.1 Vorderseite 3.2 Rückseite 4 - Installationshinweis 4.1 Für den optimalen Betrieb: 4.2 Zu verwendende Kabel 5 - Installation 5.1 Montage im VDI-Gehäuse 5.2 Anschluss 5.3 Erweiterter Modus Aufgrund möglicher Weiterentwicklungen von Normen und Produkten sind die in der vorliegenden Anleitung aufgeführten Angaben und Bilder nur bei entsprechender Bestätigung von uns verbindlich.
  • Page 20: Präsentation

    1 - Präsentation Der PoE SW4 versorgt die Kameras TYCAM 1100 INDOOR und TYCAM 2100 OUTDOOR bzw. alle mit der PoE-Technologie (Power over Ethernet) kompatiblen Geräte (max. 4), gemäß den Standards PoE 802.3af und PoE 802.3at. Der Strom- und Datenfluss geschieht gleichzeitig über die Ports 1, 2, 3 und 4.
  • Page 21: Beschreibung

    3 - Beschreibung 3.1 Vorderseite Kontrollleuchte Status Beschreibung Leuchtet Das Gerät wurde ordnungsgemäß mit der durchgehend Stromversorgung verbunden. Das Gerät wurde nicht richtig verbunden oder wird nicht mit Strom versorgt. Leuchtet Die PoE-Leistung erreicht ihren unteren Grenzwert PoE-MAX durchgehend (6 W). Blinkt Die PoE-Leistung erreicht ihren oberen Grenzwert (60 W).
  • Page 22: Installationshinweis

    4 - Installationshinweis 4.1 Für den optimalen Betrieb: • Installieren Sie den PoE SW4 in • Verwenden Sie das im Lieferumfang einem trockenen, gut belüfteten und des Gerätes enthaltene Netzteil. staubfreien Innenraum. Stellen Sie sicher, dass die Eingangsspannung mit dem auf dem •...
  • Page 23: Installation

    5.1 Montage im VDI-Gehäuse Sie können den PoE SW4 in einer VDI-Kommunikationsbox installieren (Sprache, Daten, Bilder). - Beachten Sie einen Abstand von 10 cm auf jeder Seite der Lüftungsschlitze. - Verbinden Sie das Gehäuse des PoE SW4 mit der Erdung. Router...
  • Page 24: Anschluss

    5.2 Anschluss Verbinden Sie den Port 5 (UPLINK) über ein Ethernetkabel (RJ45) mit Ihrem Router. Verbinden Sie Ihre Kamera mit dem Port 1 (prioritärer PoE-Port) mit einem Ether- netkabel der Kategorie 5 oder höher. Bei Bedarf können Sie ein beliebiges kompatibles Gerät (Kamera, IP-Telefon, Wire- less Access Point ...) an die Ports 2, 3 und 4 anschließen.
  • Page 26: Caratteristiche Tecniche

    Caratteristiche tecniche Interfacce Porta RJ45 10/100 Mbps Porta prioritaria Porta 1 Prestazioni Salvare e trasferire Supportato Table MAC Apprendimento MAC Auto-apprendimento Capacità di 1 Gbps commutazione Potenza PoE PoE standard IEEE 802.3af, IEEE 802.3at Modalità di Supporta l’alimentazione 8 pin, i pin 1,2,3,6 alimentazione PoE e i pin 4,5,7,8 possono essere alimentati simultaneamente...
  • Page 27 1 - Presentazione 2 - Contenuto della confezione 3 - Descrizione 3.1 Lato anteriore 3.2 Lato posteriore 4 - Consigli di installazione 4.1 Per assicurare un funzionamento ottimale 4.2 Tipo di cavo da utilizzare 5 - Installazione 5.1 Montaggio in scatola VDI 5.2 Collegamento 5.3 Modalità...
  • Page 28: Presentazione

    La potenza massima per l’insieme delle 4 uscite è di 60 W . Il PoE SW4 supporta la modalità Extend. Con la modalità estesa e un cavo Ethernet di categoria 6, la distanza di trasmissione dei dati può raggiungere 300 metri.
  • Page 29: Descrizione

    3 - Descrizione 3.1 Lato anteriore Spia Stato Descrizione Accesa fissa L’apparecchio è collegato correttamente all’alimentazione elettrica. Spenta L’apparecchio è collegato in modo scorretto, oppure non è collegato all’alimentazione elettrica. Accesa fissa La potenza PoE raggiunge il suo valore limite inferiore PoE-MAX (6W).
  • Page 30: Consigli Di Installazione

    4 - Consigli di installazione 4.1 Per assicurare un funzionamento ottimale • Installate il PoE SW4 all’interno in un • Utilizzate l’adattatore di ambiente asciutto, ben ventilato e alimentazione incluso per alimentare privo di polvere. l’apparecchio. Assicuratevi che la tensione •...
  • Page 31: Installazione

    5.1 Montaggio in scatola VDI Potete installare il PoE SW4 nella scatola di comunicazione VDI (Voce, Dati, Immagine). - Mantenete uno spazio di 10 cm su ogni lato delle griglie di aerazione. - Collegate la scatola del PoE SW4 alla presa di terra. Router...
  • Page 32: Collegamento

    5.2 Collegamento Collegate la porta 5 (UPLINK) al vostro router usando un cavo Ethernet RJ45. Collegate la vostra telecamera alla porta 1 (porta PoE prioritaria) con un cavo Ethernet di categoria 5 o superiore. Se necessario, potete collegare ogni altra periferica compatibile (Telecamera, Telefono IP, Punto di accesso senza filo, ecc.) sulle porte 2, 3 e 4.
  • Page 34: Características Técnicas

    Características técnicas Interfaces Puerto RJ45 10/100 Mbps Puerto prioritario Puerto 1 Rendimiento Almacenar y transferir Compatible Tabla MAC Aprendizaje MAC Auto-aprendizaje Capacidad de 1 Gbps conmutación Potencia PoE PoE estándar IEEE 802.3af, IEEE 802.3at Modo de alimentación Admite la alimentación de 8 terminales; los terminales 1, 2, 3, 6 y los terminales 4, 5, 7, 8 se pueden alimentar de forma simultánea Puerto PoE...
  • Page 35 1 - Presentación 2 - Contenido del paquete 3 - Descripción 3.1 Parte frontal 3.2 Parte trasera 4 - Recomendaciones de instalación 4.1 Para garantizar un funcionamiento óptimo: 4.2 Tipo de cable a utilizar 5 - Instalación 5.1 Montaje en caja VDI 5.2 Conexión 5.3 Modo extendido Debido a la evolución de las normas y del material, las características indicadas en el...
  • Page 36: Presentación

    La potencia máxima para las 4 salidas es de 60 W. El módulo PoE SW4 admite el modo Extendido. Con el modo extendido y un cable Ethernet de categoría 6, la distancia de transmisión de datos puede llegar a 300 metros.
  • Page 37: Descripción

    Puerto 5 (UPLINK) router 3.2 Parte trasera Selector de modo extendido. Consulte el apdo. 5.3. Toma de tierra: Conexión del módulo PoE SW4 a la toma de tierra. - Toma de alimentación: Use el adaptador de alimentación de 230 V suministrado.
  • Page 38: Recomendaciones De Instalación

    4 - Recomendaciones de instalación 4.1 Para garantizar un funcionamiento óptimo: • Instale el módulo PoE SW4 en el • Conecte la alimentación del aparato interior en un entorno seco, bien una vez realizadas todas las demás ventilado y sin polvo.
  • Page 39: Instalación

    5 - Instalación 5.1 Montaje en caja VDI Puede instalar el módulo PoE SW4 en una caja de comunicación VDI (Voz, Datos, Imagen). - Respete un espacio de 10 cm a cada lado de las rejillas de aireación. - Conecte la caja del módulo PoE SW4 a la toma de tierra.
  • Page 40: Conexión

    5.2 Conexión Conecte el puerto 5 (UPLINK) al router con un cable Ethernet RJ45. Conecte la cámara al puerto 1 (puerto PoE prioritario) con un cable Ethernet de categoría 5 o superior. Si es preciso, puede conectar cualquier otro periférico compatible (cámara, teléfono IP, punto de acceso inalámbrico, etc...) en los puertos 2, 3 y 4.
  • Page 42: Dane Techniczne

    Dane techniczne Interfejsy Port RJ-45 10/100 Mb/s Port priorytetowy Port 1 Wydajność Przechowywanie i Obsługiwane przesyłanie Tabela MAC Uczenie MAC Uczenie automatyczne Zdolność przełączania 1 Gb/s Moc PoE Norma PoE IEEE 802.3af, IEEE 802.3at Tryb zasilania PoE Obsługa zasilania 8-stykowego, styki 1, 2, 3, 6 oraz styki 4, 5, 7, 8 mogą...
  • Page 43 1 - Prezentacja 2 - Zawartość opakowania 3 - Opis 3.1 Przód 3.2 Tył 4 - Zalecenia dotyczące instalacji 4.1 Aby zapewnić optymalne działanie: 4.2 Typ przewodu jakiego należy użyć 5 - Instalacja 5.1 Montaż w skrzynce VDI 5.2 Podłączenie 5.3 Tryb rozszerzony Z uwagi na możliwe zmiany norm i sprzętu, parametry podane w tekście lub na ilustracjach zawartych w niniejszym dokumencie są...
  • Page 44: Prezentacja

    Zasilanie i dane mogą przechodzić równocześnie przez porty 1, 2, 3 i 4. Maksymalna moc łączna wszystkich 4 wyjść wynosi 60 W. Przełącznik PoE SW4 obsługuje tryb Extend (rozszerzony). W trybie rozszerzonym i z użyciem przewodu Ethernet kategorii 6 odległość przesyłania danych może osiągać...
  • Page 45: Opis

    PoE. Porty PoE — 1, 2, 3, 4 Port 5 (UPLINK) — router 3.2 Tył Przełącznik trybu rozszerzonego Patrz § 5.3. Uziemienie Podłączenie obu- dowy przełącznika PoE SW4 do uziemienia. Gniazdo zasilania Używać zasilacza 230 V z zestawu.
  • Page 46: Zalecenia Dotyczące Instalacji

    4 - Zalecenia dotyczące instalacji 4.1 Aby zapewnić optymalne działanie: • Zamontować przełącznik PoE SW4 w • Do zasilania urządzenia używać pomieszczeniu, w miejscu suchym z zasilania z zestawu. dobrą wentylacją i niezapylonym. Upewnić się, że napięcie wejściowe odpowiada wartości podanej na •...
  • Page 47: Instalacja

    5 - Instalacja 5.1 Montaż w skrzynce VDI Przełącznik PoE SW4 można montować w skrzynce komunikacji VDI (wideo, dane, obraz). — Przestrzegać odległości 10 cm z każdej strony kratek wentylacyjnych. — Podłączyć obudowę przełącznika PoE SW4 do uziemienia. Router...
  • Page 48: Podłączenie

    5.2 Podłączenie Podłączyć port 5 (UPLINK) do router za pomocą przewodu Ethernet RJ-45. Podłączyć kamerę do portu 1 (priorytetowy port PoE) za pomocą przewodu Ethernet kategorii 5 lub wyższej. W razie potrzeby do portów 2, 3 i 4 można podłączyć dowolne inne kompatybilne urządzenie peryferyjne (kamerę, telefon IP, punkt dostępu bezprzewodowego itp.).
  • Page 50: Technische Kenmerken

    Technische kenmerken Interfaces RJ45-poort 10/100 Mbps Prioritaire poort Poort 1 Performance Opslag en overdracht Ondersteund MAC-tabel MAC leren Zelf lerend Schakelcapaciteit 1 Gbps PoE-vermogen PoE-standaard IEEE 802.3af, IEEE 802.3at PoE voedingsmodus Ondersteunt 8-pins voeding, de pennen 1,2,3,6 en pennen 4,5,7,8 kunnen gelijktijdig worden gevoed PoE-poort 1 - 2 - 3 - 4...
  • Page 51 1 - Voorstelling 2 - Inhoud van de verpakking 3 - Omschrijving 3.1 Voorzijde 3.2 Achterzijde 4 - Aanbevelingen voor installatie 4.1 Voor een optimale werking 4.2 Te gebruiken kabel 5 - Installatie 5.1 Montage in VDI-box 5.2 Aansluiting 5.3 Extend-modus Wegens de evolutie van de normen en van het materiaal verplichten de kenmerken, zoals aangegeven in de teksten en afbeeldingen van dit document, ons pas na bevestiging door onze diensten.
  • Page 52: Voorstelling

    De SW4 PoE ondersteunt de Extend-modus. Met Extend-modus en Category 6 Ethernet-kabel kan de datatransmissie-afstand tot 300 meter zijn. Dit apparaat is "plug & play" en vereist geen speciale configuratie. 2 - Inhoud van de verpakking PoE SW4 230V netadapter...
  • Page 53: Omschrijving

    3 - Omschrijving 3.1 Voorzijde Lampje Status Omschrijving Brandt Het apparaat is correct op de voeding aangesloten. stabiel Gedoofd Het apparaat is niet goed aangesloten of is niet op de voeding aangesloten. Brandt Het PoE-vermogen bereikt de onderste grenswaarde (6W). PoE-MAX stabiel Knippert...
  • Page 54: Aanbevelingen Voor Installatie

    4 - Aanbevelingen voor installatie 4.1 Voor een optimale werking • Installeer de PoE SW4 binnenshuis • Gebruik de meegeleverde in een droge, goed geventileerde en voedingsadapter om het apparaat van stofvrije omgeving. stroom te voorzien. Zorg ervoor dat de ingangsspanning •...
  • Page 55: Installatie

    5 - Installatie 5.1 Montage in VDI-box U kunt de PoE SW4 installeren in een VDI-communicatiekast (spraak, gegevens, afbeelding). - Laat een ruimte van 10 cm aan elke kant van de ventilatieroosters. - Sluit de PoE SW4-box aan op de aardverbinding.
  • Page 56: Aansluiting

    5.2 Aansluiting Verbind poort 5 (UPLINK) met uw router via een RJ45 Ethernet-kabel. Sluit uw camera aan op poort 1 (prioritaire PoE-poort) met een Ethernet-kabel van categorie 5 of hoger. Indien nodig kunt u elk ander compatibel apparaat (camera, IP-telefoon, draadloos toegangspunt, enz.) verbinden met poorten 2, 3 en 4.
  • Page 58: Tekniske Spesifikasjoner

    Tekniske spesifikasjoner Grensesnitt RJ45-port 10/100 Mbps Prioritert port Port 1 Ytelse Lagre og overføre Støttet MAC-bord MAC-opplæring Selvlæring Kommuteringskapasitet 1 Gbps PoE styrke PoE standard IEEE 802.3af, IEEE 802.3at PoE tilførselsmodus Støtter tilførsel med 8 pins. Pins 1, 2, 3 og 6, og pins 4, 5, 7 og 8 kan få...
  • Page 59 1 - Presentasjon 2 - Emballasjens innhold 3 - Beskrivelse 3.1 Forside 3.2 Bakside 4 - Installasjonsråd 4.1 For å sikre optimal funksjon 4.2 Kabeltype som skal brukes 5 - Installasjon 5.1 Montering i VDI-boks 5.2 Tilkobling 5.3 Utvidet modus Som en følge av endringer av standarder og på...
  • Page 60: Presentasjon

    1 - Presentasjon PoE SW4 gjør det mulig å tilføre strøm, via Ethernet RJ45-forbindelsen, til TYCAM 1100 INNENDØRS og TYCAM 2100 UTENDØRS eller til ethvert PoE- kompatibelt utstyr (Power over Ethernet) (maks. 4) med standardene PoE 802.3af og PoE 802.3at.
  • Page 61: Beskrivelse

    PoE-effekten på den tilhørende porten er over 30 W. Slukket Ingen POE-kompatibel komponent er tilkoblet. PoE-porter - 1, 2, 3, 4. Port 5 (UPLINK) router 3.2 Bakside Utvidet modusvelger. Se § 5.3. Jordkontakt: Tilkobling av PoE SW4-boksen til en jordforbindelse. Strømkontakt: Benytt alltid den vedlagte 230V strømadapteret.
  • Page 62: Installasjonsråd

    4 - Installasjonsråd 4.1 For å sikre optimal funksjon • Installer PoE SW4 innendørs i et tørt, • Koble strømtilførselen til apparatet støvfritt og godt ventilert miljø. etter å ha utført alle andre tilkoblinger. • Forsikre deg om at apparatet er riktig festet til et rack eller plassert på...
  • Page 63: Installasjon

    5 - Installasjon 5.1 Montering i VDI-boks Du kan installere PoE- SW4 i VDI-kommunikasjonsboks (Stemme, Data, Bilde). - Respekter en avstand på 10 cm på hver side av lufteristene. - Koble PoE SW4-boksen til jordkontakten. LINK/ACT POE STATUS LINK/ACT PoE MAX...
  • Page 64: Tilkobling

    5.2 Tilkobling Koble port 5 (UPLINK) til router med en Ethernet-kabel RJ45. Koble kameraet til port 1 (prioritert PoE-port) med en Ethernet-kabel i kategori 5 eller høyere. Du kan tilkoble annet kompatibelt utstyr (kamera, IP-telefon, trådløst tilgangspunkt, osv...) til portene 2, 3 og 4 ved behov. Koble til den vedlagte 230V strømadapteren.
  • Page 66: Tekniset Ominaisuudet

    Tekniset ominaisuudet Rajapinnat RJ45-portti 10/100 Mbit/s Ensisijainen portti Portti 1 Suorituskyky Tallentaa ja siirtää Tuettu MAC-taulukko MAC-oppiminen Itseoppiminen Välityskyky 1 Gb/s PoE-teho PoE-standardi IEEE 802.3af, IEEE 802.3at PoE-virransyöttötila Tukee 8-koskettimista virransyöttöä, koskettimet 1,2,3,6 ja koskettimet 4,5,7,8 voidaan virroittaa samanaikaisesti PoE-portti 1 - 2 - 3 - 4 Portin 30 W...
  • Page 67 1 - Esittely 2 - Pakkauksen sisältö 3 - Kuvaus 3.1 Etusivu 3.2 Takasivu 4 - Asennussuositus 4.1 Optimaalisen toiminnan varmistamiseksi 4.2 Käytettävä kaapelityyppi 5 - Asennus 5.1 Asennus video-, data- ja kuva-asennuskaappiin 5.2 Liitäntä 5.3 Laajennettu tila Standardien ja laitteiston kehittymisen vuoksi tämän asiakirjan tekstissä ja kuvissa ilmoitetut ominaisuudet eivät ole sitovia ilman antamaamme erillistä...
  • Page 68: Esittely

    1 - Esittely PoE SW4 mahdollistaa virransyötön Ethernet RJ45 -yhteyden kautta TYCAM 1100 INDOOR- ja TYCAM 2100 OUTDOOR -kameroille tai mille tahansa PoE (Power over Ethernet) -laitteelle (enint. 4 kpl), joka on standardien PoE 802.3af ja PoE 802.3at mukainen. Virtaa ja dataa voidaan siirtää samanaikaisesti porteista 1, 2, 3 ja 4.
  • Page 69: Kuvaus

    Vastaavan portin PoE-antoteho ylittää 30 W. Sammutettu Yhtään PoE-yhteensopivaa oheislaitetta ei ole kytketty. POE-portit 1, 2, 3, 4. Portti 5 (PLINK) reititin 3.2 Takasivu Laajennetun tilan valitsin Katso kohta 5.3. Maadoitusliitäntä: PoE SW4 -kotelon maadoitusliitäntä. Virtaliitäntä: Käytä mukana toimitettua 230 V:n verkkolaitetta.
  • Page 70: Asennussuositus

    • Pistorasiaan kytkettäessä pistorasian siivoat. on oltava laitteen lähellä ja helppopääsyisessä paikassa. 4.2 Käytettävä kaapelityyppi Valitse asianmukainen kaapelityyppi kytkettävä laitteen ja PoE SW4:n välisen etäisyyden perusteella. - 200 metriin saakka: Käytä kategorian 5 Ethernet-kaapelia. - 200–300 metriä: Käytä kategorian 6 Ethernet-kaapelia.
  • Page 71: Asennus

    5 - Asennus 5.1 Asennus video-, data- ja kuva-asennuskaappiin PoE SW4 voidaan asentaa video-, data- ja kuva-asennuskaappiin. - Jätä 10 cm tilaa ilmanvaihtoristikoiden kummallekin sivulle. - Liitä PoE SW4 -kotelon maadoitus. Reititin...
  • Page 72: Liitäntä

    5.2 Liitäntä Kytke portti 5 (UPLINK) reititin Ethernet RJ45 -kaapelilla. Kytke kamerasi porttiin 1 (ensisijainen PoE-portti) vähintään luokan 5 Ethernet-kaapelilla. Tarvittaessa voit kytkeä minkä tahansa muun yhteensopivan oheislaitteen (kameran, IP-puhelimen, langattoman liityntäpisteen jne.) portteihin 2, 3 ja 4. Kytke mukana toimitettu 230 V:n verkkolaite. RJ45 RJ45 RJ45...
  • Page 76 www.deltadore.com...

Table des Matières