Table des Matières
Publicité
Les langues disponibles
Les langues disponibles
Liens rapides
OSCILLATING CERAMIC
TOWER HEATER
WARNING
CAUTION
USER MANUAL
Model No. KPT-5167L
ON/OFF
MODE
UP
TIMER
DOWN
OSCIL
Read and understand this entire user manual, including all safety information,
before
electric shock, or serious personal injuries.
Keep this user manual for future reference.
KM051919_KPT-5167L
Publicité
Table des Matières

Sommaire des Matières pour Konwin KPT-5167L
- Page 1 OSCILLATING CERAMIC TOWER HEATER USER MANUAL Model No. KPT-5167L ON/OFF MODE TIMER DOWN OSCIL Read and understand this entire user manual, including all safety information, WARNING before electric shock, or serious personal injuries. CAUTION Keep this user manual for future reference.
-
Page 2: Important Instructions
Thank you for choosing a KONWIN Product. This user manual will provide you with valuable information necessary for the proper care and maintenance of your new product. Thoroughly read the instructions and familiarize yourself with all the operational aspects of your new product. - Page 3 10. DO NOT insert or allow foreign objects to enter any ven- tilation or exhaust opening as this may cause an electric shock or re, or damage the heater. 11. To prevent a possible re, DO NOT block the air intakes or exhaust in any manner.
-
Page 4: Safety Features
SPECIFICATIONS Voltage Frequency Wattage(Max) 120 Vac 60Hz 1500W SAFETY FEATURES Tip-Over Safety Feature This heater is equipped with a shut-off safety feature. Once the heater is tipped over, an internal switch will automatically shut the heater off. Once the heater is restored to an upright position, the heater will reset. -
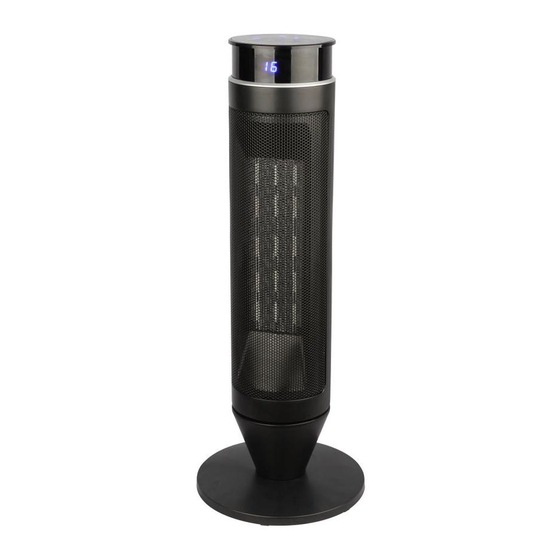
Page 5: Product Diagram
IN THE BOX • Oscillating ceramic tower heater • Remote control (battery included User manual PRODUCT DIAGRAM Control Buttons REMOTE CONTROL and LED Display ON/OFF MODE Temperature TIMER DOWN OSCIL Display Handle Air Outlet POWER SWITCH Base Air Intake Front View Back View... -
Page 6: Led Display
CONTROL BUTTONS AND LED DISPLAY LED Display Control Buttons CONTROL BUTTON FUNCTION ON/OFF Turns the heater and display ON or OFF. Selects between Fan, Low Heat, and High Heat Mode modes. Oscillating Starts and stops oscillation. Timer Sets the hour value for the timer. odour may be present. -
Page 7: Temperature Display
TEMPERATURE DISPLAY LED display DISPLAY FUNCTION Temp D Decreases to the desired temperature. Temp UP Increases to the desired temperature. The temperature adjustment can only be operated by remote control. -
Page 8: Remote Control
REMOTE CONTROL ON/OFF MODE TIMER DOWN OSCIL Remote Control CONTROLS FUNCTION ON/OFF Used ower ON or OFF. DOWN Decreases set temperature. Increases set temperature. OSCIL Selects oscillation mode. MODE Selects an, ow eat or igh eat mode. TIMER Sets Remote Control Battery Cover CR2025 PULL... - Page 9 INSTRUCTIONS FOR USE 1. Pla surface. 2. Pull out the insula the remote control battery compartment as shown below. Remote Control Insulating Film Battery Cover PULL Insulating Film Turn on the power switch at the back of the unit With the power in the OFF position, plug the unit directly into a 120 VAC electrical outlet.
- Page 10 SELECTING THE DESIRED TEMPERATURE UNIT AND FUNCTION REMOTE 1. Set the temperature by pressing the + or - button on the remote control (NOT the control button on the product). The LED d The temperature can be set from 10°C to 49°C. NOTE: Once the temperature has been set, the heater will remain on until the room temperature increases to the set temperature.
- Page 11 SETTING THE OSCILLATING FUNCTION UNIT REMOTE FUNCTION Press the oscillating button. When the heater is ON and in oscillating mode, the indicator is lit. The indicator is OFF when the oscillating mode is turned OFF.
- Page 12 MAINTENANCE Turn the POWER to the OFF position. Unplug the unit and let it cool completely. To keep the heater clean, the outer shell may be cleaned with a soft, damp cloth. A mild detergent can be used if necessary. After cleaning, dry the unit with a soft cloth.
- Page 13 TROUBLESHOOTING If the heater will not operate, please check the following: Check if the power cord is plugged into an electrical outlet. If not, plug the unit into an appropriate outlet. Check if electricity to the outlet is working. Ensure power is turned to the ON position. Make sure the heater is placed on a flat, solid surface.
- Page 14 Any extended warranties (warranties that cover above and be- yond this manufacturer warranty) that are sold through a retailer or third party are not directly correlated with this Konwin limited warranty, and may be redirected to the said retailer or third party for coverage.
-
Page 15: Customer Service And Support
Model number & serial number (located on front panel, rear panel or on box) Date of purchase Retailer Daytime phone number Email address Copy of receipt Detailed description of issue/symptom Distributed by: Ningbo Konwin Electrical Appliance Co., Ltd. Ningbo, China 315315 MADE IN CHINA... - Page 16 COLONNE DE CHAUFFAGE OSCILLANTE À CÉRAMIQUE MANUEL DU PROPRIETAIRE ON/OFF MODE TIMER DOWN OSCIL Veuillez lire et bien comprendre tout ce manuel d'utilisation, y compris toutes les AVERTISSEMENT informations de sécurité, avant de brancher ou d'utiliser ce produit. Le non-respect des consignes risque de provoquer un incendie, un choc électrique ou des blessures graves.
-
Page 17: Consignes Importantes
Merci d’avoir choisi un produit KONWIN. Ce manuel d'utilisation vous fournira les informations nécessaires au bon entretien de votre nouveau produit. Veuillez prendre le temps de lire entièrement ces instructions et de vous familiariser avec les différentes fonctions de votre nouveau produit. - Page 18 9. Ne PAS placer le cordon sous un tapis. Ne PAS couvrir le cordon d' une couverture, d'un tapis de passage,ou tout autre objet.Disposer le corder à l'écart des zones de circulation et là où il n'y a pas de risque de trébuchement. 10.
- Page 19 19. Ne PAS utiliser à l’extérieur. 20. AVERTISSEMENT : Pour réduire les risques d’incendie et d’électrocution, ne PAS utiliser cet appareil avec un régulateur de vitesse à semi-conducteurs. 21. Ne PAS tenter de réparer ou de régler une fonction électrique ou mécanique de l'appareil, car, cela annulerait votre garantie.
-
Page 20: Dispositifs De Sécurité
SPÉCIFICATIONS Tension Fréquence Watt.(Max) 120 V à CA 60Hz 1500W DISPOSITIFS DE SÉCURITÉ Protection anti-basculement Cet appareil de chauffage est équipé d'un dispositif de sécurité d'arrêt. Si l'appareil de chauffage se renverse, un interrupteur interne éteint automatiquement l’appareil. L'appareil de chauffage se réinitialise lorsqu'il est remis en position verticale. -
Page 21: Dans La Boîte
DANS LA BOÎTE • Colonne de chauffage oscillante à céramique • Télécommande (pile incluse) Manuel d'utilisation SCHÉMA DU PRODUIT Boutons de commande et affichage DEL Télécommande ON/OFF MODE Affichage de la TIMER DOWN OSCIL température Poignée Sortie d'air COMMUTATEUR Base Entrée d'air Vue de face Vue arrière... -
Page 22: Boutons De Commande Et Affichage Led
BOUTONS DE COMMANDE ET AFFICHAGE LED Affichage LED Boutons de commande BOUTON DE COMMANDE FONCTION Allume ou éteint l'appareil de chauffage et ON/OFF l'affchage. Sélectionne parmi les modes Ventilation, Chaleur Mode faible et chaleur élevée. Oscillation Démarre et arrêter l'oscillation. Horaire Règle l'heure de la minuterie. -
Page 23: Affichage De La Température
AFFICHAGE DE LA TEMPÉRATURE Affichage DEL AFFICHAGE FONCTION DOWN (diminution Diminue à la température désirée. de la température) UP (augmentation Augmente à la température désirée. de la température) Le réglage de la température ne peut être effectué que par télécommande. -
Page 24: Télécommande
Télécommande ON/OFF MODE TIMER DOWN OSCIL Télécommande CONTRÔLES FONCTIONS Allumer ou étein l'appareil de chauffage et l'af chage. Diminue à la température désirée. Augmente à la température désirée. Sélectionne le mode d'oscillation. Sélectionner parmi les modes de ventilation, Télécommande Couvercle de la pile CR2025 TIRER •... -
Page 25: D'utilisation
D’UTILISATION Placer le produit sur une surface ferme et Retirer le lm isolant du compartiment à piles de la télécommande comme illustré ci-dessous. Télécommande Film isolant Couvercle de la POUSSER Film isolant Allume à l'arrière de l' Avec l'alimentation en position OFF , brancher l'unité... -
Page 26: Sélection De La Température Désirée
SÉLECTION DE LA TEMPÉRATURE DÉSIRÉE APPAREIL ET FONCTION TÉLÉCOMMANDE 1. Régler la température en appuyant sur le bouton + ou - de la télécommand REMARQUE : REMARQUE : RÉGLAGE DE LA La fonction de minuterie de mise hors tension permet à l'appareil de ATTENTION chauffage de s'éteindre après un certain temps et ne peut être réglé... -
Page 27: Réglage De La Fonction Oscillante
RÉGLAGE DE LA FONCTION OSCILLANTE UNITÉ TÉLÉCOMMANDE FONCTIONS Appuyez sur le bouton Oscillation. Lorsque le chauffage est allumé et en mode Oscillation, l'indicateur est allumé. L'indicateur est éteint lorsque le mode Oscillation est désactivé. -
Page 28: Entretien
ENTRETIEN 1. Mettez la PUISSANCE en position OFF. 2. Débranchez l'appareil et laissez-le refroidir complètement. 3. Pour garder le chauffeur propre, la coque extérieure peut être nettoyée avec un chiffon doux et humide. Un détergent doux peut être utilisé si nécessaire. 4. -
Page 29: Dépannage
DÉPANNAGE ne fonctionne pas, veuillez véri er les points Véri e r si le cordon d'alimentation est branché dans une , branche r l'appareil prise électrique. prise appropriée. Véri e r si l'électricité de la prise fonctionne. que l'alimentation est que l'appareil de chau age est placé... -
Page 30: Garantie Limitée Du Fabricant
GARANTIE LIMITÉE DU FABRICANT Garantie limitée de 1 an : Konwin garantit ce produit contre les défauts de matériaux et de fabrication sur les , pour une période d'un an à compter de la date d'achat originale. Votre reçu de vente indiquant la date d'achat du produit est votre preuve d'achat. -
Page 31: Service Et Soutien À La Clientèle
Veuillez lire attentivement le manuel d'utilisation avant d'installer ou d'utiliser ce produit. Pour le support de garantie, veuillez suivre les directives suivantes : Contacter le soutien technique des produits Konwin Site Internet : Courriel : Service@konwinchina.com Heures d'ouverture :de 9 h à 17 h (HNC), du lundi au vendredi Veuillez fournir les renseignements suivants : •...