Publicité
Liens rapides
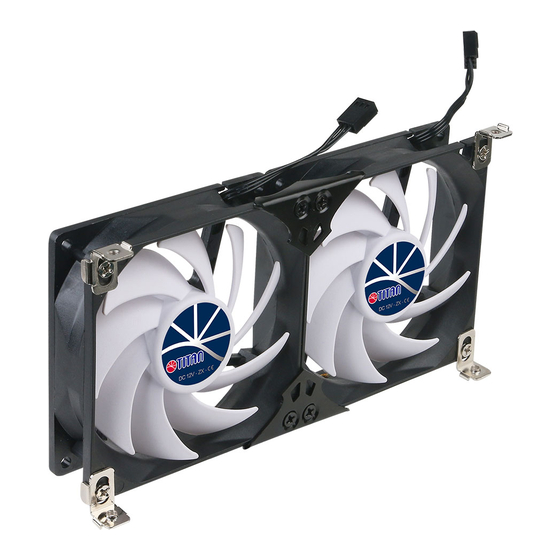
Multi-Purpose Rack Fan for Vent
(TTC-SC22 Series)
Assembly Guide
A
B
C
D
Lieferumfang
A Lüftergehäuse
B Hakenleisten
C Kopfschrauben
D Drehzahlregler
E doppelseitiges Klebeband
F M5-Schrauben
Fan base
Hook clip
Cap screw
Speed controller
G Vibrationsdämpfer
x 1
x 4
x 4
x 1
E
F
G
A Tuuletinjalka
B Koukkukiinnitys
C Syöttöruuvi
Double-sided tape
M5 screw
Rubber mat
D Nopeudensäädin
x 1
x 2
x 2
E Kaksipuolinen liimaside
F M5 ruuvi
G Kumimatto
Fan Installation
Fan base basic installation illustration
Fan Installation Flow
1
● Adhere rubber mats G on the grille side of fan base.
● Kleben Sie die Vibrationsdämpfer G in die Mitte auf der Rückseite des Lüfterrahmens.
G
● Приклейте резиновые коврики G к стороне основания вентилятора, где предусмотрена решетка.
● Pegue las alfombrillas de goma G en el lado de la base del ventilador que está provisto de una rejilla.
● Applicare le gomme antiscivolo G sul lato del ventilatore che prevede una griglia.
● Liimaa kumimatto G tuuletinjalan sivulle, tarjoten kitkaa.
● Collez les supports en caoutchouc G sur le côté du fond du ventilateur qui prévoit une grille.
● 將橡膠墊"G"貼至風扇主體背面(十字面)
● Gゴムマットを本体の十字面に貼り付ける
2
● Screw the 4 hook clips B and cap screws C on the front side of the fan frame.
● Befestigen Sie die 4 Hakenleisten B und Kopfschrauben C an der Vorderseite des Lüfterrahmens
● Сначала прикрутите крюковые зажимы B и фиксирующий винт C на одну сторону вентилятора.
● Previamente atornille la pinza de gancho B y el tornillo de retención C a un lado del ventilador.
● Avvitare prima i morsetti ad uncino B e la vite d'unione C su un lato del ventilatore.
● Ruuvaa ensin koukkukiinnitykset B ja syöttöruuvi C tuulettimen sivulle.
● Vissez d'abord les pinces à crochet B et la vis de raccord C sur l'un des côtés du ventilateur.
● 將"B"件與"C"件先行鎖上風扇主體一側
● 予めBフッククリップとCキャプねじを本体の1側に締め付ける
B
C
Instruction of Use
Количество элементов модели
Modelo Posición Cantidad
Lettera Componente Quantità
x1
A Основание вентилятора
x1
A Base del ventilador
x1
A Base del ventilatore
x4
B Крюковые зажимы
x4
B Pinzas de gancho
x4
B Morsetto ad uncino
x4
C Фиксирующий винт
x4
C Tornillo de retención
x4
C Vite d'unione
x1
D Регулятор скорости
x1
D Regulador de velocidad
x1
D Regolatore di velocità
x1
E Двусторонний скотч
x1
E Cinta adhesiva de dos caras
x1
E Nastro biadesivo
x2
F M5 Винт
x2
F Tornillo M5
x2
F Vite M5
x2
G Резиновые коврики
x2
G Alfombrillas de goma
x2
G Gomma antiscivolo
組み立て方
Modèle Éléments Quantités
組裝零件
A 本体
x1
A Fond de ventilateur
x1
A 風扇主體
x1
B フッククリップ
x4
B Pinces à crochet
x4
B 金屬扣件
x4
C キャプねじ
x4
C Vis de raccord
x4
x4
C 手轉螺絲
D スピードコントローラー
x1
D Régulateur de vitesse
x1
D 調速器
x1
E 両面テープ
x1
E Ruban adhésif double-face
x1
E 雙面膠帶
x1
F M5 ねじ
x2
F Vis M5
x2
F M5 螺絲
x2
G ゴムマッ ト
x2
G Supports en caoutchouc
x2
x2
G 橡膠墊
3
● Remove the ventilation grille of your vehicle and put the fan frame on the backside of the ventilation grille. You
● Bauen Sie das Lüftungsgitter an Ihrem Fahrzeug aus und legen Sie den Lüfterrahmen auf die Rückseite des
● Поместите вентилятор на вентиляционное отверстие. Прикрепите боковую часть к зажиму на вентиляции.
● Ponga el ventilador en el orificio de ventilación. Fije el lado con las pinzas en el sistema de ventilación. ● Porre
● Aseta tuuletin venttiiliin. Kiinnitä sen sivu kiinnittäjillä venttiiliin.
● Placez le ventilateur sur l'ouverture d'aération. Fixez le côté avec les pines sur la ventilation.
● 將風扇主體放至排風處,以金屬扣件固定至排風處
● 本体を換気口に置き、金属の掛け金で換気口と固定する
x1
x4
x4
4
x1
● Hook the 4 hooks of the hook clips B safelely into the ventilation grille and secure it by tightening the cap screws C. For
x1
x2
● Haken Sie alle 4 Haken der Befestigungsleisten B fest in das Lüftungsgitter ein und drehen Sie die 4 Kopfschrauben C
x2
● Прикрутите крюковые зажимы B и фиксирующий винт на отверстие решетки. Для детальной установки,
● Atornille las pinzas de gancho B y los tornillos de retención C en el orificio de la rejilla. Para una indicación de
x1
● Avvitare i morsetti ad uncino B e le viti d'unione C ben stretti all'apertura della griglia. Per indicazioni di installazione
x4
x4
x1
● Ruuvaa koukkukiinnittäjät B ja syöttöruuvi C kiinni kitka-aukkoon. Tarkempi asennusvinkki, katso kohta 1.
x1
● Vissez les pinces à crochet B et les vis de raccord C sur l'ouverture de la grille. Notice détaillée d'installation, veuillez
x2
x2
● 將另一側金屬扣件B以及金屬螺絲C,將其固定鎖上
● 反対側にBフッククリップとCキャプねじを締め付ける
5
● Use a screwdriver to screw the cap screw C orderly.
● Benutzen Sie einen Schraubenzieher, um die Kopfschrauben C ordnungsgemäß zu befestigen.
● Используйте отвертку для правильной фиксации фиксирующего винта C.
● Para una fijación correcta de los tornillos de retención C, por favor, utilice un destornillador.
● Per un corretto fissaggio delle viti d'unione C, utilizzare un cacciavite.
● Kunnollisesti kiinnittääksesi syöttöruuvin C käytä ruuvimeisseliä.
● Pour une fixation conforme des vis de raccord C, veuillez utiliser un tournevis.
● 用螺絲起子, 將 金屬螺絲C依序鎖固。
● ドライバーで、 Cキャプねじをしっかり締め付ける
6
● The installation is ready now please complete it by reinserting the ventilation grille into your vehicle.
● Der Doppellüfter ist nun fertig montiert. Bitte setzen Sie abschließend das Lüftungsgitter wieder in ihr Fahrzeug
● Теперь установка готова. Завершите ее, поместив вентиляционную решетку в Ваше транспортное
● La instalación está ahora lista. Por favor, complétela poniendo las rejas de ventilación en su automóvil.
● L'installazione è ora terminata. È necessario completarla inserendo la griglia di areazione nell'apparecchio.
● Asennus on nyt valmis. Viimeistele liu'uttamalla tuuletusritilä ajoneuvoon.
● L'installation est maintenant prête. Veuillez la compléter en poussant la grille de ventilation dans le véhicule.
● 風扇安裝完成
● ファンの組立が完成 !
● Illustration (1) If the other side of hook clips cannot be fastened at ventilation grille successfully, please try to
● Zeichnung (1) Wenn sich die eine Seite der Hakenleisten nicht richtig in das Lüftungsgitter einhaken lässt,
● Изображение (1) В случае, если крюковые скобы не могут быть как следует прикреплены к
● Imagen (1) Si no se puede fijar bien la otra cara de las pinzas de gancho en las rejas de ventilación, intente por
● Figura (1) Nel caso in cui l'altro lato del gancio ad uncino non si sia agganciato correttamente alla griglia di
Illustration (1)
● Kuva (1) Jos koukkujen toista puolta ei voida liittää onnistuneesti tuuletusritilään, yritä löystää L-muotoisen
● Illustration (1) Si l'autre côté des pinces à crochet ne peut pas être fixé avec succès sur la grille du ventilateur,
● 備註(一) 如另一側金屬扣件無法順利扣上,請用螺絲起子鬆開L型鐵片上的螺絲,左右移動調整距離。
● 備考(一)もし反対側の掛金が順調にフック出来ない場合は、ドライバーでL型鉄片のねじを緩め、 左右に移動し
might cut 4 holes into the insect net of the ventilation grille at those positions you intend to attach the double fan.
Lüftungsgitters. Schneiden Sie evtl. 4 Löcher in den Insektenschutzeinsatz des Lüftungsgitters, und zwar an den
Stellen, an denen Sie den Doppellüfter einbauen möchten
il ventilatore sull'apertura dell'areazione. Fissarne il lato all'apertura con i morsetti.
detailed installation, please check Illustration (1)
fest. Eine detaillierte Abbildung zur Montage finden Sie unter Zeichnung (1)"
пожалуйста, проверьте Изображение (1) "
instalación detallada, por favor, comprobar referencia (1)
dettagliate, controllare il riferimento (1).
contrôler la référence (1).
另一側風扇組裝注意事項,請見備註(一)
ein.
средство.
loosen the screws on L type clip to adjust the right distance.
versuchen Sie bitte, die Schrauben am L-förmigen Teil der Hakenleisten (B) zu lösen und anschließend den
richtigen Abstand durch Verschieben nach links oder rechts einzustellen. Befestigen Sie danach die Schrauben
wieder.
вентиляционной решетке, попробуйте ослабить винты на L-образном зажиме, чтобы установить
правильное расстояние.
favor destornillar los tornillos del clip en forma de L para configurar la distancia correcta.
areazione, è necessario tentare di svitare le viti della clip a forma di L per impostare la distanza corretta.
kiinnikkeen ruuvit oikean etäisyyden säätämiseksi.
essayez de retirer les vis sur le clip en forme de L pour régler la distance correcte."
て、最適な距離を調整してみてください。
Publicité

Sommaire des Matières pour Titan TTC-SC22 Série
- Page 1 ● Remove the ventilation grille of your vehicle and put the fan frame on the backside of the ventilation grille. You might cut 4 holes into the insect net of the ventilation grille at those positions you intend to attach the double fan. ●...
- Page 2 Speed Controller MANUAL ● Guide cables through backside-opening Screw the lower controller case with M5 Fan base basic installation illustration ● (Please do like that if you want to guide the cables Screws F through the with “+” marked holes AUTO through the opening at the backside of the controller.