Waring Commercial CTS1000 Mode D'emploi
Masquer les pouces Voir aussi pour CTS1000:

Publicité

Les langues disponibles

Les langues disponibles

Liens rapides

COMMERCIAL CONVEYOR TOASTER
TOSTADORA CON TRANSPORTADOR COMERCIAL
GRILLE-PAIN À CONVOYEUR À USAGE COMMERCIAL
CTS1000/CTS1000CND/CTS1000B
For your safety and continued enjoyment of this product,
always read the instruction book carefully before using.
Para su seguridad y para disfrutar plenamente de este producto,
siempre lea las instrucciones cuidadosamente antes de usarlo.
Afin que votre appareil vous procure en toute sécurité beaucoup de
satisfaction, lire attentivement le mode d'emploi avant de l'utiliser.

Publicité

Table des Matières
loading

Sommaire des Matières pour Waring Commercial CTS1000

  • Page 1 COMMERCIAL CONVEYOR TOASTER TOSTADORA CON TRANSPORTADOR COMERCIAL GRILLE-PAIN À CONVOYEUR À USAGE COMMERCIAL CTS1000/CTS1000CND/CTS1000B For your safety and continued enjoyment of this product, always read the instruction book carefully before using. Para su seguridad y para disfrutar plenamente de este producto, siempre lea las instrucciones cuidadosamente antes de usarlo.
  • Page 2: Important Safeguards

    IMPORTANT SAFEGUARDS When using electrical appliances, basic safety precautions should always be followed, including the following: Read all instructions. 1. Unplug from outlet when not in use and before cleaning. Allow unit to cool before unplugging, cleaning or handling. Do not unplug until the READY/HOT light has turned off indicating that the unit has cooled off completely.
  • Page 3 12. Oversized bread, metal foil packages or utensils must not be inserted in a toaster as they may involve a risk of fire or electrical shock. 13. Do not attempt to dislodge food when toaster is plugged into electrical outlet. 14.
  • Page 4: Short Cord Instructions

    28. Neglecting to keep fan opening clean could result in toaster failure. SAVE THESE INSTRUCTIONS FOR COMMERCIAL USE ONLY Item Electrical Plug Type Listings CTS1000 120 Volt, 15A, 1800W NEMA 5-15P UL, NSF CTS1000CND 120 Volt, 12.5A, 1500W NEMA 5-15P UL, CUL, NSF CTS1000B 208 Volt, 13A, 2700W...
  • Page 5: Electric Power

    ELECTRIC POWER If the electrical circuit is overloaded with other appliances, your appliance may not operate. It should be operated on an electrical circuit that is free from other appliances. If you are not sure of the reason for overloading or cannot find a separate circuit, contact a qualified electrician.
  • Page 6 PARTS (CTS1000/CTS1000CND) 1. Wire Bread Feeder 2. Reflector/Crumb Tray 3. Toast Drawer 4. POWER ON Indicator Light 5. Temperature READY Indicator Light 6. ON/OFF Toggle Switch 7. Conveyor Speed Control Knob 8. Standby Switch 9. Adjustable Feet...
  • Page 7 PARTS (CTS1000B) 1. Wire Bread Feeder 2. Reflector/Crumb Tray 3. Toast Drawer 4. POWER ON Indicator Light 5. Temperature READY/HOT Light 6. Conveyor Speed Control Knob 7. Power Control Knob 8. Function Control Knob 9. Feet...
  • Page 8 OPERATION INSTRUCTIONS CTS1000/CTS1000CND There are four unattached feet. Each has a screw protruding from the top for assembly. Locate the four screw holes at each corner of the bottom housing. Insert the screw and turn clockwise until snug. Repeat for remaining feet.
  • Page 9 10. If toast is too light or too dark, adjust the speed control. Turn the knob to the right for lighter toasting. Turn the knob to the left for darker toasting. For best results, use day-old bread stored at room temperature. Standby Function 11.
  • Page 10: Important

    Toasting 8. P lace bread, bagel or muffin to be toasted on wire bread feeder. The conveyor toaster will automatically pull bread into the toasting chamber at the speed set by the conveyor speed control knob. 9. W hen complete, toast will slide down bread chute into the toast drawer.
  • Page 11: Cleaning Instructions

    • Switch toaster to the OFF position, allow the toaster to cool completely and unplug. CAUTION: DO NOT ATTEMPT TO CLEAR THE JAM UNTIL THE TOASTER HAS COOLED THOROUGHLY. • To clear jam, remove reflector/crumb tray and, using a long object, preferably made of wood, dislodge object causing jam.
  • Page 12: Medidas De Seguridad Importantes

    MEDIDAS DE SEGURIDAD IMPORTANTES Siempre que use aparatos eléctricos, debe tomar precauciones básicas de seguridad, entre las cuales las siguientes: Lea todas las instrucciones. 1. Desconecte el aparato cuando no esté en uso y antes de limpiarlo. Permita que el aparato enfríe antes de limpiarlo o manipularlo.
  • Page 13 como cortinas, colgaduras o paredes. No guarde ningún artículo sobre el aparato cuando esté encendido o mientras esté caliente. No haga funcionar el aparato bajo un armario. 12. N o inserte alimentos muy grandes, papel de aluminio o utensilios de metal en el aparato. Esto podría provocar un incendio o una descarga eléctrica.
  • Page 14 GUARDE ESTAS INSTRUCCIONES PARA USO COMERCIAL SOLAMENTE Modelo Especificaciones Tipo de Homologaciones eléctricas enchufe CTS1000 120V, 15A, 1800W NEMA 5-15P UL, NSF CTS1000CND 120V, 12.5A, 1500W NEMA 5-15P UL, CUL, NSF CTS1000B 208V, 13A, 2700W NEMA 6-20P UL, CUL, NSF CABLE ELÉCTRICO CORTO...
  • Page 15: Uso De Extensiones

    USO DE EXTENSIONES No se recomienda utilizar una extensión eléctrica con este aparato. RIESGO DE SOBRECARGA ELÉCTRICA Procure no utilizar muchos aparatos al mismo tiempo. Esto podría provocar una sobrecarga eléctrica. Le recomendamos que conecte la freidora sobre un circuito eléctrico separado. Si no halla un circuito separado, o si no sabe porque ocurre una sobrecarga eléctrica, comuníquese con un electricista.
  • Page 16 PIEZAS (CTS1000/CTS1000CND) 1. Rejilla de alimentación 2. Bandeja recogemigas/Reflector 3. Bandeja de retorno 4. Luz de encendido POWER ON 5. Luz de listo READY 6. Botón de encendido/apagado 7. Control de velocidad de la cinta 8. Botón de espera 9. Pies ajustables...
  • Page 17 PIEZAS (CTS1000B) 1. Rejilla de alimentación 2. Bandeja recogemigas/Reflector 3. Bandeja de retorno 4. Luz de encendido POWER ON 5. Luz de listo/caliente READY/HOT 6. Control de velocidad de la cinta 7. Botón de encendido/apagado & control de tostado 8. Selector de función 9.
  • Page 18 INSTRUCCIONES DE OPERACIÓN CTS1000/CTS1000CND El aparato cuenta con cuatro pies que necesitan instalarse antes del primer uso. Cada pies cuenta con un tornillo de montaje. Voltee la plancha y ubique los orificios para tornillo en cada esquina de la base. Introduzca el tornillo en el orificio y gire en sentido horario para apretar.
  • Page 19 10. Si el pan es demasiado claro o demasiado tostado, cambie la velocidad de la cinta. Gire la perilla de control de velocidad de la cinta hacia la derecha para tostar más, o hacia la izquierda para tostar menos. Para lograr resultados óptimos, utilice pan del día anterior, conservado a temperatura ambiente.
  • Page 20 9. La bandeja de retorno recogerá la tostada. 10. Si el pan es demasiado claro o demasiado tostado, cambie la velocidad de la cinta y el grado de tostado. Modo de espera 11. Durante largos periodos de inactividad, se puede poner el aparato en espera, reduciendo el consumo de energía en un 75%.
  • Page 21 PRECAUCIÓN: NO INTENTE DESALOJAR LOS ALIMENTOS ATASCADOS HASTA QUE EL APARATO ESTÉ COMPLETAMENTE FRÍO. • Retire la bandeja recogemigas y desaloje los alimentos atascados con un utensilio de madera largo. Instrucciones de limpieza • PRECAUCIÓN: Apague el aparato y espere que la luz READY/ HOT se apague antes de desconectar el aparato.
  • Page 22: Importantes Consignes De Sécurité

    IMPORTANTES CONSIGNES DE SÉCURITÉ L'utilisation d'appareils électriques requiert la prise de précautions élémentaires, parmi lesquelles les suivantes : Lire toutes les instructions. 1. Débrancher l'appareil lorsque vous ne l'utilisez pas et avant de le nettoyer. Laisser l’appareil refroidir avant de le débrancher et avant toute manipulation ou entretien.
  • Page 23 11. Afin d'éviter les risques d'incendie, ne pas couvrir l'appareil et le tenir éloigné des matériaux inflammables tels que les rideaux ou les murs pendant l'utilisation. Ne pas faire fonctionner l'appareil sous un placard de cuisine ou une armoire murale. 12.
  • Page 24: Cordon Électrique

    28. Nettoyer régulièrement la grille de ventilation pour prévenir la surchauffe de l’appareil. GARDER CES INSTRUCTIONS POUR USAGE COMMERCIAL UNIQUEMENT Modèle Spécifications Type de prise Homologations électriques CTS1000 120V, 15A, 1800W NEMA 5-15P UL, NSF CTS1000CND 120V, 12.5A, 1500W NEMA 5-15P UL, CUL, NSF CTS1000B 208V, 13A, 2700W...
  • Page 25: Utilisation De Rallonges

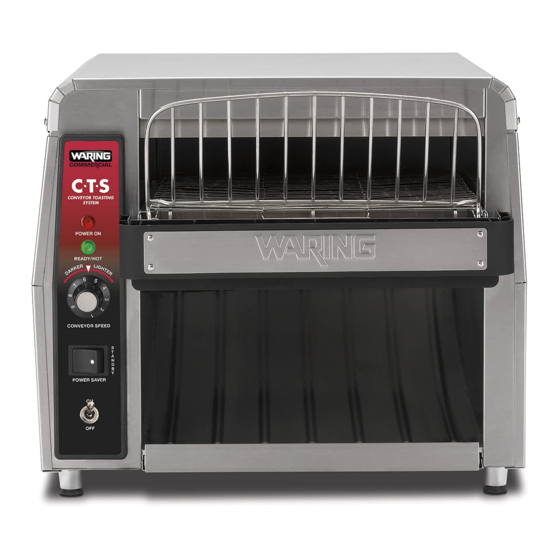
    UTILISATION DE RALLONGES L’utilisation d’une rallonge électrique ou d'un cordon électrique plus long est déconseillée. ALIMENTATION Si le circuit électrique alimentant l'appareil alimente également d'autres appareil, il est possible que l'appareil ne fonctionne pas. Il est conseillé de brancher l'appareil sur un circuit qui n’alimente aucun autre appareil électrique.
  • Page 26 ÉLÉMENTS DU GRILLE-PAIN (CTS1000/CTS1000CND) 1. Grille d'alimentation 2. Ramasse-miettes/Réflecteur 3. Plateau de sortie du pain 4. Voyant de mise sous tension "POWER ON" 5. Voyant de préchauffage "READY" 6. Interrupteur marche/arrêt 7. Bouton de réglage de la vitesse du convoyeur 8.
  • Page 27: Éléments Du Grille-Pain (Cts1000B)

    ÉLÉMENTS DU GRILLE-PAIN (CTS1000B) 1. Grille d'alimentation 2. Ramasse-miettes/Réflecteur 3. Plateau de sortie du pain 4. Voyant de mise sous tension "POWER ON" 5. Voyant de préchauffage/chaud"READY/HOT" 6. Bouton de réglage de la vitesse du convoyeur 7. Bouton marche/arrêt & contrôle du brunissage 8.
  • Page 28 MODE D'EMPLOI CTS1000/CTS1000CND L'appareil inclut quatre pieds à hauteur réglable, emballés séparément. Chaque pied est équipé d'une vis de montage. Retourner l'appareil et prendre note des trous de vis à chaque coin. Introduire la vis dans le trou et serrer dans le sens des aiguilles d'une montre.
  • Page 29 10. Si le pain n’est pas assez ou trop grillé, modifier la vitesse du convoyeur. Tourner le bouton de réglage de la vitesse du convoyeur vers la droite pour que le pain soit moins grillé ou vers la gauche pour qu’il soit plus grillé. Il est recommandé d’utiliser du pain de la veille, conservé...
  • Page 30: Important

    9. U ne fois grillé, le pain sortira sur le plateau de sortie. 10. Si le pain n’est pas assez ou trop grillé, modifier la vitesse du convoyeur et le degré de brunissage. Mode de veille 11. Pendant de longues périodes d’inactivité, vous pouvez mettre l’appareil en veille ("STANDBY"...
  • Page 31 ATTENTION : ATTENDRE QUE LE GRILLE-PAIN AIT COMPLÈTEMENT REFROIDI AVANT DE DÉGAGER LES ALIMENTS. • Pour dégager les aliments coincés dans le grille-pain, retirer le ramasse-miettes et déloger les aliments à l’aide d’un objet long, préférablement en bois. Nettoyage et entretien •...
  • Page 32 ©2013 Waring Commercial 314 Ella T. Grasso Avenue Torrington, CT 06790 www.waringcommercialproducts.com Printed in China Imprimé en Chine Impreso en la China CTS1000/CTS1000CND/CTS1000B IB 13WC143872 IB-8550B...

Ce manuel est également adapté pour:

Cts1000cndCts1000b

Table des Matières