Table des Matières
Publicité
Liens rapides
easyF
Owner's manual
Series / Serie / Série :
____________________
Write the serial number in the space above for
future reference.
Escriba el número de serie en el espacio de arriba
para referencia futura.
Écrivez le numéro de série dans l'espace ci-dessus
pour référence future
Series
Serie
Série
QUESTIONS?
¿PREGUNTAS?
1-877-227-0955
Customerservice@capbarbell.com
Cap Barbell Houston, TX 77042
WARNING!
SERIOUS INJURY OR DEATH
CAN OCCUR IF CAUTION IS NOT
USED. To reduce the risk of serious
injury,
read
all
important
precautions and instructions in this
manual and all warnings on your
product before using it. Keep this
manual for future reference. FOR
CONSUMER USE ONLY
¡CUIDADO!
LESIONES GRAVES O LA MUERTE
PUEDEN OCURRIR SI NO SE USA
PRECAUCIÓN. Para reducir el riesgo
de lesiones graves, lea todas las
advertencias en este manual y las
etiquetas en el producto antes de
usarlo. Guardar este manual para
referencia
futura.
PARA
DOMESTICO SOLAMENTE
ATTENTION !
LE FAIT DE NE PAS OBSERVER LES
INFORMATIONS PEUT ENTRAÎNER
LA MORT OU DES BLESSURES
GRAVES. Pour réduire le risque de
blessure
grave,
lisez
toutes
avertissements dans ce manuel et
vignettes
sur
le
produit
l'utilisation.
Conservez
ce
pour référence future. POUR UN
USAGE DOMESTIQUE SOULEMENT
/ Manual del usuario / Manuel de l'utilisateur
USO
les
Bicicleta Estática Ajustable
avant
manuel
CHB-EFX917FT
Adjustable Exercise Bike
Vélo d'Exercice Réglable
1
T
i
Publicité
Table des Matières

Sommaire des Matières pour easyFiT CHB-EFX917FT
- Page 1 Owner’s manual / Manual del usuario / Manuel de l’utilisateur CHB-EFX917FT Series / Serie / Série : ____________________ Write the serial number in the space above for future reference. Escriba el número de serie en el espacio de arriba para referencia futura.
- Page 2 TABLE OF CONTENTS - INDICE - LE CONTENU SECTION ..................................WARNING DECAL PLACEMENT COLOCACION DE ETIQUETAS DE ADVERTENCIA / EMPLACEMENT DE VIGNETTES D’AVERTISSEMENT ..........................................WARNINGS ADVERTENCIAS / AVERTISSEMENTS ..................................MAIN PARTS AND DIMENSIONS PARTES PRINCIPALES Y MEDIDAS / PIÈCES PRINCIPALES ET DIMENSIONS ..………………………………………………………………………………………………………………….………………......HARDWARE HERRAMIENTAS / OUTILS .........................................PARTS LIST LISTA DE PARTES / LISTE DES PIÈCES...
- Page 3 1. WARNING DECAL PLACEMENT COLOCACIÓN DE ETIQUETAS DE ADVERTENCIA EMPLACEMENT DE VIGNETTES D’AVERTISSEMENT This drawing shows the location of the Este dibujo muestra la ubicación de la Ce dessin montre l'emplacement de warning decal(s). If a decal is missing or calcomanía de advertencia (s).
-
Page 4: Avertissements
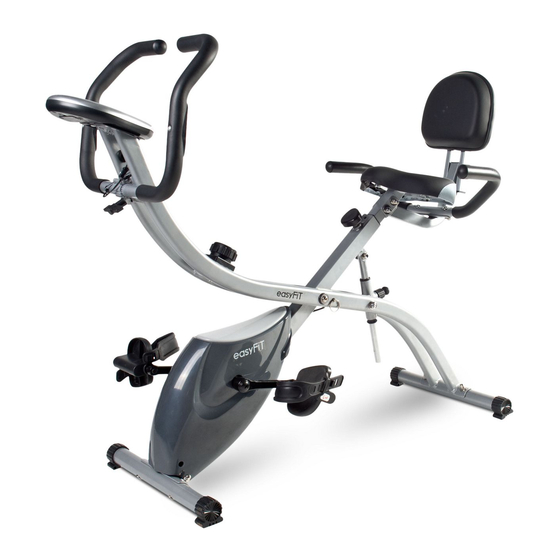
2. WARNINGS SERIOUS INJURY OR DEATH CAN OCCUR IF CAUTION IS NOT USED. To reduce the risk of serious injury, read all instructions in this manual and all warnings on your product before using it. 1. Before starting any exercise program, consult your doctor. This is especially important for people over 35 years of age or people with pre-existing health problems. - Page 5 3. MAIN PARTS AND DIMENSIONS PARTES PRINCIPALES Y MEDIDAS PIÈCES PRINCIPALES ET DIMENSIONS If you have any questions after reading this manual, please see the front cover of this manual. To help us assist you, note the product model number before contacting us. Before reading further, please familiarize yourself with the parts that are labeled in the drawing below.
- Page 6 4. HARDWARE / HERRAMIENTAS / OUTILS Assembly may require two persons. Place all parts in a cleared area and remove the packing materials. Do not dispose of the packing materials until assembly is completed. See below a list of tools that are included with your product.
- Page 7 5. PARTS LIST / LISTA DE PARTES / LISTE DES PIÈCES Qty./ Description Descripción Description Cant./ Qté. M8x50 Bolt M8x50 Perno M8x50 Boulon Foot bar Barra del pie Barre de pied ¢8 Curved washer ¢8 Arandela curveada ¢8 Rondelle courbé é...
- Page 8 6. EXPLODED VIEW / DIBUJO DE DESPIECE / VUE ÉCLATÉE...
- Page 9 7. ASSEMBLY / MONTAJE / MONTAGE...
- Page 11 Pedals are marked "L" and "R" and indicate the left and right side of the bike. Make sure to use appropriately marked pedal with the corresponding crank. Failure to do so may result in damage to pedal or crank voiding warranty. Left pedal has left-handed thread and must be turned counterclockwise (CCW) to attach, right pedal has right-hand thread, must be turned clockwise (CW) to attach.
-
Page 12: Exercise Guidelines
EXERCISE GUIDELINES Before beginning any exercise program, consult your physician. This is especially important for persons over age 35 or persons with pre-existing health problems. For models with heart rate monitors: The pulse sensor is not a medical device. Various factors, including the user’s movement, may affect the accuracy of heart rate readings. The pulse sensor is intended only as an exercise aid in determining heart rate trends in general. -
Page 13: Intensité De L'entraînement
DIRECTIVES EXERCICE Avant de commencer tout programme d'exercice, consultez votre médecin. Ceci est particulièrement important pour les personnes âgées de plus de 35 ans ou des personnes ayant préexistante de la santé. Pour les modèles avec des moniteurs de fréquence cardiaque: Le capteur de pouls n'est pas un dispositif médical. Divers facteurs, y compris les mouvements de l'utilisateur, peuvent affecter la précision de la lecture du rythme cardiaque. - Page 14 OPERATIONAL INSTRUCTIONS INSTRUCCIONES DE USO INSTRUCTIONS D’UTILISATION To adjust the resistance: The resistance knob is located just below the handlebar. Turn the knob in a clockwise direction to increase pedal resistance. Turn the knob in a counter clockwise direction to decrease pedal resistance.
- Page 15 To adjust the angle of the handlebar: Loosen the adjustment knob a few turns. Next, pivot the handlebar to the desired angle, and then tighten the knob. Como ajustar el ángulo del manillar: Primero afloje la perilla de ajuste dándole un par de vueltas. A continuación, girar el manillar al ángulo deseado, y luego apriete el botón.
- Page 16 10. MAINTENANCE OF YOUR BICYCLE IMPORTANT: The safety and integrity designed into this bike can only be maintained when the equipment is regularly examined for damage and repaired. It is the sole responsibility of the user/owner to ensure that regular maintenance is performed.
-
Page 17: Entretien De Votre Vélo
10. MATENIMIENTO DE LA BICICLETA IMPORTANTE: La seguridad y la integridad diseñada en esta bicicleta sólo pueden mantenerse cuando es examinada periódicamente por daños y reparada. Es responsabilidad exclusiva del usuario / propietario el asegurarse de que el mantenimiento regular se lleva a cabo. Componentes desgastados o dañados deberán ser sustituidos inmediatamente y dejar de usar el equipo hasta que se efectúe la reparación. -
Page 18: Key Functions
11. CONSOLE TIME (TMR)……………………………………….…00:00-99:59 MIN SPEED (SPD)…………………………………….…0.0-99.9KM/H DISTANCE ( ) DST …………………………….….0.00-999.9KM CALORIES ( ) CAL ……………………………..…0-9999KCAL KEY FUNCTIONS: MODE: This key lets you select and lock onto a particular function you want. RESET: Resets the value to zero. OPERATION PROCEDURES: AUTO ON/OFF: The system turns on when any key is pressed or when it receives an input from the speed sensor. - Page 19 11. MONITOR TIEMPO (TMR)……………………………………….…00:00-99:59 MIN VELOCIDAD (SPD)…………………………………….…0.0-99.9KM/H DISTANCIA(DST)…………………………….….0.00-999.9KM CALORIAS(CAL)……………………………..…0-9999KCAL FUNCIONES PRINCIPALES: MODO: Esta tecla permite seleccionar y bloquear la función particular que usted desea. REINICIO: Restablece el valor a cero. PROCEDIMIENTOS DE OPERACIÓN: ENCENDIDO Y APAGADO AUTOMÁTICO: El sistema se enciende cuando se presiona cualquier tecla o cuando se recibe una entrada del sensor de velocidad.
-
Page 20: Fonctions Principales
11. MONITEUR TEMPS (TMR)……………………………………….…00:00-99:59 MIN VITESSE (SPD)…………………………………….…0.0-99.9KM/H DISTANCE(DST)…………………………….….0.00-999.9KM CALORIES(CAL)……………………………..…0-9999KCAL FONCTIONS PRINCIPALES: MODE : Cette touche vous permet de sélectionner et de verrouiller une fonction particulière que vous voulez. REMETTRE : Réinitialise la valeur à zéro. PROCÉDURES DE FONCTIONNEMENT AUTO ON / OFF : Le système s'allume lorsque n'importe quelle touche est enfoncée ou quand il reçoit une entrée du capteur de vitesse. -
Page 21: Garantía Limitada
LIMITED WARRANTY The manufacturer’s warranty applies only to products purchased in the Contiguous United States and covers your product against defects in materials, and craftsmanship when used for the intended purpose, under normal use and conditions, and provided that the product receives normal maintenance and care. The warranty covers defects in material and craftsmanship for 1 year on frame and 90 days on all other components from date of purchase.