JVC Everio GZ-R10 Guide De L'utilisateur

JVC Everio GZ-R10 Guide De L'utilisateur

Masquer les pouces Voir aussi pour Everio GZ-R10:
Table des Matières

Publicité

Les langues disponibles

Les langues disponibles

Liens rapides

Basic User Guide
HD MEMORY CAMERA
GZ-R10 A
Detailed User Guide
For more details on operating this
product, please refer to the "Detailed
User Guide" at the following website.
o http://manual3.jvckenwood.com/index.html/
Dear Customers
Thank you for purchasing this JVC product.
Before use, please read the Safety
Precautions and Cautions on p. 2 and
p. 17 to ensure safe use of this product.
BC
BC mark means complies with Energy Efficiency Law.
LYT2689-001A-M
Mobile User Guide
.
When you are outside, refer to
the "Mobile User Guide".
Mobile User Guide can be
viewed with standard browser
for Android tablet and iPhone.
o http://manual3.jvckenwood.com/mobile/us/
For Future Reference:
Enter the Model No. (located on the bottom
of the camera) and Serial No.
(located on the bottom of the camera)
below.
Model No.
Serial No.
EN

Publicité

Table des Matières
loading

Sommaire des Matières pour JVC Everio GZ-R10

  • Page 1 Dear Customers For Future Reference: Thank you for purchasing this JVC product. Enter the Model No. (located on the bottom Before use, please read the Safety of the camera) and Serial No. Precautions and Cautions on p. 2 and (located on the bottom of the camera) p.
  • Page 2: Safety Precautions

    The rating information and safety caution of data the AC adapter are on its upper and/or lower JVC will not be responsible for any lost data. sides. It is recommended to copy your important recorded data to a disc or other recording...
  • Page 3 “Siemens Plug”, as apparatus (including amplifiers) that shown. For this AC plug adapter, consult your produce heat. nearest JVC dealer. Protect the power cord from being walked on or pinched particularly at plugs, Plug Adapter convenience receptacles, and the point where they exit from the apparatus.
  • Page 4 Remember that this unit is intended for private consumer use only. This unit is equipped with Water Any commercial use without proper proof, Dust proof, Drop proof and permission is prohibited. (Even if you record Freeze proof. an event such as a show, performance or Water proof: Equivalent to IEC exhibition for personal enjoyment, it is Standard publication 529 IPX8...
  • Page 5: Table Des Matières

    USB Cable Adapter Cable AC-V11U (Type A - Micro Type B) AV Cable Core Filter Basic User Guide QAM1322-001 (for AV Cable) (this manual) Please consult your JVC dealer or the nearest JVC service center when purchasing a new AV cable.
  • Page 6: Grip Belt Adjustment

    Grip Belt Adjustment Pull back the pad Adjust the length of the belt Attach the pad Date and Time Setting When the month, day, year, hour, or Open the LCD monitor. minute item is tapped, 3 and 2 will be displayed. The unit turns on.
  • Page 7: Open The Terminal Cover (Sd Card Cover)

    Never damage or scratch the waterproof seal and terminal cover. Doing so can result in leaks. If the seal is damaged, contact your nearest JVC Service Center for a replacement. (Charges apply.) Read the “Detailed User Guide”...
  • Page 8: Charging The Battery

    When the recording time becomes extremely short even when the battery is fully charged, the battery needs to be replaced. For details on replacing the built-in battery (subject to a fee), consult the nearest JVC service center. For details on other charging methods, please refer to the “Detailed User Guide”.
  • Page 9: Inserting An Sd Card

    Inserting an SD Card Insert a commercially available SD card before recording. Open the terminal cover. Insert an SD card. (Rear) Label Before inserting the SD card, close the LCD monitor to turn off this unit. o To remove the SD card Push the SD card inward once, then pull it out straight.
  • Page 10: Video Recording

    Video Recording You can record without worrying about the setting details by using the P (Intelligent Auto) mode. Settings such as exposure and focus will be adjusted automatically to suit the shooting conditions. Before recording an important scene, it is recommended to conduct a trial recording. Check if the recording Check if the recording mode mode is A video.
  • Page 11: Attaching The Core Filter

    o Indications during video recording Video Quality Recording Media Battery Indicator Image Stabilizer Still Image Recording Button Scene Counter Remaining Recording 0:00:00 [0:54] Time Recording in Progress ≪PLAY MENU Recording-Standby NOTE The estimated recording time of the supplied battery is approximately 2 hour 30 minutes of actual recording and up to 4 hours 30 minutes of continuous recording.
  • Page 12: Playing Back/Deleting Files On This Unit

    Playing Back/Deleting Files on this Unit Select and play back the recorded videos or still images from an index screen (thumbnail display). Volume adjustment Turn up the during playback Tap A or B to select the video volume or still image mode. +...
  • Page 13: Install Everio Mediabrowser (Windows 8/Windows 8.1)

    Install Everio MediaBrowser (Windows 8/Windows 8.1) o Operation on the computer: Everio MediaBrowser is included with your camera. It lets you archive and organize your videos. It also lets you Perform the following steps. create discs and upload video to YouTube, and other popular web sites.
  • Page 14: Install Everio Mediabrowser (Windows 7 / Windows Vista)

    Install Everio MediaBrowser (Windows 7 / Windows Vista) o Operation on the computer: Everio MediaBrowser is included with your camera. It lets you archive and organize your videos. It also lets you Perform the following steps. create discs and upload video to YouTube, and other popular web sites.
  • Page 15: File Backup (Windows)

    File Backup (Windows) o Operation on the computer: Preparation: Install the Everio MediaBrowser software onto the computer. Select files. Make sure that enough space is left in the HDD of computer. Select “All volume in camcorder”, then click “Next”. Open the terminal cover. Connect the USB cable.
  • Page 16: Working With Imovie And Iphoto

    Working with iMovie and iPhoto You may use the software supplied o iMovie and iPhoto with the Mac Computer to view and You can import files from this unit to a edit files from the camera. computer using Apple’s iMovie '11, Connect the camera to the Mac Version 10 or iPhoto.
  • Page 17: Troubleshooting/Cautions

    … when not in use, as some machines use If the above do not solve the problem, current even when switched off. consult your nearest JVC dealer or do not drop intentionally or subject to … JVC service center. strong impact.
  • Page 18: Lcd Monitor

    While the LCD monitor screen has Recording Medium more than 99.99% effective pixels, 0.01% of the pixels may be bright Be sure to follow the guidelines spots (red, blue, green) or dark spots. below to prevent corruption or This is not a malfunction. The spots damage to your recorded data.
  • Page 19 To protect the unit, DO NOT Changes or modifications not drop the unit or strike it against hard … objects. approved by JVC could void the user’s authority to operate the subject it to shock or excessive … equipment. This equipment has been vibration during transportation.
  • Page 20: Recordable Time/Specifications

    (W x H x D: excluding grip belt) Weight Approx. 286 g (0.63 lbs) The specifications and appearance of this product are subject to changes for further improvement without prior notice. For more information, please refer to the Detailed User Guide. http://manual3.jvckenwood.com/index.html/ ©2014 JVC KENWOOD Corporation 0114NAR-SW-VM...
  • Page 21 Para futuras consultas: Gracias por haber adquirido este producto A continuación, introduzca el número de JVC. modelo y el número de serie de la cámara. Antes de su uso, lea las precauciones de Ambos están ubicados en la parte inferior seguridad y advertencias en p.
  • Page 22: Precauciones De Seguridad

    Precauciones de seguridad ADVERTENCIA: ATENCION La videocámara con la batería instalada no PELIGRO DE ELECTROCUCION debe ser expuesta al calor excesivo, como NO ABRA por ejemplo la luz solar directa, el fuego, etc. ATENCION: PRECAUCIÓN: PARA EVITAR RIESGOS DE ELECTROCUCION, NO EXTRAIGA LA Una batería de iones de litio incorporada se CUBIERTA (O LA PARTE POSTERIOR).
  • Page 23 Si utiliza el adaptador de CA en países datos importantes. fuera de los EE.UU. JVC no se responsabiliza por las pérdidas de El adaptador de CA suministrado tiene una datos. Se recomienda copiar todos los datos función de selección automática de tensión...
  • Page 24 Recuerde que esta cámara debe usarse únicamente para fines privados. Este producto es a prueba de agua, Está prohibido cualquier uso comercial sin la antipolvo, resistente a las caídas y a autorización correspondiente. (Aunque prueba de congelación. grabe acontecimientos, tales como Impermeable: Equivalente a la espectáculos o exhibiciones, para su disfrute publicación del estándar IEC 529...
  • Page 25: Verificar Los Accesorios

    (Tipo A - Tipo B Micro) Cable de AV Filtro central Guía básica del usuario QAM1322-001 (para cable AV) (este manual) Consulte con su distribuidor de JVC o con el centro de servicios JVC más cercano cuando compre un nuevo cable AV.
  • Page 26: Ajuste De La Correa De Mano

    Ajuste de la correa de mano Panel Deslice el panel hacia atrás Regule la longitud de la correa Conecte el panel Ajuste de la fecha y la hora 3 y 2 se visualizarán cuando se Abra el monitor LCD. seleccione con el dedo el elemento del mes, del día, del año, de la hora Se enciende la unidad.
  • Page 27: Abra La Tapa Del Terminal (Cubierta De La Tarjeta Sd)

    Nunca dañe o arañe la junta impermeable ni la tapa del terminal. Si lo hace, pueden producirse filtraciones. Si la junta resulta dañada, póngase en contacto con su distribuidor JVC o centro de servicios JVC más cercano. (Se aplicarán costes).
  • Page 28: Carga De La Batería

    Para obtener detalles sobre el reemplazo de la batería incorporada (sujeto a una tarifa), consulte al distribuidor JVC o al centro de servicios JVC más cercano. Para obtener detalles sobre otros métodos de carga, consulte la “Guía detallada del usuario”.
  • Page 29: Insertar Una Tarjeta Sd

    Insertar una tarjeta SD Introduzca una tarjeta SD comercialmente disponible antes de iniciar la grabación. Abra la tapa del terminal. Introduzca una tarjeta SD. (Parte Etiqueta posterior) Antes de insertar la tarjeta SD, cierre el monitor LCD para apagar esta unidad. o Para extraer la tarjeta SD Presione la tarjeta SD hacia adentro y luego retírela hacia arriba.
  • Page 30: Grabación De Vídeo

    Grabación de vídeo Puede grabar sin preocuparse por los detalles de los ajustes utilizando el modo P (automático inteligente). Los ajustes tales como la exposición y el enfoque se ajustan automáticamente para adecuarse a las condiciones de disparo. Antes de grabar una escena importante, se recomienda realizar una grabación de prueba.
  • Page 31 o Indicaciones durante la grabación de vídeo Calidad de vídeo Grabación de soportes Indicador de batería Estabilizador de imágenes Contador de escenas Espera de grabación Tiempo restante de grabación 0:00:00 [0:54] Grabación en curso ≪PLAY MENU NOTA El tiempo estimado de grabación de la batería suministrada es de aproximadamente 2 horas 30 minutos de grabación efectiva y hasta 4 horas 30 minutos de grabación continua.
  • Page 32: Reproducción

    Reproducir/eliminar archivos en esta unidad Seleccione y reproduzca los vídeos grabados o imágenes fijas desde la pantalla de índice (pantalla de vistas en miniatura). Ajuste del volumen Suba el durante la Pulse A o B para seleccionar volumen reproducción el modo vídeo o imagen fija. +...
  • Page 33: Instalar Everio Mediabrowser (Windows 8/Windows 8.1)

    Instalar Everio MediaBrowser (Windows 8/Windows 8.1) o Funcionamiento en el ordenador: Everio MediaBrowser viene incluido con la cámara. Le permite archivar y organizar sus videos. También le permite crear Lleve a cabo los siguientes discos y descargar video en YouTube y pasos.
  • Page 34: Instalar Everio Mediabrowser (Windows 7 / Windows Vista)

    Instalar Everio MediaBrowser (Windows 7 / Windows Vista) o Funcionamiento en el ordenador: Everio MediaBrowser viene incluido con la cámara. Le permite archivar y organizar sus videos. También le permite crear Lleve a cabo los siguientes discos y descargar video en YouTube y pasos.
  • Page 35: Copia De Seguridad De Archivo (Windows)

    Copia de seguridad de archivo (Windows) o Funcionamiento en el ordenador: Preparación: Instale el software Everio MediaBrowser en la computadora. Seleccionar archivos. Asegúrese de que haya suficiente espacio en el disco duro de la computadora. Seleccione “Todo el volumen en la videocamara”...
  • Page 36: Trabajar Con Imovie Y Iphoto

    Trabajar con iMovie y iPhoto o iMovie y iPhoto Puede utilizar el software provisto con una computadora Mac para ver y Puede importar archivos desde esta editar archivos desde la cámara. unidad a un ordenador mediante el uso Conecte la cámara a la computadora de Apple iMovie ’11, Versiones 10 o Mac utilizando el cable USB.
  • Page 37: Resolución De Problemas/Precauciones

    CA de la … resuelve el problema, póngase en unidad cuando no esté en uso, ya que contacto con su distribuidor JVC o algunas máquinas usan corriente incluso centro de servicios JVC más cercanos. estando apagadas.
  • Page 38: Monitor Lcd

    Si bien la pantalla del monitor LCD Soporte de grabación tiene más de 99,99 % píxeles efectivos, es posible que el 0,01 % de Asegúrese de seguir las los píxeles sean manchas brillantes siguientes pautas para evitar (rojas, azules, verdes) o manchas corromper o dañar los datos oscuras.
  • Page 39 Para proteger el aparato, NO DEBE dejar caer el aparato ni golpearlo … Los cambios o modificaciones no contra objetos duros. aprobados por JVC podrian anular la someterlo a sacudidas o vibración autoridad del usuario para utilizar el … excesiva durante su transporte.
  • Page 40: Tiempo De Grabación/Especificaciones

    (W x H x D: excluyendo la correa de mano) Peso Aprox. 286 g (0,63 lbs) Las especificaciones y el aspecto de este producto están sujetos a cambios sin previo aviso. Para obtener más información, consulte la Guía detallada del usuario. http://manual3.jvckenwood.com/index.html/ ©2014 JVC KENWOOD Corporation 0114NAR-SW-VM...
  • Page 41 Chers clients et chères clientes Pour consultation ultérieure : Merci d’avoir acheté ce produit JVC. Entrez le N° de Modèle (situé sur le Avant toute utilisation, veuillez lire les dessous de l’appareil photo) et le N° de précautions de sécurité...
  • Page 42: Précautions De Sécurité

    Précautions de sécurité AVERTISSEMENT : ATTENTION Le caméscope avec des batteries installées, RISQUE D’ÉLECTROCUTION ne devrait pas être exposé à une chaleur NE PAS OUVRIR excessive telle que la lumière directe du soleil, le feu ou similaire. ATTENTION : POUR ÉVITER TOUT RISQUE ATTENTION : D’ÉLECTROCUTION, NE PAS OUVRIR LE BOÎTIER.
  • Page 43 Faites une sauvegarde des données Utilisation de l’adaptateur secteur en importantes enregistrées. dehors des États-Unis JVC ne sera pas responsable des données L’adaptateur secteur fourni dispose d’une perdues. Il est recommandé de copier vos selection automatique de la tension dans la données importantes enregistrées sur un...
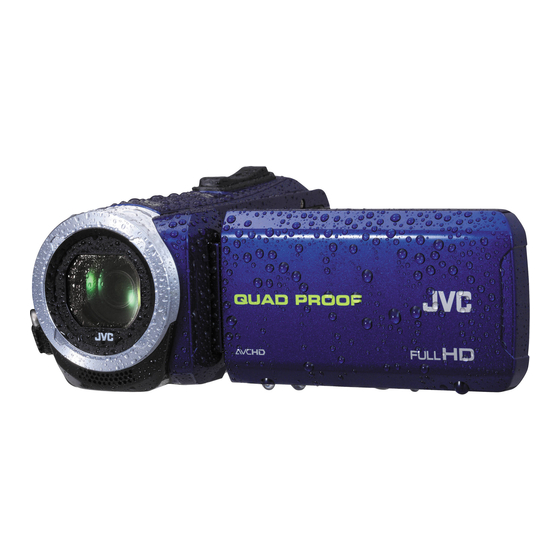
  • Page 44 Noter que ce caméscope est destiné à un usage privé uniquement. Cet appareil est étanche à l’eau et à la Toute utilisation commerciale sans poussière, résistant aux chutes et à autorisation est interdite. (Même si vous l’épreuve du gel. enregistrez un spectacle ou une exposition Étanche : Équivalent à...
  • Page 45: Vérifier Les Accessoires

    (Type A - Micro Type B) Câble AV Filtre à noyau de ferrite Guide de l’utilisateur QAM1322-001 (pour câble AV) (ce manuel) Veuillez consulter votre revendeur JVC ou le centre de service JVC le plus proche lorsque vous achetez un nouveau câble AV.
  • Page 46: Ajustement De La Dragonne

    Ajustement de la dragonne Tablette Tirez la tablette Ajustez la longueur de la dragonne Fixez la tablette Réglage de la date et l’heure Lorsque le mois, le jour, l’année, Ouvrez l’écran LCD. l’heure ou les minutes sont tapés, 3 et 2 s’afficheront. L’unité...
  • Page 47: Ouvrez Le Couvercle De Borne (Couvercle De La Carte Sd)

    N’endommagez et ne rayez jamais le joint d’étanchéité et le couvercle de borne. Cela risquerait de provoquer des fuites. Si le joint est endommagé, consultez le centre de services JVC le plus proche de vous pour un remplacement. (Service payant.) Lisez attentivement les “Manuel d’utilisation”...
  • Page 48: Chargement De La Batterie

    Pour plus de détails concernant le remplacement de la batterie intégrée (service payant), veuillez consulter le centre de services JVC le plus proche. Pour plus de détails sur d’autres méthodes de chargement, veuillez vous...
  • Page 49: Insérer Une Nouvelle Carte Sd

    Insérer une nouvelle carte SD Insérez une carte SD disponible dans le commerce avant tout enregistrement. Ouvrez le couvercle de borne. Insérez une carte (Vue Étiquette arrière) Avant d’insérer la carte SD, fermez l’écran LCD pour éteindre cet appareil. o Pour retirer la carte SD Poussez la carte SD vers l’intérieur puis tirez-la vers vous.
  • Page 50: Enregistrer Des Vidéos

    Enregistrer des vidéos Vous pouvez enregistrer sans avoir à vous préoccuper des détails de réglage en utilisant le mode P (Auto Intelligent). Les réglages comme l’exposition et la mise au point seront ajustés automatiquement pour s’adapter aux conditions de prises de vue.
  • Page 51: Fixer Le Filtre À Noyau De Ferrite

    o Indications apparaissant à l’écran pendant l’enregistrement de vidéos Qualité vidéo Supports d’enregistrement Indicateur de batterie Stabilisateur d’image Compteur de scènes Attente-enregistrement Durée d’enregistrement restante 0:00:00 [0:54] Enregistrement en cours ≪PLAY MENU REMARQUE La durée d’enregistrement estimée de la batterie fournie est d’approximativement 2 heures 30 minutes d’enregistrement effectif et jusqu’à...
  • Page 52: Lecture

    Lecture/suppression de fichiers sur cet appareil Sélectionner et lire les vidéos ou photos enregistrées à partir d’un écran d’index (affichage miniature). Réglage du volume Augmenter pendant la lecture Tapez sur la touche A ou B le volume pour sélectionner le mode vidéo +...
  • Page 53: Installez Everio Mediabrowser (Windows 8/Windows 8.1)

    Installez Everio MediaBrowser (Windows 8/Windows 8.1) o Fonctionnement sur l’ordinateur : Everio MediaBrowser est inclus avec votre caméra. Il vous permet d’archiver et d’organiser vos vidéos. Il vous permet Effectuez les étapes également de créer des disques et suivantes. télécharger des vidéos sur YouTube, et A Affichez “Apps”.
  • Page 54: Installer Everio Mediabrowser (Windows 7 / Windows Vista)

    Installer Everio MediaBrowser (Windows 7 / Windows Vista) Everio MediaBrowser est inclus avec o Fonctionnement sur l’ordinateur : votre caméra. Il vous permet d’archiver et d’organiser vos vidéos. Il vous permet Effectuez les étapes également de créer des disques et suivantes.
  • Page 55: Sauvegarde De Fichier (Windows)

    Sauvegarde de fichier (Windows) o Fonctionnement sur l’ordinateur : Préparation : Installez le logiciel Everio MediaBrowser sur l’ordinateur. Sélectionnez les fichiers. Assurez-vous qu’il y a suffisamment d’espace sur le disque dur de l’ordinateur. Sélectionnez “Tout le volume du camescope”, puis cliquez “Suivant”. Ouvrez le couvercle de la borne.
  • Page 56: Travailler Avec Imovie Et Iphoto

    Travailler avec iMovie et iPhoto Vous pouvez utiliser le logiciel fourni o iMovie et iPhoto avec l’ordinateur Mac pour visualiser et Vous pouvez importer des fichiers de éditer les fichiers à partir de la caméra. cet appareil vers un ordinateur utilisant Connectez la caméra à...
  • Page 57: Dépannage/Mises En Garde

    6 mois, puis continuez à la stocker à un Si les points ci-dessus ne peuvent résoudre le problème, consultez votre niveau de 30 % de charge (i). revendeur JVC ou le centre de services Retirez l’adaptateur AC de l’appareil lorsque … JVC le plus proche.
  • Page 58: Support D'enregistrement

    Bien que l’écran LCD ait plus de 99,99 Support d’enregistrement % de pixels effectifs, 0,01 % des pixels peuvent être des points lumineux Veiller à suivre les directives ci- (rouge, bleu, vert) ou des taches dessous pour éviter d’altérer ou foncées.
  • Page 59 Des changements ou modifications non … objets durs. approuvés par JVC peuvent annuler le le soumettre à trop de chocs ou vibrations droit de l’utilisateur de faire fonctionner … durant le transport.
  • Page 60: Durée D'enregistrement/Spécifications

    (L x H x P : sans la dragonne) Poids Environ 286 g (0,63 lbs) Les caractéristiques et l’apparence de ce produit sont susceptibles d’être modifiées sans préavis pour d’éventuelles améliorations. Pour de plus amples informations, veuillez consulter le Manuel d’utilisation. http://manual3.jvckenwood.com/index.html/ ©2014 JVC KENWOOD Corporation 0114NAR-SW-VM...

Table des Matières