Masquer les pouces Voir aussi pour Crossline:

Publicité

Les langues disponibles
  • FR

Les langues disponibles

  • FRANÇAIS, page 10

Liens rapides

Strichlaser Crossline
Lijnlaser Crossline
Laser traits Crossline
Laser a fascio Crossline
Line Laser Crossline
Liniový laser Crossline
1
DE
NL
FR
IT
GB
CZ

Publicité

Table des Matières
loading

Sommaire des Matières pour Storch Crossline

  • Page 1 Strichlaser Crossline Lijnlaser Crossline Laser traits Crossline Laser a fascio Crossline Line Laser Crossline Liniový laser Crossline...
  • Page 2: Lieferumfang

    Vielen Dank für Ihr Vertrauen zu STORCH. Mit dem Kauf haben Sie sich für ein Qualitäts-Produkt entschieden. Haben Sie trotzdem Anregungen zur Verbesserung oder aber vielleicht einmal ein Problem, so freuen wir uns sehr, von Ihnen zu hören. Bitte sprechen Sie mit Ihrem Außendienst-Mitarbeiter oder in dringenden Fällen auch mit uns direkt.
  • Page 3: Sicherheitshinweise

    Sicherheitshinweise: Der Strichlaser Crossline entspricht der Laserklasse 2 (5 mW) / Laserklasse 3A (10 mW) gemäß CFR21. Nicht in den Laserstrahl blicken, da dies zu Augenschäden führen kann. Das Instrument vor dem Transport ausschalten. Die Taste auf der Geräteoberseite nicht mit spitzen Gegenständen (z.B. Fingernägel) betätigen.
  • Page 4: Gerätebeschreibung

    Gerätebeschreibung Bedienfeld Laserstrahlaustritt für Vertikallaser Batteriefachdeckel Laserstrahlaustritt für Horizontallaser Trageriemen Feinjustierung Nivellierschraube Lotlaser und Stativgewinde Ein / Aus-Schalter Bedienfeld Taste Vertikallinie 2 Libelle (mit LED-Beleuchtung) Taste Horizontallinie Taste Vertikallinie 1 Dimmertaste Hell / Dunkel Dimmer-Kontroll-LED grün Einschalt-Kontroll-LED rot...
  • Page 5: Bedienung

    Die drei Nivellierschrauben so einstellen, dass die Libellenblase in den schwarzen Ring gelangt. Bitte beachten: die Libelle dient nur zur Hilfe der geraden Aufstellung des Crossline. Die Nivellierung der Laserdioden erfolgt intern (Punkte 3 und 5) und ist von der Libelle unabhängig.
  • Page 6: Technische Gegevens

    Hartelijk dank voor uw vertrouwen in STORCH. Met deze aankoop hebt u voor een kwaliteitsproduct gekozen. Als u desondanks een tip voor verbeteringen hebt of wellicht ooit een probleem ondervindt, dan horen wij graag van u. Neem contact op met de medewerker buitendienst of in dringende gevallen rechtstreeks met ons.
  • Page 7 Veiligheidsrichtlijnen: De lijnlaser Crossline voldoet aan laserklasse 2 (5 mW) / laserklasse 3A (10 mW) conform CFR21. Niet in de laserstraal kijken, dit kan tot oogschade leiden. Schakel het instrument voor het transport uit. De knop bovenop het apparaat niet met spitse voorwerpen (bijv. vingernagels) gebruiken.
  • Page 8: Apparaatbeschrijving

    Apparaatbeschrijving Bedieningspaneel Laserstraal-opening voor verticale laser Deksel van batterijvak Laserstraal-opening voor horizontale laser Draagriem Fijninstelling Nivelleerschroef Loodlaser en statiefschroefdraad Aan/Uit-schakelaar Bedieningspaneel Knop verticale lijn 2 Waterpas (met LED-verlichting) Knop horizontale lijn Knop verticale lijn 1 Dimknop licht / donker Dimcontole-LED groen Inschakelcontrole-LED rood...
  • Page 9: Garantievoorwaarden

    Stel de drie nivelleerschreoven zodanig in dat het belletje van de waterpas in de zwarte ring komt. Let op: de waterpas dient alleen voor het horizontaal opstellen van de Crossline. De nivellering van de laserdioden vindt intern plaats (punt 3 en 5) en is onafhankelijk van de waterpas.
  • Page 10: Caractéristiques Techniques

    Si vous avez malgré tout des suggestions pour l‘amélioration ou si vous deviez rencontrer un problème, nous sommes avec plaisir à votre disposition. Dans ce cas, contactez votre représentant, ou directement notre service clients, s‘il s‘agit d‘un problème urgent. Salutations dévouées SAV STORCH Tél.: +49 (0) 2 02 . 49 20 - 112 Fax: +49 (0)2 02 .
  • Page 11: Consignes De Sécurité

    Consignes de sécurité : Le laser à trait Crossliner correspond à la catégorie de laser 2 (5 mW) / catégorie de laser 3A (10 mW) selon CFR21. Ne pas regarder le rayon laser, risque de blessures des yeux. Arrêter l'appareil avant le transport. Ne pas actionner la touche située sur la face supérieure de l'appareil avec des objets pointus (p.
  • Page 12: Description De L'appareil

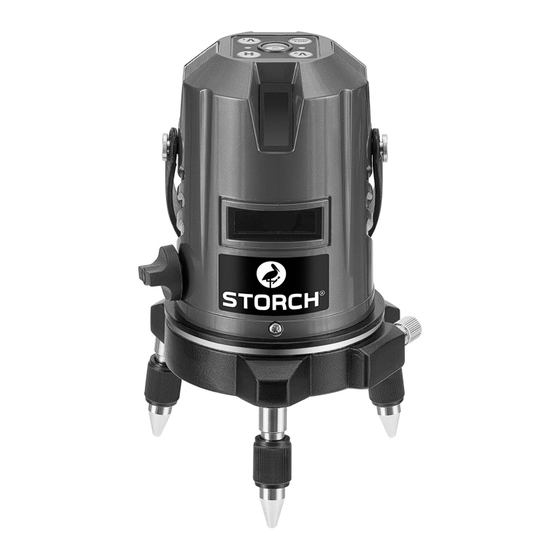
    Description de l'appareil Tableau de commande Sortie de rayon laser pour laser vertical Couvercle du compartiment à batteries Sortie de rayon laser pour laser horizontal Sangle de transport Réglage fin Vis de nivellement Laser vertical et filetage du trépied Commutateur Marche/ Arrêt Tableau de commande Touche ligne verticale 2 Niveau à...
  • Page 13: Utilisation

    Régler les trois vis de nivellement de telle façon que la bulle du niveau se trouve dans le cercle noir. Veuillez prendre en compte : le niveau à bulle sert uniquement à aider à installer le Crossline bien droit. La mise à...
  • Page 14: Table Des Matières

    Grazie per la fiducia accordata a STORCH. Con l‘acquisto avete scelto un prodotto di qualità. Se comunque avete dei suggerimenti volti a migliorare la nostra offerta o se doveste incontrare qualche difficoltà, non esitate a rivolgerVi a noi. Contattate il Vostro rappresentante oppure rivolgeteVi direttamente a noi in casi urgenti.
  • Page 15: Avvertenze Di Sicurezza

    Avvertenze di sicurezza: Il laser a fascio Crossline corrisponde alla categoria Laser 2 (5 mW) / Categoria laser 3A (10 mW), secondo il codice di normativa federale CFR21. Non puntare gli occhi nel raggio laser, visto che ciò può danneggiare gli occhi.
  • Page 16: Descrizione Attrezzo

    Descrizione attrezzo Pannello di controllo Punto di fuoriuscita del raggio laser per uso in verticale Coperchio per alloggiamento batteria Punto di fuoriuscita del raggio laser per uso in orizzontale Cinghia Aggiustamento di precisione Vite di livellamento Laser a piombo e filettatura cavalletto Interruttore ON / OFF Pannello di controllo Tasto fascio verticale 2...
  • Page 17: Uso

    Impostare le tre viti di livellamento in modo che la bolla della livella si trovi all'interno del cerchio nero. Attenzione: la livella serve solamente come ausilio per il posizionamento dritto del Crossline. Il livellamento dei diodi laser avviene all‘interno (punti 3 e 5) e non dipende dalla libella.
  • Page 18 Thank you for purchasing a STORCH product. You have purchased a quality product. If you would like to suggest an improvement, or experience a problem with your product, please do not hesitate to contact us. Please contact your field sales representative or, in urgent cases, contact us directly.
  • Page 19: Safety Instructions

    Safety instructions: The Line Laser Crossline is a Class 2 laser 2 (5 mW) / Class 3A laser (10 mW) pursuant to CFR21. Do not stare at the laser, it will damage your eyes. When moving the instrument, please turning off the power.
  • Page 20: Device Description

    Device description Control panel Laser beam egress point for vertical laser Battery cover Laser beam egress point for horizontal laser Carrying strap Fine adjustment Leveling screw Plumbline laser and tripod thread On / Off switch Control panel Key Vertical line 2 Level (LED illuminated) Key horizontal line Key Vertical line 1...
  • Page 21: Care And Maintenance

    Adjust the three levelling screws so that the bubble is in the black circle. Please note: the sight glass is only used as an aid for levelling the Crossline. Levelling of the laser diodes is handled internally (items 3 and 5) and is inde- pendent of the sight glass.
  • Page 22: Rozsah Dodávky

    Děkujeme Vám za důvěru ve firmu STORCH. S nákupem výrobku jste se rozhodli pro kvalitní produkt. Pokud přesto máte podněty na zlepšení nebo možná nějaký problém, tak bychom byli velmi rádi, kdybyste se nám ozvali. Promluvte si s příslušným externím spolupracovníkem naší firmy nebo se v naléhavých případech obracejte přímo na nás.
  • Page 23: Bezpečnostní Pokyny

    Bezpečnostní pokyny: Liniový laser Crossline odpovídá třídě laseru 2 (5 mW) / třídě laseru 3A (10 mW) podle CFR21. Nedívejte se do laserového paprsku, protože to může vést k poškození očí. Instrument před přepravováním vypněte. Tlačítko na horní straně přístroje nestiskávejte špičatými předměty (např. nehty).
  • Page 24: Popis Přístroje

    Popis přístroje Ovládací pole Výstup laserového paprsku pro vertikální laser Kryt přihrádky na baterie Výstup laserového paprsku pro horizontální laser Nosný řemen Přesné nastavení Nivelační šroub Laser - olovnice a závit pro stativ Spínač Zapnout / Vypnout Ovládací pole Tlačítko vertikální linie 2 Libela (s osvětlením LED) Tlačítko horizontální...
  • Page 25: Péče A Údržba

    Tři nivelační šrouby nastavte tak, aby bublina libely byla umístěna v černém kroužku. Pamatujte: libela slouží jen jako pomůcka k rovnému ustavení přístroje Crossline. Nivelace laserových diod se provádí interně (body 3 a 5) a na libele nezávisí. Jestliže laserový paprsek bliká při zapínání instrumentu, je sklon přístroje příliš velký; přiměřeně nastavte tři šrouby nebo stativ.
  • Page 28: Laser A Fascio Crossline

    Trépied pour laser traits 44 04 02 Lunette laser N. art. Denominazione 44 15 00 Laser a fascio Crossline 44 15 05 Cavalletto per laser a fascio 44 04 02 Occhiali per laser Malerwerkzeuge & Profigeräte GmbH Platz der Republik 6 - 8...

Table des Matières