Publicité
Les langues disponibles
Les langues disponibles
Liens rapides
Owner’s Manual
Manuel d'utilisation
Model/Modèle FR-560FM
Two Way Family Radio With
Built-In Broadcast FM Receiver
Walkie-talkie avec récepteur
de radio FM incorporé
Customer Service
Service à la clientèle
1-800-260-6650
Publicité

Manuels Connexes pour Audiowox FR-560FM

Sommaire des Matières pour Audiowox FR-560FM
- Page 1 Owner’s Manual Manuel d'utilisation Model/Modèle FR-560FM Two Way Family Radio With Built-In Broadcast FM Receiver Walkie-talkie avec récepteur de radio FM incorporé Customer Service Service à la clientèle 1-800-260-6650...
- Page 2 CONGRATULATIONS ON YOUR SELECTION OF THE FR-560FM It is one of the most sophisticated and reliable two way family radios available. BEFORE OPERATING YOUR FR-560FM READ THIS MANUAL CAREFULLY...
- Page 3 It is skillfully constructed to give you reliable communications for many different applications. The FR-560FM is ideal for use around the house, in your boat, on hunting and camping trips, on the ski slopes or at the mall.
- Page 4 PERFORMANCE Your transceiver will achieve its maximum operating range when communicating with other transceivers in a flat open area with no trees or buildings obstructing its signal. Range may be up to two miles under such conditions. Obstacles such as buildings, trees or mountains will tend to reduce the transceiver’s effective range.
- Page 5 SAFETY INFORMATION (CONTINUED) Important: To maintain compliance with the FCC’ s RF exposure guidelines hold the transmitter at least 1 inch (2.5 centimeters) from your face and speak in a normal voice, with the antenna pointed up and away. If you wear the handset on your body while using the headset accessory, use only the Audiovox supplied belt clip for this product and ensure that the antenna is at least 1 inch (2.5 centimeters) from your body when...
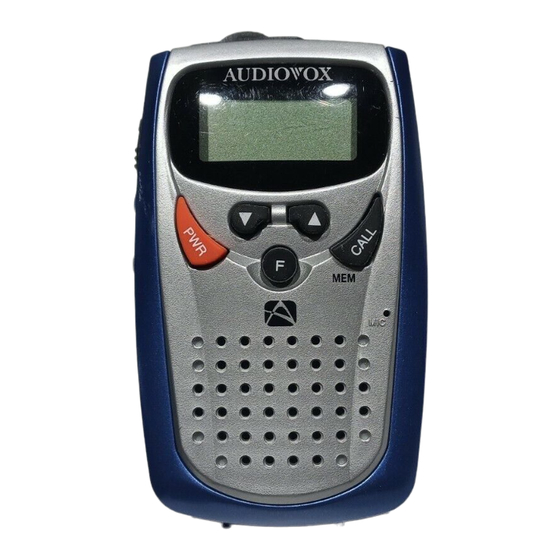
- Page 6 FUNCTION AND LOCATION OF THE CONTROLS...
- Page 7 1. Power Button (PWR): Press and hold this button for 2 seconds to turn the transceiver on or off. 2. Push-to-Talk Button (PTT): Press to transmit. Release to receive. 3. Monitor Button (M): Press and hold to bypass the squelch and listen to channel activity.
- Page 8 LCD DISPLAY AND OPERATION The FR-560FM is equipped with an LCD display to indicate its settings and functions. When the radio is on, pressing any button will illuminate the display for 5 seconds. Transmission Indicator Call Button Indicator Low Battery Alert Indicator...
- Page 9 Your FR-560FM has a unique circuit designed to dramatically extend the life of its batteries. After 10 seconds of inactivity, the FR-560FM will switch to battery saver mode. While in battery saver mode, the battery saver mode indicator ( ) is present on the display, and the transceiver will remain ready to receive any incoming transmissions while the battery saver mode is active.
- Page 10 Call Button (8) When the CALL button is pressed, the FR-560FM will transmit a 3-second ringing sound to other transceiver’s tuned to the same channel. This feature can be used to signal other parties that voice communication is desired.
- Page 11 FUNCTIONS Function Select (F) Button Pressing the Function button will allow selection of frequency channels, as well as selection of the various unit functions. Each press permits selection of the desired channel (1–14), FM mode on or off, beep tone, scan, VOX and Dual Watch functions. Pressing the Func- tion button in the FM mode will allow FM frequency and FM preset se- lection.
- Page 12 Using Up ( ) or Down ( ) buttons, select desired memory position (1–9) for selected station frequency. Press and hold CALL button to lock station frequency into selected memory position. FM Auto Scan To automatically search for an FM station, press and hold the Up ( ) or Down ( ) button while the FM radio frequency display is blinking.
- Page 13 VOX Function This feature enables you to have hands-free conversation. When using the internal microphone/speaker or external microphone/ headset (purchased separately), your voice or the signal is detected and the radio transmits and receives automatically. To access the VOX function, press function (F) button repeatedly until VOX icon ( ) flashes.
- Page 14 To Transmit 1. Set the desired primary channel. 2. Press and hold the PTT (Push-to-Talk) button while speaking slowly and clearly in a normal voice, approximately 2 to 3 inches from the microphone. 3. The transmit indicator ( ) will illuminate while transmitting. 4.
- Page 15 WARNING n Remove the batteries from the transceiver if it is not expected to be used for long periods. This will eliminate the possibility of battery acid leaking from the batteries and corroding the transceiver. n Avoid exposing the unit to water or extremes of temperature. n Do not use this device in or near a mining facility, which uses remotely triggered explosives or in areas labeled “Blasting Area”.
- Page 16 SPECIFICATIONS* Channels: Output Power: 500 mW ERP Battery Life Alkaline: 30 - 35 Hours Power Source: 4.5V DC These specifications are subject to change without notice. They represent typical values, individual units may vary. Channel Frequencies: Channel Channel 462.5625 467.5625 462.5875 467.5875 462.6125...
- Page 17 90 DAY LIMITED WARRANTY Applies to Audiovox Family Radio Service Products. AUDIOVOX CORPORATION (the Company) warrants to the original retail purchaser of this product that should this product or any part thereof, under normal use and conditions, be proven defective in material or workmanship within 90 days from the date of original purchase, such defect(s) will be repaired or replaced with new or reconditioned product (at the Company's option) without charge for parts and repair labor.
- Page 18 FÉLICITATIONS POUR AVOIR CHOISI LE FR-560FM Il s’agit de l’un des walkies-talkies les plus perfectionnés et les plus fiables existant sur le marché. AVANT D’UTILISER VOTRE FR-560FM LISEZ ATTENTIVEMENT CE MANUEL...
- Page 19 Sa conception ingénieuse assure la fiabilité de vos communications dans des situations très variées. Le FR-560FM est idéal à la maison, lorsque vous partez à la chasse, faire du camping ou du bateau, sur les pistes de ski ou au centre commercial.
- Page 20 PERFORMANCES Vous bénéficierez de la couverture maximale de votre émetteur-récepteur lors de communications en terrain plat, sans arbres ni bâtiments pour bloquer le signal. Dans de telles conditions, la couverture peut atteindre jusqu’à trois kilomètres (deux miles). Les obstacles, tels que bâtiments, arbres ou montagnes tendent à réduire la couverture effective de l’émetteur-récepteur.
- Page 21 FONCTION ET EMPLACEMENT DES COMMANDES -21-...
- Page 22 1. Touche de marche-arrêt (PWR) : Pressez cette touche pendant 2 secondes pour allumer ou pour éteindre l’émetteur-récepteur. 2. Poussoir d’émission (PTT) : Pressez pour émettre. Relâchez pour recevoir. 3. Touche de contrôle (M) : Pressez la touche et maintenez-la enfoncée de façon à...
- Page 23 L’AFFICHEUR À CRISTAUX LIQUIDES ET SON FONCTIONNEMENT Le FR-560FM est doté d’un afficheur à cristaux liquides permettant de visualiser les réglages et les fonctions de l’appareil. Lorsque la radio est allumée, presser une touche quelconque éclaire l’afficheur pendant 5 secondes.
- Page 24 MISE EN PLACE DES PILES Votre FR-560FM est alimenté par trois piles alcalines « AAA » ou par trois batteries rechargeables « AAA ». Les piles alcalines vous permettront d’obtenir les meilleures perfor- mances de votre émetteur-récepteur. Retirez le couvercle du compartiment des piles en faisant pivoter la pince de ceinture de façon à...
- Page 25 UTILISATION DE VOTRE FR-560FM Allumer et éteindre l’émetteur-récepteur (PWR) Une pression de 2 secondes sur la touche PWR (1) met l’appareil sous tension. Le haut-parleur émet une tonalité d’avertissement pour confirmer que l’appareil est sous tension. L’émetteur-récepteur effectue par ailleurs un autotest de mise sous tension de 1 seconde, par lequel l’afficheur à...
- Page 26 FONCTIONS Sélecteur de fonctions (F) Cette touche vous permet de sélectionner les canaux de fréquence ainsi que les diverses fonctions de l’appareil. Chaque pression vous permet de sélectionner le canal voulu (de 1 à 14), d’activer ou de désactiver le mode FM ainsi que de sélectionner les fonctions Tonalités d’avertissement, Exploration, Fonctionnement commandé...
- Page 27 Sélectionnez l’emplacement mémoire (de 1 à 9) qui correspondra à la fréquence de la station choisie au moyen de la touche vers le haut ( ) ou vers le bas ( Pressez la touche CALL et maintenez-la enfoncee pour mémoriser la fréquence à...
- Page 28 Fonctionnement commandé par la voix (VOX) À l’aide du microphone/ Cette fonction vous permet de parler les mains libres. speaker interne ou du téléphone externe de microphone/ear (acheté séparément), votre voix ou le signal est détectée et la radio transmet et reçoit automatiquement.
- Page 29 Pour émettre 1. Effectuez le réglage du canal principal souhaité. 2. Pressez la touche PTT (poussoir d’émission) en parlant lentement et clairement d’une voix normale, à une distance d’environ 5 à 7,5 cm (2 à 3 pouces) du micro. 3. L’indicateur d’émission ( ) s’allume durant l’émission.
- Page 30 AVERTISSEMENT Retirer les piles de l’émetteur-récepteur lorsque celui-ci ne doit pas être utilisé pendant une période prolongée. On évitera ainsi les fuites d’électrolyte pouvant provoquer la corrosion de l’émetteur-récepteur. Éviter d’exposer l’appareil à l’eau ou à des températures extrêmes. Ne pas utiliser cet appareil dans ou à proximité d’une exploitation minière où l’on fait exploser des explosifs à...
- Page 31 CARACTÉRISTIQUES TECHNIQUES* Canaux : Puissance de sortie : 500 mW ERP Durée de vie des piles alcalines : 30-35 heures Alimentation : 4,5 V c.c. Ces caractéristiques techniques sont susceptibles d’être modifiées sans préavis. Elles représentent les valeurs types, les valeurs de chaque appareil pouvant varier. Fréquences des canaux Canal Canal...
- Page 32 GARANTIE LIMITÉE DE 90 JOURS Applicable aux walkies-talkies (Family Radio Service) Audiovox. AUDIOVOX CORPORATION (ci-après, « la Société ») garantit au premier acheteur au détail de cet appareil, que si, dans des conditions normales d’utilisation, il est démontré que cet appareil, ou une quelconque de ses pièces, présente un ou des défauts de matériaux ou de fabrication dans un délai de 90 jours à...