Télécharger Imprimer la page

Publicité

Les langues disponibles
  • FR

Les langues disponibles

Liens rapides

Model KCR-11
User manual – Kitchen radio with light and timer
Gebruikshandleiding – Keukenradio met licht en timer
Benutzerhandbuch – Küchenradio mit Beleuchtung und Zeitschaltuhr
Mode d'emploi - Radio de cuisine avec éclairage et minuteur
Manual de usuario – Radio de cocina con luz y temporizador

Publicité

loading

Sommaire des Matières pour LENCO KCR-11

  • Page 1 Model KCR-11 User manual – Kitchen radio with light and timer Gebruikshandleiding – Keukenradio met licht en timer Benutzerhandbuch – Küchenradio mit Beleuchtung und Zeitschaltuhr Mode d’emploi - Radio de cuisine avec éclairage et minuteur Manual de usuario – Radio de cocina con luz y temporizador...
  • Page 2: Table Des Matières

    Index English ..................................... 3 Nederlands ....................................11 Deutsch ....................................20 Français ....................................29 Español ....................................38 Version : 1.0...
  • Page 3: English

    English KCR-11 CAUTION: Usage of controls or adjustments or performance of procedures other than those specified herein may result in hazardous radiation exposure. This unit should not be adjusted or repaired by anyone except qualified service personnel. PRECAUTIONS BEFORE USE KEEP THESE INSTRUCTIONS IN MIND: Do not use this device near water.
  • Page 4 36. Never place this apparatus on other electrical equipment. 37. Do not use or store this product in a place where it is subject to direct sunlight, heat, excessive dust or vibration. 38. Do not allow children access to plastic bags. 39.
  • Page 5 ACCESSORIES  Mounting kit (plastic plate + 2 sets of screws + 4 spacers + drill hole paper template) Plastic plate Spacer Drill hole paper template  Instruction manual MOUNTING THE SET UNDER A CABINET 1. Decide the location to install the unit in the cabinet/shelf. Since the unit’s speakers are located on the left edge side and right edge side respectively, it is recommended to reserve enough space to avoid blocking the sound.
  • Page 6 FRONT PANEL 1. STANDBY Press to turn on the unit. Press again to turn off and go to Standby mode 2. LIGHT ON/OFF Slide to turn on or turn off the downward lighting 3. NUMERIC BUTTONS Press to direct tune to the stored preset FM channel 4.
  • Page 7 INSTALLING THE BATTERIES FOR CLOCK/FM PRESET CHANNEL/TIMER BACKUP The clock/FM preset channel/timer (if set) will be maintained during a power failure by installing 2 x AAA/LR03 batteries (not supplied). Once the power is restored, check the clock to make sure it is accurace and set it again if necessary. INSTALLING THE BATTERIES 1.
  • Page 8 CLOCK SETUP 1. Turn off the unit in Standby mode. 2. Press and hold the CLOCK SET button to enter the Clock setup. “24H” or “12H” will be displayed. 3. Press the button to toggle between 24H (display 24 hours format) or 12H (display 12 hours format). Press the CLOCK SET button to confirm.
  • Page 9 Trouble Shooting No power • Ensure that the mains cable is connected securely. • Ensure that the unit is switched on. The unit does not respond when pressing any buttons. • In some situations the unit may freeze during use. To reset the unit, pull the plug from the mains socket, wait a few seconds and then plug it in again.
  • Page 10 • Our product is improved ceaselessly and the specification and function may be changed without prior notice. GUARANTEE Lenco offers service and warranty in accordance with the European law, which means that in case of repairs (both during and after the warranty period) you should contact your local dealer.
  • Page 11: Nederlands

    Nederlands KCR-11 LET OP: Gebruik van bedieningen of afstellingen of uitvoer van procedures anders dan gespecificeerd in deze documentatie kan leiden tot blootstelling aan schadelijke straling. Dit apparaat dient uitsluitend te worden aangepast of gerepareerd door gekwalificeerd onderhoudspersoneel. VOORZORGSMAATREGELEN VOOR GEBRUIK ONTHOUD DE VOLGENDE INSTRUCTIES: Gebruik dit apparaat niet in de buurt van water.
  • Page 12 31. Het nominale specificatielabel is te vinden op het paneel aan de onder- of achterkant van het apparaat. 32. Dit apparaat is niet bestemd voor gebruik door mensen (inclusief kinderen) met fysieke, zintuiglijke of geestelijke gebreken of gebrek aan kennis en ervaring, tenzij zij onder toezicht staan of instructies hebben over het juiste gebruik van het apparaat hebben gekregen van de persoon die verantwoordelijk is voor hun veiligheid.
  • Page 13 ACCESSOIRES  Montagekit (kunststof plaat + 2 sets schroeven + 4 tussenringen + papieren sjabloon voor boorgaten) Kunststof plaat Tussenring Papieren sjabloon voor boorgaten  Gebruiksaanwijzing DE SET ONDER EEN KASTJE MONTEREN 1. Bepaal op welke plek u het apparaat onder het kastje/de schap wilt installeren. Omdat de luidsprekers van het apparaat aan de linker- en rechterzijden zijn geplaatst, raden wij u aan genoeg ruimte over te laten zodat het geluid niet wordt geblokkeerd.
  • Page 14 VOORPANEEL...
  • Page 15 1. STAND-BY Indrukken om het apparaat in te schakelen. Nogmaals indrukken om uit en op stand-by te schakelen 2. LIGHT ON/OFF Schuiven om de naar onder gerichte verlichting in of uit te schakelen 3. NUMERIEKE TOETSEN Indrukken om direct af te stemmen op een opgeslagen FM-voorkeuzekanaal 4.
  • Page 16 DE BATTERIJEN INSTALLEREN VOOR DE KLOK/FM-VOORKEUZEKANALEN/TIMERBACK-UP De klok/FM-voorkeuzekanalen/timer (indien ingesteld) zullen tijdens een stroomuitval worden behouden door 2 x type AAA/LR03 batterijen te installeren (niet inbegrepen). Nadat de stroom eenmaal is hersteld, controleer dan of de klok nog steeds nauwkeurig is en stel eventueel opnieuw in.
  • Page 17 Opmerking: De antennedraad op het achterpaneel van het apparaat dient volledig te worden uitgetrokken voor een goede FM-ontvangst. U kunt de antennepositie aanpassen om de ontvangst te verbeteren. KLOKINSTELLING 1. Schakel het apparaat uit en op stand-by. 2. Houd de toets CLOCK SET ingedrukt om de klokinstelling te openen. “24H” of “12H” zal worden weergegeven. 3.
  • Page 18 Probleemoplossing Geen spanning • Zorg ervoor dat het netsnoer stevig is aangesloten. • Zorg ervoor dat het apparaat is ingeschakeld. Het apparaat reageert niet wanneer er op een toets wordt gedrukt. • Het apparaat kan tijdens gebruik in sommige gevallen vastlopen. U kunt het apparaat resetten door de stekker uit het stopcontact te trekken, enkele seconden te wachten en de stekker weer aan te sluiten.
  • Page 19 GARANTIE Lenco biedt service en garantie aan overeenkomstig met de Europese wetgeving. Dit houdt in dat u, in het geval van reparaties (zowel tijdens als na de garantieperiode), contact moet opnemen met uw lokale handelaar. Belangrijke opmerking: Het is niet mogelijk om producten die moeten worden gerepareerd rechtstreeks naar Lenco te sturen.
  • Page 20: Deutsch

    Deutsch KCR-11 ACHTUNG: Die zweckentfremdete Bedienung, Benutzung oder Einstellung der Prozeduren kann zu gefährlichen Unfällen durch Strahlen führen. Dieses Gerät darf außer von qualifizierten Fachleuten von niemand anderem repariert oder eingestellt werden. VORSICHTSMASSNAHMEN VOR DER BENUTZUNG BEFOLGEN SIE IMMER FOLGENDE ANWEISUNGEN: Benutzen Sie das Gerät nicht in der Nähe von Wasser.
  • Page 21 32. Dieses Gerät ist nicht zur Benutzung durch Personen (auch Kinder) mit physischen, sensorischen oder mentalen Beeinträchtigungen oder ohne ausreichender Erfahrung vorgesehen, es sei denn, sie werden durch eine verantwortliche Person beaufsichtigt oder wurden in die ordnungsgemäße Bedienung des Gerätes durch eine für ihre Sicherheit verantwortlichen Person eingewiesen.
  • Page 22 ZUBEHÖR  Montagesatz (Kunststoffplatte + 2 Schraubensätze + 4 Abstandhalter + Papierschablone für Bohrungen) Kunststoffplatte Abstandhalter Papierschablone für Bohrungen  Bedienungsanleitung DEN SATZ UNTER EINEN SCHRANK MONTIEREN 1. Entscheiden Sie, an welchem Standort Sie das Gerät im Schrank / Regal montieren möchten. Da sich die Gerätelautsprecher an der rechten und linken Seitenkante befinden, wird empfohlen, ausreichend Platz vorzusehen, um zu vermeiden, dass der Ton blockiert wird.
  • Page 23 VORDERANSICHT...
  • Page 24 1. BEREITSCHAFTSMODUS Drücken Sie die Taste, um das Gerät einzuschalten. Drücken, um es auszuschalten und in den Standby-Modus zu versetzen 2. LIGHT ON/OFF Schieben Sie den Knopf, um die nach unten gerichtete Beleuchtung ein- oder auszuschalten 3. ZIFFERNTASTEN Drücken Sie den Knopf, um direkt den gespeicherten, voreingestellten FM Sender auszuwählen 4.
  • Page 25 BATTERIEN FÜR DIE NOTSTROMVERSORGUNG DER UHR / FM KANAL VOREINSTELLUNG / ZEITSCHALTUHR EINLEGEN Die Uhr / FM Kanal voreinstellen / Zeitschaltuhr (falls eingestellt) bleiben bei einem Stromausfall erhalten, wenn man 2 x AAA/LR03 Batterien (nicht im Lieferumfang enthalten) einlegt. Sobald die Stromversorgung wiederhergestellt ist, überprüfen Sie die Uhr, um sicherzustellen, dass diese richtig eingestellt ist oder stellen Sie diese gegebenenfalls neu ein.
  • Page 26 Hinweis: Das Antennenkabel an der Rückseite des Geräts muss vollständig ausgezogen werden, um einen guten FM Empfang sicherzustellen. Ändern Sie die Ausrichtung der Antenne, um den besten Empfang zu erhalten. EINSTELLEN DER UHRZEIT 1. Schalten Sie das Gerät aus wenn sich dieses im Bereitschaftsmodus befindet. Drücken und halten Sie den Knopf für die CLOCK SET, um das Menü...
  • Page 27 Fehlersuche Kein Strom • Stellen sie sicher, dass das Netzkabel sicher eingesteckt ist. • Stellen Sie sicher, dass die Anlage eingeschaltet ist. Die Anlage reagiert nicht auf das Drücken der Tasten. • In einigen Fällen, kann sich das Gerät beim Gebrauch aufhängen. Ziehen Sie den Stecker aus der Steckdose und warten Sie einige Sekunden, um das Gerät zurückzusetzen.
  • Page 28 Änderungen. GARANTIE Lenco bietet Leistungen und Garantien im Einklang mit Europäischem Recht. Im Falle von Reparaturen (sowohl während als auch nach Ablauf der Garantiezeit) sollten Sie deshalb Ihren Einzelhändler kontaktieren. Wichtiger Hinweis: Es ist nicht möglich, Geräte für Reparaturen direkt an Lenco zu schicken.
  • Page 29: Français

    Français KCR-11 ATTENTION : L’utilisation de commandes ou de réglages ou l’exécution de procédures autres que ceux spécifiés dans ce manuel peut entraîner une exposition à des rayonnements dangereux. Cet appareil ne doit pas être réglé ou réparé par quiconque d’autre que du personnel qualifié.
  • Page 30 32. Cet appareil n’est pas destiné à être utilisé par des personnes (enfants compris) souffrant de handicaps physiques, sensoriels ou mentaux, ou manquant d’expérience et de connaissances, sauf si elles sont sous surveillance ou ont reçu des instructions sur l’utilisation correcte de l’appareil par la personne qui est responsable de leur sécurité. 33.
  • Page 31 ACCESSOIRES  Kit de fixation (plaque en plastique + 2 jeux de vis + 4 entretoises + gabarit de perçage en papier) Plaque en plastique Entretoise Gabarit de perçage  Mode d’emploi FIXATION DE L’ENSEMBLE SOUS UN PLACARD 1. Déterminez l’endroit où installer l’appareil dans le placard/l’étagère. Étant donné que les haut-parleurs de l’appareil sont placés respectivement du côté...
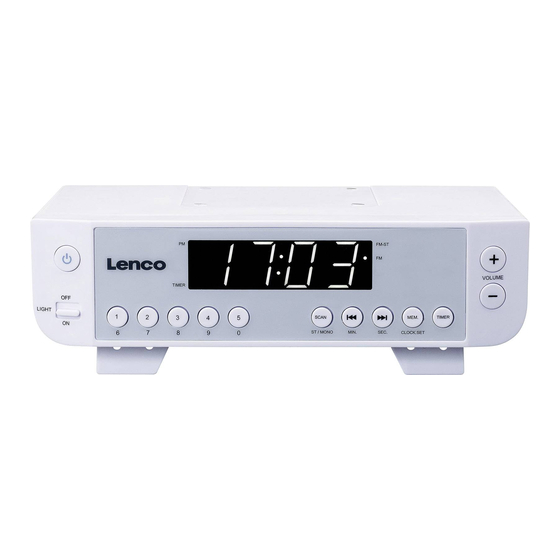
  • Page 32 FAÇADE...
  • Page 33 1. MISE EN VEILLE Appuyez dessus pour mettre en marche l'appareil. Rappuyez dessus pour éteindre et passer en mode veille. 2. LIGHT ON/OFF Faites glisser pour allumer ou éteindre l’éclairage vers le bas 3. PAVÉ NUMÉRIQUE Appuyez sur ces touches pour accéder directement au canal FM préréglé enregistré 4.
  • Page 34 INSTALLATION DES PILES POUR L’HORLOGE / CANAL FM PRÉRÉGLÉ / SAUVEGARDE DU MINUTEUR L’horloge / le canal FM préréglé / le minuteur (si configuré) est maintenu(e) en cas de panne de courant avec l’installation de 2 piles AAA/LR03 (non fournies). Une fois le courant rétabli, vérifiez l’horloge pour vous assurer qu’elle est précise et réglez-la à nouveau si nécessaire.
  • Page 35 Remarque : e panneau L’antenne filaire située sur l arrière de l’appareil doit être complètement déployée pour assurer une bonne réception FM. Orientez l'antenne autrement afin d'améliorer la réception. RÉGLAGE DE L'HORLOGE 1. Éteignez l'appareil en le mettant en mode veille. 2.
  • Page 36 Dépannage Pas d’alimentation • Assurez-vous que la prise secteur est bien branchée. • Assurez-vous que l'unité est allumée. L'unité ne répond pas aux touches. • Dans certaines situations, l’appareil peut geler pendant son utilisation. Pour réinitialiser l’appareil, débranchez la fiche de la prise secteur, patientez quelques secondes, puis rebranchez-la.
  • Page 37 • Étant donné que nous améliorons constamment nos produits, leurs caractéristiques et fonctions peuvent changer sans préavis. GARANTIE Lenco propose un service et une garantie conformément à la législation européenne, ce qui signifie qu’en cas de besoin de réparation (aussi bien pendant et après la période de garantie), vous pouvez contacter votre revendeur le plus proche.
  • Page 38: Español

    Español KCR-11 PRECAUCIÓN: El uso de los controles o ajustes o el funcionamiento de los procedimientos excepto a aquellos especificados aquí pueden provocar una exposición peligrosa a la radiación. Esta unidad no debe ajustarse o repararse por ninguna persona salvo personal de servicio cualificado.
  • Page 39 33. Este producto está diseñado para un uso no profesional únicamente y no para un uso comercial o industrial. 34. Asegúrese de que la unidad esté fijada en una posición estable. Los daños provocados por utilizar este producto en una posición inestable o por no seguir cualquier otra advertencia o precaución incluida en este manual de usuario no estarán cubiertos por la garantía.
  • Page 40 ACCESORIOS  Kit de montaje (placa de plástico + 2 juegos de tornillos + 4 espaciadores+ plantilla de papel de agujeros de taladro) Placa de plástico Espaciador plantilla de papel de agujeros de taladro  Manual de instrucciones MONTAJE DEL CONJUNTO BAJO UN ARMARIO 1.
  • Page 41 PANEL FRONTAL...
  • Page 42 ESPERA Púlselo para encender la unidad. Vuélvalo a pulsar para apagarla y entrar en modo en espera. 2. LIGHT ON/OFF Deslícelo para encender o apagar la iluminación inferior. 3. BOTONES NUMÉRICOS Púlselo para sintonizar directamente el canal FM presintonizado guardado. 4.
  • Page 43 INSTALACIÓN DE LAS PILAS PARA EL RESPALDO DEL RELOJ /CANAL PRESINTONIZADO FM /TEMPORIZADOR El reloj /canal presintonizado FM /temporizador (si está configurado) se mantendrá durante un fallo de corriente instalando 2 pilas AAA/LR03 (no incluidas). Una vez que se haya restaurado la alimentación, compruebe el reloj para asegurarse de que es preciso y vuelva a configurarlo si es necesario.
  • Page 44 Nota: cable de la a ntena situado en el panel posterior esté completamente extendido para asegurar una buena recepción FM. Cambie la posición de la antena para conseguir la mejor recepción. CONFIGURACIÓN DEL RELOJ 1. Apague la unidad en modo de espera. 2.
  • Page 45 Solución de problemas No se enciende • Asegúrese de que el cable de la corriente principal está conectado de forma segura. • Asegúrese de que la unidad está encendida. La unidad no responde cuando se pulsa cualquier botón. • En algunas situaciones la unidad puede congelarse durante su uso. Para reiniciar la unidad, tire del enchufe de la toma de corriente, espere unos segundos y vuelva a enchufarlo.
  • Page 46 GARANTÍA Lenco ofrece servicio y garantía en cumplimiento con las leyes de la Unión Europea, lo cual implica que, en caso de que su producto precise ser reparado (tanto durante como después del periodo de garantía), deberá contactar directamente con su distribuidor.