Table des Matières

Sommaire des Matières pour AL Tech Othello II
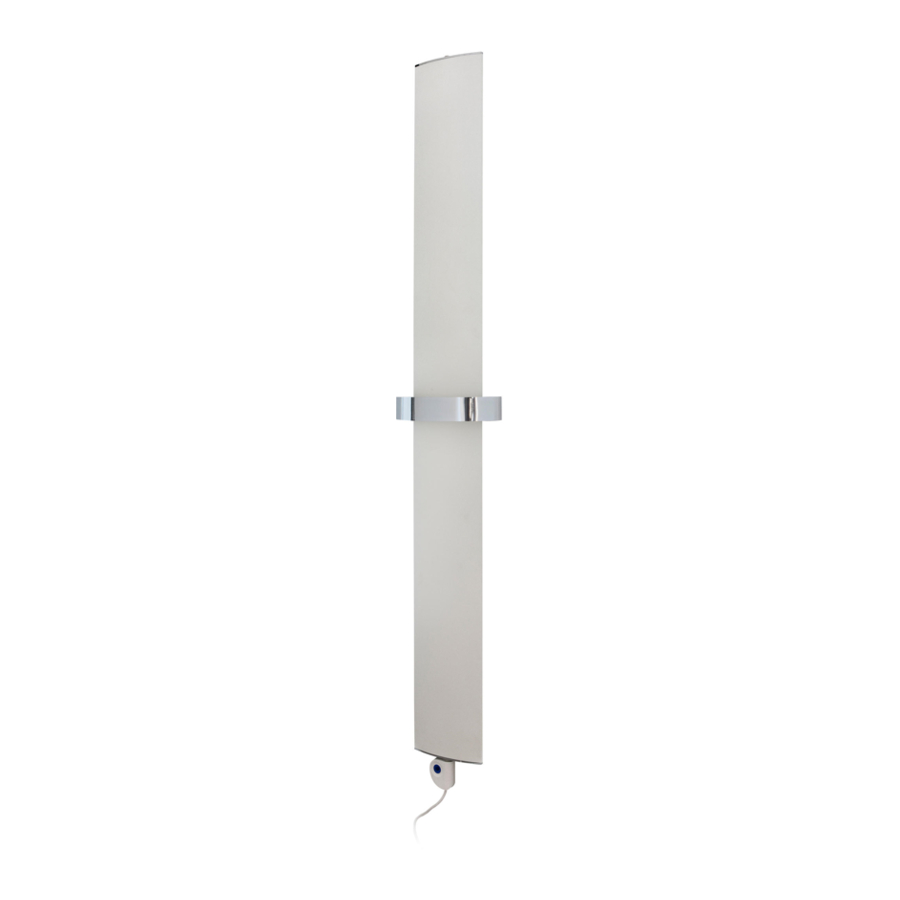
- Page 1 OTHELLO MONO Radiatore elettrico Electric radiator Radiateur électrique Classe II 450 W Manuale d’uso e di installazione Installation booklet Manuel d'instructions et d'installation...
- Page 2 DISEGNI TECNICI / TECHNICAL DRAWING / DESSINS TECNIQUES Fig. 1 - Fil Pilote Fig. 2: Classificazione della sala bagno / Bathroom classification / Classification de la salle de bain VOLUME 3 IPX4 IPX1...
- Page 3 Fig. 3 - Vista frontale / Frontal view / Vue de face pavimento / floor Fig. 3A - Vista dal basso / Bottom view / Vue de dessous 26,1...
- Page 4 Fig. 4A - Fori di fissaggio Fig. 4 - Fori di fissaggio / Fixing holes / Trous de (verso di montaggio delle staffe) /Fixing fixation holes (correct position of the brackets) / Trous de fixation (position correcte des supports) min. 20 cm Fig.
- Page 5 Fig. 6 - Termostato SMART / SMART thermostat / Thermostat SMART Fig. 7 - Aggiungere il radiatore / Add the radiator / Ajouter le radiateur Fig. 9 - Mode FIL PILOT Fig. 10 - Mode COMFORT Fig. 8 - Mode STAND BY Fig.
- Page 6 Fig. 14 - Boost 2H Fig. 15 - Rilevatore di finestre aperte / Open window detection / Détecteur de fenêtre ouverte Fig. 16 - Wi-Fi Fig. 17- Telecomando remoto / Fig. 18 - Smaltimento / Remote control / Télécommande Disposal / Disposition SU RICHIESTA/ON REQUEST...
-
Page 7: Dati Del Produttore
DATI DEL PRODUTTORE Grazie per averci scelti. Prima di installare e/o utilizzare il prodotto siete pregati di leggere attentamente questo manuale riguardante l’installazione, l’utilizzo e la corretta manutenzione. Questo radiatore è prodotto da: AL-TECH srl - Via E. Ferrari, 1 62017 Porto Recanati (MC) Italy, ridea@al-techsrl.com - Tel. - Page 8 UTILIZZO SICURO • Il radiatore può essere utilizzato da bambini di meno di 8 anni e da persone con abilità fisiche, sensoriali o mentali ridotte, o da mancata esperienza o conoscenze necessarie, a condizione che siano sorvegliate o dopo aver ricevuto le istruzioni d’utilizzo a dell’apparecchio e dopo aver compreso i pericoli inerenti ad esso.
- Page 9 • Se il cavo di alimentazione è danneggiato, deve esserlo essere sostituito dal produttore, dal suo agente di servizio o persone con qualifiche simili per evitare qualsiasi rischio. • Il radiatore elettrico deve essere installato al riparo da un eventuale contatto con l’acqua e i dispositivi di comando e di comando elettrico non devono essere posizionati a portata di persone che si trovano dentro vasche da bagno, docce o situazioni a contatto con l’acqua.
- Page 10 INSTALLAZIONE Leggete attentamente tutte le istruzioni e le misure per un montaggio corretto del radiatore. • Effettuare le connessioni elettriche solamente dopo aver fissato il radiatore alla parete. • I raccordi devono essere effettuati unicamente da personale qualificato ed esperto e devono essere realizzati conformemente alle regolamentazioni in vigore utilizzando materiali certificati.
-
Page 11: Scheda Tecnica
SCHEDA TECNICA [Fig. 3; 3a] OTHELLO II 450 W MODELLO Potenza elettrica 450 W Alimentazione 230V +/- 10% 50Hz elettrica Classe di isolamento CLASSE II Grado di protezione IPX4 - apparecchio protetto contro i getti d’acqua Dimensioni L x H x P 200x1800x35 mm Interassi tra i fori di fissaggio... - Page 12 ISTRUZIONI DI MONTAGGIO A MURO • Forare il muro considerando Lf [larghezza tra i fori] e Hf [altezza tra i fori] [Fig. 4]. • Avvitare le staffe nelle 4 guide. • Fissare le due staffe superiori rivolte verso l’alto (le viti devono essere inserite nelle staffe, ma non completamente avvitate).
- Page 13 COME UTILIZZARE IL CRONOTERMOSTATO [Fig. 6] Il termostato ha due tasti: 1) CONNESSIONE: per connetterlo allo smartphone o al telecomando remoto; [Fig. 6a] 2) STAND-BY (Stand by o comfort 20 ° C). [Fig. 6b] MODALITÀ OPERATIVE: Stand-by, Fil Pilot, Comfort, Riduzione notturna, antigelo, termostato programmabile, BOOST 2H, ECO, rilevatore di finestre aperte, ASC.
- Page 14 FUNZIONI Le seguenti funzioni possono essere attivate tramite l’app Radiatori 2000 SMART o tramite il telecomando remoto [PAR. 17] [Fig. 8] 1. STAND-BY In modalità STAND-BY il termostato non scalda. [Fig. 9] 2. FIL PILOTE È possibile collegare il termostato ad una centralina Fil-Pilote. NOTA: tale connessione è...
- Page 15 [Fig. 14] 7. BOOST 2H La modalità BOOST 2H può essere utilizzata per riscaldare rapidamente l'ambiente o accelerare l'asciugatura delle salviette. L'apparecchio viene acceso alla massima potenza per 2 ore, con temperatura impostata a 30 ° C. La modalità BOOST 2H è impostata per arrestarsi automaticamente dopo un periodo di 2 ore e tornare alla modalità...
-
Page 16: Controllo Remoto
MODULO WI-FI Per attivare il modulo Wi-Fi e controllare i radiatori di casa da remoto, procedere come segue: 1) Andare nell’area Wi-Fi dell’applicazione [Fig. 16a]; 2) Selezionare AGGIUNGERE WI-FI [Fig. 16b]; 3) Selezionare AGGIUNGERE TERMOSTATO NON ANCORA CONNESSO ALLA RETE DI CASA [Fig. -
Page 17: Smaltimento
Il produttore AL-TECH srl - Via E. Ferrari, 1 62017 Porto Recanati (MC) Italy, ridea@al-techsrl.com Tel. +39 071 7506170 dichiara che il modello di radiatore elettrico: OTHELLO II 450 w Sono fabbricati conformemente alla direttiva europee: Direttiva 2014/35/UE. E conformemente alle norme armonizzate: - EN 60335-1:2012 + A11:2014 + A13:2017 + A1:2019 + A2:2019 + A14:2019: Sicurezza degli apparecchi elettrici domestici e simili, regolamentazioni generali. -
Page 18: Manufacturer's Details
MANUFACTURER’S DETAILS Dear customer, thank you for having chosen us. Before installing and/or using the product, please read this manual on installation, use and correct maintenance carefully. The radiator is manufactured by: AL-TECH srl - Via E. Ferrari, 1 62017 Porto Recanati (MC) Italy, ridea@al-techsrl.com - Tel. - Page 19 SAFE USE • The radiator can be used by children under 8 years old or by people with reduced physical, sensory or mental abilities, or without the necessary experience or knowledge, provided that they are supervised or after having received the instruc- tions for use of the appliance and after having understood the dangers linked to it.
- Page 20 • This radiator’s protection system is designed to prevent direct access to the electric heating elements and must be kept in its position during use. • Do not load or hang excessive weights, the range of the structure calculated to support a maximum of 2Kg. •...
-
Page 21: Technical Data Sheet
TECHNICAL DATA SHEET [Fig. 3; 3a] MODEL OTHELLO II 450 W 450 W Rated power 230V +/- 10% 50Hz Power supply CLASSE II Insulation class IPX4 Protection rating 200x1800x35 mm Dimensions L x H x P Centre distance between 1390 mm the fixing holes LfxHf... - Page 22 WALL MOUNTING INSTRUCTIONS • Drill the wall considering Lf [hole length] and Hf [hole height] [Fig. 4]. • Screw in the 4 rails. • Fix the two top wall brackets facing upwards (the screws must be inserted in the bracket, but not fully screwed). (A and B) [Fig. 4a] •...
- Page 23 HOW TO USE THE THERMOSTAT [Fig. 6] The thermostat has two buttons: 1) CONNECTION: to connect a smartphone or a remote control; [Fig. 6a] 2) STAND-BY (Stand by or comfort 20 ° C). [Fig. 6b] OPERATING MODES: Stand-by, Fil Pilot, Comfort, Night, Antifreeze, Programmable Thermostat, BOOST 2H, ECO, detection of open windows, ASC.
-
Page 24: Functions
FUNCTIONS The following functions can only be managed via an application or the remote control. [Page 14] [Fig. 8] 1. STAND-BY In STAND-BY mode, the radiator does not heat up. [Fig. 9] 2. MODE FIL PILOTE FIL PILOT is a special communication protocol that allows the radiator to be managed by a special control unit. -
Page 25: Weekly Program 24H/24 Et 7J
[Fig. 14] 7. BOOST 2H This mode can be used to heat the environment quickly. The device is delivered on full power for 2 hours with a temperature set at 30 ° C. BOOST 2H mode it is configured to stop automatically after a period of 2 hours and return to operating mode previously defined. -
Page 26: Remote Control
WI-FI MODULE To activate the Wi-Fi module and control the domestic radiators remotely, proceed as following: 1) Go to the Wi-Fi area of the application [Fig. 16a]; 2)Select ADD WI-FI [Fig. 17b]; 3)Select ADD THERMOSTAT NOT YET CONNECTED TO THE HOME NETWORK [Fig. 16c]; 4) Activate the Wi-Fi of the smartphone / tablet;... - Page 27 The manufacturer, AL-TECH srl - Via E. Ferrari, 1 62017 Porto Recanati (MC) Italy, ridea@al-techsrl.com Tel. +39 071 7506170, declares that the electric panel heater models: OTHELLO II 450 W are manufactured in compliance with European Directives: Directive 2014/35/EU and 2014/30/EU.
- Page 28 WARRANTY AND CUSTOMER SUPPORT The aluminium alloy body is guaranteed against manufacturing defects for up to 5 years from the date of purchase. The electrical and electronic components are guaranteed for 2 years from the date of purchase of the radiator. The warranty is valid if the product remains intact, without any alteration or modification.
-
Page 29: Données Du Producteur
DONNÉES DU PRODUCTEUR Cher client, Merci de votre attention, avant d'installer et / ou d'utiliser le produit, veuillez lire attentivement ce manuel concernant l'installation, l'utilisation et la maintenance correcte de l'appareil. Ce radiateur est fabriqué par: AL-TECH srl - Via E. Ferrari, 1 62017 Porto Recanati (MC) Italy, ridea@al-techsrl.com - Tel. -
Page 30: Utilisation Sûre
UTILISATION SÛRE Cet appareil peut être utilisé par des enfants âgés d’au • moins 8 ans et par des personnes ayant des capacités physi- ques, sensorielles ou mentales réduites ou dénuées d’ex- périence ou de connaissances nécessaires, à condition qu’ils soient surveillés ou après avoir reçu des instructions une utilisation sûre de l’appareil et une compréhension des dan- gers inhérents à... - Page 31 • Tous les contacts doivent être séparés d’au moins 3 • Il est obligatoire que le système d’alimentation électrique auquel le régulateur est raccordé ait une protection différentielle extra- sensible. • Le câble électrique doit être branché à une prise ou à...
-
Page 32: Exigence D'installation
INSTALLATION Lisez attentivement toutes les instructions et les mesures pour un montage correct du radiateur Effectuer les connexions électriques uniquement après la fixation du radiateur au mur. • Les raccordements doivent être effectués uniquement par un personnel qualifié et • expérimenté... -
Page 33: Outils Necessaires Au Montage
- Foret mural D. 8 (si vous utilisez les bouchons fournis); MATÉRIEL PRÉSENT DANS L’EMBALLAGE - 4 supports muraux - 8 vis et chevilles pour béton, brique et pierre. FIG. 3; 3a] OTHELLO II 450 MODÈLE 450 W Puissance nominale 230V +/- 10% 50Hz Alimentation électrique... -
Page 34: Entretien
INSTRUCTIONS DE MONTAGE MURAL • Percez le mur en considérant Lf et Hf (trous de fixation). • Connectez les 4 guides en utilisant les vis. • Insérez les 2 supports muraux supérieures face au plafond. • Les vis seront sur le support, pas complètement vissées. •... -
Page 35: Connexion
MODE D’UTILISATION DU THERMOSTAT PROGRAMMABLE Le thermostat a deux boutons: [FIG. 6] a) STAND-BY (Stand by ou confort 20°C). b) CONNEXION: pour connecter un smartphone ou une télécommande; MODES DE FONCTIONNEMENT: Stand-by, Fil Pilot, Confort, Nuit, Antigel, Thermostat Programmable, BOOST 2H, ECO, détection de fenêtres ouvertes, ASC. LED: chaque fonction correspond à... - Page 36 4) Ajoutez le radiateur avec le bouton + ADD ONE sur l'écran du smartphone. Chaque radiateur sera inséré automatiquement avec le nom ONE. [FIG. 7] 5) Renommez chaque radiateur avec le nom souhaité en le sélectionnant. Une fois que vous avez enregistré tous les radiateurs de la maison, vous pouvez commencer à...
-
Page 37: Détection De Fenêtres Ouvertes
5. ANTIGEL (led bleu clignotant) Dans ce mode de fonctionnement, la température ne peut pas être réglé par l'utilisateur, mais est fixée à 7 ° C. En mode antigel, l’écran indique le symbole du gel et la température d’antigel, flèchie à 7 °C. Ce mode empêche la température ambiante de tomber en dessous de 7 °... -
Page 38: Module Wifi
MODULE WIFI Pour activer le module Wi-Fi et contrôler les radiateurs domestiques à distance, procédez comme suit: Avec les programmes P8 et P9, il est possible de définir un calendrier personnalisé pour chaque jour de la semaine. A partir du jour 1, sélectionnez la séquence souhaitée pour choisir, pour chaque heure, d'avoir la température "CONFORT"... -
Page 39: Télécommande
TÉLÉCOMMANDE Comme alternative à l'application, l'électronique communique également avec une télécommande qui peut être achetée sur demande. [FIG. 17] La télécommande a une connexion sans fil: elle peut être portable ou fixée au mur près du radiateur (max. 4 mètres). À... -
Page 40: Normes Internationales
NORMES INTERNATIONALES Le producteur, AL-TECH srl, déclare que modèles de panneaux de chauffage électrique: OTHELLO II 450 W sont fabriqués conformément aux directives européennes: Directive 2014/35/UE et 2014/30/EU, et conformément aux normes harmonisées: - EN 60335-2-30:2009 + A11:2012 + A1:2020;...