Table des Matières

Publicité

Les langues disponibles

Les langues disponibles

Liens rapides

INSTRUCTION MANUAL
MANUEL D'INSTRUCTION
MANUAL DE INSTRUCCIONES
FSV-144US
BEFORE USE, PLEASE READ AND FOLLOW ALL SAFETY RULES AND OPERATING
INSTRUCTIONS.
AVANT D'UTILISER L'APPAREIL, VEUILLEZ LIRE ATTENTIVEMENT LES RÈGLES DE
SÉCURITÉ ET LES INSTRUCTIONS.
LEA Y SIGA TODAS LAS INSTRUCCIONES Y ADVERTENCIAS DE SEGURIDAD DE ESTE
MANUAL ANTES DE UTILIZAR EL APARATO.
FAGOR has a policy of continuous improvement on its products and reserves the right to change materials and specifications
without notice.
FAGOR a une politique d‟amélioration continue de ses produits et se réserve le droit de changer les matériaux el les
spécifications sans préavis.
FAGOR sigue una política de mejora continua en sus productos y se reserva el derecho a hacer cambios en los materiales y
especificaciones del mismo sin previo aviso.
1

Publicité

Table des Matières
loading

Sommaire des Matières pour Fagor FSV-144US

  • Page 1 FAGOR a une politique d‟amélioration continue de ses produits et se réserve le droit de changer les matériaux el les spécifications sans préavis. FAGOR sigue una política de mejora continua en sus productos y se reserva el derecho a hacer cambios en los materiales y especificaciones del mismo sin previo aviso.
  • Page 2: Table Des Matières

    TABLE OF CONTENTS IMPORTANT SAFETY INSTRUCTIONS WINE COOLER SAFETY IMPORTANT SAFEGUARDS PARTS AND FEATURES INSTALLATION INSTRUCTIONS Before using your wine cooler Installation of your wine cooler Built-in cabinet instructions Electrical connection Extension cord Surge protector OPERATING YOUR WINE COOLER Recommended temperature settings ON/OFF power Control panel lock Setting the temperature control...
  • Page 3: Important Safety Instructions

    IMPORTANT SAFETY INSTRUCTIONS To reduce the risk of fire, electrical shock,   or injury when using your appliance, follow WARNING these basic precautions: Read all instructions before using the wine cooler. DANGER or WARNING: To avoid the possibility of child entrapment, please take the following precautions before throwing out the appliance.
  • Page 4: Important Safeguards

    IMPORTANT SAFEGUARDS Before the appliance is used, it must be properly positioned and installed as described in this manual, so read the manual carefully. To reduce the risk of fire, electrical shock or injury when using the appliance, follow basic precaution, including the following: Plug into a grounded 3-prong outlet, do not remove grounding prong, do not use an adapter, and do not use an extension cord.
  • Page 5: Parts And Features

    PARTS & FEATURES 1. Interior light – Upper Zone 2. Interior fan – Upper Zone 3. Temperature Control Panel 4. Interior light – Lower Zone 5. Interior fan – Lower Zone 6. Front grille 7. Glass door with stainless steel Frame 8.
  • Page 6: Installation Instructions

    INSTALLATION INSTRUCTIONS BEFORE USING YOUR WINE COOLER Remove the exterior and interior packing. Before connecting this appliance to the power source, let it stand upright for approximately 2 hours. This will reduce the possibility of a malfunction in the cooling system from handling during transportation.
  • Page 7: Electrical Connection

    The cutout dimension illustrated allows for a normal door opening clearance and access to the racks when installed as a built-in appliance. If installing between frameless cabinets, a ½” wide filler strip or side panel may be needed on the side with the hinge. This strip will act as a spacer between the appliance case and adjacent cabinet door.
  • Page 8: Operating Your Wine Cooler

    OPERATING YOUR WINE COOLER It is recommended you install the wine cooler in a place where the ambient temperature is between 19ºC-24ºC (66ºF-75ºF). If the ambient temperature is above or below recommended temperatures, the performance of the unit may be affected. For example, placing your unit in extreme cold or hot conditions may cause interior temperatures to fluctuate.
  • Page 9: Storage

    STORAGE Many bottles may differ in size and dimensions. As such the actual number of bottles you may be able to store may vary. You can place 44 standard bottles in this wine cooler. The upper zone can hold as many as 16 wine bottles (2 rows of 8 bottles) and the lower zone can hold as many as 28 wine bottles (2 rows x 8 bottles, plus 1 row x 12 bottles (6+6 stacked up)).
  • Page 10: Care And Maintenance

    CARE AND MAINTENANCE DEFROST Any ice build-up on the inner back wall during compressor operation will be automatically defrosted in a compressor off cycle. When defrosting is in process, only the circulation fans for both zones run. Defrost water will drain into the drip pan (on the compressor), and the water will be evaporated by the compressor.
  • Page 11: Troubleshooting Guide

    TROUBLESHOOTING GUIDE You can solve many common Wine Cooler problems easily, saving you the cost of a possible service call. Try the suggestions below to see if you can solve the problem before calling the servicer. PROBLEM POSSIBLE CAUSE SOLUTION Not plugged in.
  • Page 12: Wiring Diagram

    WIRING DIAGRAM...
  • Page 13 TABLE DES MATIÈRES CONSIGNES DE SÉCURITÉ IMPORTANTS SÉCURITÉ RELATIVE À L‟APPAREIL CONSEILS DE SÉCURITÉ IMPORTANTS PIÈCES ET CARACTÉRISTIQUES PRÉPARATION ET INSTALLATION DU CELLIER Préparation du cellier Installation du cellier Encastrement Branchement au réseau électrique Rallonge Parasurtenseur (Powerbar) FONCTIONNEMENT DE L‟APPAREIL Recommandations relatives à...
  • Page 14: Consignes De Sécurité Importants

    CONSIGNES DE SÉCURITÉ IMPORTANTES Pour diminuer les risques d‟incendie, d‟électrocution ou AVERTISSEMENT d‟accident pendant l‟utilisation de votre appareil, veuillez suivre les mesures de sécurité suivantes: Veuillez lire toutes les instructions avant d‟utiliser l‟appareil. DANGER ou AVERTISSEMENT: Les risques d‟enfermement ou de suffocation pour les enfants demeurent une réalité.
  • Page 15: Conseils De Sécurité Importants

    CONSEILS DE SÉCURITÉ IMPORTANTS Avant toute utilisation, le cellier doit être convenablement positionné et installé comme il est décrit dans ce manuel, il est donc nécessaire de le lire attentivement. Pour réduire les risques d‟incendie, d‟électrocution ou de blessure lors de l‟utilisation de l‟appareil, nous vous recommandons de suivre les mesures de sécurité...
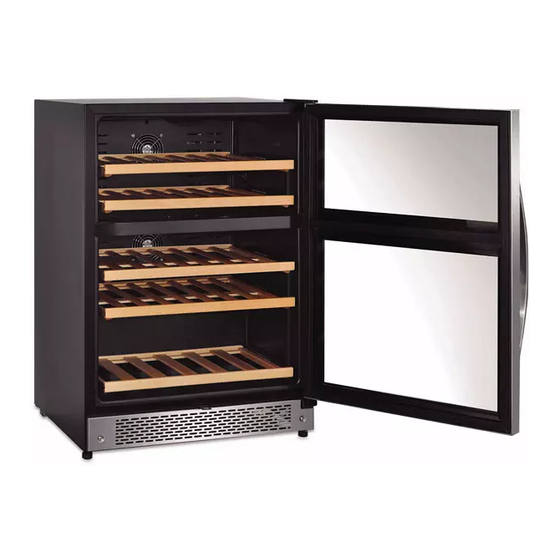
  • Page 16: Pièces Et Caractéristiques

    PIÈCES ET CARACTÉRISTIQUES Lumière intérieure – zone supérieure Ventilateur intérieur – zone supérieure Panneau de contrôle de la température Lumière intérieure – zone inférieure Ventilateur intérieur – zone inférieure Coup-de-pied Porte vitrée en acier inoxydable Poignée en acier inoxydable Serrure (certains modèles) 10.
  • Page 17: Préparation Et Installation Du Cellier

    PRÉPARATION ET INSTALLATION DU CELLIER PREPARATION DU CELLIER Retirez l„emballage extérieur et intérieur. Lisez le mode d‟emploi. Placez l‟appareil à l‟endroit qui lui est réservé puis attendez environ deux heures avant de le brancher. Vous éviterez ainsi des troubles de fonctionnement au niveau du système de refroidissement possiblement occasionnés lors du transport.
  • Page 18: Branchement Au Réseau Électrique

    Si l'installation se fait entre des armoires sans cadre, une fourrure d‟un ½ " de large ou une bande panneau latérale pourra être nécessaire du côté charnière. La bande agira comme un espacement entre le boitier de l'appareil et la porte du cabinet adjacent. La largeur de l‟ouverture doit inclure le panneau ou la fourrure.
  • Page 19: Fonctionnement De L"Appareil

    FONCTIONNEMENT DE L’APPAREIL Il est recommandé de placer l‟appareil dans un endroit où la température ambiante se situe entre 19° et 24°C (66°F-75°F). Si la température ambiante est supérieure ou inférieure à la température recommandée, il se peut que le fonctionnement de l‟appareil en soit affecté. Par exemple, exposer votre appareil à...
  • Page 20: Éclairage Intérieur

    ÉCLAIRAGE INTERIEUR S‟il est laissé allumer, l‟éclairage intérieur s‟éteindra automatiquement au bout de dix minutes. Vous devrez alors déverrouiller le panneau de contrôle et appuyer sur l‟icône représentant l‟éclairage pour le rétablir. CAPACITE D’ENTREPOSAGE Les bouteilles peuvent varier en taille et en dimension. Ainsi, le nombre réel de bouteilles qu‟il vous sera possible d‟entreposer variera également.
  • Page 21: Entretien De L"Appareil

    ENTRETIEN DE L’APPAREIL DECONGÉLATION L‟accumulation de glace sur le mur arrière intérieures ‟éliminera automatiquement quand le compresseur aura terminé son cycle. L'eau s'égouttera en passant par le sortie de vidange du mur arrière intérieure dans un contenant situé au-dessus du compresseur, à partir d‟ où elle s'évapore. NETTOYAGE DE L’APPAREIL Coupez le courant, débranchez l‟appareil et videz le contenu incluant les tablettes.
  • Page 22: Guide De Dépannage

    GUIDE DE DÉPANNAGE Vous pouvez facilement résoudre plusieurs des problèmes courants de votre appareil et vous épargner ainsi des frais de service. Essayez les suggestions ci-dessous qui s‟appliquent à votre situation avant de faire appel à un professionnel. PROBLÈME CAUSE POSSIBLE SOLUTION Vérifiez s‟il est bien branché.
  • Page 23: Schéma De Câblage

    SCHÉMA DE CÂBLAGE M IC R O - C O M P U T E R C O N T R O L L E R T R A N S F O R M E R U P P E R L O W E R D E F R O S T D E F R O S T...
  • Page 24 INDICE INSTRUCCIONES DE SEGURIDAD SEGURIDAD DEL APARATO MEDIDAS PREVENTIVAS PIEZAS Y CARACTERISTICAS INSTRUCCIONES DE INSTALACION Antes de utilizar su armario bodega Instalación de su armario bodega Instalación integrada Conexión eléctrica Cable de extensión/Alargador Protector de sobretensión UTILIZACION DEL ARMARIO BODEGA Temperatura recomendada para la conservación del vino Encendido/Apagado Bloqueo del panel de control...
  • Page 25: Instrucciones De Seguridad

    INSTRUCCIONES DE SEGURIDAD Para evitar riesgo incendio,   descargas eléctricas o daños al utilizar su ADVERTENCIA aparato, tome las siguientes precauciones: Lea detenidamente este manual antes de su instalación y uso. PELIGRO O ADVERTENCIA: Para evitar la posibilidad de que los niños se queden atrapados, por favor tome las siguientes precauciones antes de deshacerse del aparato: Retire la(s) puerta(s) de la unidad.
  • Page 26: Medidas Preventivas

    MEDIDAS PREVENTIVAS Antes de utilizar el aparato, lea atentamente estas instrucciones de seguridad y asegúrese de que el armario bodega se instala en una ubicación adecuada. Para evitar que se produzcan descargas eléctricas, fugas o fuego, tenga en cuenta los siguientes puntos: Asegúrese de conectar la unidad a un enchufe de tres puntas con toma a tierra.
  • Page 27: Piezas Y Caracteristicas

    PIEZAS Y CARACTERISTICAS Luz interior – zona superior Ventilador interior – zona superior Panel de control de temperatura Luz interior – zona inferior Ventilador interior – zona inferior Rejilla frontal Puerta de vidrio con marco en acero inoxidable Tirador de acero inoxidable Cerradura (algunos modelos) 10.
  • Page 28: Instrucciones De Instalacion

    INSTRUCCIONES DE INSTALACION ANTES DE UTILIZAR SU ARMARIO BODEGA Retire el embalaje exterior e interior. Antes de conectar el aparato a la fuente de alimentación, déjelo en posición vertical aproximadamente 2 horas, esto evitará cualquier posible fallo del sistema de refrigeración debido a un manejo inapropiado durante su transporte.
  • Page 29: Conexión Eléctrica

    La dimensión del corte que aparece en la ilustración establece el espacio necesario para abrir la puerta y tener acceso a las repisas extraíbles, cuando se instala como un aparato integrado. Si se instala entre armarios sin marco, en el lado de la bisagra podría ser necesaria una tira de relleno de ½" (1.27 cm) de ancho o un panel lateral.
  • Page 30: Utilizacion Del Armario Bodega

    UTILIZACION DEL ARMARIO BODEGA Se recomienda colocar el armario bodega en un lugar donde la temperatura ambiente sea de entre 19° y 24°C (66°F-75°F). Si la temperatura ambiente no es la recomendada, el rendimiento del aparato puede disminuir. Si coloca el aparato en lugares muy fríos o calientes la temperatura interior puede variar. Puede que el armario bodega no alcance el rango de los 4°...
  • Page 31: Capacidad

    CAPACIDAD Tal y como los tamaños y dimensiones de las botellas varían, la capacidad de almacenamiento de su armario bodega también. Puede conservar 44 botellas estándar en este armario bodega. La zona superior puede albergar hasta 16 botellas de vino (2 filas de 8 botellas) y la zona inferior puede albergar hasta 28 botellas de vino -2 filas x 8 botellas, además de una fila de 12 botellas (6 + 6 apiladas).
  • Page 32: Cuidado Y Mantenimiento

    CUIDADO Y MANTENIMIENTO DESHIELO Cualquier acumulación de hielo en la pared trasera interna será automáticamente descongelada en un ciclo de descompresión. Cuando la descongelación se encuentra en proceso, sólo operan los ventiladores de circulación de las dos zonas. El agua descongelada se drena en la bandeja de goteo (en el compresor), y el compresor evapora el agua.
  • Page 33: Solucion De Problemas

    SOLUCION DE PROBLEMAS Puede solucionar muchos problemas comunes del aparato fácilmente y eso le ahorrará el coste de una posible llamada al servicio de asistencia técnica. Antes de llamar al servicio técnico, revise los siguientes consejos prácticos de resolución de problemas. PROBLEMA CAUSA PROBABLE SOLUCION...
  • Page 34: Diagrama Electrico

    DIAGRAMA ELECTRICO...

Table des Matières