Publicité
Les langues disponibles
Les langues disponibles
Liens rapides
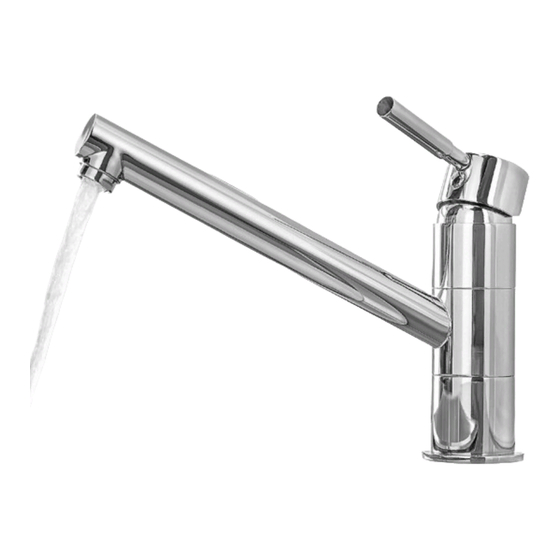
EINHEBEL-SPÜLTISCHARMATUR / KITCHEN MIXER
TAP / MITIGEUR DE CUISINE MONOCOMMANDE
EINHEBEL-SPÜLTISCHARMATUR
Montage-, Bedienungs- und Sicherheitshinweise
MITIGEUR DE CUISINE MONOCOMMANDE
Instructions de montage, d'utilisation et consignes de sécurité
BATERIA ZLEWOZMYWAKOWA
Wskazówki montażu, obsługi i bezpieczeństwa
JEDNOPÁKOVÁ DREZOVÁ BATÉRIA
Pokyny pre montáž, obsluhu a bezpečnostné pokyny
1-GREBS KØKKENARMATUR
Monterings-, betjenings- og sikkerhedshenvisninger
IAN 368455_2010
KITCHEN MIXER TAP
Assembly, operating and safety instructions
MENGKRAAN
Montage-, bedienings- en veiligheidsinstructies
PÁKOVÁ BATERIE
Pokyny k montáži, obsluze a bezpečnostní pokyny
GRIFO MONOMANDO DE COCINA
Instrucciones de montaje, de uso y de seguridad
Publicité

Manuels Connexes pour LIVARNO home HG04894


Sommaire des Matières pour LIVARNO home HG04894
- Page 1 EINHEBEL-SPÜLTISCHARMATUR / KITCHEN MIXER TAP / MITIGEUR DE CUISINE MONOCOMMANDE EINHEBEL-SPÜLTISCHARMATUR KITCHEN MIXER TAP Montage-, Bedienungs- und Sicherheitshinweise Assembly, operating and safety instructions MITIGEUR DE CUISINE MONOCOMMANDE MENGKRAAN Instructions de montage, d‘utilisation et consignes de sécurité Montage-, bedienings- en veiligheidsinstructies BATERIA ZLEWOZMYWAKOWA PÁKOVÁ...
- Page 2 DE / AT / CH Montage-, Bedienungs- und Sicherheitshinweise Seite GB / IE Assembly, operating and safety instructions Page FR / BE Instructions de montage, d‘utilisation et consignes de sécurité Page NL / BE Montage-, bedienings- en veiligheidsinstructies Pagina 18 Wskazówki montażu, obsługi i bezpieczeństwa Strona Pokyny k montáži, obsluze a bezpečnostní...
- Page 3 Sie benötigen · You need · Il vous faut · U hebt nodig Wymagane · Potřebujete · Potrebujete · Necesita · Du skal bruge:...
- Page 5 Einhebel-Spültischarmatur 1 Gewinderohr 1 Mischdüse 1 Einstellhebel Einleitung 1 Arretierungsschraube 1 Plastikabdeckung Wir beglückwünschen Sie zum Kauf Ihres neuen 1 KartuschenAbdeckring Produkts. Sie haben sich damit für ein hochwertiges 1 KartuschenSicherungsring Produkt entschieden. Machen Sie sich vor der ersten 1 Kartusche Inbetriebnahme mit dem Produkt vertraut.
- Page 6 nur durch fachkundige Personen durchführen. Schrauben Sie die Mischdüse Undichtigkeiten oder Wasseraustritt können zu Öffnen Sie die HauptWasserzufuhr und lassen erheblichen Sachschäden an Gebäude oder Sie das Wasser zwei Minuten lang laufen. Hausrat führen. Prüfen Sie daher alle Verbin Schrauben Sie die Mischdüse anschließend dungen sorgfältig auf Dichtigkeit.
- Page 7 Temperaturbegrenzung Wartung und Reinigung einstellen Armatur pflegen und reinigen Die Kartusche dieser Armatur verfügt über eine Temperaturbegrenzung. Diese Funktion ist werksseitig Beachten Sie, dass Sanitärarmaturen einer beson nicht aktiviert (neutrale Einstellung). deren Pflege bedürfen. Beachten Sie daher die folgenden Anweisungen: VORSICHT! Verändern Sie die Einstellung Verwenden Sie keine ätzenden oder alkohol...
- Page 8 kein Stagnationswasser zur Zubereitung von angesehen werden können oder Beschädigungen Speisen und Getränken, besonders nicht bei an zerbrechlichen Teilen, z. B. Schalter, Akkus oder der Ernährung von Säuglingen. Anderenfalls die aus Glas gefertigt sind. können gesundheitliche Beschwerden auftre ten. Frisches Wasser können Sie daran erken Abwicklung im Garantiefall nen, dass es spürbar kühler die Leitung verlässt als Stagnationswasser.
- Page 9 Kitchen mixer tap 1 Locking screw 1 Plastic cover 1 Cartridge end ring Introduction 1 Cartridge locking ring 1 Cartridge We congratulate you on the purchase of your new 1 Tap body product. You have chosen a high quality product. 1 Cartridge setting ring Familiarise yourself with the product before using it 1 Hexagonal key...
- Page 10 tioned within the area of the sink, otherwise Lift the lever until you notice a slight resist escape of water can lead to serious flooding ance. This resistance will cause a stop in case to your house or building. of partial opening and will therefore simply limit CAUTION! DANGER OF SCALDING! the flow of water.
- Page 11 Disposal CAUTION! Do not take the screw completely out; just loosen it until the control lever be easily taken off. The packaging is wholly composed of environmen Take off the control lever tally friendly materials that can be disposed of at a Loosen the cartridge end ring by hand.
- Page 12 Warranty to you. Ensure that you enclose the proof of pur chase (till receipt) and information about what the The product has been manufactured to strict quality defect is and when it occurred. guidelines and meticulously examined before deliv ery. In the event of product defects you have legal Service rights against the retailer of this product.
- Page 13 Mitigeur de cuisine 1 écrou monocommande 1 tube fileté 1 bec de mitigeur 1 levier de contrôle Introduction 1 vis de blocage 1 cache en plastique Nous vous félicitons pour l‘achat de votre nouveau 1 bague de fin de cartouche produit.
- Page 14 Rinçage du robinet ATTENTION ! RISQUE DE DÉGÂTS MA- TÉRIELS ! Confiez exclusivement le montage à des techniciens qualifiés. Les fuites ou rup Afin d’éliminer les éventuelles impuretés, il tures de conduites d’eau peuvent occasionner convient de rincer le robinet avant la première d’importants dégâts matériels du bâtiment ou utilisation.
- Page 15 Ouvrez l’alimentation principale en eau. en tournant dans le sens des aiguilles d’une Remontez le levier de contrôle et le tourner montre. à droite ou à gauche pour régler l‘intensité du Appuyez le cache en plastique dans jet et la température de l‘eau. l‘ouverture.
- Page 16 Informations Indépendamment de la garantie commerciale sous crite, le vendeur reste tenu des défauts de conformité Potabilité de l’eau du robinet du bien et des vices rédhibitoires dans les conditions prévues aux articles L2174 à L21713 du Code Informezvous auprès des autorités locales sur la de la consommation et aux articles 1641 à...
- Page 17 Faire valoir sa garantie l‘aurait pas acquise, ou n‘en aurait donné qu‘un moindre prix, s‘il les avait connus. Pour garantir la rapidité d’exécution de la procédure Article 1648 1er alinéa du Code civil de garantie, veuillez respecter les indications suivantes : L‘action résultant des vices rédhibitoires doit être intentée par l‘acquéreur dans un délai de deux ans Veuillez conserver le ticket de caisse et la référence...
- Page 18 Mengkraan 1 Regelhendel 1 Vastzetschroef 1 Plastic afdekking Inleiding 1 Eindring voor patroon 1 Vastzetring voor patroon Hartelijk gefeliciteerd met de aankoop van uw nieuwe 1 Patroon product. U hebt voor een hoogwaardig product 1 Kraanbehuizing gekozen. Maak u voor de eerste ingebruikname 1 Instelring vertrouwd met het product.
- Page 19 Controleer daarom alle verbindingen zorgvuldig Open de hoofdwaterkraan en laat het water op dichtheid. twee minuten lang lopen. Let er op, dat alle afdichtingen juist gemonteerd Schroef de spuitmond vervolgens weer vast. zijn, om te voorkomen dat water door een on dichte verbinding kan lekken.
- Page 20 Temperatuurbegrenzing Onderhoud en reiniging instellen Armatuur onderhouden en reinigen De patroon van deze armatuur bezit een tem peratuurbegrenzing. Deze functie is fabrieksmatig niet geactiveerd (neutrale instelling). Houd er a.u.b. rekening mee dat sanitaire ar maturen speciaal onderhoud vergen. Neem VOORZICHTIG! Verander de instelling van daarom de volgende instructies in acht: de temperatuurbegrenzing pas nadat u de ar...
- Page 21 Gebruik geen stagnatiewater voor het bereiden onderdelen gelden (bijv. batterijen) of voor bescha van voeding en drank, vooral niet bij het voe digingen aan breekbare onderdelen, zoals bijv. den van zuigelingen. Anders kan gevaar voor schakelaars, accu’s of dergelijke onderdelen, die de gezondheid ontstaan.
- Page 22 Bateria zlewozmywakowa Opis części 1 długi wąż elastyczny (ciepła / zimna woda) Wstęp 1 nakrętka blokująca 1 pierścień uszczelniający Gratulujemy Państwu zakupu nowego produktu. 1 podkładka (plastikowa) Zdecydowali się Państwo na zakup produktu naj 1 podkładka (metalowa) wyższej jakości. Przed uruchomieniem urządzenia 1 nakrętka po raz pierwszy zapoznaj się...
- Page 23 wszystkie przewody urządzeń elektrycznych zo spowodowanego nieszczelnością. Spuścić stały właściwie oraz bezpiecznie zainstalowane. pozostałą wodę z przewodów. UWAGA! NIEBEZPIECZEŃSTWO Armaturę należy zainstalować tak, jak poka USZKODZENIA CIAŁA! Upewnić się, czy zano na rys. A i B. OSTROŻNIE! Nie przekręcać ani nie naprę wszystkie części są...
- Page 24 Obsługa Ponownie zaciągnąć pieścień zabezpieczający głowicę przy użyciu obcęgów na korpusie Uruchomienie armatury . Zamocować pierścień osłonowy głowicy ręcznie. Wskazówka: Po dłuższym nieużywaniu armatury Ponownie założyć dźwignię nastawczą należy najpierw gruntownie przepłukać przewody, korpus armatury i zaciągnąć śrubę bloku aby usunąć zastoje i pozostałości. jącą...
- Page 25 Informacje W przypadku wystąpienia w ciągu 3 lat od daty zakupu wad materiałowych lub fabrycznych, doko Zdatność do picia wody nujemy – według własnej oceny – bezpłatnej na wodociągowej prawy lub wymiany produktu. Świadczenie gwarancyjne obejmuje wady materia Zasięgnąć informacji u miejscowych władz gminnych / miejskich odnośnie zdatności do łowe i fabryczne.
- Page 26 Páková baterie 1 Nastavovací páka 1 Jistící šroub 1 Umělohmotný kryt Úvod 1 Kroužek ukončující patronu 1 Kroužek blokující patronu Blahopřejeme Vám ke koupi nového výrobku. Roz 1 Patrona hodli jste se pro kvalitní výrobek. Před prvním uve 1 Těleso armatury dením do provozu se seznamte s výrobkem.
- Page 27 Funkce úspory vody Dbejte na to, aby byla všechny těsnění správně usazena, aby jste zabránili úniku vody díky ně těsnosti. Kartuše této armatury má úspornou funkci. Výtoková trubka může být otočena do vámi Redukuje průtokové množství vody. Tím je požadované polohy. Ujistěte se, aby výtoková možné...
- Page 28 Odstranění do odpadu Uvolněte jistící šroub tak, že ho otočíte proti směru hodinových ručiček s pomocí Imnbuso vého klíče Obal se skládá z ekologicky vhodných materiálů, POZOR! Nevyjímejte šroub úplně ven; jen ho které můžete jednoduše zlikvidovat prostřednictvím uvolněte tak, aby šla ovládací páka snadno místních recyklačních středisek.
- Page 29 Servis Vaše práva ze zákona nejsou omezena naší níže uvedenou zárukou. Servis Česká republika Na tento artikl platí 3 záruka od data zakoupení. Tel.: 800600632 Záruční lhůta začíná od data zakoupení. Uscho EMail: owim@lidl.cz vejte si dobře originál pokladní stvrzenky. Tuto stvr zenku budete potřebovat jako doklad o zakoupení.
- Page 30 Jednopáková drezová batéria 1 aretačná skrutka 1 umelohmotný kryt 1 krycí krúžok kartuše Úvod 1 poistný krúžok kartuše 1 kartuša Blahoželáme Vám ku kúpe Vášho nového výrobku. 1 telo batérie Kúpou ste sa rozhodli pre vysoko kvalitný produkt. 1 nastavovací krúžok kartuše Pred prvým uvedením do prevádzky sa oboznámte 1 šesťhranný...
- Page 31 Funkcia šetrenia vody alebo na vybavení domácností. Preto dôkladne skontrolujte tesnenie všetkých spojov. Dbajte na to, aby boli všetky tesnenia správne Kartuša v tejto armatúre disponuje funkciou osadené, aby ste predišli úniku vody v dôsledku eko. Táto znižuje prietokové množstvo cez vo netesnosti.
- Page 32 Riaďte sa obrázkom D, aby ste nastavili Vodovodné batérie čistite iba čistou vodou, ohraničenie teploty. jemnými čistiacimi prostriedkami a mäkkou Uzatvorte hlavný prívod vody. handričkou príp. kožou. Opatrne odstráňte umelohmotný kryt pomo Zmiešavaciu trysku v pravidelných časových cou malého plochého skrutkovača. intervaloch vyskrutkujte a odstráňte vápenaté...
- Page 33 prípravu potravín počas tehotenstva. Olovo Číslo výrobku nájdete na typovom štítku, gravúre, prechádza do pitnej vody a je obzvlášť škod na prednej strane Vášho návodu (dole vľavo) alebo livé pre zdravie dojčiat a malých detí. ako nálepku na zadnej alebo spodnej strane. Ak sa vyskytnú...
- Page 34 Grifo monomando de cocina 1 Tuerca 1 Tubo roscado 1 Boquilla mezcladora Introducción 1 Palanca de ajuste 1 Tornillo de anclaje Enhorabuena por la adquisición de su nuevo producto. 1 Cubierta de plástico Ha elegido un producto de alta calidad. Familiarícese 1 Anillo terminal del cartucho con el producto antes de la primera puesta en fun...
- Page 35 ¡CUIDADO! RIESGO DE DAÑOS A LA Saque el boquilla mezcladora. PROPIEDAD Haga que solo personas con Abra el suministro de agua y déjela correr experiencia realicen la instalación. Las fugas o durante dos minutos. escapes de agua pueden generar daños gra Luego, vuelva a colocar el boquilla mezcla...
- Page 36 Cómo establecer el límite de Cuidado y limpieza temperatura Cuidado y limpieza de la llave El cartucho de este producto tiene una unidad que limita la temperatura. Esta función no se activa Tenga en cuenta que todas las conexiones sa en la fábrica (ajuste neutro).
- Page 37 la preparación de comidas y bebidas, en parti normal y que, por ello, puedan considerarse pie cular para la alimentación de lactantes. De lo zas de desgaste (por ej. las pilas). Tampoco cubre contrario podría resultar perjudicial para la daños de componentes frágiles como, por ejem salud.
- Page 38 1-grebs køkkenarmatur 1 patronafdækningsring 1 patronsikringsring 1 patron Indledning 1 armaturlegeme 1 patronens indstillingsring Hjerteligt tillykke med købet af deres nye produkt. 1 indvendig sekskantnøgle Du har besluttet dig for et produkt af høj kvalitet. Gør Dem fortrolig med apparatet inden første Tekniske data ibrugtagning.
- Page 39 Drej afløbet i den ønskede position. Vær op Løft indstillingshåndtaget , til du mærker let mærksom på, at afløbet peger hen mod vasken. modstand. I denne indstilling bliver vandgen Ellers kan vandudslip forårsage betydelige skader nemstrømningen begrænset. på bygningen. Hvis du vil øge vandgennemstrømningen, løft FORSIGTIG! RISIKO FOR SKOLDNING! indstillingshåndtaget mere, indtil du har...
- Page 40 Fjern plastikafdækningen forsigtigt med en Ved manglende overholdelse af plejevejlednin lille, flad skruetrækker. gen kan man forvente skader på overfladen. I Låseskruen løsnes med en indvendig seks så tilfælde kan garantikrav ikke gøres gæl kantnøgle ved at dreje mod urets retning. dende.
- Page 41 Garanti serviceadresse ved vedlæggelse af købsbeviset (kassebon) og angivelsen af, hvori manglen består, Produktet blev produceret omhyggeligt efter de og hvornår den er opstået. strengeste kvalitetskrav og kontrolleret grundigt in den levering. Hvis der forekommer mangler ved Service dette produkt, så har de juridiske rettigheder over for sælgeren af dette produkt.
- Page 42 OWIM GmbH & Co. KG Stiftsbergstraße 1 74167 Neckarsulm GERMANY Model-No.: HG04894 Version: 04 / 2021 Stand der Informationen · Last Information Update · Version des informations · Stand van de informatie · Stan informacji · Stav informací · Stav informácií · Estado de las informaciones ·...