Hitachi AXM649BT Notice D'utilisation

Hitachi AXM649BT Notice D'utilisation

Bluetooth microsysteem
Masquer les pouces Voir aussi pour AXM649BT:
Table des Matières

Publicité

Les langues disponibles
  • FR

Les langues disponibles

  • FRANÇAIS, page 29

Liens rapides

INSTRUCTION MANUAL
NOTICE D'UTILISATION
GEBRUIKSAANWIJZING
MANUALE DI ISTRUZIONI
MANUAL DE INSTRUCCIONES
NÁVOD K OBSLUZE
NÁVOD NA OBSLUHU
KULLANMA KILAVUZU
AXM649BT
Bluetooth Micro system
Micro Chaîne Bluetooth
Bluetooth Microsysteem
Sistema Micro Hi-Fi Bluetooth
Before operating please read these instructions thoroughly.
Lisez attentivement cette notice d'utilisation en totalité avant d'utiliser le produit.
Voor gebruik, lees deze gebruiksaanwijzing grondig door.
Prima di utilizzare il prodotto, leggere attentamente le istruzioni.
Lea detenidamente estas instrucciones antes de utilizar el aparato.
Nežli začnete přístroj používat, přečtěte si prosím pozorně tento návod.
Pred spustením si pozorne prečítajte návod.
Lütfen çalıştırmadan önce bu talimatların tamamını okuyun.
Microcadena Bluetooth
Bluetooth mikrosystém
Bluetooth Müzik Seti

Publicité

Table des Matières
loading

Sommaire des Matières pour Hitachi AXM649BT

  • Page 1 INSTRUCTION MANUAL NOTICE D'UTILISATION GEBRUIKSAANWIJZING MANUALE DI ISTRUZIONI MANUAL DE INSTRUCCIONES NÁVOD K OBSLUZE NÁVOD NA OBSLUHU KULLANMA KILAVUZU AXM649BT Bluetooth Micro system Microcadena Bluetooth Micro Chaîne Bluetooth Bluetooth mikrosystém Bluetooth Microsysteem Bluetooth mikrosystém Sistema Micro Hi-Fi Bluetooth Bluetooth Müzik Seti Before operating please read these instructions thoroughly.
  • Page 2 Some Dos And Don't On The Safe Use Of Equipment This equipment has been designed and manufactured to meet international safety standards but, like any electrical equipment, care must be taken if you are to obtain the best results and safety is to be assured.
  • Page 3 To achieve the utmost in enjoyment and performance, please read this manual carefully before attempting to operate the unit in order to became familiar with its features, and assure you years of faithful, trouble free performance and listening pleasure. Important Notes * Keep instructions: the safety and operating instructions should be retained for future reference.
  • Page 4: Laser Product

    Note: - This unit will become warm when used for a long period of time. This is normal and does not indicate a problem with the unit. - If unusual conditions occur in the display or buttons, switch the unit off then turn on the unit again.
  • Page 5: Battery Safety Guidelines

    Battery Safety Guidelines Used correctly, domestic batteries are a safe and dependable source of portable power. Problems can occur if they are misused or abused — resulting in leakage or, in extreme cases, fire or explosion. Here are some simple guidelines to safe battery use designed to eliminate any such problems.
  • Page 6: Table Des Matières

    Table of Contents Some Dos And Don't On The Safe Use Of Equipment ............ 1 Important Notes ........................ 2 Laser Product ............................. 3 Correct Handling of Batteries ........................3 Battery Safety Guidelines ....................4 Pack Contents ........................7 Product Overview ......................8 The CD Player ............................
  • Page 7 MP3/WMA Disc Playing ....................19 Playing Repeatedly (MP3 disc) ........................ 20 Use the USB ........................20 For devices with USB Cables: ......................... 20 For memory Cards ........................... 20 USB Storage Device Data Protection ...................... 20 Set the alarm timer ......................22 Activate / deactivate alarm timer ..................
  • Page 8: Pack Contents

    MANUALE DI ISTRUZIONI MANUAL DE NSTRUCCIONES NÁVOD K OBSLUZE NÁVOD NA OBSLUHU KULLANMA KI AVUZU AXM649BT B uetoo h M cro system M crocadena B uetooth M cro Cha ne Blue oo h B uetoo h mikrosys ém B uetoo h M crosys eem B uetoo h mikrosys ém...
  • Page 9: Product Overview

    Product Overview The CD Player 1. Standby Button 2. Clock Button 3. Mode Button 4. USB Jack 5. Remote Sensor 6. Vacuum Fluorescent Display (VFD) Display Lens 7. Disc Tray 8. Fast Forward Button (C) Tuning Forward Button Reverse Button (D) <...
  • Page 10: Remote Control Overview

    Remote Control Overview Standby Button Disc Function Button FM Button Mode Button ( MODE Intro Button ( INTRO Loudness Button ( LOUDNESS Preset Equalizer Button ( P-EQ ) Clock Button ( CLOCK Next Button Preset Up Switch 10. Fast Backward Button DISPLAY Tuning Backward Button 11.
  • Page 11: Installation Of Battery

    Installation of Battery 1. Remove the insulating mylar strip from the battery. It is located at the bottom back side of the remote control. 2. Loosen the screw on the battery compartment cover with a screwdriver. Pull out the battery compartment with your fingernails.
  • Page 12: Remote Control Operation Range

    Remote Control Operation Range 30° 30° Max. 5 m D S LAY Point the remote control to the unit no more than 5 meters from the remote control sensor and within 30° horizontally and 30° vertically of the front of the unit. The operating distance may vary according to the brightness of the room.
  • Page 13: Connections

    Connections Caution: Make all connections before plugging the unit into the AC Power outlet. Please read these additional installation notes before use. If the following steps are not followed correctly the unit may become damaged. Please note the correct steps for setting up the unit are as follows: 1.
  • Page 14: Connecting The Fm Antenna

    Connecting the FM Antenna Connect the supplied FM Antenna to the FM An- tenna socket on the rear of the unit. AUX IN 1 AUX IN 2 ANTENNA Caution: CABLE To avoid noise, keep Antenna away from the unit, ANTENNA the connecting cable and the AC power cable.
  • Page 15: Connecting Control Cable

    Connecting Control Cable Connect the control cable between the CD player and the amplifier. The CD player AUX N 1 AUX IN 2 ANTENNA ABLE The Amplifier CABL SPEAKER OUTPU (6 ) Connecting the AC Power Cable Insert the AC Power cable into a wall outlet, then your unit is ready to use. Caution: * Be sure to unplug the power plug from the outlet when going out or when the unit is not in use for an extended period of time.
  • Page 16: Setting The Clock

    Setting the Clock  Setting the Clock Manually 1. Set the unit in eco power standby mode. 2. Press and hold the Clock button ( ), the VFD will display CLOCK SET and CLOCK 24 CLOCK begins to blink. 3. Set the hour with the Volume Up/Down button ( ) or Previous/Next buttons ( VOL+/- 4.
  • Page 17: Listening To Radio Broadcasts

    Listening to Radio Broadcasts You can listen to FM stations. Stations can be tuned in manually, automatically or from preset mem- ory storage. Caution: Before listening to the radio, please check that the FM Antenna is correctly connected and adjusted for length and direction.
  • Page 18: Fm Display Modes

    FM Display Modes Every time you press the button, the display will cycle through the following display modes: DISPLAY Station Name, Frequency, Programme Type, Radio Text, Date / Clock. The information is displayed on the lower segment of the display. Station Name When an RDS station is received, the name of that station Station Name...
  • Page 19: Cd Operation

    CD Operation CD Playing 1. Rotate the Function button ( ) on the unit or press the Disc Function button ( ) on FUNCTION the remote control. The word “DISC” will be displayed on the front panel. 2. Press the Open/Close button ( ) to open the disc door and place the disc on the disc tray (with the printed side up).
  • Page 20: Playing Repeatedly (Cd)

    Playing Repeatedly (CD) ONE and ALL Repeat Play can be set by pressing the Mode button ( MODE First press : To repeat the same track, the words “ ” and “ ” will blink. Second press : To repeat playing all tracks on a disc, the words “ ”...
  • Page 21: Playing Repeatedly (Mp3 Disc)

    Playing Repeatedly (MP3 disc) ONE, ALB and ALL repeat play can be set by pressing the Mode button ( MODE First press : To repeat the same track, the words “ ” and “ ” will blink. Second press : To repeat playing album, the words “ ”...
  • Page 22 2. Turn on the Bluetooth function on your device. 3. Search for other Bluetooth device with your device. 4. Select “ ” in the pairing list. AXM649BT 5. Enter default password “ ” if necessary. 0000 6. Press and hold Pairing Cleared button ( ) more than 2 seconds to clear pairing mode.
  • Page 23: Set The Alarm Timer

    Set the alarm timer This unit can be used as an alarm clock. You can select DISC, USB or TUNER as alarm source. Note: ■ Ensure that you have set the clock correctly. 1. In standby mode, press and hold the button until [TIMER SET] (set timer) scrolls on the TIMER display.
  • Page 24: Disc Handling

    Disc Handling Handling Precautions • Hold the disc by the edges so the surface will not be soiled with fingerprints. (A) Fingerprints, dirt and scratches can cause skipping and distortion. • Do not write on the label side with a ball-point pen or other writing implements. •...
  • Page 25: Troubleshooting

    Troubleshooting If you are having a problem with your unit, check this list for a poss ble solution before calling for service. If you cannot solve the problem from the hints given here, or the unit has been physically damaged, call a qualified person, such as your dealer, for service.
  • Page 26: Specifications

    Specifications Unit Specification Power Requirements 220-240V ~ 50/60Hz FM Tuning Range 87.5~108 Power Consumption 50W (ECO Standby 0.5W) Output Power 45W x 2 ≤ Dimensions (CD) 160(W) x 78(H) x 250(D) mm (Amplifier) 160(W) x 78(H) x 250(D) mm Speaker Specification Impedance 6Ω...
  • Page 27 The mark is in compliance with the Waste Electrical and Electronic Equipment Directive 2002/96/EC (WEEE). The mark indicates the requirement NOT to dispose the equipment including any spent or discarded batteries as unsorted municipal waste, but use the return and collection systems available.
  • Page 28 Darty Group España France Darty Hispana S.A. Darty France Polígono Industrial C.L.A. 129, avenue Gallieni - 93140 Calle Rio Guadalhorce N 4 BONDY, 28906 Getafe (Madrid) France Ayuda en línea Darty Spain: Hotline Darty France 902 30 30 14 Quels que soient votre panne et le lieu d'achat de votre produit en France, avant de vous déplacer en magasin Darty, appelez le 0 978 970 970...
  • Page 29 Choses à faire et à éviter pour une utilisation sécurisée de l’appareil Cet appareil a été conçu et fabriqué conformément aux standards de sécurité internationaux, mais comme pour tous les appareils électriques, vous devez en prendre soin afin de garantir une utilisa- tion optimale et non dangereuse.
  • Page 30 Afin de profiter au mieux de votre appareil, lisez attentivement cette notice d’utilisation avant de l'utiliser pour la première fois pour vous familiariser avec ses fonctions. Vous pourrez ainsi profiter de votre appareil audio sans souci pendant des années. Remarques importantes * Conservez la notice d’utilisation : conservez les consignes de sécurité...
  • Page 31 TENSION DANGEREUSE Il y a à l’intérieur du boîtier de cet appareil une tension suffisamment élevée pour présenter un risque de choc électrique pour les personnes. ATTENTION La notice d’utilisation contient d’importantes consignes d’utilisation et d’entretien, pour votre sécurité, respectez-les. AVERTISSEMENT : POUR VOUS PRÉMUNIR CONTRE LES RISQUES D'INCENDIE OU DE CHOC ÉLECTRIQUE, VEILLEZ À...
  • Page 32 A pleine puissance, l’écoute prolongée du baladeur peut endommager l’oreille de l’utilisateur. AVERTISSEMENT: pour protéger votre ouïe Il est important que n'importe quel casque ou écouteurs utilisés en conjonction avec ce produit soient conformes à la norme Français Arrêté du 8 novembre 2005 portant application de l'article L. 5232-1 Ceci garantit que le niveau sonore ne dépasse pas 100 dB SPL.
  • Page 33 Consignes de sécurité concernant les piles Utilisées correctement, les piles à usage domestique constituent une alimentation électrique portable fiable et sûre. Des problèmes peuvent survenir si elles sont utilisées de manière impropre ou non soigneuse, elles peuvent se mettre à fuir et parfois, dans des cas extrêmes, provoquer un incendie ou une explosion.
  • Page 34 Table des matières Choses à faire et à éviter pour une utilisation sécurisée de l’appareil ......1 Remarques importantes ....................2 Appareil laser ............................. 3 Manipulation correcte des piles ......................... 3 Consignes de sécurité concernant les piles ..............5 Contenu de l'emballage ....................8 Description de l’appareil ....................
  • Page 35 Disques MP3/WMA ......................20 Répéter la lecture (Disque MP3) ......................21 USB ..........................21 Supports de stockage avec câble USB : ....................21 Cartes mémoire ............................21 Protection des données des supports de stockage USB ................. 21 Régler l’alarme ....................... 23 Activer/désactiver l’alarme....................
  • Page 36: Contenu De L'emballage

    MANUALE DI ISTRUZIONI MANUAL DE NSTRUCCIONES NÁVOD K OBSLUZE NÁVOD NA OBSLUHU KULLANMA KI AVUZU AXM649BT B uetoo h M cro system M crocadena B uetooth M cro Cha ne Blue oo h B uetoo h mikrosys ém B uetoo h M crosys eem B uetoo h mikrosys ém...
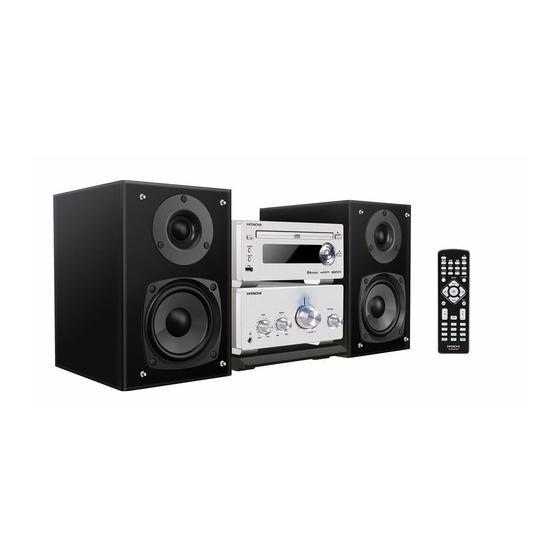
  • Page 37: Description De L'appareil

    Description de l’appareil Lecteur CD 1. Touche Veille 2. Touche Horloge 3. Touche Mode 4. Port USB 5. Capteur infrarouge 6. Afficheur fluorescent (VFD) 7. Plateau de lecture 8. Avance rapide (C) Monter la fréquence radio Retour rapide (D) Baisser la fréquence radio <...
  • Page 38: Description De La Télécommande

    Description de la télécommande Veille Disque ( Radio ( Mode ( MODE Intro ( INTRO Compensation sonore ( LOUDNESS Égaliseur ( P-EQ ) Horloge ( CLOCK Suivant Station préréglée suivante 10. Retour rapide DISPLAY Baisser la fréquence radio 11. Précédent Station préréglée précédente 12.
  • Page 39: Installation De La Pile

    Installation de la pile 1. Retirez la languette isolante en Mylar du logement de la pile. Elle se trouve au bas du dos de la télécommande. 2. Avec un tournevis, dévissez la vis du logement de la pile. Sortez le porte-pile à...
  • Page 40: Portée D'utilisation De La Télécommande

    Portée d'utilisation de la télécommande 30° 30° Max. 5 m D S LAY Dirigez la télécommande vers l’appareil, à moins de 5 m du panneau avant de l’appareil, et selon un angle horizontal de 30° et un angle vertical de 30°. La portée de la télécommande peut varier en fonction de la luminosité...
  • Page 41: Branchements

    Branchements Attention : Effectuez tous les branchements avant de brancher l’unité principale dans une prise électrique. Lisez ces instructions d'installation complémentaires avant d'utiliser l’appareil. Si vous ne respectez pas les consignes suivantes, cela peut détériorer l’appareil. L’ordre d'installation correct de l’appareil est le suivant : 1.
  • Page 42: Brancher L'antenne Fm

    Brancher l’antenne FM Branchez l’antenne FM fournie dans la prise d’antenne FM au dos de l’appareil. AUX IN 1 AUX IN 2 ANTENNA Attention : CABLE Afin d’éviter les parasites, veillez à ce que l’antenne ANTENNA soit éloignée de l’appareil, des câbles de connex- ion et du cordon d’alimentation.
  • Page 43: Brancher Le Câble De Commande

    Brancher le câble de commande Branchez le câble de commande sur le lecteur CD et l’amplificateur. Lecteur CD AUX N 1 AUX IN 2 ANTENNA ABLE Amplificateur CABL SPEAKER OUTPU (6 ) Brancher le cordon d'alimentation Branchez la fiche du cordon d’alimentation dans une prise murale, votre appareil est prêt à l’emploi. Attention: * Pensez à...
  • Page 44: Régler L'horloge

    Régler l'horloge  Réglage manuel de l'horloge 1. Mettez l’appareil dans le mode veille économie d’énergie. 2. Maintenez la touche Horloge ( ) appuyée, « CLOCK SET » s’affiche et CLOCK 24 se met à CLOCK clignoter. 3. Réglez les chiffres des heures avec les touches du volume ( ) ou les touches Précédent/ VOL+/- Suivant (...
  • Page 45: Écouter La Radio

    Écouter la radio Vous pouvez écouter les stations de radio FM. Les fréquences des stations de radio peuvent être réglées manuellement ou automatiquement, ou être préréglées. Attention : Avant d’écouter la radio, vérifiez que l’antenne FM est correctement branchée, déployée et orientée. Régler la fréquence d’une station de radio 1.
  • Page 46: Modes D'affichage Fm

    Modes d'affichage FM Chaque fois que vous appuyez sur la touche Affichage , l’écran bascule successivement DISPLAY dans les modes d’affichage suivants : Nom de la Station, Fréquence, Type de Programme, Radiotexte, Heure. Les informations s’affichent dans la partie inférieure de l'écran. Nom de la Station Lors de la réception d’une station RDS, le nom de la Nom de la Station...
  • Page 47: Lecture Des Cd

    Lecture des CD 1. Tournez le bouton Fonction ( ) de l’appareil ou appuyez sur la touche Disque ( ) de FUNCTION la télécommande. « DISC » s’affiche sur le panneau avant. 2. Appuyez sur la touche Ouvrir/Fermer ( ) pour ouvrir le plateau de lecture, puis insérez un disque dans le plateau de lecture (face imprimée vers le haut).
  • Page 48: Lire Le Début (Intro) De Chaque Piste

    Lire le début (intro) de chaque piste Appuyez sur la touche de la télécommande pour lire successivement le début de chaque INTRO piste. Les 10 premières secondes de chaque piste sont lues. Lorsque vous entendez la piste dési- rée, appuyez sur la touche pour l’écouter.
  • Page 49: Répéter La Lecture (Disque Mp3)

    Répéter la lecture (Disque MP3) Appuyez plusieurs fois sur la touche pour sélectionner l’un des modes de répétition : UN, ALB ou TOUT. MODE Première pression : Répéter la lecture d’un fichier, « » et « » clignotent. Deuxième pression : Répéter la lecture des fichiers dans un ordre aléatoire, « »...
  • Page 50 2. Allumez le Bluetooth de votre périphérique Bluetooth. 3. Recherchez les autres périphériques Bluetooth avec votre périphérique. 4. Sélectionnez « » dans la liste de couplage. AXM649BT 5. Si nécessaire, saisissez le mot de passe par défaut « ». 0000 6.
  • Page 51: Régler L'alarme

    Régler l’alarme Cet appareil intègre une fonction alarme. Vous pouvez sélectionner DISQUE, USB ou TUNER comme source audio de l’alarme. Remarque : ■ Vérifiez que vous avez correctement réglé l’horloge. 1. Dans le mode veille, maintenez la touche Minuterie appuyée jusqu’à ce que [TIMER TIMER SET] (Régler l’alarme) défile à...
  • Page 52: Manipulation Des Disques

    Manipulation des disques Précautions d’utilisation • Saisissez les disques par leur bord de manière à ne pas souiller leur surface avec vos empreintes digitales. (A) Les empreintes digitales, les saletés et les rayures peuvent faire sauter la lecture et provoquer la distorsion du son.
  • Page 53: Dépannage

    Dépannage Si vous rencontrez un problème avec votre appareil, procédez aux vérifications suivantes avant de contacter un réparateur. Si vous n’arrivez pas à régler le problème avec ces indications ou si l’appareil a subi une détériora- tion physique, contactez un personnel qualifié, par exemple le distributeur, pour faire réparer l’appareil. Problème Cause possible Action...
  • Page 54: Spécifications

    Spécifications Spécification de l’unité principale Alimentation 220-240V ~ 50/60Hz Plage de réception FM 87.5~108 Puissance absorbée 50 W (veille ECO 0,5 W) Puissance de sortie 45W x 2 ≤ Taux de distorsion harmonique Dimensions (CD) 160 (L) x 78 (H) x 250 (P) mm (Amplificateur) 160 (L) x 78 (H) x 250 (P) mm Spécifications des enceintes Impédance...
  • Page 55 Le symbole est conforme à la réglementation 2002/96/CE (DEEE) concernant les Déchets d’Équipements Électriques et Électroniques. Ce symbole signifie que l’appareil et les piles/batteries usagés ou à mettre au rebut NE DOIVENT PAS être jetés avec les ordures ménagères non triées, mais déposés dans un centre de collecte spécifique existant.
  • Page 56 Darty Group España France Darty Hispana S.A. Darty France Polígono Industrial C.L.A. 129, avenue Gallieni - 93140 Calle Rio Guadalhorce N 4 BONDY, 28906 Getafe (Madrid) France Ayuda en línea Darty Spain: Hotline Darty France 902 30 30 14 Quels que soient votre panne et le lieu d'achat de votre produit en France, avant de vous déplacer en magasin Darty, appelez le 0 978 970 970...
  • Page 57 Hoe het apparaat op een veilige manier gebruiken Dit apparaat is ontworpen en vervaardigd conform de internationale veiligheidsnormen maar, zoals bij elk ander elektrisch apparaat, moet u voorzichtig zijn om het beste resultaat te krijgen en ervoor te zorgen dat de veiligheid altijd wordt gewaarborgd. *********************************** LEES de gebruiksaanwijzing alvorens het apparaat te gebruiken.
  • Page 58 Om het meeste plezier en de beste prestaties uit uw apparaat te krijgen, lees deze gebruiksaanw jzing grondig door alvorens het apparaat te gebruiken zodat u vertrouwd bent met zijn bediening en gedurende jaren probleemloos naar het apparaat kunt luisteren. Belangrijke mededelingen * Bewaar de gebruiksaanwijzing: bewaar de gebruiksaanwijzingen en veiligheidsvoorschriften voor toekomstige raadpleging.
  • Page 59 GEVAARLIJKE SPANNING Er is gevaarlijke spanning binnenin dit product aanwezig, deze kan voldoende hoog zijn om een risico op elektrische schokken bij personen te veroorzaken. OPGELET De gebruiksaanw jzing bevat belangrijke gebruiks- en onderhoudsinstructies voor uw veiligheid. Het is nodig om deze gebruiksaanw jzing te raadplegen. WAARSCHUWING: OM BRAND OF RISICO OP SCHOKKEN TE VERMIJDEN;...
  • Page 60 Een langdurige blootstelling aan een hoog volume met gebruik van een kop- of oortelefoon kan het gehoor van de gebru ker beschadigen. WAARSCHUWING: om uw gehoor te beschermen Het is belangrijk om met dit product een kop- of oortelefoon te gebru ken conform het besluit van de Franse regering van 8 november 2005 houdende toepassing van artikel L.5232-1.
  • Page 61 Batterijveiligheidsrichtlijnen Het gebruik van juiste batterijen voor huishoudelijke doeleinden zijn een veilige en betrouwbare, draagbare voedingsbron. Problemen kunnen zich voordoen als deze verkeerd worden gebruikt – wat leidt tot lekkage, of in extreme gevallen, tot brand of ontploffing. Hier volgen enkele eenvoudige richtlijnen voor een veilig batterijgebruik zodat dergelijke problemen zich niet voordoen.
  • Page 62 Inhoudsopgave Hoe het apparaat op een veilige manier gebruiken ............1 Belangrijke mededelingen ....................2 Laserproduct .............................. 3 Juiste hantering van de batterijen ......................3 Batterijveiligheidsrichtlijnen ....................4 Inhoud van de verpakking ....................7 Beschrijving van het product .................... 8 De CD-speler .............................
  • Page 63 MP3/WMA-disc afspelen ....................19 Herhaald afspelen (MP3-disc) ......................... 20 De USB gebruiken ......................20 Voor apparatuur met een USB-kabel: ...................... 20 Voor geheugenkaarten: ..........................20 Gegevensbescherming bij USB-opslagapparatuur ................. 20 De alarmtimer instellen ....................22 De alarmtimer in-/uitschakelen ..................22 De slaaptimer instellen ....................
  • Page 64: Inhoud Van De Verpakking

    MANUALE DI ISTRUZIONI MANUAL DE NSTRUCCIONES NÁVOD K OBSLUZE NÁVOD NA OBSLUHU KULLANMA KI AVUZU AXM649BT B uetoo h M cro system M crocadena B uetooth M cro Cha ne Blue oo h B uetoo h mikrosys ém B uetoo h M crosys eem B uetoo h mikrosys ém...
  • Page 65: Beschrijving Van Het Product

    Beschrijving van het product De CD-speler 1. Stand-by knop 2. Klok knop 3. Modus knop 4. USB-aansluiting 5. Afstandssensor 6. Vacuüm-fluorescentiedisplay (VFD) Display Lens 7. Disclade 8. Snel doorspoelen knop (C) Vooruit afstemmen knop Terugspoelen knop (D) < Achteruit afstemmen knop Volgende knop ( G ) Preset omhoog schakelaar AUX IN 2...
  • Page 66: Beschrijving Van De Afstandsbediening

    Beschrijving van de afstandsbediening Stand-by knop Discfunctieknop FM knop Modus knop ( MODE Intro knop ( INTRO Geluidssterkte knop ( LOUDNESS Preset Equalizer knop ( P-EQ ) Klok knop ( CLOCK Volgende knop Preset omhoog schakelaar 10. Terugspoelen knop DISPLAY Achteruit afstemmen knop 11.
  • Page 67: De Batterijen Installeren

    De batterijen installeren 1. Verwijder het isolatiestrookje van de batterij. Deze bevindt zich onderaan de afstandsbediening. 2. Maak de schroef op het batterijdeksel met een schroevendraaier los. Haal de batterijhouder met uw vingernagels uit.  3. Breng een nieuwe (2025) batterij juist in en plaats de batterijhouder opnieuw in de originele positie.
  • Page 68: Werkingsbereik Van De Afstandsbediening

    Werkingsbereik van de afstandsbediening 30° 30° Max. 5 m D S LAY Richt de afstandsbediening niet verder dan 5 meter naar de sensor van de afstandsbediening en binnen een hoek van 30° horizontaal en 30° verticaal naar de voorzijde van het apparaat. De werk- ingsafstand kan verschillen naar gelang de helderheid van de kamer.
  • Page 69: Aansluitingen

    Aansluitingen Waarschuwing: Maak alle aansluitingen voordat u de stekker in een AC-stopcontact steekt. Lees deze extra installatie-instructies voor gebruik. Het niet juist opvolgen van deze stappen kan schade aan het apparaat veroorzaken. Stel het apparaat correct op door volgende stappen uit te voeren: 1.
  • Page 70: De Fm-Antenne Aansluiten

    De FM-antenne aansluiten Sluit de meegeleverde FM-antenne op de FM- antenne aansluiting achteraan het apparaat aan. AUX IN 1 AUX IN 2 ANTENNA Waarschuwing: CABLE Om geruis te voorkomen, houd de antenne uit de ANTENNA buurt van het apparaat, de aansluitkabel en het AC-snoer.
  • Page 71: Besturingskabel Aansluiten

    Besturingskabel aansluiten Sluit de vermogenskabel tussen de CD-speler en de versterker aan. De CD-speler AUX N 1 AUX IN 2 ANTENNA ABLE De versterker CABL SPEAKER OUTPU (6 ) Het AC-snoer aansluiten Steek de stekker van het AC-snoer in een stopcontact en uw apparaat is klaar voor gebru k. Waarschuwing: * Haal de stekker uit het stopcontact als u de woning verlaat of wanneer het apparaat gedurende een lange periode niet gebruikt zal worden.
  • Page 72: De Klok Instellen

    De klok instellen  De klok handmatig instellen 1. Stel het apparaat op de ECO-stroom stand-bymodus in. 2. Druk en houd de klok knop ( ) ingedrukt, de VFD geeft CLOCK SET weer en CLOCK 24 CLOCK begint te knipperen. 3.
  • Page 73: Naar Radio-Uitzendingen Luisteren

    Naar radio-uitzendingen luisteren U kunt naar FM-stations luisteren. Het station kan handmatig of automatisch worden afgestemd of uit voorkeurstations worden gekozen. Waarschuwing: Alvorens naar de radio te luisteren, controleer of de FM-antenne juist is aangesloten en op de juiste lengte en richting is ingesteld. Op een radiostation afstemmen 1.
  • Page 74: Fm-Displaymodi

    FM-displaymodi Telkens u op de knop drukt, zal het display de volgende displaymodi doorlopen: Naam van DISPLAY radiostation, frequentie, programmatype, radiotekst, datum / klok. De informatie wordt in het onderste deel van het display weergegeven. Naam van radiostation Naam van Als een RDS-station wordt ontvangen, worden de naam radiostation van het radiostation weergegeven...
  • Page 75: Cd-Werking

    CD-werking CD’s afspelen 1. Draai de functiekiezer ( ) op het apparaat of druk op de Disc functieknop ( ) op de FUNCTION afstandsbediening. Het woord “DISC” wordt op het frontpaneel weergegeven. 2. Druk op de Open/dicht knop ( ) om de CD-deur te openen en de disc op de disclade (met de bedrukte zijde omhoog) te plaatsen 3.
  • Page 76: Het Begin (Intro) Van Elke Track Afspelen

    Het begin (intro) van elke track afspelen Druk op de Intro knop ( ) op de afstandsbediening om opeenvolgend het begin van elke track INTRO af te spelen. De afspeelt jd van elke track is 10 seconden. Als u de gewenste track hoort, druk op de Intro knop ( INTRO Herhaald afspelen (CD)
  • Page 77: Herhaald Afspelen (Mp3-Disc)

    Herhaald afspelen (MP3-disc) Druk op de modus knop ( ) om EEN, ALB of ALLES herhalen in te stellen. MODE Eerste druk : Om dezelfde track te herhalen, de woorden “ ” en “ ” knipperen. Tweede druk : Om het album willekeurig af te spelen, het woord “ ”...
  • Page 78 2. Schakel de Bluetooth-functie op uw apparaat in. 3. Zoek naar het ander Bluetooth-apparaat met uw apparaat. 4. Selecteer “ ” in de lijst met koppelingen. AXM649BT 5. Voer, indien nodig, het standaard wachtwoord “ ” in. 0000 6. Druk en houd de Koppeling wissen knop (...
  • Page 79: De Alarmtimer Instellen

    De alarmtimer instellen Dit apparaat kan als een alarmklok worden gebruikt. U kunt DISC, USB of TUNER als alarmbron selecteren. Opmerking: ■ Zorg dat u de klok juist hebt ingesteld. 1. In de stand-bymodus, druk en houd de Timer knop op de afstandsbediening ingedrukt TIMER totdat [TIMER SET] op het display wordt weergegeven.
  • Page 80: Discs Hanteren

    Discs hanteren Voorzorgsmaatregelen bij gebruik • Houd de disc bij de rand vast zodat het oppervlak niet door vingerafdrukken bevuild wordt. (A) Vingerafdrukken, vuil en krassen kunnen het overslaan en vervorming veroorzaken. • Schrijf niets op de labelzijde met een balpen of ander schrijfgerief. •...
  • Page 81: Probleemoplossing

    Probleemoplossing As uw apparaat niet naar behoren werkt, raadpleeg deze lijst voor een mogel jke oplossing alvo- rens met een reparateur contact op te nemen. Neem contact op met een gekwalificeerde persoon, zoals uw handelaar, als onderstaande tips het probleem niet oplossen of het apparaat fysiek beschadigd is. Probleem Mogelijke oorzaak Handeling...
  • Page 82: Specificaties

    Specificaties Specificaties van apparaat Stroomeisen 220-240V ~ 50/60Hz FM-afstembere k 87.5~108 Stroomverbruik 50W (ECO Stand-by 0,5W) Uitgaand vermogen 45W x 2 ≤ Afmetingen (CD) 160(B) x 78(H) x 250(D) mm (Versterker) 160(B) x 78(H) x 250(D) mm Specificaties van luidspreker Impedantie 6Ω...
  • Page 83 Het teken voldoet aan de richtlijn inzake Afgedankte elektrische en elektronische apparatuur 2002/96/EC (AEEA). Het teken geeft aan dat het apparaat, inclusief de lege batterijen, NIET met het huishoudelijk afval mag worden weggegooid, maar moet worden ingeleverd b j de officiële inza- melpunten.
  • Page 84 Darty Group España France Darty Hispana S.A. Darty France Polígono Industrial C.L.A. 129, avenue Gallieni - 93140 Calle Rio Guadalhorce N 4 BONDY, 28906 Getafe (Madrid) France Ayuda en línea Darty Spain: Hotline Darty France 902 30 30 14 Quels que soient votre panne et le lieu d'achat de votre produit en France, avant de vous déplacer en magasin Darty, appelez le 0 978 970 970...
  • Page 85 Istruzioni per l'uso sicuro del prodotto Il dispositivo è stato progettato e costruito in conformità agli standard internazionali di sicurezza. Tuttavia, come per ogni dispositivo elettronico, è necessario adottare alcuni accorgimenti per as- sicurare i migliori risultati e preservare la sicurezza. *********************************** Leggere le istruzioni prima di utilizzare il prodotto.
  • Page 86 Per utilizzare il prodotto a lungo e in maniera ottimale, si raccomanda di leggere attentamente questo manuale per familiarizzarsi con le funzioni dell'apparecchio. Note importanti * Relative alla sicurezza e all'uso del prodotto per futuro riferimento. * Non installare l'apparecchio nei seguenti luoghi: Luoghi esposti alla luce solare diretta o vicino ad apparecchi che irradiano calore, ad esempio caloriferi elettrici.
  • Page 87: Manutenzione Delle Batterie

    Nota: - Se utilizzato a lungo, l'apparecchio diventa caldo. Si tratta di un fenomeno normale. - Se il display o i pulsanti funzionano in modo anomalo, spegnere e riaccendere l’apparecchio. - L’etichetta informativa è posizionata sulla base dell’unità. - The marking information is located at the bottom of apparatus. Prodotto laser Il prodotto è...
  • Page 88: Uso Sicuro Delle Batterie

    Uso sicuro delle batterie Se utilizzate correttamente, le batterie domestiche sono una fonte di energia sicura e affidabile. Tuttavia, un uso errato o improprio può causare perdite e, in casi estremi, incendi o esplosioni. Di seguito sono descritte semplici istruzioni per un uso sicuro delle batterie e per evitare pericoli.
  • Page 89 Indice Istruzioni per l'uso sicuro del prodotto ................1 Note importanti ......................... 2 Prodotto laser ............................. 3 Manutenzione delle batterie ........................3 Uso sicuro delle batterie ....................4 Contenuto della confezione ....................7 Panoramica del prodotto ....................8 Lettore CD ..............................8 Amplificatore ..............................
  • Page 90 Lettura di dischi MP3/WMA .................... 19 Riproduzione ripetuta (dischi MP3) ......................20 Lettura di dispositivi USB ....................20 Per dispositivi dotati di cavo USB: ......................20 Per le schede di memoria: ........................20 Protezione dati USB ..........................20 Impostare la sveglia......................22 Attivare/disattivare la sveglia ..................
  • Page 91: Contenuto Della Confezione

    MANUALE DI ISTRUZIONI MANUAL DE NSTRUCCIONES NÁVOD K OBSLUZE NÁVOD NA OBSLUHU KULLANMA KI AVUZU AXM649BT B uetoo h M cro system M crocadena B uetooth M cro Cha ne Blue oo h B uetoo h mikrosys ém B uetoo h M crosys eem B uetoo h mikrosys ém...
  • Page 92: Panoramica Del Prodotto

    Panoramica del prodotto Lettore CD 1. Pulsante Standby 2. Pulsante Orologio (CLOCK) 3. Pulsante Modalità (MODE) 4. Ingresso USB 5. Sensore telecomando 6. Display fluorescente a vuoto (VFD) 7. Vassoio disco 8. Pulsante Avanti veloce (C) Sintonizzazione avanti Pulsante Indietro veloce (D) Sintonizzazione indietro Pulsante <...
  • Page 93: Panoramica Del Telecomando

    Panoramica del telecomando Pulsante Standby Funzione disco Funzione radio Modalità ( MODE Intro ( INTRO Loudness ( LOUDNESS Equalizzatori predefiniti ( P-EQ ) Orologio ( CLOCK Successivo Preimpostato su 10. Avanti veloce DISPLAY Sintonizzazione indietro 11. Precedente Preimpostato giù 12. Riproduci/Pausa 13.
  • Page 94: Inserimento Delle Batterie

    Inserimento delle batterie 1. Rimuovere la pellicola protettiva dal vano batteria, situato sul retro del telecomando. 2. Allentare con un cacciavite la vite sul coperchio del vano batteria. Estrarre la batteria con l’ausilio delle unghie.  3. Sostituire con una nuova batteria (di tipo 2025) e inserire il vano batteria nella posizione ...
  • Page 95: Portata Del Telecomando

    Portata del telecomando 30° 30° Max. 5 m D S LAY Puntare il telecomando verso l’unità a non più di 5 metri di distanza dall’apposito sensore, entro un’angolazione orizzontale di 30° e una verticale di 30° rispetto al lato frontale dell’unità stessa. La portata potrebbe variare in base alla luminosità...
  • Page 96: Collegamenti

    Collegamenti Attenzione! Effettuare tutti i collegamenti prima di collegare l’apparecchio alla presa di corrente. Leggere queste note integrative sull’installazione prima dell’uso. L'unità potrebbe subire danni in caso di mancato rispetto delle istruzioni seguenti. Di seguito sono riportare le fasi per una configurazione corretta dell’unità: 1.
  • Page 97: Collegamento Dell'antenna Fm

    Collegamento dell’antenna FM Collegare l’antenna FM fornita alla presa Antenna FM sul retro dell’unità. AUX IN 1 AUX IN 2 ANTENNA Attenzione! CABLE Per evitare disturbi, tenere l’antenna lontano ANTENNA dall’unità, dal cavo di collegamento e dal cavo di alimentazione. Collegamento degli altoparlanti Collegare i cavi degli altoparlanti ai terminali, come mostrato in figura.
  • Page 98: Collegamento Del Cavo Di Controllo

    Collegamento del cavo di controllo Collegare il cavo di controllo sia al lettore CD che all’amplificatore. Lettore CD AUX N 1 AUX IN 2 ANTENNA ABLE Amplificatore CABL SPEAKER OUTPU (6 ) Collegamento del cavo di alimentazione Inserire il cavo di alimentazione in una presa di corrente. L’unità è quindi pronta per l’uso. Attenzione! * Assicurarsi di scollegare l’apparecchio dalla presa di corrente se si prevede di non utilizzarlo per un periodo prolungato.
  • Page 99: Orologio

    Orologio  Impostazione manuale dell'orologio 1. Impostare la modalità Standby Eco Power. 2. Tenere premuto il pulsante Orologio ( ); sul display apparirà “CLOCK SET”, e “CLOCK 24” CLOCK inizierà a lampeggiare. 3. Impostare l’ora con i pulsanti Aumento volume/Diminuzione volume ( ) o con i pulsanti VOL+/- Precedente/Successivo (...
  • Page 100: Unzionamento Della Radio

    Unzionamento della radio È poss bile sintonizzarsi sulle stazioni radio FM manualmente o automaticamente, o sintonizzarsi direttamente sulle stazioni preimpostate. Attenzione! Prima di iniziare ad ascoltare la radio, verificare che l’antenna FM sia collegata correttamente e regolata in termini di lunghezza e orientamento. Ricerca di una stazione 1.
  • Page 101: Modalità Di Visualizzazione Fm

    Modalità di visualizzazione FM A ogni pressione del pulsante DISPLAY, il display passa ciclicamente fra le modalità di visualizzazione seguenti: Nome stazione, Frequenza, Tipo di programma, Testo radio, Data/Ora. Le informazioni sono visualizzate nel segmento inferiore del display. Nome della stazione Alla ricezione di una stazione RDS, sul display apparirà...
  • Page 102: Lettura Di Cd

    Lettura di CD Riproduzione di CD 1. Ruotare la manopola Selezione funzione ( ) sull’unità o premere il pulsante Funzione FUNCTION disco ( ) sul telecomando. Sul pannello anteriore è visualizzata la parola “DISC”. 2. Premere il pulsante Apri/Chiudi ( ) per aprire lo sportello del vano dischi e inserire il disco sull’apposito vassoio (con il lato stampato rivolto verso l’alto).
  • Page 103: Riproduzione Dell'inizio Di Ogni Traccia

    Riproduzione dell’inizio di ogni traccia Premere il pulsante Intro ( ) sul telecomando per avviare la riproduzione consecutiva dell’inizio INTRO di ogni traccia. Il tempo di riproduzione di ogni traccia è 10 secondi. Dopo avere ascoltato la traccia desiderata, premere il pulsante Intro ( INTRO Riproduzione ripetuta (dischi CD) Premendo il pulsante Modalità...
  • Page 104: Riproduzione Ripetuta (Dischi Mp3)

    Riproduzione ripetuta (dischi MP3) Premendo il pulsante Modalità ( ), è possibile ripetere la riproduzione di una traccia, di un al- MODE bum o di tutte le tracce. Prima pressione : consente di ripetere la stessa traccia. Sul display lampeggeranno “ ”...
  • Page 105 2. Attivare la funzione Bluetooth sul dispositivo. 3. Cercare altri dispositivi Bluetooth con il dispositivo. 4. Selezionare “ ” dall'elenco dei dispositivi appaiabili. AXM649BT 5. Se necessario, inserire la password predefinita “ ”. 0000 6. Tenere premuto il pulsante Annullamento appaiamento ( ) per più...
  • Page 106: Impostare La Sveglia

    Impostare la sveglia L'unità può essere usata come orologio sveglia. Come fonte audio per la sveglia è possibile selezionare DISC (disco), USB o TUNER (radio). Nota: ■ Assicurarsi di avere impostato correttamente l'orologio. 1. In modalità Standby, tenere premuto il pulsante finché...
  • Page 107: Manipolazione Dei Dischi

    Manipolazione dei dischi Precauzioni durante la manipolazione • Tenere il disco lungo i bordi, per non sporcare la superficie con le impronte digitali. (A) Impronte, tracce di sporco e graffi possono causare distorsioni e impedire una riproduzione corretta delle tracce. •...
  • Page 108: Risoluzione Dei Problemi

    Risoluzione dei problemi In caso di problemi con l’unità, effettuare i controlli elencati di seguito prima di contattare l’assistenza. Se il problema persiste o se l’unità è fisicamente danneggiata, contattare una persona qualificata, ad esempio il proprio rivenditore, per richiedere assistenza. Sintomo Possibile causa Azione...
  • Page 109: Specifiche Tecniche

    Specifiche tecniche Specifiche unità Requisiti di alimentazione 220-240V ~ 50/60Hz Gamma di sintonia FM 87.5~108 Consumo di potenza 50 W (ECO Standby 0,5 W) Alimentazione in uscita 45W x 2 ≤ Distorsione armonica totale Dimensioni (CD) 160 (L) x 78 (H) x 250 (P) mm (Amplificatore) 160 (L) x 78 (H) x 250 (P) mm Specifiche altoparlante Impedenza...
  • Page 110 Il simbolo certifica la conformità alla Direttiva europea 2002/96/CE in materia di smaltimento di apparecchiature elettriche ed elettroniche (RAEE). Il simbolo indica che il prodotto, incluse eventuali batterie esauste, NON deve essere smaltito assieme ai rifiuti generici, ma avvalendosi dei sistemi o dei centri di raccolta dedicati disponibili.
  • Page 111 Darty Group España France Darty Hispana S.A. Darty France Polígono Industrial C.L.A. 129, avenue Gallieni - 93140 Calle Rio Guadalhorce N 4 BONDY, 28906 Getafe (Madrid) France Ayuda en línea Darty Spain: Hotline Darty France 902 30 30 14 Quels que soient votre panne et le lieu d'achat de votre produit en France, avant de vous déplacer en magasin Darty, appelez le 0 978 970 970...
  • Page 112 Conjunto de normas para el uso seguro del equipo Este equipo ha sido diseñado y fabricado cumpliendo con las normas de seguridad internacio- nales, aunque al igual que cualquier otro equipo eléctrico, se deberá manejar con cuidado si se desea obtener un rendimiento óptimo y garantizar la seguridad. *********************************** LEA las instrucciones de funcionamiento antes de utilizar el equipo.
  • Page 113 Para sacar el máximo provecho y disfrute de su equipo, lea este manual detenidamente antes de usarlo para familiarizarse con sus funciones y garantizarle muchos años de deleite musical y un funcionamiento fiable y sin problemas. Notas importantes * Conserve las instrucciones: guarde las instrucciones de seguridad y uso para futuras referencias. * Evite la instalación de la unidad en lugares como los que se describen a continuación: Lugares expuestos a la luz directa del sol o cerca de aparatos que irradien calor, tales como estufas eléctricas.
  • Page 114 ADVERTENCIA: PARA EVITAR RIESGOS DE INCENDIO O ELECTROCUCIÓN, NO EXPONGA ESTE APARATO A GOTEOS O SALPICADURAS. Nota: - Esta unidad se calienta cuando se utiliza durante un período de tiempo prolongado. Esto es normal y no indica ningún problema en la unidad. - Si observa anomalías en los botones o la pantalla, apague la unidad y enciéndala de nuevo.
  • Page 115 Medidas de seguridad acerca de las pilas Usadas correctamente, las pilas son una fuente de alimentación portátil segura y fiable. Se pueden producir problemas si se utilizan de manera inapropiada o se abusa de ellas , resultando en filtraciones o, en casos extremos, incendios o explosiones.
  • Page 116 Índice de materias Conjunto de normas para el uso seguro del equipo ............1 Notas importantes ......................2 Producto Láser ............................3 Manipulación correcta de las pilas ......................3 Medidas de seguridad acerca de las pilas ............... 4 Contenido del paquete ..................... 7 Descripción general del producto ..................
  • Page 117 Reproducción de discos MP3/WMA ................19 Reproducción repetida (discos MP3) ....................... 20 Utilización del USB ......................20 Para dispositivos con cables USB ......................20 Para tarjetas de memoria ......................... 20 Protección de datos de dispositivos de almacenamiento USB ..............20 Ajuste de la alarma ......................
  • Page 118: Contenido Del Paquete

    MANUALE DI ISTRUZIONI MANUAL DE NSTRUCCIONES NÁVOD K OBSLUZE NÁVOD NA OBSLUHU KULLANMA KI AVUZU AXM649BT B uetoo h M cro system M crocadena B uetooth M cro Cha ne Blue oo h B uetoo h mikrosys ém B uetoo h M crosys eem B uetoo h mikrosys ém...
  • Page 119: Descripción General Del Producto

    Descripción general del producto Reproductor de CD 1. Botón de modo en espera 2. Botón de reloj 3. Botón de modo 4. Puerto USB 5. Sensor de la señal del mando a distancia 6. Pantalla fluorescente de vacío (VFD en sus siglas en inglés) 7.
  • Page 120: Descripción General Del Mando A Distancia

    Descripción general del mando a distancia Botón de modo en espera Botón del CD Botón de radio FM Botón de modo ( MODE Botón de previo ( INTRO Botón de sonoridad ( LOUDNESS Botón de ecualización predeterminada ( P-EQ ) Botón del reloj ( CLOCK Botón Siguiente...
  • Page 121: Instalación De Las Pilas

    Instalación de las pilas 1. Retire la tira aislante de Mylar de la pila. Está ubicada en la parte inferior trasera del mando a distancia. 2. Afloje el tornillo de la tapa del compartimento de la pila con un destornillador. Saque el compartimento de la pila con la uña.
  • Page 122: Alcance De La Señal Del Mando A Distancia

    Alcance de la señal del mando a distancia 30° 30° Máx. 5 m D S LAY Apunte con el mando a distancia hacia la unidad a no más de 5 metros del sensor del mando a distancia y en un ángulo de no más de 30° en horizontal y 30° en vertical respecto a la parte del- antera de la unidad.
  • Page 123: Conexiones

    Conexiones Atención: Realice todas las conexiones antes de enchufar la unidad a la toma de corriente. Lea estas notas de instalación adicionales antes de usar la unidad. Si no se respetan perfectamente los pasos siguientes, la unidad podría quedar dañada. Por favor, siga los siguientes pasos correctos para preparar la unidad: 1.
  • Page 124: Conexión De La Antena De Fm

    Conexión de la antena de FM Conecte la antena de FM suministrada a la toma de la antena de FM en la parte trasera de la unidad. AUX IN 1 AUX IN 2 ANTENNA Precaución: CABLE Para evitar ruidos, mantenga la antena alejada de ANTENNA la unidad, del cable de conexión y del cable de ali- mentación.
  • Page 125: Conexión Del Cable De Control

    Conexión del cable de control Conecte el cable de control entre el reproductor de CD y el amplificador. Reproductor de CD AUX N 1 AUX IN 2 ANTENNA ABLE Amplificador CABL SPEAKER OUTPU (6 ) Conexión del cable de alimentación Inserte el cable de alimentación en una toma mural y su unidad estará...
  • Page 126: Ajustes Del Reloj

    Ajustes del reloj  Ajuste manual del reloj 1. Cambie la unidad al modo de espera ECO-Power. 2. Mantenga pulsado el botón del reloj ( ); la pantalla VFD mostrará “CLOCK SET” y “CLOCK CLOCK 24 HR” comenzará a parpadear. 3.
  • Page 127: Cómo Escuchar La Radio

    Cómo escuchar la radio Esta unidad le permite escuchar las emisoras de radio FM. Las emisoras pueden sintonizarse manualmente, automáticamente o mediante presintonías guardadas en la memorias. Atención: Antes de escuchar la radio, compruebe que la antena de FM está conectada correctamente y está extendida en la dirección apropiada.
  • Page 128: Información De La Radio Fm En La Pantalla

    Información de la radio FM en la pantalla Cada vez que pulse el botón , la pantalla mostrará los siguientes modos: Nombre de la DISPLAY emisora, frecuencia, tipo de programa, texto de radio, fecha / hora. La información aparece en el segmento inferior de la pantalla. Nombre de la emisora Cuando se recibe una emisora RDS, el nombre de la Nombre de...
  • Page 129: Utilización Del Lector De Cd

    Utilización del lector de CD Reproducción de CD 1. Gire el selector de función ( ) de la unidad o pulse el botón de función del disco ( FUNCTION del mando a distancia. La pantalla mostrará “DISC” en el panel frontal. 2.
  • Page 130: Previo De Cada Canción

    Previo de cada canción Pulse el botón Intro ( ) del mando a distancia para reproducir el inicio de cada canción en INTRO orden. Se reproducirán los primeros 10 segundos de cada canción. Cuando se reproduzca el inicio de la canción que quiere escuchar, pulse ( ) para escucharla por completo.
  • Page 131: Reproducción Repetida (Discos Mp3)

    Reproducción repetida (discos MP3) La reproducción repetida ONE (una), ALB (álbum) y ALL (todas) se puede establecer pulsando el botón ( MODE Pulse una vez : Se repetirá la misma canción; “ “ ” parpadearán. TRK” y Pulse dos veces : Se repetirán todas las canciones de un álbum;...
  • Page 132 2. Active la función Bluetooth en su dispositivo. 3. Busque otros dispositivos Bluetooth en el dispositivo. 4. Seleccione “ ” en la lista de dispositivos Bluetooth. AXM649BT 5. Introduzca la contraseña predeterminada “ ” si se lo pide. 0000 6. Mantenga pulsado el botón de anclaje ( ) más de 2 segundos para desanclar el dispositivo.
  • Page 133: Ajuste De La Alarma

    Ajuste de la alarma Esta unidad puede utilizarse como una alarma. Se puede elegir el modo DISC, USB o TUNER como la fuente de la alarma. Nota: ■ Asegúrese de haber ajustado correctamente el reloj. 1. En el modo en espera, mantenga pulsado el botón hasta la pantalla muestre [TIMER TIMER SET] (ajustar alarma).
  • Page 134: Manipulación De Discos

    Manipulación de discos Precauciones de manipulación • Sujete el disco por los bordes para no ensuciar la superficie con huellas dactilares. (A) Las huellas dactilares, la suciedad y las rayas pueden causar saltos y distorsiones. • No escriba en el lado de la etiqueta con un bolígrafo u otros utensilios de escritura. •...
  • Page 135: Resolución De Problemas

    Resolución de problemas Si tiene problemas con la unidad, compruebe la lista de posibles soluciones antes de llamar al ser- vicio de reparación. Si no puede solucionar el problema con los consejos que se incluyen aquí, o si la unidad está daña- da físicamente, llame a un personal técnico cualificado, como a su distribuidor, para que la repare.
  • Page 136: Especificaciones

    Especificaciones Especificaciones de la unidad Requisitos de alimentación 220-240V ~ 50/60Hz Frecuencia de sintonización de FM : 87.5~108 Consumo eléctrico 50W (modo en espera ECO: 0,5W) Potencia de salida 45W x 2 ≤ Dimensiones (CD) 160(An) x 78(Al) x 250(Pr) mm (Amplificador) 160(An) x 78(Al) x 250(Pr) mm Especificaciones de los altavoces Impedancia...
  • Page 137 La marca cumple con la Directiva sobre Residuos de Aparatos Eléctricos y Electrónicos 2002/96/CE (RAEE). El símbolo le recuerda que NO deberá desechar el equipo, incluidas las pilas agotadas o descartadas, junto con residuos municipales sin clasificar, sino que deberá depositarlo por separado en los sistemas de recogida dispon bles.
  • Page 138 Darty Group España France Darty Hispana S.A. Darty France Polígono Industrial C.L.A. 129, avenue Gallieni - 93140 Calle Rio Guadalhorce N 4 BONDY, 28906 Getafe (Madrid) France Ayuda en línea Darty Spain: Hotline Darty France 902 30 30 14 Quels que soient votre panne et le lieu d'achat de votre produit en France, avant de vous déplacer en magasin Darty, appelez le 0 978 970 970...
  • Page 139 Jak bezpečně používat přístroj a čemu se vyhnout Přístroj byl navržen a vyroben tak, aby splňoval mezinárodní bezpečnostní normy. Stejně jako každé elektrické zařízení ale vyžaduje péči, má-li být bezpečný a co nejvýkonnější. *********************************** PŘEČTĚTE SI návod k obsluze, než začnete přístroj používat. ZAJISTĚTE , aby všechna elektrická...
  • Page 140 Než začnete reproduktor používat, přečtěte si pozorně tento návod k obsluze. Seznámí vás s vlastnostmi přístroje a zajistí vám dlouhé roky bezproblémového fungování a radosti z poslechu. Důležité: * Návod k obsluze uchovejte – bezpečnostní a provozní pokyny můžete v budoucnu potřebovat k nahlédnutí.
  • Page 141 VAROVÁNÍ: ABY NEDOŠLO K ÚRAZU ELEKTRICKÝM PROUDEM ČI OHNĚM, NEVYSTAVUJTE PŘÍSTROJ KAPAJÍCÍ NEBO STŘÍKAJÍCÍ KAPALINĚ. Poznámka: - Tento přístroj se při dlouhém používání zahřívá. Toto zahřívání je ale zcela běžné a není známkou poruchy. - Všimnete-li si neobvyklého chování světelného indikátoru nebo tlačítek, přístroj vypněte a poté jej opět zapněte.
  • Page 142 Baterie – bezpečnostní pokyny Jsou-li baterie určené pro domácnost používány správným způsobem, představují bezpečný a spolehlivý zdroj přenosné energie. Při nesprávném použití ale mohou vzniknout problémy, jako např. vytékání elektrolytu a v extrémních případech požár i nebo výbuch. Problémům se můžete vyhnout, budete-li se řídit těmito jednoduchými radami.
  • Page 143 Obsah Jak bezpečně používat přístroj a čemu se vyhnout............1 Důležité..........................2 Laserový produkt ............................3 Správné nakládání s bateriemi ........................3 Baterie – bezpečnostní pokyny ..................4 Obsah balení ........................7 Přehled produktu ......................8 CD přehrávač ............................. 8 Zesilovač...
  • Page 144 Přehrávání MP3/WMA disku................... 19 Opakované přehrávání (MP3 disk) ......................20 Použití USB ........................20 Zařízení s kabelem USB: ......................... 20 Paměťové karty ............................20 USB zařízení a ochrana údajů ......................... 20 Nastavení času buzení ....................22 Zapnutí / vypnutí buzení ....................22 Nastavení...
  • Page 145: Obsah Balení

    MANUALE DI ISTRUZIONI MANUAL DE NSTRUCCIONES NÁVOD K OBSLUZE NÁVOD NA OBSLUHU KULLANMA KI AVUZU AXM649BT B uetoo h M cro system M crocadena B uetooth M cro Cha ne Blue oo h B uetoo h mikrosys ém B uetoo h M crosys eem B uetoo h mikrosys ém...
  • Page 146: Přehled Produktu

    Přehled produktu CD přehrávač 1. Tlačítko Pohotovostní režim (Standby) 2. Tlačítko Hodiny (Clock) 3. Tlačítko Režim (Mode) 4. USB konektor 5. Čidlo dálkového ovládání 6. Vacuum Fluorescent Display (VFD) Čočka displeje 7. Přihrádka pro disk 8. Rychlé převíjení dopředu (C) Ladění...
  • Page 147: Dálkový Ovladač

    Dálkový ovladač Tlačítko pro pohotovostní režim Tlačítko pro funkci disku Tlačítko funkci FM Tlačítko režim ( MODE Tlačítko pro začátek skladby ( INTRO Tlačítko síly zvuku ( LOUDNESS Tlačítko přednastavení ekvalizéru ( P-EQ ) Tlačítko hodin ( CLOCK Tlačítko další Tlačítko přednastavení...
  • Page 148: Instalace Baterie

    Instalace baterie 1. Z baterie sloupněte mylarovou pásku. Nachází se na okraji spodní zadní části dá kového ovladače. 2. Uvolněte šroub na krytu prostoru pro baterie pomocí šroubováku. Vytáhněte přihrádku na baterie nehty.  3. Správně vyměňte novou baterii (velikost 2025) a zcela zasuňte přihrádku na baterie zpět do ...
  • Page 149: Dosah Dálkového Ovladače

    Dosah dálkového ovladače 30° 30° Max. 5 m D S LAY Namiřte dálkové ovládání na jednotku ze vzdáleností ne větší než 5 m od čidla pro dálkové ovládání a v úhlu 30° horizontálně a 30° vert kálně od přední strany jednotky. Tato vzdálenost se může lišit podle světlosti pokoje.
  • Page 150: Zapojení

    Zapojení Upozornění: Všechny části musí být zapojeny ještě před tím, než se přístroj připojí do elek- trické sítě. Před použitím si prosím přečtěte tyto poznámky k instalaci. Jestliže se nebudete řídit správně těmito kroky, může dojít k poškození jednotky. Správný postup sestavení jednotky je následující: 1.
  • Page 151: Připojení Fm Antény

    Připojení FM antény Připojte dodanou FM anténu do zdířky pro FM an- ténu na zadní straně jednotky. AUX IN 1 AUX IN 2 ANTENNA Upozornění: CABLE Chcete-li předejít šumu, držte anténu od jednotky, ANTENNA spojovacího kabelu a napájecího kabelu. Zapojení reproduktorů Připojte reproduktorové...
  • Page 152: Zapojení Ovládacího Kabelu

    Zapojení ovládacího kabelu Zapojte ovládací kabel mezi CD přehrávač a zesilovač. CD přehrávač AUX N 1 AUX IN 2 ANTENNA ABLE Zesilovač CABL SPEAKER OUTPU (6 ) Zapojení napájecího kabelu Zapojte napájecí kabel do stěnové zásuvky, jednotky je nyní připravena k použití. Upozornění: * Před odchodem z domova nebo nemá-li být přístroj delší...
  • Page 153: Nastavení Času

    Nastavení času  Manuální nastavení času 1. Přepněte přístroj eko pohotovostního režimu. 2. Stiskněte a podržte tlačítko ( ). Na VFD displeji se zobrazí CLOCK SET a začne blikat CLOCK CLOCK 24. 3. Tlačítky pro hlasitost ( ) nebo další/předchozí ( ) nastavte hodinu.
  • Page 154: Poslech Rozhlasového Vysílání

    Poslech rozhlasového vysílání Můžete poslouchat FM stanice. Stanice lze naladit ručně, automaticky nebo z přednastavené paměti. Upozornění: Než začnete poslouchat rádio, ujistěte se, že je FM anténa správně zapojena a je upravena její délka a směr. Ladění stanice 1. Funkci rádia zvolíte otočením regulátoru funkce ( ) na jednotce nebo stisknutím tlačítka FUNCTION ) na dá...
  • Page 155: Fm Režim Zobrazení

    FM režim zobrazení Pokaždé, když stlačíte tlačítko DISPLAY, bude displej procházet následujícími režimy zobrazení: Název stanice, frekvence, typ programu, text rádia, datum / čas. Tyto informace se zobrazují ve spodní části displeje. Název stanice Pokud je aktuálně naladěna RDS stanice, na displeji se Název stanice zobrazí...
  • Page 156: Obsluha Cd

    Obsluha CD Přehrávání CD 1. Funkci CD zvolíte otočením regulátoru funkce ( ) na jednotce nebo stisknutím tlačítka FUNCTION ) na dálkovém ovládání. Na předním panelu se objeví slovo „DISC“. 2. Stiskem tlačítka otevřít/zavřít ( ) otevřete mechaniku a vložte disk do přihrádky pro disk (potištěnou stranou nahoru).
  • Page 157: Opakované Přehrávání (Cd Disk)

    Přehrávání začátku každé skladby Stisknutím tlačítka ( ) na dálkovém ovladači spustíte postupné přehrávání začátků jednot- INTRO livých skladeb. Doba přehrávání každé skladby je 10 vteřin. Když uslyšíte požadovanou skladbu, stiskněte tlačítko ( INTRO Opakované přehrávání (CD disk) Opakované přehrávání typu ONE (jedna stopa) a ALL (vše) lze nastavit stiskem tlačítka režimu ( MODE První...
  • Page 158: Opakované Přehrávání (Mp3 Disk)

    Opakované přehrávání (MP3 disk) Opakované přehrávání typu ONE (jedna stopa), ALB (album) a ALL (vše) lze nastavit stiskem tlačítka režimu ( MODE První stisknutí : Opakování stejné stopy, na displeji bude blikat „ TRK“ a „REP“ Druhé stisknutí : Opakované přehrávání a ba, slovo „ TRK“...
  • Page 159 2. Zapněte funkci Bluetooth na vašem zařízení. 3. Vyhledejte jiné zařízení Bluetooth na vašem zařízení. 4. Zvolte „ AXM649BT“ v seznamu párování. 5. Zadejte heslo „ 0000“, pokud o to zařízení požádá. 6. Chcete-li odpojit funkci Bluetooth, stiskněte a podržte tlačítko zrušení párování ( ) na víc...
  • Page 160: Nastavení Času Buzení

    Nastavení času buzení Tato jednotka může být použita jako budík. Můžete si vybrat DISC, USB nebo TUNER jako zdroj budíku. Poznámka: ■ Ujistěte se, že jste správně nastavili hodiny. 1. V pohotovostním režimu stiskněte a podržte tlačítko dokud se na displeji neobjeví nápis TIMER [TIMER SET] (nastavení...
  • Page 161: Zacházení S Diskem

    Zacházení s diskem Opatření při manipulaci • Disk vždy uchopte za hrany tak, aby na povrchu nezůstaly vaše otisky prstů. (A) Otisky prstů, špína a škrábance mohou způsobit přeskakování a zkreslení. • Nepopisujte potištěnou stranu disku kuličkovým perem nebo jinými nástroji. •...
  • Page 162: Řešení Problémů

    Řešení problémů Došlo-li při používání výrobku k potížím, zkuste nejprve najít jejich možné řešení v této kapitole. Pokud je výrobek poškozen nebo problém nelze pomocí tohoto návodu odstranit nebo je výrobek fyzicky poškozen, kontaktujte kvalifikovanou osobu, např. svého prodejce, ohledně servisu. Symptom Možná...
  • Page 163: Specifikace

    Specifikace Jednotka Zdroj napětí 220-240V ~ 50/60Hz Rozsah ladění FM 87.5~108 Příkon 50W (EKO pohotovostní režim 0,5 W) Výstupní výkon 45W x 2 ≤ Rozměry (CD) 160 (šířka) x 78 (výška) x 250 (hloubka) mm (Zesilovač) 160 (šířka) x 78 (výška) x 250 (hloubka) mm Specifikace reproduktoru Impedance 6Ω...
  • Page 164 Značka je v souladu se směrnicí o odpadních elektrických a elektronických zařízeních 2002/96/ EC (OEEZ). Výrobky označené tímto symbolem včetně spotřebovaných nebo vyřazených baterií je ZAKÁZÁNO likvidovat jako netříděný komunální odpad, ale musí být odevzdány do recyklačních nebo sběrných systémů. Pokud je na bateriích nebo akumulátorech, které...
  • Page 165 Darty Group España France Darty Hispana S.A. Darty France Polígono Industrial C.L.A. 129, avenue Gallieni - 93140 Calle Rio Guadalhorce N 4 BONDY, 28906 Getafe (Madrid) France Ayuda en línea Darty Spain: Hotline Darty France 902 30 30 14 Quels que soient votre panne et le lieu d'achat de votre produit en France, avant de vous déplacer en magasin Darty, appelez le 0 978 970 970...
  • Page 166 Niektoré povolené a zakázané činnosti na bezpečné používanie zariadenia Toto zariadenie bolo navrhnuté a vyrobené tak, aby spĺňalo medzinárodné bezpečnostné normy. Avšak pre každé elektrické zariadenie platí, že sa musíte o neho starať, aby ste dosiahli čo najdlhšiu životnosť a zostali v bezpečí. *********************************** PREČÍTAJTE si tieto prevádzkové...
  • Page 167 Ak chcete dosiahnuť maximálne využitie a výkon, prečítajte si pozorne tento návod predtým, než začnete prístroj používať, aby ste sa zoznámili s jeho funkciami a dosiahli mnoho rokov spoľahlivej a bezproblémovej prevádzky a pôžitku z hudby. Dôležité poznámky * Tieto bezpečnostné a prevádzkové pokyny si odložte pre budúcu potrebu. * Neinštalujte prístroj na miesta popísané...
  • Page 168 Poznámka: - Tento prístroj sa zahrieva pri dlhšom použití. To je normálne a neznamená to problém s prístrojom. - Ak sa objavia neobvyklé stavy na displeji alebo s tlačidlami, vypnite prístroj a potom ho znovu zapnite. - Typový štítok je umiestnený na základni prístroja. - Značka prístroja sa nachádza na spodnej strane prístroja.
  • Page 169 Bezpečnostné pokyny pre batérie Pri správnom použití sú domáce batérie bezpečný a spoľahlivý zdroj prenosnej energie. Problémy môžu nastať, ak sa nepoužívajú správne alebo sú zneužívané - čo môže viesť k vytekaniu alebo v krajných prípadoch, požiaru alebo výbuchu. Ďalej uvádzame niektoré jednoduché pokyny na bezpečné používanie batérií, ktoré...
  • Page 170 Obsah Niektoré povolené a zakázané činnosti na bezpečné používanie zariadenia ......1 Dôležité poznámky ......................2 Laserový produkt ............................3 Správna manipulácia s batériami ....................... 3 Bezpečnostné pokyny pre batérie ..................4 Obsah balenia ........................7 Prehľad výrobku ....................... 8 CD prehrávač...
  • Page 171 Prehrávanie MP3/WMA diskov ..................19 Opakované prehrávanie (MP3 disk) ......................20 Používanie USB ......................20 Pre zariadenia s USB káblom ........................20 Pre pamäťové karty ..........................20 USB pamäťové zariadenia pre ochranu údajov ..................20 Nastavenie času budenia ....................22 Zapnutie / vypnutie času budenia ...................
  • Page 172: Obsah Balenia

    MANUALE DI ISTRUZIONI MANUAL DE NSTRUCCIONES NÁVOD K OBSLUZE NÁVOD NA OBSLUHU KULLANMA KI AVUZU AXM649BT B uetoo h M cro system M crocadena B uetooth M cro Cha ne Blue oo h B uetoo h mikrosys ém B uetoo h M crosys eem B uetoo h mikrosys ém...
  • Page 173: Prehľad Výrobku

    Prehľad výrobku CD prehrávač 1. Tlačidlo pre pohotovostný režim 2. Tlačidlo pre nastavenie času 3. Tlačidlo pre nastavenie režimu 4. USB port 5. Snímač diaľkového ovládača 6. Vákuový fluorescenčný displej (VFD) 7. Priehradka na disk 8. Tlačidlo pre rýchle prevíjanie vpred (C) Tlačidlo pre ladenie vpred Tlačidlo vzad (D) Tlačidlo pre ladenie vzad...
  • Page 174: Diaľkové Ovládanie

    Diaľkové ovládanie Tlačidlo pre pohotovostný režim Tlačidlo pre ovládanie disku Tlačidlo FM Tlačidlo režim ( MODE Tlačidlo pre úvod ( INTRO Tlačidlo pre hlasitosť ( LOUDNESS Tlačidlo predvoľby ekvalizéra ( P-EQ ) Tlačidlo pre čas ( CLOCK Tlačidlo nasledujúci Tlačidlo pre predvoľbu hore 10.
  • Page 175: Inštalácia Batérie

    Inštalácia batérie 1. Odstráňte izolačný prúžok z batérie. Nachádza sa na zadnej časti diaľkového ovládača. 2. Uvoľnite skrutku na kryte priestoru pre batérie pomocou skrutkovača. Vytiahnite priehradku na batérie.  3. Správne vložte novú batériu (rozmer 2025) a úplne zasuňte priehradku na batérie späť do pôvodnej polohy.
  • Page 176: Dosah Diaľkového Ovládania

    Dosah diaľkového ovládania 30° 30° Max. 5 m D S LAY Namierte diaľkové ovládanie na prístroj najviac ako 5 metrov od snímača diaľkového ovládania 30° horizontálne a 30° vertikálne od prednej strany prístroja. Vezmite na vedomie, že prevádzková vzdialenosť môže byť závislá na jase v miestnosti. Poznámka: •...
  • Page 177: Zapojenie

    Zapojenie Pozor: Vykonajte všetky zapojenia pred pripojením prístroja do zásuvky. Pred použitím si prečítajte tieto ďalšie poznámky pre inštaláciu. Ak sa nedodržia nasledujúce kroky, môže dôjsť k poškodeniu prístroja. Správne kroky pre nastavenie prístroja sú nasledovné: 1. Káble reproduktorov, spojovací kábel medzi CD prehrávačom a zosilňovačom sa musia pripojiť ako prvé.
  • Page 178: Pripojenie Fm Antény

    Pripojenie FM antény Pripojte dodanú FM anténu do zásuvky pre FM an- ténu na zadnej strane prístroja. AUX IN 1 AUX IN 2 ANTENNA Pozor: CABLE Aby sa zabránilo rušeniu, musí byť anténa v ANTENNA dostatočnej vzdialenosti od prístroja, spojovacieho kábla a napájacieho kábla.
  • Page 179: Pripojenie Spojovacieho Kábla

    Pripojenie spojovacieho kábla Pripojte spojovací kábel medzi CD prehrávač a zosilňovač. CD prehrávač AUX N 1 AUX IN 2 ANTENNA ABLE Zosilňovač CABL SPEAKER OUTPU (6 ) Pripojenie napájacieho kábla Zapojte sieťový kábel do zásuvky. Potom je váš prístroj pripravený na používanie. Pozor: * Odpojte napájací...
  • Page 180: Nastavenie Času

    Nastavenie času  Manuálne nastavenie času 1. Nastavte prístroj do eco pohotovostného režimu. 2. Stlačte a podržte tlačidlo pre nastavenie času ( ), VFD zobrazí CLOCK SET a začne blikať CLOCK CLOCK 24. 3. Nastavte hodinu tlačidlom pre nastavenie hlasitosti ( ) alebo tlačidlami predchádzajúci alebo VOL+/- nasledujúci (...
  • Page 181: Počúvanie Rozhlasového Vysielania

    Počúvanie rozhlasového vysielania Môžete počúvať FM stanice. Stanice je možné naladiť ručne, automaticky alebo z uložených v pamäti. Pozor: Pred počúvaním rádia skontrolujte, či FM anténa je správne pripojená a dostatočné roztiahnutá a nasmerovaná. Naladenie stanice 1. Otáčajte prepínač funkcií ( ) na prístroji alebo stlačte tlačidlo ( ) na diaľkovom ovládači.
  • Page 182: Fm Zobrazovacie Režimy

    FM zobrazovacie režimy Po každom stlačení tlačidla sa displej prepína v nasledujúcich režimoch: Názov stanice, DISPLAY frekvencia, programový typ, rádiotext, dátum / čas. Informácia sa zobrazuje v spodnej časti displeja. Názov stanice Ak sa pr jíma RDS stanica, zobrazí sa názov tejto stanice. Názov stanice Typ programu Identifikačný...
  • Page 183: Cd Prehrávač

    CD prehrávač Prehrávanie CD 1. Otáčajte prepínač funkcií ( ) na prístroji alebo stlačte tlačidlo ( ) na diaľkovom FUNCTION ovládači. Na prednom paneli sa zobrazí slovo „DISC“. 2. Stlačte tlačidlo otvoriť/zatvoriť ( ) pre otvorenie dvierok mechaniky a vložte disk do priehradky na disk (potlačenou stranou nahor).
  • Page 184: Prehrávanie Úvodu Každej Skladby

    Prehrávanie úvodu každej skladby Stlačte tlačidlo pre úvod ( ) na diaľkovom ovládači, ak si chcete postupne prehrať úvod každej INTRO skladby. Doba prehrávania každej skladby je 10 sekúnd. Ak počujete požadovanú skladbu, stlačte tlačidlo pre úvod ( INTRO Opakované prehrávanie (CD) Opakované...
  • Page 185: Opakované Prehrávanie (Mp3 Disk)

    Opakované prehrávanie (MP3 disk) Opakované prehrávanie JEDNEJ, VŠETKÝCH skladieb, alebo ALBUMU môžete vykonať stlačením tlačidla ( MODE Prvé stlačenie : Ak chcete zopakovať rovnakú skladbu, budú blikať slová „ “ a „ “. Druhé stlačenie : Pre opakované prehrávanie albumu slovo „ “...
  • Page 186 2. Zapnite Bluetooth funkciu na vašom prístroji. 3. Vyhľadajte iné Bluetooth zariadenia na vašom prístroji. 4. Vyberte „ “ v párovacom zozname. AXM649BT 5. V prípade potreby zadajte heslo „ ”. 0000 6. Stlačte a podržte tlačidlo pre vymazanie spárovania ( ) dlhšie ako 2 sekundy pre...
  • Page 187: Nastavenie Času Budenia

    Nastavenie času budenia Tento prístroj môže byť použitý ako budík. Môžete si vybrať DISC, USB alebo TUNER ako zdroj budenia. Poznámka: ■ Uistite sa, že ste správne nastavili čas. 1. V pohotovostnom režime stlačte a podržte tlačidlo , pokiaľ na displeji nezačne rolovať TIMER [TIMER SET] (nastavenie časovača).
  • Page 188: Manipulácia S Diskami

    Manipulácia s diskami Bezpečnostné opatrenia pri manipulácii • Disk berte do rúk iba za okraje, aby na povrchu nezostávali odtlačky prstov. (A) Odtlačky prstov, špina a škrabance môžu spôsobiť preskakovanie a skreslenie. • Nepíšte nič guľôčkovým perom alebo inými písacími potrebami na povrch disku. •...
  • Page 189: Riešenie Problémov

    Riešenie problémov Ak máte problém s prístrojom, pozrite si tento zoznam možných riešení predtým, ako sa obrátite na servis. Ak nedokážete odstrániť problém pomocou týchto rád, alebo došlo k fyzickému poškodeniu prístro- ja, zavolajte kvôli oprave kvalifikovanú osobu, napr. predajcu. Príznak Možná...
  • Page 190: Technické Parametre

    Technické parametre Parametre prístroja Napájanie 220-240V ~ 50/60Hz FM frekvenčný rozsah 87.5~108 Príkon 50 W (ECO pohotovostný režim 0,5 W) Výstupný výkon 45W x 2 ≤ Rozmery (CD) 160(š) × 78(v) × 250(h) mm (Zosilňovač) 160(š) × 78(v) × 250(h) mm Parametre reproduktora Impedancia 6Ω...
  • Page 191 Značka znamená súlad so Smernicou o odpade z elektrických a elektronických zariadení 2002/96/ES (OEEZ). Výrobky označené týmto symbolom vrátane spotrebovaných alebo vyradených batérií je ZAKÁZANÉ l kvidovať ako netriedený komunálny odpad, ale musia byť odovzdané do recyklačných alebo zberných systémov. Ak je na batériách alebo akumulátoroch, ktoré...
  • Page 192 Darty Group España France Darty Hispana S.A. Darty France Polígono Industrial C.L.A. 129, avenue Gallieni - 93140 Calle Rio Guadalhorce N 4 BONDY, 28906 Getafe (Madrid) France Ayuda en línea Darty Spain: Hotline Darty France 902 30 30 14 Quels que soient votre panne et le lieu d'achat de votre produit en France, avant de vous déplacer en magasin Darty, appelez le 0 978 970 970...
  • Page 193 Cihazın güvenli kullanımı ile ilgili yapılması ve yapılmaması gereken bazı hususlar Bu cihaz, uluslararası güvenl k standartlarını karşılayacak şekilde tasarlanmış ve üretilmiştir ancak, her elektr kli cihazda olduğu gibi en iyi sonucu almak ve güvenli bir çalışma sağlamak için d kkatli olunmalıdır.
  • Page 194 Cihazdan en yüksek keyif ve performansı almak için, cihazı kullanmaya başlamadan önce özelliklerini iyice öğrenmek, yıllarca güvenli, sorunsuz bir performans ve dinleme zevki sağlamak amacıyla lütfen bu kılavuzu d kkatle okuyun. Önemli Notlar * Talimatları muhafaza edin: güvenl k ve çalıştırma talimatları gelecekte başvuru amacıyla saklanmalıdır.
  • Page 195 Not: - Bu cihaz uzun süre kullanıldığında ısınır. Bu durum normaldir ve cihazda herhangi bir sorun olduğunu göstermez. - Ekranda veya düğmelerde anormal bir durum oluşursa, cihazı kapatın ve daha sonra tekrar açın. - Ürün et keti cihazın alt kısmında yer alır. - İşaretleme et ket bilgileri cihazın alt kısmında yer alır.
  • Page 196 Pillere Ait Güvenlik Talimatları Doğru kullanıldığında, dahili piller güvenli ve taşınabilir güç kaynağıdırlar. Yanlış veya uygun olmayan biçimde kullanıldıklarında sorunlara — sızıntıya veya aşırı durumlarda yangına veya patlamaya neden olabilirler. Burada bu tür sorunları gidermek amacıyla bazı basit güvenli pil kullanım talimatları...
  • Page 197 İçindekiler Cihazın güvenli kullanımı ile ilgili yapılması ve yapılmaması gereken bazı hususlar ..1 Önemli Notlar........................2 Lazer Ürünü ............................... 3 Pillerin Doğru Kullanımı ..........................3 Pillere Ait Güvenlik Talimatları ..................4 Paket İçeriği ........................7 Ürüne Genel Bakış ......................8 CD Çalar ..............................
  • Page 198 MP3/WMA diski çalma ....................19 Tekrarlayarak çalma (MP3 diski) ......................20 USB kullanımı ........................ 20 USB kablolu aygıtlar için .......................... 20 Hafıza kartları için ............................ 20 USB depolama aygıtı veri koruması ......................20 Alarm zamanlayıcısını ayarlama ..................22 Alarm zamanlayıcısını etkinleştirme/devre dışı bırakma ..........22 Uyku zamanlayıcısını...
  • Page 199: Paket İçeriği

    MANUALE DI ISTRUZIONI MANUAL DE NSTRUCCIONES NÁVOD K OBSLUZE NÁVOD NA OBSLUHU KULLANMA KI AVUZU AXM649BT B uetoo h M cro system M crocadena B uetooth M cro Cha ne Blue oo h B uetoo h mikrosys ém B uetoo h M crosys eem B uetoo h mikrosys ém...
  • Page 200: Ürüne Genel Bakış

    Ürüne Genel Bakış CD Çalar 1. Hazırda bekleme düğmesi 2. Saat düğmesi 3. Mod düğmesi 4. USB jakı 5. Uzaktan kumanda sensörü 6. Vakumlu Floresan Ekran (VFD) Ekran Lensi 7. Disk tepsisi 8. Hızlı ileri düğmesi (C) İleri ayar düğmesi Hızlı...
  • Page 201: Uzaktan Kumandaya Genel Bakış

    Uzaktan Kumandaya Genel Bakış Hazırda bekleme düğmesi Disk işlev düğmesi FM düğmesi Mod düğmesi ( MODE Giriş düğmesi ( INTRO Ses şiddeti düğmesi ( LOUDNESS Önayarlı ekolayzer düğmesi ( P-EQ ) Saat düğmesi ( CLOCK Sonraki düğmesi Yukarı önayar düğmesi 10.
  • Page 202: Pilin Takılması

    Pilin takılması 1. Pilin üzerindeki mylar izolasyon şeridini çıkarın. Şerit uzaktan kumandanın arkasında, alt kısımda yer alır. 2. Pil yuvası kapağında yer alan vidayı bir tornavida ile gevşetin. Pil yuvasını tırnak ucunuzla çekerek çıkarın.  3. Eski pili çıkararak yeni bir pil (2025 boy) takın ve pil yuvasını...
  • Page 203: Uzaktan Kumanda Çalıştırma Mesafesi

    Uzaktan Kumanda Çalıştırma Mesafesi 30° 30° Maks. 5 m D S LAY Uzaktan kumanda ünitesini uzaktan kumanda sensöründen en fazla 5 metre, ünitenin önünden ya- tay olarak 30° ve d key olarak 30° mesafe içinde yönlendirin. Çalışma mesafesi oda aydınlatmasına bağlı...
  • Page 204: Bağlantılar

    Bağlantılar Dikkat: Cihazın fişini AC güç prizine takmadan önce tüm bağlantıları yapın. Lütfen kullanmadan önce bu ek kurulum notlarını okuyun. Aşağıdaki adımlar doğru şekilde izlenmezse cihaz hasar görebilir. Cihazın kurulumu için izlenmesi gereken doğru adımlar aşağıdaki gibidir: 1. İlk olarak hoparlör kabloları, CD çalar ile amplifikatör arasındaki kontrol kablosu bağlanmalıdır. 2.
  • Page 205: Fm Anteninin Bağlanması

    FM anteninin bağlanması Ürünle birlikte verilen FM antenini cihazın arka kısmında yer alan FM anteni soketine bağlayın. AUX IN 1 AUX IN 2 ANTENNA Dikkat: CABLE Gürültü oluşmasını önlemek için anteni cihazdan, ANTENNA bağlantı kablosundan ve AC güç kablosundan uzak tutun.
  • Page 206: Kontrol Kablosunun Bağlanması

    Kontrol kablosunun bağlanması Kontrol kablosunu CD çalar ile amplifikatör arasına bağlayın. CD çalar AUX N 1 AUX IN 2 ANTENNA ABLE Amplifikatör CABL SPEAKER OUTPU (6 ) AC güç kablosunun bağlanması AC güç kablosunu bir prize taktığınızda cihazınız kullanıma hazırdır. Dikkat: * Dışarı...
  • Page 207: Saatin Ayarlanması

    Saatin ayarlanması  Saatin manuel olarak ayarlanması 1.Cihazı eco güç hazırda bekleme moduna alın. 2.Saat düğmesine ( ) basın ve basılı tutun, ekranda CLOCK SET (SAAT AYARI) görüntülenir CLOCK ve CLOCK 24 yazısı yanıp sönmeye başlar. 3. Ses artırma/azaltma ( ) veya Önceki/Sonraki düğmeleri ( ) veya Önceki/Sonraki VOL+/-...
  • Page 208: Radyo Yayınlarını Dinleme

    Radyo yayınlarını dinleme Bu cihazda FM radyo istasyonlarını dinleyebilirsiniz. İstasyonlar manuel olarak, otomatik veya hafızadan çağrılarak ayarlanabilir. Dikkat: Radyo dinlemeden önce, FM anteninin düzgün bir şekilde takılmış, uzunluğunun ve yönünün ayarlanmış olduğunu kontrol edin. Bir radyo istasyonunun ayarlanması 1. Ana ünite üzerindeki işlev düğmesini ( ) çevirin veya uzaktan kumanda üzerindeki tuner FUNCTION işlev düğmesine (...
  • Page 209: Fm Ekran Modları

    FM ekran modları (EKRAN) düğmesine her bastığınızda ekran modu aşağıdaki seçenekler arasında DISPLAY değişecektir: İstasyon Adı, Frekans, Program Türü, Radyo Metni, Tarih / Saat. Bilgiler ekranın alt bölümünde görüntülenir. İstasyon Adı Bir RDS istasyonu alındığında ekranda bu istasyonun İstasyon Adı adı...
  • Page 210: Cd Işlemleri

    CD işlemleri CD çalma 1. Ana ünite üzerindeki işlev düğmesini ( ) çevirin veya uzaktan kumanda üzerindeki disk FUNCTION işlev düğmesine ( ) basın. Ön panelde “DISC” yazısı görüntülenir. 2. Disk kapağını açmak için açma/kapama düğmesine ( ) basın ve diski (et ketli yüzü yukarıya bakacak şekilde) disk tepsisine yerleştirin.
  • Page 211: Her Parçanın Girişini (Intro) Çalma

    Her parçanın girişini (Intro) çalma Her bir parçanın başlangıcını art arda çalmak için, uzaktan kumanda üzerindeki Giriş düğmesine ) basın. Her parçanın çalma süresi 10 saniyedir. İstenen parçayı duyduğunuzda Giriş INTRO düğmesine ( ) basın. INTRO Tekrarlayarak çalma (CD) BİRİNİ ve TÜMÜNÜ Tekrar Çalma işlemi Mod düğmesine ( ) basılarak ayarlanabilir..
  • Page 212: Tekrarlayarak Çalma (Mp3 Diski)

    Tekrarlayarak çalma (MP3 diski) BİRİNİ, ALBÜMÜ ve TÜMÜNÜ Tekrar Çalma işlemi Mod düğmesine ( ) basılarak MODE Birinci basış : Aynı parçayı tekrarlamak için, “ ” ve “ ” sözcükleri yanıp söner. İkinci basış : Albüm çalmayı tekrarlamak için, “ ”...
  • Page 213 2. Cihazınızın Bluetooth işlevini açın. 3. Cihazınızla diğer Bluetooth aygıtlarını tarayın. 4. Eşleştirme listesinden “ ” yi seçin. AXM649BT 5. Gerekirse varsayılan parolayı “ ” girin. 0000 6. Eşleştirme modunu silmek için 2 saniyeden uzun bir süre boyunca Eşleştirme Temizlendi düğmesine (...
  • Page 214: Alarm Zamanlayıcısını Ayarlama

    Alarm zamanlayıcısını ayarlama Bu cihaz bir alarm saati olarak kullanılabilir. Alarm kaynağı olarak DISC, USB veya TUNER'i seçebilirsiniz. Not: ■ Saati doğru şekilde ayarladığınızdan emin olun. 1. Hazırda bekleme modundayken, ekranda [TIMER SET] (zamanlayıcı ayarı) görüntüleninceye kadar düğmesini basılı tutun. TIMER 2.
  • Page 215: Disk Kullanımı

    Disk kullanımı Kullanma ile ilgili alınacak önlemler • Diski, yüzeyinde parmak izi kalmayacak şekilde kenarlarından tutun. (A) Parmak izleri, kir ve çizikler atlama ve bozulmaya neden olabilir. • Etiketli yüzeyine tükenmez kalem veya diğer yazma araçları ile yazı yazmayın. • Plak temizlik spreyleri, benzin, tiner, stat k elektrik önleyici sıvılar veya diğer çözücü...
  • Page 216: Sorun Giderme

    Sorun Giderme Cihazınızla ilgili bir sorun yaşıyorsanız, servis çağırmadan önce bu listeyi kontrol ederek olası bir çözüm olup olmadığına bakın. Burada verilen ipuçlarını kullanarak sorunu çözemiyorsanız veya cihaz fiziksel olarak hasar görmüşse, servis almak için yetkili bir kişiyle, örneğin bayinizle irtibata geçin. Sorun Olası...
  • Page 217: Teknik Özellikler

    Teknik Özellikler Ana Ünite Teknik Özellikleri Güç Gereksinimleri 220-240V ~ 50/60Hz FM Ayar Aralığı 87.5~108 Güç Tüketimi 50W (ECO Standby 0.5W) Çıkış Gücü 45W x 2 ≤ THD (Toplam Harmonik Distorsiyon): Ebatlar: (CD) 160(G) x 78(Y) x 250(D) mm (Amplifikatör) 160(G) x 78(Y) x 250(D) mm Hoparlör Teknik Özellikleri Empedans 6Ω...
  • Page 218 işareti, Elektr kli ve Elektronik Cihaz Atıkları Direktifi 2002/96/EC (WEEE) ile uyumludur. Bu işaret, ömrü dolmuş veya bozuk pil içeren cihazların türlerine göre ayrılmamış ev atıklarıyla birl kte atılmaması, bunun yerine mevcut iade ve toplama sistemlerinin kullanılması gerektiğini belirtmekte- dir. Bu cihazda bulunan pillerde veya akülerde Hg, Cd veya Pb kimyasal sembolleri varsa, pil % 0,0005’ten fazla Cıva veya % 0,002’den fazla Kadmiyum veya % 0,004’ten fazla Kurşun içeriyor demektir.
  • Page 219 08_AXM649BT_TR_P41013409-A101_4 Mar 13.indd 27 2013-3-14 10:32:15...
  • Page 220 Darty Group España France Darty Hispana S.A. Darty France Polígono Industrial C.L.A. 129, avenue Gallieni - 93140 Calle Rio Guadalhorce N 4 BONDY, 28906 Getafe (Madrid) France Ayuda en línea Darty Spain: Hotline Darty France 902 30 30 14 Quels que soient votre panne et le lieu d'achat de votre produit en France, avant de vous déplacer en magasin Darty, appelez le 0 978 970 970...

Table des Matières