Télécharger Imprimer la page

Publicité

Les langues disponibles
  • FR

Les langues disponibles

  • FRANÇAIS, page 8

Liens rapides

Manuel d'utilisation
Instructions manual
Bedienungsanleitung
Handboek
Manual de Utilización
Manuale d'uso
FO35
Four Electrique
Electric oven
Elektro-Ofen
Elektrische Oven
Horno Eléctrico
Forno Elettrico

Publicité

loading

Sommaire des Matières pour H.Koenig FO35

  • Page 1 Manuel d'utilisation Instructions manual Bedienungsanleitung Handboek Manual de Utilización Manuale d’uso FO35 Four Electrique Electric oven Elektro-Ofen Elektrische Oven Horno Eléctrico Forno Elettrico...
  • Page 2 ENGLISH IMPORTANT SAFETY INSTRUCTIONS When using your Toast Oven , basic safety precautions should always be observed, including the following: Read all instructions. 15. Do not clean the inside of the oven with metal 2. Do not touch hot surfaces. Always use handles or scouring pads, pieces can break off the pad and knobs.
  • Page 3 SAVE THESE INSTRUCTIONS For Household Use Only Getting To Know Your Convection Oven MAIN COMPONENT: A: Housing I:Function Control Knob B: Front Plate J: Timer Control Knob C: Upper Door Frame K: Indicator Cover D: Handle L: Foot E: Lower Door Frame M: Bake Tray F: Lower Heating Element N: Wire Rack...
  • Page 4 your new toaster oven. 5. After re–assembling your oven, we recommend that you run it at the highest temperature (230℃)on the toast function for approximately 15 minutes to eliminate any packing residue that may remain after shipping. This will also remove all traces of odor initially present. Please Note: Initial start-up operation may result in minimal smell and smoke (about 15 minutes).
  • Page 5 handle, or an oven mitt when removing hot items from the oven. BROIL For best results, it is recommended that your preheat the oven for 15 minutes on 230℃. Operation  Set the temperature Control Knob to 230℃.  Turn function control to .and Preheat the oven.
  • Page 6 Operation  Set the Temperature Control Knob to 230℃.  Turn the function control knob to  Place food to be toasted on the wire rack.  Turn the time control knob.  Bell will ring to signal the end of the toast cycle. Note: Wire Rack should be positioned in the middle of the oven with the indentations pointing down.
  • Page 7 Care & Cleaning Warning: Be sure to unplug the oven and allow it to cool before cleaning. Any spattering that occurs while cooking and comes into contact with the continuous coating is oxidized while the oven is in operation. If desired, wipe the walls with a damp sponge, cloth or nylon scouring pad and mild detergent.
  • Page 8 FRANCAIS RECOMMANDATIONS DE SECURITE IMPORTANTES. Lorsque vous utilisez votre four-grill il est recommandé de veiller à votre sécurité, en suivant des mesures de prévention dont voici une liste non exhaustive : Lisez le mode d’emploi 14. Ne pas nettoyer le four avec des Ne pas toucher les surfaces chaudes.
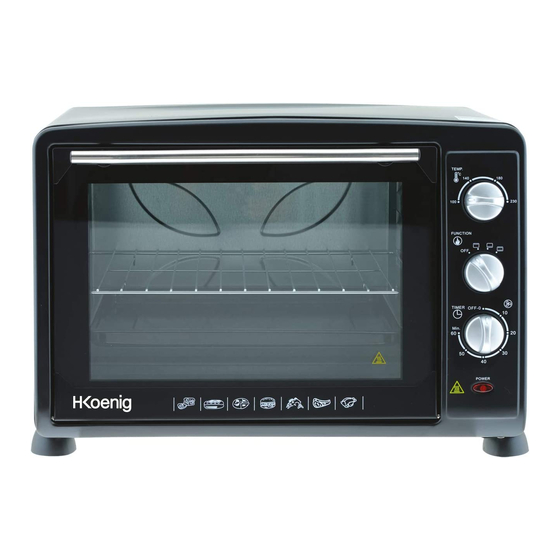
  • Page 9 Appareil prévu pour un usage domestique exclusivement. Connaître votre nouveau four électrique Description et accessoires : A: protection extérieure I: bouton de contrôle du mode de cuisson B: porte J: bouton de contrôle du temps de cuisson C: rebord supérieur de la porte K: témoin d'allumage D: poignée L: pied...
  • Page 10 aliments de manière homogène, ce qui dore et fait croustiller l’extérieur des aliments tout en les gardant juteux et savoureux à l’intérieur. Grâce au ventilateur, la température du four est constante et homogène pour une cuisson parfaite ce qui n’est pas le cas des fours traditionnels du fait que la température varie selon l’endroit du four où...
  • Page 11 6. Les aliments doivent être placés aussi haut que possible sans toucher le dispositif de chauffe supérieur. 7. Réglez la température selon vos besoins. 8. Badigeonnez les aliments de l’assaisonnement choisi. 9. Réglez le temps de cuisson selon les besoins. 10.
  • Page 12 8. Réglez le temps de cuisson selon les besoins. 9. Vous pouvez laisser la porte du four légèrement entrouverte si vous le souhaitez. 10. Pensez à retourner les aliments en milieu de cuisson. 11. Une fois la cuisson terminée, placez le bouton de contrôle du temps de cuisson sur off. Positions de la grille : Pour des biscuits : utiliser les positions moyenne et basse.
  • Page 13 DEUTSCH WICHTIGE SICHERHEITSHINWEISE Während des Gebrauchs Ihres Ofen’s müssen Sie den Standard-Sicherheitsmassnahmen folgen: 1. Lesen Sie alle Instruktionen. Flüssigkeiten von dem Ofen entfernen. 2. Fassen heisse Oberflächen 15. Reinigen Sie das Innere des Ofens niet mit Gebrauchen Sie immer die Griffel oder knöpfe. Stahlwolle, stücke können...
  • Page 14 BEWAHREN SIE DIESE ANLEITUNG Nur für Gebrauch im Haushalt Lernen Sie Ihren Elektro-Ofen kennen : AUPTBESTANDTEIL A: Gehäuse J:Zeitregler B: Frontplatte K:Kontrolleuchte L: Fuβ C: Oberer Türrahmen D: Griff M: Back Blatt E: Unterster Türrahmen N:Gitter F: Unterster Wiederstand O: Blatt hebel G:Glas Tür H:Temperaturregler I: Funktionsschalter...
  • Page 15 Hinweis: Beim ersten mal kann ein minimaler Geruch und rauch (ca. 15 Minuten) folgen. Das ist normal und harmlos und wird durch die Verbrennung des Schutzmaterials die auf den Heizelementen angebracht sind verursacht. Verwendung Ihres Heiβluftofens Über das Heiβluftgaren Heiβluftgaren vereint heiβe Luft Bewegung mit regelmäβiger Ventilation der Funktionen (Braten, Backen, Rösten).
  • Page 16  Legen Sie das Essen auf das Gitter und platzieren Sie es auf die oberste lade.  Essen sollte so nah wie möglich an dem oberen Heizelement sein ohne es zu berühren.  Drehen Sie den Temperaturregler auf die gewünschte Temperatur. Verteilen Sie Öl oder Soβen auf dem Essen, so wie gewünscht.
  • Page 17  Drehen Sie den Funktions knopf auf . Heizen Sie den Ofen vor.  Platzieren Sie das Gitter auf die mittelste lade.  Legen Sie das Essen auf das Gitter und schieben Sie es in die Lade.  Lebensmittel sollte möglichst nahe an der Bodenheizung sein ohen es zu berühren. ...
  • Page 18 NEDERLAND BELANGRIJKE VEILIGHEIDSINSTRUCTIES Tijdens het gebruik van uw Toast oven, moet u altijd de standard veiligheidsmaatregelen in acht nemen, waaronder de volgende: 1. Lees alle instructies. andere hete vloeistoffen. 2. Raak nooit hete oppervlakken aan. Gebruik 15. Reinig de binnenkant van de oven niet met altijd de handgrepen of knoppen.
  • Page 19 BEWAAR DEZE INSTRUCTIES Alleen voor huishoudelijk gebruik Leer uw elektrische oven kennen MAIN COMPONENT: A: Behuizing J:Timercontrole knop B: Frontplaat K:Indicatie licht C: Bovenste deur frame L: Voet D: Hendel M: Bak blad E: Onderste deur frame N:Rooster F: Onderste weerstand O: Blad hendel G:Glazen deur H:Temperatuur controle knop...
  • Page 20 Let op: De eerste inbedrijfstelling kan in minimale geur en rook (ongeveer 15minuten) resulteren. Dit is normaal en ongevaarlijk en komt door de verbranding van de beschermende stof aangebracht op de verwarmingselementen in de fabriek. Het gebruik van uw heteluchtoven Over convectie koken Convectie koken combineert warme lucht beweging door middel van een ventilator met reguliere functies (braden, bakken, roosteren).
  • Page 21  Plaats het bak blad en rooster erin.  Plaats het voedsel op het rooster en zet het op het bovenste rek.  Voedsel moet zo dichtbij mogelijk bij het bovenste verwarmingselement geplaatst worden zonder het aan te raken.  Draai de temperatuur knop op de gewenste temperatuur.
  • Page 22  Draai de functie knop op . Verwarm de oven.  Plaats het rooster op de laagste of middelste rek.  Plaats het voedsel op het rooster en glijd deze in het rek.  Voedsel moet zo dicht mogelijk bij de onderste verwarmingselement worden geplaatst zonder het aan te raken.
  • Page 24 ESPANOL INSTRUCCIONES IMPORTANTES DE SEGURIDAD Cuando use este horno, asegúrese de seguir las precauciones básicas de seguridad, entre ellas las siguientes: 1. Lea todas las instrucciones. 14. Tenga mucho cuidado al quitar la bandeja, la rejilla o al desechar la grasa caliente u otros 2.
  • Page 25 25. No lo use al aire libre. 26. No utilice el dispositivo para otro uso distinto al indicado. GUARDE ESTAS INSTRUCCIONES SÓLO PARA USO DOMÉSTICO Conozca su nuevo horno eléctrico COMPONENTES PRINCIPALES: A: Carcasa I: Perilla de control de función B: Placa frontal J: Perilla de control de tiempo C: Marco superior de la puerta...
  • Page 26 3. Lave todos los accesorios con agua caliente y jabón o en el lavavajillas. 4. Seque completamente todos los accesorios y vuelva a montarlos en el horno, enchúfelo y ya está listo para usar su nuevo horno tostador. 5. Después de volver a montar el horno, se recomienda que se ejecute el horno en la temperatura más alta (230 ℃) en la función Tostar durante aproximadamente 15 minutos para eliminar cualquier resto de embalaje que pueda quedar después del envío.
  • Page 27 ● Luz de neón: Se ilumina cuando el horno está encendido ● Bandeja de horneado: Para usarse en el asado de carne, pollo, pescado y varios otros alimentos. También se utiliza cuando se usa el asador para recoger las gotas que caen. ●...
  • Page 28 PIERNAS DE POLLO 200℃ 30-35 min FILETES DE PESCADO 180℃ 20-25 min FILETE DE SALMÓN 180℃ 20-25 min Nota: Todos los tiempos de asado están basados en carnes a la temperatura de la nevera. Las carnes congeladas puede tardar mucho más tiempo. Por lo tanto, el uso de un termómetro para carnes es muy recomendable.
  • Page 29 Tartas - Use la parte inferior y media de soporte. ATENCIÓN: Tenga siempre mucho cuidado al quitar la bandeja de hornear, parrilla o un recipiente cualquiera de un horno caliente. Siempre use el mango para parrilla, o un guante para horno cuando retire elementos calientes del horno. Cuidado y limpieza Advertencia: Asegúrese de desenchufar el horno y deje que se enfríe antes de limpiarlo.
  • Page 30 ITALIANO IMPORTANTI ISTRUZIONI DI SICUREZZA Quando si utilizza questo apparecchio, dovrebbero sempre essere osservate delle precauzioni di sicurezza, come le seguenti: 1. Leggere tutte le istruzioni. 15. Non pulire la parte interna del forno con spugne 2. Non toccare le superfici calde. Usare sempre le metalliche, poiché...
  • Page 31 CONSERVARE QUESTE ISTRUZIONI Solo per uso domestico Conoscere il proprio nuovo forno elettrico COMPONENTI PRINCIPALI: A: Alloggiamento I: Manopola di controllo delle funzioni B: Lastra frontale J: Timer C: Cornice superiore dello sportello K: Spia luminosa D: Maniglia L: Piede E: Cornice inferiore dello sportello M: Vassoio F: Resistenza riscaldante inferiore...
  • Page 32 Nota Bene: è possibile che la prima volta che l’apparecchio viene messo in funzione, si crei un leggero odore di fumo (per circa 15 minuti). Questo è normale e innocuo ed è dovuto alla combustione della sostanza protettiva applicata in fabbrica agli elementi riscaldanti. Come utilizzare il forno a convezione Informazioni sulla cottura a convezione La cottura a convezione combina un movimento di aria calda per mezzo di una ventola con tutte le tradizionali...
  • Page 33  Impostare sulla funzione e preriscaldare il forno.  Posizionare la griglia sul vassoio.  Posizionare gli alimenti sulla griglia e farli scivolare in cima alla griglia.  Gli alimenti dovrebbero essere posizionati il più possibile vicino alla resistenza riscaldante superiore senza toccarla.
  • Page 34 risultati, si raccomanda di preriscaldare il forno per 15 minuti a 230°C. Funzionamento  Impostare la temperatura a 230°C.  Impostare sulla funzione . Dunque preriscaldare il forno.  Riporre la griglia sul sostegno più basso o in posizione media. ...
  • Page 35 AMBIANTE ATTENZIONE : Non gettare quest’ apparecchio tra i rifiuti domestici. Per questo tipo di prodotti è fornito dai comuni un sistema di raccolta e ritiro in zona ed è quindi un dovere informarsi per conoscere il giusto smistamento del rifiuto. Infatti, i prodotti elettrici ed elettronici possono contenere sostanze pericolose che hanno effetti dannosi sull’ambiente o sulla nostra salute e quindi devono essere riciclati.