Table des Matières
Publicité
Les langues disponibles
Les langues disponibles
Liens rapides
Publicité
Chapitres
Table des Matières

Manuels Connexes pour Intenso TAB 824


Sommaire des Matières pour Intenso TAB 824
- Page 1 INTENSO TAB 824 V1.2...
-
Page 2: Table Des Matières
TAB 824 Bedienungsanleitung Vielen Dank, dass Sie sich für das TAB 824 entschieden haben. Folgen Sie bitte dieser Anleitung, um über die wichtigsten Funktionen des Gerätes informiert zu werden. 1.) Inhaltsverzeichnis 1.) Inhaltsverzeichnis ....................................1 2.) Hinweise ........................................ 2 3.) Geräteüberblick ..................................... 4 4.) Packungsinhalt ...................................... -
Page 3: Hinweise
Dieses Handbuch enthält unter Umständen nicht alle Funktionen Ihres Gerätes. Für die Nutzung von Anwendungen die von Drittanbietern stammen, kontaktieren Sie bitte den Anbieter. Bitte beachten Sie, dass alle Angaben ohne vorherige Ankündigung geändert werden können. Aktuelle Informationen finden Sie unter www.intenso.de Markenzeichen Google™, das Google™-Logo und Android™... - Page 4 Benutzen Sie nur das beiliegende Netzadapter- und Netzanschlusskabel. Um die Stromversorgung zu Ihrem Gerät zu unterbrechen, ziehen Sie das Netzteil aus der Steckdose. Halten Sie beim Abziehen immer das Netzteil selbst fest. Ziehen Sie nie an der Leitung. ...
-
Page 5: Geräteüberblick
Lautstärke – Ruhemodus zu reaktivieren. Rückseitige Kamera Micro-SD Kartenslot Lautsprecher 4.) Packungsinhalt Bitte überprüfen Sie den Packungsinhalt auf Vollständigkeit: TAB 824 Stereo-Kopfhörer USB Kabel Netzteil 5V 2.0A Bedienungsanleitung Tasche in Lederoptik DE - 4... -
Page 6: Laden Des Akkus
5.) Laden des Akkus Bitte laden Sie den Akku des Gerätes vor der ersten Benutzung vollständig auf. Verbinden Sie dazu das beiliegende Netzteil mit dem Gerät und einer Steckdose. Das vollständige Laden dauert ca. 5 Stunden. Der Ladezustand wird an der vorderen, linken Seite des Geräts angezeigt. Die LED leuchtet während des Aufladens Rot und wechselt zu Gelb, wenn der Akku vollständig geladen ist. -
Page 7: Touchscreen
Um den Speicher zu deaktivieren, wählen Sie “USB-Speicher deaktivieren” aus. Wählen Sie beim Computer die Funktion „Sicher Entfernen“ aus, um das Gerät vom Computer zu trennen. Hinweis: Die vorinstallierten Anwendungen und das Android™ Betriebssystem nehmen einen Teil des vorhandenen internen Speichers ein. -
Page 8: Wifi
9.) WIFI Um das Gerät mit dem Internet zu verbinden, benötigen Sie eine WLAN Verbindung. Um diese herzustellen, tippen Sie bitte auf das WIFI Icon auf dem Startbildschirm, oder öffnen Sie in den Einstellungen die WLAN Einstellungen. Hinweis: Bitte beachten Sie, dass sich ein WLAN Netz in Reichweite ihrer aktuellen Position befinden muss. -
Page 9: Manuelle Verbindung
Manuelle Verbindung Um manuell nach einem erreichbaren WLAN Netz zu suchen, gehen Sie bitte wie folgt vor: (1) Öffnen Sie die Einstellungen. (2) Öffnen Sie jetzt die WLAN-Einstellungen und tippen Sie auf „Scannen“. (3) Sollte das WLAN Netz nicht in der Liste der verfügbaren Netzwerke erscheinen, wählen Sie den Punkt “Netzwerk hinzufügen”... -
Page 10: Statusleiste
Ziehen Sie das Schloss Symbol mit Ihrem Finger in Pfeilrichtung Hinweis: Ziehen Sie das Schloss Symbol zum erscheinenden Kamera Symbol, um direkt die Kameraanwendung zu öffnen. Statusleiste Die Statusleiste finden Sie im unteren Bereich des Startbildschirms. Sie besitzt folgende Funktionalität: Sie erhalten Informationen über: ... -
Page 11: Anpassung Des Startbildschirms
Durch kurzes Tippen auf die Uhr öffnen Sie die erweiterte Statusleiste. Hier werden Ihnen aktuelle Statusmeldungen angezeigt. Durch nochmaliges Tippen auf die Uhr in der erweiterten Statusleiste werden Ihnen verschiedene Schnellzugriffe, wie zum Beispiel der Zugang zu den Einstellungen, angezeigt. Anpassung des Startbildschirms Sie können Ihren Startbildschirm ganz einfach an Ihre individuellen Bedürfnisse anpassen. -
Page 12: Vorinstallierte Anwendungen Auf Dem Startbildschirm
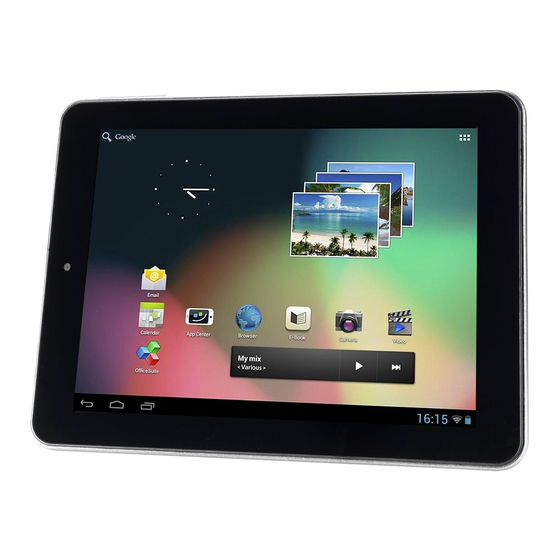
Vorinstallierte Anwendungen auf dem Startbildschirm A Verknüpfung zur Google™ Suche B Anwendungsübersicht C Analoge Uhr D Fotogalerie E Apps auf dem Startbildschirm F Musik Schnellzugriff G Statusleiste: Zurück, Home, zuletzt genutzte Programme, Uhrzeit, Wlan, Akkustatus a) Suchleiste für die Google™ Suche Tippen Sie kurz auf die Lupe, um die Google™... -
Page 13: Anwendungsübersicht
b) Anwendungsübersicht Tippen Sie kurz auf das Anwendungsübersicht Icon, um die Anwendungsübersicht zu öffnen. Sie sehen nun eine Übersicht aller vorinstallierten und bereits von Ihnen installierten Anwendungen. Öffnen Sie die gewünschte Anwendung durch kurzes Tippen auf das entsprechende Icon. Anwendungsübersicht c) Analoge Uhr (Widget) Tippen Sie auf die analoge Uhr, um den Wecker zu aktivieren oder zu deaktivieren, oder weitere Wecker hinzuzufügen. - Page 14 Tippen Sie auf das Fotosymbol , um zwischen verschiedenen Gruppierungsmöglichkeiten wählen. Um das nächste oder vorherige Bild angezeigt zu bekommen, schieben Sie das aktuelle Bild mit dem Finger einfach nach links oder rechts aus dem Display. Legen Sie zwei Finger auf den Touchscreen und ziehen Sie diese auseinander, um das Bild stufenlos zu vergrößern.
-
Page 15: Apps Auf Dem Startbildschirm
e) Apps auf dem Startbildschirm Hier finden Sie eine Auswahl der bereits vorinstallierten Anwendungen. aa) Versand / Empfang von E-Mails Auf diesem Gerät ist eine E-Mail Anwendung vorinstalliert. Sie können damit Ihre bereits bestehende E-Mail Adresse nutzen, um E-Mails zu versenden und zu empfangen. Hinweis: Für diese Funktion ist eine WLAN Verbindung zum Internet erforderlich Öffnen Sie die Anwendung über das „E-Mail“... -
Page 16: Verwaltung Der E-Mail Accounts
Verwaltung der E-Mail Accounts Hinzufügen eines neuen Postfaches: (1) Öffnen Sie die E-Mail Anwendung und tippen Sie auf die Menü Taste zum Anzeigen der weiteren Optionen. Wählen Sie den Menüpunkt „Einstellungen und anschließend “Konto hinzufügen”, um ein neues Postfach anzulegen. (2) Folgen Sie dem Einrichtungsassistenten, um ein neues Postfach anzulegen. -
Page 17: Bb) Kalender
bb) Kalender Tippen Sie kurz auf dieses Icon, um eine Kalenderübersicht zu erhalten. Um Termine und Erinnerungen verwalten zu können, müssen Sie Ihren bestehenden Google™ -Kalender synchronisieren, oder einen neuen Google™ -Kalender einrichten. Haben Sie noch kein Google™-Konto auf dem Gerät eingerichtet, folgen Sie einfach bei der ersten Nutzung des Kalenders den Anweisungen des Einrichtungsassistenten, oder öffnen Sie später die Kalendereinstellungen. -
Page 18: Ee) Web Browser
ee) Web Browser Um den Web Browser zu starten, tippen Sie bitte auf das Browser Icon in der Anwendungsübersicht. Um eine Internetseite zu öffnen, tippen Sie bitte auf das Eingabefeld für die Internetadresse. Die virtuelle Tastatur öffnet sich nun und Sie können jetzt die Adresse der gewünschten Internetseite eingeben. -
Page 19: Nutzung Des Web Browsers
Nutzung des Web Browsers Sie können durch die Anzeige im Display scrollen, indem Sie eine vertikale Wischbewegung mit Ihrem Finger durchführen. Bitte beginnen Sie die Wischbewegung nicht auf einem Menüpunkt oder Link, da ansonsten die vorhandene Verknüpfung geöffnet werden würde. ... -
Page 20: Hh) Video
hh) Video Tippen Sie kurz auf das Video Icon im Startbildschirm oder der Anwendungsübersicht, um die Videowiedergabe zu öffnen. Es werden Ihnen nun die Videodateien in einer Liste angezeigt. Wählen Sie die gewünschte Datei durch kurzes Antippen und das Video startet. Wiedergabebildschirm 1. - Page 21 Tippen Sie kurz auf das Musik Symbol in der Anwendungsübersicht oder auf den aktuellen Titel im Musik Widget, um die Musikwiedergabe zu öffnen. In der folgenden Übersicht haben Sie die Wahl, sich Ihre Musik nach Interpreten, Alben, Titel, Playlist oder der aktuellen Wiedergabe sortiert anzeigen zu lassen. Tippen Sie dazu einfach kurz auf das entsprechende Symbol.
-
Page 22: System Einstellungen
Im Wiedergabemodus können Sie weitere Einstellungen vornehmen. Tippen Sie dazu kurz auf die Menü-Taste Bibliothek – Eine Übersicht aller vorhandenen Musikdateien wird angezeigt. Party Mix – Den Party Mix Modus aktivieren bzw. deaktivieren. Zur Playlist hinzufügen – Den aktuell gespielten Titel zu einer Playlist hinzufügen. Löschen –... -
Page 23: Einstellungsübersicht
Einstellungsübersicht Drahtlos & WLAN Nehmen Sie hier Ihre WLAN-Einstellungen vor. Netzwerke Mehr Hier können Sie weitere Netzwerkeinstellungen vornehmen. Stellen Sie hier die gewünschte Lautstärke und den gewünschten Töne Benachrichtigungston ein. Weiterhin können Sie einen Bestätigungston bei Berührung des Touchscreens und einen Hinweiston beim Entsperren der Displaysperre aktivieren bzw. -
Page 24: Verwaltung Von Anwendungen
12.) Verwaltung von Anwendungen Vorinstallierte Anwendungen Dieses Gerät wird mit bereits vorinstallierten Anwendungen ausgeliefert. Eine Übersicht der bereits installierten Anwendungen finden Sie in der Anwendungsübersicht . Hierzu gehören unter anderem der Video Player, Audio Player, Internet Browser, Alarm, Rechner und noch einige mehr. -
Page 25: Datei Explorer
13.) Datei Explorer Öffnen Sie die Anwendungsübersicht und tippen Sie anschließend kurz auf das Explorer Icon, um den Datei Explorer zu starten. Durch Dateien und Ordner navigieren Ihnen stehen der interne Speicher (internal Memory), die Speicherkarte (SD Card) und USB zur Auswahl. -
Page 26: Task Manager
Symbol. 15.) Eingeschränkte Garantiebedingungen Die Garantie deckt nur den Ersatz dieses Intenso Produkts ab. Die Garantie gilt nicht für normale Verschleißerscheinungen, die sich aus fehlerhaftem, unsachgemäßem Gebrauch, Nachlässigkeit, Unfall, Inkompatibilität, oder aus mangelhafter Leistung einer bestimmten Computer Hardware oder Computer Software ergeben. -
Page 27: Technische Daten
16.) Technische Daten 1.6 GHz Dualcore based on Cortex A9 Arbeitsspeicher 1 GB DDR 3 Betriebssystem Android 4.1.1 Windows XP / Vista / 7 / 8 / Linux 2,4 und höher / Mac 10.6 Kompatible Betriebssysteme und höher Anschlussmöglichkeiten Kopfhörer, Micro SD (SDHC), micro USB, HDMI WLAN WiFi (802.11 b/g/n) G-Sensor... -
Page 28: Lizenzinformation
20.) Lizenzinformation HINWEIS! Sehr geehrte Kundin, sehr geehrter Kunde, bei Interesse können Sie und jeder Dritte den Quelltext der verwendeten GPL/LGPL von der Intenso Homepage http://www.intenso.de herunterladen. Der Quelltext des gesuchten Produkts ist für jeden zugänglich über Auswahl der gültigen Produktkategorie und des gewünschten Gerätes. In den Produktdetails finden Sie den Menüpunkt „Treiber“. - Page 29 its scope. The act of running the Program is not restricted, and the output from the Program is covered only if its contents constitute a work based on the Program (independent of having been made by running the Program). Whether that is true depends on what the Program does. 1.
- Page 30 from you under this License will not have their licenses terminated so long as such parties remain in full compliance. 5. You are not required to accept this License, since you have not signed it. However, nothing else grants you permission to modify or distribute the Program or its derivative works. These actions are prohibited by law if you do not accept this License.
- Page 31 SPECIAL, INCIDENTAL OR CONSEQUENTIAL DAMAGES ARISING OUT OF THE USE OR INABILITY TO USE THE PROGRAM (INCLUDING BUT NOT LIMITED TO LOSS OF DATA OR DATA BEING RENDERED INACCURATE OR LOSSES SUSTAINED BY YOU OR THIRD PARTIES OR A FAILURE OF THE PROGRAM TO OPERATE WITH ANY OTHER PROGRAMS), EVEN IF SUCH HOLDER OR OTHER PARTY HAS BEEN ADVISED OF THE POSSIBILITY OF SUCH DAMAGES.
-
Page 32: Eg Konformitätserklärung
Sitz in der Diepholzerstr. 15 in 49377 Vechta, Deutschland erklären auf eigene Verantwortung, dass das Produkt: Modell: 8“ Intenso TAB824 (Artikel Nr. 5510863) Beschreibung: Tablet-Computer auf das sich diese Erklärung bezieht, mit den folgenden Richtlinien und Normen konform ist: R&TTE Richtlinie 1999/5/EG... - Page 33 TAB 824 Instruction manual Thank you for choosing the TAB824. Please follow these instructions in order to be informed about the key functions of the device. 1.) Contents 1.) Contents ........................................ 1 2.) Notes ........................................2 3.) Device overview..................................... 4 4.) Package contents ....................................
-
Page 34: Notes
This manual may not contain all the features of your device. For the use of third-party applications, please contact the respective manufacturer. Please note that all details can be modified without previous announcement. Current information can be found at www.intenso.de. Trademarks Google™, the Google™... - Page 35 To interrupt the power supply to your unit, unplug the AC adapter from the outlet. Always hold the adapter firmly when disconnecting the power supply. Never pull on the line. Do not open the housing of the power adapter. With open housing, there is danger of electrical shock.
-
Page 36: Device Overview
Back camera Micro SD Card slot Integrated speaker 4.) Package contents Please check if the contents are complete: TAB 824 Stereo headphones USB cable Power supply 5V 2.0A User Manual Bag in leather look... -
Page 37: Charging The Battery
5.) Charging the battery Fully charge the battery of the device before using it for the first time. To this end connect the supplied power cable with the device and a socket. The complete charging process takes about 5 hours. The charging status is displayed at the front left side of the device. The LED lights up Red during the charging process, and changes to Yellow as soon as the battery is fully charged. -
Page 38: Touchscreen
Select `Turn off USB storage´ to deactivate the memory. Select the function `Remove safely´ on the computer to separate the device from the computer. Note: The pre-installed applications and the Android™ operating system take up some of the existing internal memory. For this reason, you cannot dispose of the entire internal memory. -
Page 39: Wifi
9.) WiFi To connect your device with the internet, you require a WIFI connection. In order to establish this, touch the WIFI icon on the starting screen, or open the WIFI setting within Settings. Note: Please note that a wireless network must be located within the range of your current location. Automatic connection Open the WIFI settings via the WIFI icon or via Settings. -
Page 40: The Home Screen
10.) The Home Screen View Unlocking the screen If the touchscreen is not used for two minutes, the device changes into standby mode. Press the on/off button for a short time to return to the active mode. The locked display is protecting against undesired input. -
Page 41: Status Bar
Status bar The status bar is to be found in the lower section of the starting screen. It has the following functions: Recently used programs Time Battery back Home screen WLAN Connection Here you will receive information on: the last used programmes ... -
Page 42: Using Several Home Screens
Using several home screens Five main screens that can be individually set-up are provided. You can easily switch between them by wiping the screen lightly to the left or right. Pressing the home button will always take you automatically back to the middle home screen. Pre-installed applications and widgets on the home screen A Link to Google™... -
Page 43: Search Bar For Google™ Search
a) Search bar for Google™ search Tap the magnifier briefly to open the Google™ search function. Enter the desired search item using the virtual keyboard and then press go. All available search results of the Google™ search will now be displayed. ... -
Page 44: Analogue Clock (Widget)
c) Analogue Clock (Widget) Tip on the analogue clock to activate or deactivate the alarm clock or to add other alarm clocks. d) Gallery / Photo gallery (Widget) Tip on the gallery icon in the application overview or on the photo preview widget to open the gallery. -
Page 45: Pre-Installed Applications On The Home Screen
By briefly tapping the touchscreen, additional functions are available. Tap the `Menu´ icon to get additional options Here you can start a slide show, edit, rotate, and cut the image, set it as background image or view the image details. Tap the dustbin icon to delete the selected image. -
Page 46: Managing Email Accounts
(4) Choose from the server types POP3, IMAP or Exchange for incoming e-mails. Note: If you do not know what settings you need to make, please contact your e-mail provider, your network administrator or search terms such as "POP address" and "name of your provider" for the required information on the Internet. (5) Enter the required information (server, port, etc.). -
Page 47: Viewing E-Mail Messages
Viewing e-mail messages Open the e-mail application by briefly tapping the e-mail icon. The mailbox you already created is displayed. You can scroll through your e-mail with a vertical sweeping motion. Tap briefly on a particular e-mail to open it. ... -
Page 48: Cc) Reading Office Documents
cc) Reading Office Documents The application "Office Suite" for reading Office documents has been pre-installed in this device. You can read Word, Excel, or PowerPoint files. Copy the desired Office files to the device. Open the application "Office Suite ". Navigate using the Explorer to the desired file. -
Page 49: Ee) Web Browser
ee) Web browser To launch the web browser, tap on the Browser icon on the home screen. To open a website, tap on the upper input field for the Internet address. The virtual keyboard now opens and you can enter the address of the desired website. To open the website, tap "Go" or tap on the arrow icon next to the input field. -
Page 50: Using The Web Browser
Using the web browser You can scroll through the display by performing a vertical sweeping motion with your finger. Please do not start the sweeping motion on a menu item or link because otherwise the existing link will open. ... -
Page 51: Music / Music Widget
Playback Screen 1. Volume Down 2. Timeline 3. Volume Up 4. Set bookmark 5. Adjust the display brightness 6. Previous Video / Rewind 7. Play / Pause 8. Next video / Fast forward 9. Change presentation format 10. Back 11. Video settings ... - Page 52 In the following view you can choose to display your music sorted by Artist, Album, Songs, Playlists or Now playing. Just tap briefly on the icon. Shows all music files sorted according to the Artists individual artists. Shows all music files sorted according to the Albums individual albums.
-
Page 53: System Settings
11.) System settings Tap the settings icon in the application menu to call up the system settings. You can find the individual categories on the left side of the menu. The available setting options are displayed by briefly pressing each selected menu item. Please note that possibly not all functions offered by are compatible with the device. -
Page 54: Managing Applications
12.) Managing Applications Pre-installed applications This device is delivered with pre-installed applications. You will find an overview of the applications already installed in the application overview . These include the video player, audio player, Internet browser, alarm, calculator and others. To open one of these applications, tap on the corresponding icon. -
Page 55: File Explorer
13.) File Explorer Open the applications overview and then tap briefly on the Explorer icon to start the file explorer. Navigating through files and folders The internal memory, memory card (SD Card) and USB are available. Tap the desired storage location in order to display the files contained on a list. -
Page 56: Task Manager
Warranty is also excluded if the product is subjected to the effects of vibration, electrostatic discharge, heat or moisture beyond the product specifications. Intenso is not liable for data loss or any collateral damage, or consequential damages, for breach of warranty or for any other damage, whatever the underlying cause. -
Page 57: Technical Data
16.) Technical Data 1.6 GHz Dualcore based on Cortex A9 Main memory 1 GB DDR 3 Operating system Android 4.1.1 Windows XP / Vista / 7 / 8 / Linux 2.4 and higher / Mac 10.6 Compatible operating systems and higher Connection options Headphone, Micro SD (SDHC), micro USB, HDMI Wireless... -
Page 58: Licenceinformation About Gnu/Lgpl
20.) Licenceinformation about GNU/LGPL Notice of GNU GENERAL PUBLIC LICENSE and LESSER GENERAL PUBLIC LICENCE Dear Customer, If interested, you and any third party can download the source code of used GPL / LGPL from Intenso Webpage http://www.intenso.de . The source code of the desired product is available to anyone on the selection of valid product category and the desired device. - Page 59 medium, provided that you conspicuously and appropriately publish on each copy an appropriate copyright notice and disclaimer of warranty; keep intact all the notices that refer to this License and to the absence of any warranty; and give any other recipients of the Program a copy of this License along with the Program. You may charge a fee for the physical act of transferring a copy, and you may at your option offer warranty protection in exchange for a fee.
- Page 60 law if you do not accept this License. Therefore, by modifying or distributing the Program (or any work based on the Program), you indicate your acceptance of this License to do so, and all its terms and conditions for copying, distributing or modifying the Program or works based on it. 6.
- Page 61 PARTY HAS BEEN ADVISED OF THE POSSIBILITY OF SUCH DAMAGES. END OF TERMS AND CONDITIONS How to Apply These Terms to Your New Programs If you develop a new program, and you want it to be of the greatest possible use to the public, the best way to achieve this is to make it free software which everyone can redistribute and change under these terms.
-
Page 62: Ec Declaration Of Conformity
Diepholzerstr. 15 in 49377 Vechta, Germany Declare under our sole responsibility that the product: Model: 8“ TAB 824 (item no. 5510863) Description: Tablet computer is in conformity with the provisions of the following Council Directives: Directive R&TTE 1999/5/CE ... - Page 63 Istruzioni per l’uso di TAB 824 Molte grazie per aver scelto il TAB 824. La invitiamo a leggere e seguire le presenti istruzioni, che Le forniranno informazioni relativamente alle più importanti funzioni dell’apparecchio. 1.) Indice 1.) Indice ........................................1 2.) Note ........................................2 3.) Quadro generale dell’apparecchio .................................
- Page 64 Questo manuale non contiene eventualmente tutte le funzioni del Suo apparecchio. Per l’utilizzo di applicazioni derivanti da fornitori terzi, contatti il rispettivo fornitore. Consideri che tutte le informazioni possono essere modificate senza preavviso. Può trovare informazioni attuali su www.intenso.de. Marchio di fabbrica Google™, il logo Google™...
- Page 65 Utilizzare l’adattatore solo con prese con messa a terra da AC 100-240V~, 50/60 Hz. In caso d’insicurezza riguardo l’alimentazione di corrente presso la collocazione dell’apparecchio, informarsi presso il fornitore d’energia in questione. Utilizzare solo il cavo dell’adattatore e di rete in fornitura. ...
-
Page 66: Quadro Generale Dell'apparecchio
Volume - camera posteriore Slot per micro scheda SD Altoparlanti integrati. 4.) Contenuto della confezione Verificare la completezza del contenuto del pacchetto: TAB 824 Cuffie stereo Cavo USB Trasformatore 5V 2.0A Istruzioni Borsa effetto pelle... -
Page 67: Caricamento Della Batteria
5.) Caricamento della batteria Ricaricare completamente la batteria prima del primo utilizzo. Collegare l’alimentatore in dotazione all’apparecchio e a una presa. La ricarica completa dura circa 5 ore. Lo stato della ricarica viene visualizzato sul lato anteriore sinistro dell’apparecchio. Il LED s’illumina di rosso durante la ricarica e diventa giallo quando la batteria è... -
Page 68: Touchscreen
Per disattivare la memoria, selezionare “Disattiva memoria USB”. Sul computer selezionare la funzione „Rimozione sicura“ , per staccare il dispositivo dal computer. Nota: Le applicazioni già installate e il sistema operativo Android™ occupano una parte della memoria interna. Per questo motivo non è... -
Page 69: Wifi
9.) WIFI Per collegare l’apparecchio a internet, è necessario una connessione WIFI. Per stabilire questo collegamento, toccate l’icona WIFI sulla schermata d’avvio o aprite le impostazioni WIFI dalle impostazioni. Nota: Consideri che una rete WLAN deve trovarsi nel raggio della Sua posizione attuale. Connessione automatica Aprite le impostazioni WIFI tramite l’icona WIFI o le impostazioni. -
Page 70: Collegamento Manuale
Collegamento manuale Per cercare manualmente una rete Wifi raggiungibile, procedere come segue: (1) Aprire le Impostazioni. (2) Aprire ora le Impostazioni Wifi e toccare “Cerca“. (3) Se la rete Wifi non compare nell’elenco delle reti disponibili, selezionare la voce “Aggiungi rete“ per inserire manualmente la rete SSID, il protocollo di sicurezza ed eventualmente la relativa password. -
Page 71: Barra Di Stato
Barra di stato La barra di stato si trova nella parte inferiore dello schermo. Possiede le seguenti funzioni: Ultimi programmi Indietro utilizzati Batteria Apre la schermata Home Collegamento WLAN Qui ottenete informazioni riguardo: i programmi usati di recente la potenza del segnale dell’attuale connessione WIFI ... -
Page 72: Utilizzare Diverse Schermate Iniziali
Utilizzare diverse schermate iniziali Sono a Sua disposizione cinque schermate individuali impostabili in modo personale. Con un leggero sfioramento verso sinistra o destra, può passare facilmente da una all’altra. Premendo il tasto Home tornerà sempre automaticamente alla fermata iniziale nel mezzo. Applicazioni già... -
Page 73: Barra Di Ricerca Per La Ricerca Google
a) Barra di ricerca per la ricerca Google™ Toccare brevemente la lente di ingrandimento per aprire la funzione di ricerca di Google™. Digitare il concetto da cercare sulla e premere Via. Vengono visualizzati ora i risultati di ricerca disponibili della ricerca con Google™. -
Page 74: Orologio Analogico (Widget)
c) Orologio analogico (widget) Sfiori l’orologio analogico per attivare e/o disattivare la sveglia o aggiungere altre sveglie. d) Galleria / galleria fotografica (widget) Sfiori l’icona della galleria nel riepilogo delle applicazioni o l‘anteprima fotografica widget per aprire la galleria. Per l’uso le foto devono essere salvate sull’apparecchio. Selezioni la galleria desiderata ed infine l’immagine selezionata con un altro tocco breve. -
Page 75: Applicazioni Già Installate Sulla Schermata Iniziale
Toccando brevemente il touchscreen saranno a Sua disposizione ulteriori funzioni. Toccare il simbolo “Menu” per ricevere altre opzioni. Qui si possono attivare delle diapositive, elaborare l’immagine, ruotarla, tagliarla, impostarla come immagine di sfondo e visualizzare i dettagli dell’immagine. Toccare il simbolo del bidone della spazzatura cancellare l’immagine selezionata. -
Page 76: Gestione Degli Account E-Mail
(4) Selezioni il tipo di server POP3, IMAP o Exchange per ricevere le e-mails. Nota: Se non sa come configurare le impostazioni, contatti il gestore del Suo account, il Suo amministratore di rete oppure cerchi in internet le relative informazioni necessarie indicando termini come „Indirizzo POP“ e „Nome del mio provider“. (5) Inserisca le informazioni necessarie (server, porta ecc.). -
Page 77: Visualizzazione Delle E-Mails
Visualizzazione delle e-mails Apra l’applicazione dell’e-mail con un breve tocco sull’icona E-mail. Visualizzerà la casella di posta già impostata. Con un movimento di sfioramento in verticale può far scorrere le e-mails. Tocchi brevemente una certa e-mail per aprirla. ... -
Page 78: Cc) Lettura Di Documenti Office
cc) Lettura di documenti Office Su questo apparecchio è già installata l’applicazione “Office Suite” per leggere Documenti di Office. Può leggere files Word, Excel o Powerpoint. Copi i files desiderati di Office sull’apparecchio. Apra l’applicazione „Office Suite“. Navighi con l’Explorer fino al file desiderato. Selezioni il file desiderato con un breve tocco e sfiori con il dito in verticale o orizzontale sul display per sfogliare le singole pagine. -
Page 79: Ee) Browser Internet
ee) Browser internet Per avviare il browser internet, tocchi l’icona del Browser nella schermata iniziale. Per aprire un sito internet, tocchi il campo superiore per inserire l’indirizzo internet. La tastiera virtuale si aprirà e poi potrà inserire l’indirizzo del sito internet desiderato. Clicchi su “Vai” o sul simbolo della freccia di fianco al campo d’inserimento per aprire il sito internet. -
Page 80: Utilizzo Del Browser Internet
Utilizzo del browser internet Può far scorrere la visualizzazione sul display eseguendo un movimento di sfioramento in verticale con il dito. Non inizi il movimento da un punto del menù o da un link, altrimenti verrà aperto il collegamento presente. ... -
Page 81: Musica / Widget Musicale
Tocchi per iniziare la riproduzione. Tocchi per interrompere la riproduzione. Tocchi per aprire le impostazioni Video. Tocchi un punto della barra d’avanzamento per far proseguire il video direttamente dal punto selezionato. Premere i tasti volume +/- sul lato del dispositivo per regolare il volume. ... - Page 82 Schermata di riproduzione (1) Riproduzione attuale (2) Attivare / Disattivare la riproduzione causale (3) Opzioni di ripetizione: Tutti i titoli vengono ripetuti Il titolo attuale viene ripetuto La ripetizione è disattivata (4) Dettagli titolo (5) Titolo successivo / precedente (6) Play / Pausa (7) Barra di avanzamento ...
-
Page 83: Impostazioni Sistema
11.) Impostazioni sistema Toccare nel menu Applicazioni l’icona Impostazioni per richiamare le impostazioni di sistema. Sul lato sinistro del menu si trovano le singole categorie. Premendo brevemente sulla voce di menu che interessa, vengono visualizzate le possibilità di configurazione disponibili. Si prega di notare che Android™... -
Page 84: Gestione Di Applicazioni
12.) Gestione di applicazioni Applicazioni già installate Questo apparecchio viene fornito con delle applicazioni già installate. Può trovare una panoramica delle applicazioni già installate nel menù principale delle applicazioni . Tra queste rientrano anche il video player, l’audio player, il browser internet, la sveglia, la calcolatrice e altre ancora. Per aprire una di queste applicazioni, tocchi brevemente la rispettiva icona. -
Page 85: File Explorer
13.) File Explorer Apra il menù principale delle applicazioni e tocchi infine brevemente l’icona Explorer per avviare il File Explorer. Navigare attraverso files e cartelle Può scegliere la memoria interna (internal memory), la scheda di memoria (SD Card) e l’USB. Tocchi la destinazione desiderata per visualizzare i files contenuti come lista. -
Page 86: Task Manager
Se il prodotto viene esposto a scosse, scariche elettrostatiche, calore o umidità non in conformità alle specifiche del prodotto, non sussiste alcuna garanzia. Intenso non è responsabile per perdite di dati o per danni concomitanti e conseguenti, per la violazione delle condizioni di garanzia o per altri danni indipendentemente dalla loro causa. -
Page 87: Dati Tecnici
16.) Dati tecnici 1.6 GHz Dualcore based on Cortex A9 Memoria 1 GB DDR 3 Sistema operativo Android 4.1.1 Windows XP / Vista / 7 / 8 / Linux 2,4 e più recenti / Mac 10.6 e più Sistemi operativi compatibili recenti Cuffie, Micro SD (SDHC), micro USB, HDMI Possibilità... -
Page 88: Licenza Informazione
20.) Licenza informazione Notice of GNU GENERAL PUBLIC LICENSE and LESSER GENERAL PUBLIC LICENCE Dear Customer, If interested, you and any third party can download the source code of used GPL / LGPL from Intenso Webpage http://www.intenso.de . The source code of the desired product is available to anyone on the selection of valid product category and the desired device. - Page 89 medium, provided that you conspicuously and appropriately publish on each copy an appropriate copyright notice and disclaimer of warranty; keep intact all the notices that refer to this License and to the absence of any warranty; and give any other recipients of the Program a copy of this License along with the Program. You may charge a fee for the physical act of transferring a copy, and you may at your option offer warranty protection in exchange for a fee.
- Page 90 law if you do not accept this License. Therefore, by modifying or distributing the Program (or any work based on the Program), you indicate your acceptance of this License to do so, and all its terms and conditions for copying, distributing or modifying the Program or works based on it. 6.
- Page 91 PARTY HAS BEEN ADVISED OF THE POSSIBILITY OF SUCH DAMAGES. END OF TERMS AND CONDITIONS How to Apply These Terms to Your New Programs If you develop a new program, and you want it to be of the greatest possible use to the public, the best way to achieve this is to make it free software which everyone can redistribute and change under these terms.
-
Page 92: Dichiarazione Di Conformità
Noi, la Intenso GmbH, con sede in Diepholzer Str. 15 a 49377 Vechta, Deutschland dichiariamo su nostra responsabilità che il prodotto: Modello: 8” TAB 824 (articolo n° 5510863) Descrizione: Tablet computer è conforme alle seguenti direttive e norme: Direttiva R&TTE 1999/5/EG ... - Page 93 TAB 824 Mode d'emploi Merci d'avoir choisi TAB824. Suivez ces instructions pour connaître les fonctions clés de l'appareil. 1.) Contenu 1.) Contenu ......................................... 1 2.) Remarques ......................................2 3.) Aperçu de l'appareil ....................................4 4.) Contenu de l'emballage ..................................4 5.) Chargement de la batterie ..................................
-
Page 94: Remarques
Ce manuel ne contient peut-être pas toutes les fonctions de votre appareil. Pour utilisation des applications de fournisseurs tiers, veuillez contacter le fabricant. Veuillez noter que toutes les instructions peuvent être modifiées sans préavis. Vous trouverez des informations actuelles à l'adresse www.intenso.de Marques Google ™, le logo Google ™... - Page 95 N'utiliser l'adaptateur de courant que pour les prises reliées à la terre avec AC 100-240V~, 50/60 Hz Si vous n'êtes pas sûr de l'alimentation sur le lieu de montage, veuillez vous adresser à votre fournisseur d'énergie concerné. Veuillez utiliser uniquement l’adaptateur de courant et le câble de raccordement au réseau fournis.
-
Page 96: Aperçu De L'appareil
Emplacement carte Micro SD Haut-parleur intégré 4.) Contenu de l'emballage Veuillez vérifier l'intégralité du contenu de l'emballage : TAB 824 Casque stéréo Câble USB Adaptateur secteur 5V 2.0A Manuel d'utilisation Sac en simili cuir... -
Page 97: Chargement De La Batterie
5.) Chargement de la batterie Veuillez charger la batterie complètement avant la première utilisation de l'appareil. Pour cela, connectez l'adaptateur secteur fourni à l'appareil et à une prise de courant. La charge complète prend environ 5 heures. L'état de charge est affiché sur le côté avant droit de l'appareil. La LED est rouge pendant la charge et passe au jaune lorsque la batterie est complètement chargée. -
Page 98: Écran Tactile
Sélectionnez « Désactiver le disque USB » pour désactiver le disque. Sélectionnez la fonction « Retirer en toute sécurité » sur l'ordinateur pour retirer le périphérique de l'ordinateur. Note : Les applications préinstallées et le système d'exploitation Android ™ prennent une partie de la mémoire interne existante..Pour cette raison, toute la mémoire interne n'est pas disponible. -
Page 99: Wifi
9.) WIFI Pour connecter votre appareil à l’Internet, vous devez avoir une connexion WIFI. Afin de l'activer, touchez l'icône WIFI sur l'écran de démarrage, ou ouvrez l'option WIFI dans Paramètres. Note : Veuillez noter qu'un réseau sans fil doit se trouver à portée de votre emplacement actuel. Connexion automatique Ouvrez le menu des paramètres WIFI grâce à... -
Page 100: L'écran D'accueil
10.) L'écran d'accueil Affichage Déverrouillage de l'écran Si l'écran tactile n'est pas utilisé pendant deux minutes, l'appareil se met en mode Standby. Appuyez sur le bouton «Marche/Arrêt» pendant une courte période pour revenir en mode actif. L'affichage verrouillé empêche les saisies involontaires. Touchez le verrou fermé sur l'écran et maintenez appuyé. -
Page 101: Barre D'état
Barre d'état La barre d'état se trouve dans la section inférieure de l'écran de démarrage. Elle a les fonctions suivantes : Indicateur de Derniers programmes batterie utilisés Étape de retour Durée Appel de l'écran d'accueil Connexion sans fil Ici vous recevrez des informations sur : ... -
Page 102: Utiliser Différents Écrans D'accueil
Utiliser différents écrans d'accueil Cinq écrans principaux peuvent être individuellement configurés. Vous pouvez facilement passer de l'un à l'autre en faisant glisser le doigt légèrement sur l'écran vers la gauche ou la droite. En appuyant sur la touche accueil, vous arrivez toujours à revenir à l'écran d'accueil central. Applications préinstallées sur l'écran d'accueil A Lien vers Google™... -
Page 103: Barre De Recherche Pour La Recherche Sur Google
a) Barre de recherche pour la recherche sur Google ™ Appuyez sur la loupe pour ouvrir brièvement la fonction de recherche Google ™. Saisissez l'élément de recherche désiré à l'aide du clavier virtuel, puis appuyez sur Envoyer. Tous les résultats de recherche disponibles de la recherche Google™... -
Page 104: Heure Analogique (Widget)
c) Heure analogique (Widget) Appuyez sur l‘heure analogique pour activer ou désactiver l’alarme de réveil, ou encore y ajouter des alarmes supplémentaires. d) Album photo (Widget) Appuyez sur l‘icône de l’album photo dans la liste des applications ou sur le widget d’aperçu des photos pour ouvrir l’album. -
Page 105: Applications Préinstallées Sur L'écran D'accueil
En tapant brièvement sur l'écran tactile, des fonctions supplémentaires sont disponibles. Appuyez sur l'icône «Menu» pour obtenir des options supplémentaires. Ici vous pouvez lancer un diaporama, modifier, tourner, et couper l'image, la définir comme image de fond ou afficher les détails de l'image. Appuyez sur l'icône poubelle pour supprimer l'image sélectionnée. -
Page 106: Gérer Les Comptes D'emails
(4) Choisissez parmi les types de serveurs POP3, IMAP ou Exchange pour e-mails entrants. Note : Si vous ne savez pas quels paramètres que vous devez effectuer, veuillez contacter votre fournisseur de messagerie électronique, votre administrateur réseau ou recherchez sur internet des termes tels que «adresse POP» et «nom de votre fournisseur»... -
Page 107: Affichage Des E-Mails
Affichage des e-mails Ouvrez l'application e-mail en tapant brièvement sur l'icône e-mail Votre boîte aux lettres déjà créée s'affiche à présent. Par un mouvement de balayage vertical vous pouvez faire défiler vos e-mails. Tapez brièvement sur un e-mail spécifique pour ouvrir celui-ci. ... -
Page 108: Cc) Lecture De Documents Office
cc) Lecture de documents Office L'application «Suite Office» est déjà préinstallée sur cet appareil pour la lecture de documents Office. Vous pouvez lire des fichiers Word, Excel, PowerPoint. Copiez les fichiers Office désirés sur l'appareil. Ouvrez l'application «Suite Office». Naviguez à l'aide de l'explorateur vers le fichier désiré. Sélectionnez le fichier désiré... -
Page 109: Utilisation Du Clavier Virtuel
Utilisation du clavier virtuel Tapez sur le champ de saisie pour ouvrir le clavier virtuel. Vous pouvez maintenant saisir du texte ou appeler des pages Internet. a. Caps Lock (Écriture en majuscule et en minuscule) b. Touche de retour en arrière c. -
Page 110: Ff) E-Book
ff) E-Book Appuyez sur l‘icône du e-book afin d’accéder à votre bibliothèque. Cette option nécessite que des e-books soient sauvegardés sur votre appareil dans un format supporté. Pour savoir comment sauvegarder un fichier sur voter appareil, veuillez consulter la section correspondante dans ce manuel. gg) Camera Appuyez sur l’icône de la caméra afin de démarrer la caméra. -
Page 111: Musique
f) Musique Tapez brièvement sur l'icône Musique sur l'écran d'accueil ou l’aperçu des applications afin d'ouvrir la lecture de la musique. Dans l'aperçu suivant, vous pouvez choisir d'afficher votre musique triée par artiste, album, titre, liste de lecture ou la lecture en cours. Pour cela, tapez simplement brièvement sur l'icône appropriée. Affiche tous les fichiers musicaux triés par artistes. -
Page 112: Paramètres Système
En mode lecture, vous pouvez ajuster d'autres paramètres. Tapez brièvement sur la touche du menu. Bibliothèque - Une liste de tous les fichiers musicaux existants sont affichés. Mix de soirée - Activer ou désactiver le mode Mix de soirée. Ajouter à la liste de lecture - Ajouter le titre en cours de lecture à la liste de lecture. Supprimer - Suppression du titre actuellement en cours de lecture Effets sonores - Définir un effet sonore pour la lecture de la musique. -
Page 113: Aperçu Des Paramètres
Aperçu des paramètres WiFi Ici vous pouvez régler les paramètres WiFi. WiFi & Réseaux Plus Ici vous pouvez régler des paramètres réseau supplémentaires. Spécifiez le volume désiré et le son pour les messages ici. Vous pouvez Sons aussi activer ou désactiver un son de confirmation lorsque vous touchez l'écran et un son indicatif lors du déverrouillage de la serrure d'affichage. -
Page 114: Gestion Des Applications
12.) Gestion des applications Applications préinstallées Cet appareil est livré avec des applications déjà préinstallées. Vous trouverez un aperçu des applications déjà installées dans l'aperçu des applications . Il s'agit notamment du lecteur vidéo, du lecteur audio, du navigateur Internet, de l'alarme, de la calculatrice et encore un peu plus. Pour ouvrir une de ces applications, tapez brièvement sur l'icône correspondante. -
Page 115: Utilisez La Barre D'outils
sous forme de liste. Si aucune carte mémoire n'était insérée ou qu'aucun dispositif de stockage n'était connecté via la connexion USB vous en êtes informé par «... est démonté». Avec un mouvement vertical de balayage, vous pouvez maintenant faire défiler vos fichiers et dossiers. -
Page 116: Gestionnaire Des Tâches
Il n'y a aucun bénéfice de la garantie en cas de non-respect du manuel utilisateur Intenso ainsi qu'en cas de mauvaise installation, utilisation, ou en cas de défauts causés par d'autres équipements. -
Page 117: Données Techniques
16.) Données techniques 1.6 GHz Dualcore based on Cortex A9 Mémoire principale 1 Go de DDR 3 Système d'exploitation Android 4.1.1 Windows XP / Vista / 7 / 8 / Linux 2.4 et ultérieur / Mac 10.6 et Systèmes d'exploitation compatibles supérieur Casque, Micro SD (SDHC), micro USB, HDMI... -
Page 118: Licence Information
20.) Licence information Notice of GNU GENERAL PUBLIC LICENSE and LESSER GENERAL PUBLIC LICENCE Dear Customer, If interested, you and any third party can download the source code of used GPL / LGPL from Intenso Webpage http://www.intenso.de . The source code of the desired product is available to anyone on the selection of valid product category and the desired device. - Page 119 medium, provided that you conspicuously and appropriately publish on each copy an appropriate copyright notice and disclaimer of warranty; keep intact all the notices that refer to this License and to the absence of any warranty; and give any other recipients of the Program a copy of this License along with the Program. You may charge a fee for the physical act of transferring a copy, and you may at your option offer warranty protection in exchange for a fee.
- Page 120 law if you do not accept this License. Therefore, by modifying or distributing the Program (or any work based on the Program), you indicate your acceptance of this License to do so, and all its terms and conditions for copying, distributing or modifying the Program or works based on it. 6.
- Page 121 PARTY HAS BEEN ADVISED OF THE POSSIBILITY OF SUCH DAMAGES. END OF TERMS AND CONDITIONS How to Apply These Terms to Your New Programs If you develop a new program, and you want it to be of the greatest possible use to the public, the best way to achieve this is to make it free software which everyone can redistribute and change under these terms.
-
Page 122: Déclaration De Conformité Ce
Nous, Intenso GmbH, avec siège à Diepholzer Str. 15 à 49377 Vechta, Allemagne déclarons sous notre responsabilité que le produit : Modèle : 8“ TAB 824 (n° article 5510863) Description : ordinateur tablette est conforme aux directives et normes suivantes : directive R&TTE 1999/5/CE... - Page 123 TAB 824 Manual de instrucciones Muchas gracias por haberse decidido por el TAB824. Por favor siga las instrucciones de este manual para estar informado sobre las funciones más importantes de este dispositivo. 1.) Índice 1.) Índice ........................................1 2.) Avisos ........................................2 3.) Vista general del aparato ..................................
- Page 124 Es posible que este manual no contenga todas las funciones de su aparato. Para hacer uso de aplicaciones que provienen de operadores terceros, le rogamos que contacte a su operador. Tenga en cuenta que cualquier especificación puede ser modificada sin previo aviso. Si desea conocer informaciones actuales, consulte la página www.intenso.de Marca Google™, Google™-Logo y Android™...
- Page 125 Cuando no lo vaya a utilizar, retire el transformador de la fuente de energía. El enchufe ha de encontrarse cerca del aparato y ser de fácil acceso Haga uso del transformador solo en tomas de tierra con AC 100-240V~, 50/60 Hz. En caso de no tener la certeza de que la fuente de energía local sea segura, consulte al distribuidor de energía respectivo.
-
Page 126: Vista General Del Aparato
Ranura para la tarjeta micro SD Altavoz integrado 4.) Contenido del paquete Por favor verifique que el contenido del paquete está completo: TAB 824 Auricular estéreo Cable de USB Transformador 5V 2.0A Manual de instrucciones ... -
Page 127: Carga De La Batería
5.) Carga de la batería Por favor, cargue la batería por completo antes del primer uso del dispositivo. Conecte el adaptador de corriente incluido con el dispositivo a una toma de corriente. La carga completa dura unas 5 horas. El estado de carga se muestra en el lado delantero izquierdo del dispositivo. -
Page 128: Pantalla Táctil
Para desactivar la memoria, elija “desactivar memoria USB“. Elija en el ordenador la función “Retirar de forma segura“ para separar el dispositivo del ordenador. Nota: las aplicaciones instaladas en el sistema operativo Android™ ocupan una parte de la memoria interna dada. Por este motivo no se encuentra la totalidad de la memoria interna a su disposición. -
Page 129: Wifi
9.) WIFI Para conectar el dispositivo a Internet, necesita una conexión inalámbrica. Para establecerla, pulse el icono Wi-Fi en la pantalla de inicio o abra la configuración inalámbrica en ajustes. Advertencia: tenga en cuenta que necesita tener una red de WLAN al alcance desde su posición actual. Conexión automática Abra la configuración inalámbrica mediante el icono Wi-Fi o mediante ajustes. -
Page 130: Pantalla Inicial
10.) Pantalla inicial Visualización Desbloqueo de la pantalla Si no utiliza la pantalla táctil durante más de dos minutos, el dispositivo cambio a modo Standby. Presione brevemente el botón On/Off para activarlo. La pantalla está protegida para evitar entradas no deseadas. -
Page 131: Barra De Estado
Barra de estado La barra de estado se encuentra en la parte inferior de la pantalla de inicio.Tiene las siguientes funciones: Últimos programas Estado de la batería utilizados Hora Volver atrás Acceso a la pantalla Conexión WLAN inicial Puede comprobar la siguiente información sobre: ... -
Page 132: Empleo De Diversas Pantallas Iniciales
Empleo de diversas pantallas iniciales Tiene a su disposición cinco pantallas de inicio configurables individualmente. Arrastrando ligeramente hacia la izquierda o la derecha, se puede cambiar fácilmente entre las unas y las otras. Pulsando la tecla “Home“ se vuelve siempre automáticamente hasta la pantalla de inicio central. Aplicaciones preinstaladas en la pantalla inicial A Enlace a la búsqueda con Google™... -
Page 133: Barra De Búsqueda Para La Búsqueda En Google
a) Barra de búsqueda para la búsqueda en Google™ Pulse brevemente en la lupa para abrir la función de búsqueda con Google™. Introduzca la palabra de búsqueda deseada mediante el teclado virtual y pulse en Búsqueda. Se le mostrarán los resultados disponibles de la búsqueda con Google™. -
Page 134: Reloj Analógico (Widget)
c) Reloj analógico (Widget) Toque el reloj analógico para activar o desactivar el despertador o añadir otros despertadores. d) Galería / galería de fotos (Widget) Toque el icon Galería en el resumen de aplicación o el widget visualización de fotos para abrir la galería. Para el uso las fotos se tienen que almacenar en el dispositivo. -
Page 135: Aplicaciones Preinstaladas En La Pantalla Inicial
e) Aplicaciones preinstaladas en la pantalla inicial Aquí encuentra una selección de las aplicaciones preinstaladas. aa) Enviar / recibir e-mails Este aparato cuenta con una aplicación de email preinstalada. Se le permite utilizar su cuenta de email para enviar y recibir emails. Advertencia: esta función requiere una conexión a Internet WLAN. -
Page 136: Administración De Una Cuenta De Correo Electrónico
Administración de una cuenta de correo electrónico Agregar un buzón de correo nuevo: (1) Abra la aplicación de correo electrónico y pulse en la tecla Menu para mostrar las opciones adicionales. Seleccione el punto de menu “Ajustes“ y después “Añadir cuenta“, para crear un nuevo buzón de correo. -
Page 137: Escribir Mensajes De Correo Electrónico
Escribir mensajes de correo electrónico (1) Pulse en la vista general del correo electrónico en el símbolo Email en la barra de menu superior y se abrirá una ventana nueva, en el cual puede escribir un nuevo correo electrónico. (2) Ahora introduzca la dirección de correo electrónico del destinatario, un asunto y el texto en los campos previstos para ello. -
Page 138: Dd) App Center
dd) App Center En este aparato se encuentra preinstalado el App Center de AndroidPIT. Aquí encuentra diversas aplicaciones, informes de tests, un blog y un foro. Para más información o ayuda sobre el funcionamiento del App Centers consulte la página web del operador: www.androidpit.de. -
Page 139: Inserción De Símbolos
Inserción de símbolos Para insertar un carácter especial como por ejemplo “ä”, mantenga pulsado con su dedo la tecla “a“ para acceder al menú de caracteres especiales. Deslice su dedo ahora al carácter especial deseado, por ejemplo la “ä“ y despegue el dedo de la pantalla. De esta forma habrá introducido una “ä“. Empleo del Web Browsers ... -
Page 140: Gg) Camera
gg) camera Toque brevemente el icon cámera para arrancar la función de la cámara. Encontrará diferentes símbolos para modificar los ajustes de la cámara, cambiar la cámara, hacer zooms y cambiar entre función de foto y de vídeo. hh) Vídeo Pulse brevemente el icono de vídeo en la pantalla de inicio o en el resumen de aplicaciones, para abrir la reproducción de vídeos. -
Page 141: Música/Widget Música
f) Música/widget música Con este Widget puede comenzar/interrumpir/reanudar la reproducción de música y cambiar a otro título. Toque brevemente el símbolo música en la vista general de aplicaciones o el título actual en el widget música para abrir la reproducción de música. En el siguiente resumen tiene la oportunidad de escoger música en base al intérprete, álbum, título, lista de reproducción o reproducción actual. -
Page 142: Configuraciones Del Sistema
En el modo de repetición se pueden efectuar otras configuraciones. Por favor pinche brevemente la tecla del menú Biblioteca – se visualiza un resumen de todos los ficheros de música disponibles. Party Shuffle – activar o desactivar el modo de Party Schuffle. Añadir a la lista de reproducción –... -
Page 143: Resumen De Las Configuraciones
Resumen de las configuraciones Redes y redes Wi-Fi Efectúe aquí sus ajustes para Wi-Fi. inalámbricas Más Aquí puede efectuar más ajustes de red. Ajuste aquí el volumen deseado y el sonido deseado para las notificaciones.. Sonidos Además puede activar o desactivar un tono de confirmación al tocar la pantalla táctil y un tono de advertencia al desbloquear el bloqueo de pantalla. -
Page 144: Gestión De Aplicaciones
12.) Gestión de aplicaciones Aplicaciones pre-instaladas Este aparato se entrega con aplicaciones preinstaladas. La idea de estas aplicaciones se encuentra en el resumen de aplicaciones . A ellas corresponde el reproductor de vídeo y de audio, el browser de Internet, la alarma, la calculadora y otras más. Para proceder a la apertura de estas aplicaciones ha de pulsar brevemente el botón correspondiente. -
Page 145: Utilizar La Barra De Herramientras
Puede seleccionar un icono de “paso adelante“ y “paso hacia atrás“ Para subir el nivel de la estructura de los ficheros, pulse brevemente el icono LevelUp. Con el icono de Home se puede ir directamente al directorio principal. Utilizar la barra de herramientras y luego en “Ocultar barra de Pulse en la tecla Menu... -
Page 146: Administrador De Tareas
15.) Condiciones de garantía limitada La garantía cubre solamente la sustitución de este producto de Intenso. La garantía no es válida en el caso de desgastes resultantes de un uso inadecuado, negligencia, accidentes, incompatibilidad, o rendimiento insuficiente por parte de un cierto Hardware o Software de ordenador. -
Page 147: Datos Técnicos
16.) Datos técnicos 1.6 GHz Dualcore based on Cortex A9 Memoria 1 GB DDR 3 Sistema operativo Android 4.1.1 Windows XP / Vista / 7 / 8 / Linux 2,4 y superior / Mac 10.6 y Sistemas operativos compatibles superior Auriculares, Micro SD (SDHC), micro USB, HDMI Posibilidades de conectar WLAN... -
Page 148: La Licencia Información
20.) La licencia información Notice of GNU GENERAL PUBLIC LICENSE and LESSER GENERAL PUBLIC LICENCE Dear Customer, If interested, you and any third party can download the source code of used GPL / LGPL from Intenso Webpage http://www.intenso.de . The source code of the desired product is available to anyone on the selection of valid product category and the desired device. - Page 149 medium, provided that you conspicuously and appropriately publish on each copy an appropriate copyright notice and disclaimer of warranty; keep intact all the notices that refer to this License and to the absence of any warranty; and give any other recipients of the Program a copy of this License along with the Program. You may charge a fee for the physical act of transferring a copy, and you may at your option offer warranty protection in exchange for a fee.
- Page 150 law if you do not accept this License. Therefore, by modifying or distributing the Program (or any work based on the Program), you indicate your acceptance of this License to do so, and all its terms and conditions for copying, distributing or modifying the Program or works based on it. 6.
- Page 151 PARTY HAS BEEN ADVISED OF THE POSSIBILITY OF SUCH DAMAGES. END OF TERMS AND CONDITIONS How to Apply These Terms to Your New Programs If you develop a new program, and you want it to be of the greatest possible use to the public, the best way to achieve this is to make it free software which everyone can redistribute and change under these terms.
-
Page 152: Declaración De Conformidad Ce
Nosotros, la empresa Intenso GmbH, con sede social en la Diepholzer Str. 15 en 49377 Vechta, Alemania declaramos bajo nuestra responsabilidad que el producto: Modelo: 8“ TAB 824 (Artículo Nº 5510863) Descripción: Ordenador-tabla cumple con las siguientes directrices y normativas: Normativa R&TTE 1999/5/CE... - Page 153 TAB 824 Manual de instruções Obrigado por ter escolhido o nosso produto TAB824. Siga as seguintes orientações, para obter maiores informações sobre este aparelho. 1.) Índice 1.) Índice ........................................1 2.) Avisos ........................................2 3.) Resumo do aparelho ..................................... 4 4.) Conteúdo da embalagem ..................................
-
Page 154: Avisos
Este manual pode eventualmente não conter todas as funções do seu aparelho. Para utilizar aplicações de operadores terceiros, contacte o operador. Por favor note que todas as especificações podem ser alteradas sem pré-aviso. Para informações actuais consulte www.intenso.de Marca Google™, e Google™-Logo e Android™ são marcas da Google™. Todos os outros nomes de produtos ou serviços pertencem aos respectivos proprietários. - Page 155 Utilize o transformador apenas em tomadas ligadas à terra com AC 100-240V~, 50/60 Hz. Caso não tenha certeza da fonte de energia no local de colocação, consulte o respectivo distribuidor de energia. Utilize apenas o transformador e o cabo de ligação à rede fornecidos. ...
-
Page 156: Resumo Do Aparelho
Camara posterior Leitor de cartões micro SD Altifalante integrado 4.) Conteúdo da embalagem Por favor verifique se o conteúdo da embalagem está completo: TAB 824 Auricular Stereo Cabo USB Transformador 5V 2.0A Manual de instruções ... -
Page 157: Carregar A Bateria
5.) Carregar a bateria Carregue completamente a bateria do aparelho antes da primeira utilização. Para tal, conecte o adaptador com o aparelho e uma tomada. O carregamento completo demora cerca de 5 horas. O estado de carregamento é indicado na parte da frente do lado esquerdo do aparelho. O LED fica vermelho durante o carregamento e muda para amarelo quando a bateria estiver completamente carregada. -
Page 158: Ecrã Táctil
Para desativar o dispositivo de memória, clique sobre “desativar dispositivo USB”. Clique sobre a função “remover hardware com segurança“ , para remover o dispositivo USB do seu computador. Nota: As aplicações pré-instaladas e o sistema operativo Android™ ocupam uma parte da memória. Por essa razão não tem a memória inteira à... -
Page 159: Wifi
9.) WIFI Para ligar o aparelho com a Internet, necessita de uma ligação WLAN. Para estabelecer a ligação, toque no ícone Wi-Fi no ecrã principal ou aceda às configurações em configurações WLAN. Note: Por favor considere que necessita de uma rede de WLAN no alcance da sua posição actual. Ligação automática Aceda através do ícone Wi-Fi ou configurações às configurações WLAN. -
Page 160: O Ecrã Inicial
10.) O ecrã inicial Visualização Desbloquear o ecrã Se o ecrã tátil não for utilizado durante dois minutos, o aparelho muda para o modo de espera. Pressione brevemente a tecla Ligar / Desligar para mudar para o modo ativo. O mostrador está bloqueado para proteger de uma utilização acidental. -
Page 161: Barra De Estado
Barra de Estado A barra de estado encontra-se na parte inferior do ecrã principal. Ela tem as seguintes funcionalidades: Programas usados recentemente Estado da bateria Hora Voltar atrás Aceder ao ecrã inicial Ligação WLAN Aqui obtém informações sobre: os programas que utilizou na última vez ... -
Page 162: Utilizar Diversos Ecrãs Iniciais
Utilizar diversos ecrãs iniciais É possível adaptar individualmente, escolhendo entre as cinco telas principais disponíveis. Um simples movimento de arrastar com o dedo para a esquerda ou direita, poderá mudar de uma para a outra. Prima a tecla Home para voltar automaticamente ao ecrã inicial central. Aplicações pré-instaladas no ecrã... -
Page 163: Barra De Pesquisa Para A Pesquisa No Google
a) Barra de pesquisa para a pesquisa no Google™ Toque suavemente sobre a Lupa, para abrir as funções de pesquisa do Google. Digite o termo desejado no teclado virtual e clique Vai. Os resultados de busca do Google irão aparecer. Dica: Se movimentar rápido para cima ou para baixo e retirar a seguir o dedo do ecrã... -
Page 164: Galeria / Galeria De Fotos
d) Galeria / Galeria de Fotos Toque no ícone da galeria na visão geral de aplicações no widget de pré-visualização de fotos para abrir a galeria. Para o usar, tem de haver fotos gravadas no dispositivo. Seleccione a galeria pretendida e a seguir a imagem pretendida premindo novamente. A imagem é apresentada no ecrã... -
Page 165: Aa) Enviar / Receber Emails
aa) Enviar / receber emails A aplicação de email está pré-instalada neste aparelho. Esta aplicação permite-lhe utilizar o seu actual endereço para enviar e receber emails. Nota: Esta função requer uma ligação WLAN à Internet. Abra a aplicação através do ícone „email “ no menu das aplicações. Instalar a conta de e-mail (1) Inicie a aplicação de email tocando no símbolo de email. -
Page 166: Ver Mensagens De E-Mail
„configuração e depois “acrescentar conta”, para adicionar um novo endereço. (2) Siga as instruções de configuração, para adicionar um novo endereço. Cancelar um endereço: (1) Abra a aplicação de E-Mail e clique sobre a tecla menu para mostrar outras opções. Selecione o ponto "configuração"... -
Page 167: Dd) App Center
Copiar os ficheiros de Office para o aparelho. Abrir a aplicação „Office Suite“. Navegar com o Explorer para o ficheiro pretendido. Seleccionar o ficheiro pretendido tocando brevemente nele. Movimentar o dedo vertical e horizontalmente sobre o ecrã para virar páginas individuais. Tocar brevemente no menu para abrir mais opções. -
Page 168: Utilização Do Teclado Virtual
Utilização do teclado virtual Toque no campo de entradas para aceder ao teclado virtual. Pode então inserir textos ou aceder a páginas da internet. a. Caps Lock (letras maiúsculas ou minúsculas) b. Tecla para voltar c. Aceder ao menu para os números, sinais e entradas de símbolos d. -
Page 169: Ff) E-Book
ff) E-Book Toque no símbolo de E-book para mostrar a sua estante de livros. Para usar esta função, os e-books têm de ser gravados no dispositivo num formato suportado. Para gravar ficheiros no dispositivo, siga as instruções no respetivo parágrafo deste manual de utilização. gg) Câmara Toque ligeiramente no ícone da câmara para inicializar a câmara. -
Page 170: Música
f) Música Com este widget, pode iniciar / interromper / continuar a reprodução de música e mudar para a faixa seguinte. Toque ligeiramente no símbolo da música na visão geral de aplicações ou na faixa atual no widget de música para abrir o ecrã de música. No seguinte resumo tem a possibilidade de obter uma listagem da sua música por intérprete, álbum, título, playlist ou a reproduzir. -
Page 171: Configurações Do Sistema
No modo de reprodução pode efectuar várias definições. Toque brevemente em menu Biblioteca – visualiza-se um resumo de todos os ficheiros de música disponíveis. Party Shuffle – activar ou desactivar o modo Party Shuffle. Adicionar à Playlist– adicionar o título a reproduzir actualmente a uma playlist. Apagar –... -
Page 172: Gerir Aplicações
Salvar & Salvar as configurações do sistema e os dados de aplicações em servidores Reposição Google. É possível estabelecer a reposição dos dados de fábrica. ATENÇÃO: Todos os dados salvos no aparelho serão perdidos. Contas Adicionar conta Aqui, poderá encontrar diferentes contas. Sistema Data &... -
Page 173: Ficheiro Explorer
13.) Ficheiro Explorer Abra o resumo das aplicações e toque a seguir brevemente no ícone do Explorer para iniciar o ficheiro Explorer. Navegar por ficheiros e pastas Tem a memória interna (internal Memory), o cartão de memória (SD Card) e o USB à escolha. Toque no local de armazenamento pretendido para visualizar uma lista dos ficheiros nele contidos. -
Page 174: Task Manager
Para confirmar toque brevemente no símbolo 15.) Condições de garantia limitada A garantia cobre apenas a substituição deste produto da Intenso. A garantia não é válida em caso de desgastes normais resultantes de uso inadequado, negligência, acidentes, incompatibilidade ou rendimento insuficiente de um certa hardware ou software de computador. -
Page 175: Dados Técnicos
16.) Dados técnicos 1.6 GHz Dualcore based on Cortex A9 Memória 1 GB DDR 3 Sistema operativo Android 4.1.1 Windows XP / Vista / 7 / 8 / Linux 2,4 e superior / Mac 10.6 e Sistemas operativos compatíveis superior Auriculares, Micro SD (SDHC), micro USB, HDMI Possibilidades de conectar WiFi (802.11 b/g/n) -
Page 176: Licença Informação
20.) Licença informação Notice of GNU GENERAL PUBLIC LICENSE and LESSER GENERAL PUBLIC LICENCE Dear Customer, If interested, you and any third party can download the source code of used GPL / LGPL from Intenso Webpage http://www.intenso.de . The source code of the desired product is available to anyone on the selection of valid product category and the desired device. - Page 177 medium, provided that you conspicuously and appropriately publish on each copy an appropriate copyright notice and disclaimer of warranty; keep intact all the notices that refer to this License and to the absence of any warranty; and give any other recipients of the Program a copy of this License along with the Program. You may charge a fee for the physical act of transferring a copy, and you may at your option offer warranty protection in exchange for a fee.
- Page 178 law if you do not accept this License. Therefore, by modifying or distributing the Program (or any work based on the Program), you indicate your acceptance of this License to do so, and all its terms and conditions for copying, distributing or modifying the Program or works based on it. 6.
- Page 179 PARTY HAS BEEN ADVISED OF THE POSSIBILITY OF SUCH DAMAGES. END OF TERMS AND CONDITIONS How to Apply These Terms to Your New Programs If you develop a new program, and you want it to be of the greatest possible use to the public, the best way to achieve this is to make it free software which everyone can redistribute and change under these terms.
-
Page 180: Declaração De Conformidade Ce
Nós, a Intenso GmbH, com sede em Diepholzer Str. 15, 49377 Vechta, Alemanha declaramos sob a nossa responsabilidade que o produto: Modelo: 8” TAB 824 (Nº de artigo 5510863) Descrição: Tablet PC se encontra em conformidade com as seguintes diretivas e normas: Diretiva R&TTE 1999/5/EG... - Page 181 Instrukcja obsługi TAB 824 Serdecznie dziękujemy za decyzję o korzystaniu z TAB824 firmy Intenso. Prosimy o zapoznanie się z tą instrukcją, aby uzyskać informacje o najważniejszych funkcjach tego urządzenia. 1.) Spis treści 1.) Spis treści ......................................1 2.) Ostrzeżenia ......................................2 3.) Widok ogólny urządzenia ..................................
-
Page 182: Ostrzeżenia
Prosimy pamiętać, że wszystkie dane mogą zostać zmienione bez wcześniejszego powiadomienia. Aktualne informacje można znaleźć na stronie www.intenso.de Znaki firmowe Google™, logo Google™ i Android™ są markami firmy Google™. Wszystkie inne nazwy produktów i usług są własnością... - Page 183 Zasilacz należy podłączać wyłącznie do uziemionych gniazdek sieciowych o napięciu AC 100- 240V~, 50/60 Hz. Jeśli nie jesteś pewny parametrów prądu w miejscu, w których korzystasz z urządzenia, to skontaktuj się z odpowiednim dostawcą prądu. Należy korzystać wyłącznie z załączonego zasilacza i przewodu sieciowego. ...
-
Page 184: Widok Ogólny Urządzenia
Gniazdo karty Micro SD Zintegrowane głośniki 4.) Zawartość opakowania Proszę sprawdzić kompletność zawartości opakowania: TAB 824 słuchawki stereo przewód USB zasilacz 5V 2.0A Instrukcja obsługi Pokrowiec skóropodobny PL - 4... -
Page 185: Ładowanie Akumulatora
5.) Ładowanie akumulatora Proszę przed pierwszy użyciem całkowicie naładować akumulator urządzenia. W tym celu należy połączyć załączony zasilacz z urządzeniem i gniazdem sieciowym. Pełne ładowanie trwa ok. 5 godzin. Stan naładowania wyświetlany jest z przodu, po lewej stronie urządzenia. Dioda LED świeci się podczas ładowania na czerwono i świeci na żółto, kiedy kiedy akumulator jest w pełni naładowany. -
Page 186: Ekran Dotykowy
Aby deaktywować nośnik danych, należy wybrać opcję „Deaktywuj pamięć USB”. Na komputerze należy wybrać funkcję „Bezpieczne usuwanie” , aby odłączyć urządzenie od komputera. Wskazówka: Fabrycznie zainstalowane aplikacje oraz system operacyjny Android™ zajmują część zainstalowanej pamięci wewnętrznej. Z tego powodu do dyspozycji nie jest dostępna całość wewnętrznej pamięci. 8.) Ekran dotykowy Urządzenie jest sterowane za pomocą... -
Page 187: Wifi
9.) WIFI Aby połączyć urządzenie z Internetem, konieczne jest połączenie z siecią bezprzewodową. Aby je utworzyć, należy nacisnąć na ikonę Wi-Fi na głównym ekranie, lub w Ustawieniach otworzyć Ustawienia Wi-Fi. Wskazówka: Należy zwrócić uwagę, że w bieżącej pozycji konieczny jest zasięg sieci bezprzewodowej. Połączenie automatyczne Używając ikony Wi-Fi lub korzystając z Ustawień... -
Page 188: Ekran Startowy
10.) Ekran startowy Widok Odblokowywanie wyświetlacza Jeśli ekran dotykowy nie jest obsługiwany przez dwie minuty, to urządzenie przechodzi w tryb czuwania. Aby przejść w tryb aktywny, należy krótko nacisnąć przycisk WŁ./WYŁ. Wyświetlacz jest zablokowany w celu ochrony przed niezamierzonym wprowadzaniem. Dotknij na wyświetlaczu zamkniętej kłódki przytrzymaj ją... -
Page 189: Dopasowanie Ekranu Startowego
Pasek stanu znajduje się w dolnym obszarze ekranu startowego. Ma on następujące funkcje: Używane ostatnio programy Wskaźnik baterii Czas Krok w tył Wywoływanie Połączenie sieci Ekranu domowego bezprzewodowe Wyświetlane są tutaj informacje o: używanych ostatnio programach sile sygnału bieżącego połączenia z siecią bezprzewodową ... -
Page 190: Używanie Różnych Ekranów Startowych
Używanie różnych ekranów startowych Dostępnych jest pięć ekranów startowych do indywidualnego skonfigurowania. Poprzez lekki ruch przesunięcia w lewo lub prawo można bardzo łatwo pomiędzy nimi przełączać. Naciśnięcie przycisku Home powoduje automatyczny powrót do środkowego ekranu startowego. Zainstalowane fabrycznie aplikacje na ekranie startowym A Skrót klawiszowy wyszukiwania Google™... -
Page 191: Pasek Wyszukiwania Google
a) pasek wyszukiwania Google™ Krótkie naciśnięcie na lupę otwiera funkcję wyszukiwania Google™. Za pomocą wirtualnej klawiatury wprowadź wybrane zapytanie i naciśnij Szukaj. Wyświetlone zostaną dostępne wyniki wyszukiwania Google™. Rada: Szybki ruch w górę lub w dół, po którym palec puszcza ekran dotykowy, powoduje szybkie przewijanie listy. -
Page 192: Zegar Analogowy (Widżet)
c) Zegar analogowy (widżet) Naciśnięcie na zegar analogowy umożliwia aktywowanie lub deaktywowanie budzika albo dodanie dalszych budzików. d) Galeria / Galeria zdjęć (widżet) Aby otworzyć galerięnależy nacisnąć ikonę galerii w obszarze aplikacji lub widżet przeglądu zdjęć. Aby uruchomić na urządzeniu muszą być zapisane zdjęcia. Wybór galerii i następnie zdjęcia następuje przez ponowne, krótkie naciśnięcie. -
Page 193: Zainstalowane Fabrycznie Aplikacje Na Ekranie Startowym
Naciśnięcie na symbol „Menu” umożliwia dostęp do dalszych opcji. Tutaj można uruchomić pokaz slajdów, dokonać obróbki zdjęcia, obracać, przycinać, wybierać jako tło pulpitu oraz wyświetlić szczegóły zdjęcia. Naciśnięcie na symbol kosza powoduje usunięcie zdjęcia. Naciśnięcie na symbol dzielenia się umożliwia wysłanie zdjęcia np. -
Page 194: Zarządzanie Kontami E-Mail
(5) Wprowadź dane (serwer, port itd.). (6) Teraz należy wybrać typ serwera dla poczty wychodzącej i wprowadzić niezbędne dane. (7) Aby przejść dalej w menu, należy nacisnąć „Dalej”. Aplikacja e-mail sprawdzić teraz wprowadzone ustawienia serwerów. Po udanej konfiguracji wyświetlony zostanie komunikat „Your account is set up, and email is on its way”. -
Page 195: Pisanie Wiadomości E-Mail
Pisanie wiadomości e-mail (1) W widoku ogólnym e-maili należy nacisnąć symbol e-mail w górnym pasku menu i otwarte zostanie nowe okno, w którym można utworzyć nową wiadomość e-mail. (2) Teraz należy wpisać adres e-mail odbiorcy, temat i tekst w przeznaczonych do tego polach. Można również... -
Page 196: Dd) App Center
dd) App Center Na urządzeniu fabrycznie zainstalowany jest AndroidPIT App Center. Tutaj można znaleźć różne aplikacje, testy, blog i forum. Dalsze wskazówki i pomoc dotyczącą App Centers można znaleźć na stronie internetowej dostawcy pod adresem www.androidpit.de. Wskazówka: Ta funkcja wymaga połączenia poprzez sieć bezprzewodową z Internetem. ee) Przeglądarka internetowa Aby uruchomić... -
Page 197: Wprowadzanie Znaków Specjalnych
Wprowadzanie znaków specjalnych Aby wprowadzić znak specjalny, np. „ą”, należy długo nacisnąć palcem na klawisz „a”, aby wywołać menu znaków specjalnych. Następnie należy przesunąć palec na wybrany znak specjalny, na przykład „ą” i zdjąć palec z wyświetlacza. Wprowadzona została litera „ą”. Korzystanie z przeglądarki internetowej ... -
Page 198: Ff) E-Book
ff) E-book Aby wyświetlić swój regał z książkami, należy nacisnąć na symbol E-book. Aby korzystać z tej aplikacji, konieczne jest zapisanie na urządzeniu e-booków w obsługiwanym formacie. Opis zapisywania plików na urządzeniu znajduje się w odpowiednim punkcie tej instrukcji obsługi. gg) Kamera Krótkie naciśnięcie ikony kamery uruchamia funkcję... -
Page 199: Muzyka / Widżet Muzyka
Naciśniecie na pozwala na dopasowanie formatu odtwarzania pliku wideo (pełny ekran, oryginalny, 16:9, 4:3). Wybór zatrzymuje bieżące odtwarzanie i pozwala na przejście do przeglądu plików wideo. f) Muzyka / Widżet Muzyka Za pomocą tego widżetu można uruchamiać/przerywać/wznawiać odtwarzanie muzyki i przechodzić do następnego utworu. -
Page 200: Ustawienia Systemowe
. Naciśnięcie utworu powoduje jego bezpośrednie odtworzenie. Aby zmienić tryb powtarzania, należy nacisnąć na symbol powtarzania Aby przejść na ekran startowy, należy krótko nacisnąć przycisk Home . Odtwarzanie muzyki nie zostanie przez to zatrzymane. W ten sposób można np. serfować w Internecie za pomocą przeglądarki i jednocześnie słuchać... -
Page 201: Przegląd Ustawień
Przegląd ustawień Tutaj dokonuje się ustawień sieci bezprzewodowej. Komunikacja WiFi Więcej Tutaj można dokonać dalszych ustawień sieciowych. bezprzewodowa i sieci Ustawianie głośności i wybór dźwięku powiadomienia. Dźwięki Ponadto można aktywować wzgl. deaktywować dźwięk potwierdzenia dotknięcia ekranu dotykowego oraz dźwięk ostrzeżenia odblokowywania ekranu. -
Page 202: Zarządzanie Aplikacjami
12.) Zarządzanie aplikacjami Aplikacje zainstalowane fabrycznie Urządzenie to dostarczane jest z zainstalowanymi fabrycznie aplikacjami. Przegląd już zainstalowanych aplikacji znajduje się w przeglądzie aplikacji . Należą do nich m.in. odtwarzacz wideo, odtwarzacz audio, przeglądarka internetowa, budzik, kalkulator oraz jeszcze kilka innych. Aby otworzyć te aplikacje, należy krótko nacisnąć... -
Page 203: Eksplorator Plików
13.) Eksplorator plików Aby uruchomić eksploratora plików, należy otworzyć przegląd aplikacji i następnie krótko nacisnąć na ikonę eksploratora. Nawigacja pomiędzy plikami i folderami Do wyboru istnieją wewnętrzna pamięć (internal Memory), karta pamięci (SD Card) i USB. Aby wyświetlić jako listę zawarte na wybranym nośniku pliki, należy nacisnąć na wybrany nośnik. Jeśli nie włożono karty pamięci lub żadnego nośnika danych nie podłączono do portu USB, pojawi się... -
Page 204: Menadżer Zadań
Jeśli produkt poddany został wstrząsom, wyładowaniom elektrycznym, temperaturze i wilgotności spoza zakresu specyfikacji produktu, to brak jest podstaw do roszczeń gwarancyjnych. Firma Intenso nie odpowiada za utratę danych lub jakiekolwiek szkody towarzyszące lub następstwa, za przekroczenie warunków gwarancji lub inne szkody bez względu na ich powód. -
Page 205: Dane Techniczne
16.) Dane techniczne 1.6 GHz Dualcore based on Cortex A9 Pamięć operacyjna 1 GB DDR 3 System operacyjny Android 4.1.1 Windows XP / Vista / 7 / 8 / Linux 2,4 lub nowszy / Mac 10.6 lub Kompatybilne systemy operacyjne nowszy Możliwości podłączeń... -
Page 206: Licencja Informacja
20.) Licencja informacja Notice of GNU GENERAL PUBLIC LICENSE and LESSER GENERAL PUBLIC LICENCE Dear Customer, If interested, you and any third party can download the source code of used GPL / LGPL from Intenso Webpage http://www.intenso.de . The source code of the desired product is available to anyone on the selection of valid product category and the desired device. - Page 207 medium, provided that you conspicuously and appropriately publish on each copy an appropriate copyright notice and disclaimer of warranty; keep intact all the notices that refer to this License and to the absence of any warranty; and give any other recipients of the Program a copy of this License along with the Program. You may charge a fee for the physical act of transferring a copy, and you may at your option offer warranty protection in exchange for a fee.
- Page 208 law if you do not accept this License. Therefore, by modifying or distributing the Program (or any work based on the Program), you indicate your acceptance of this License to do so, and all its terms and conditions for copying, distributing or modifying the Program or works based on it. 6.
- Page 209 PARTY HAS BEEN ADVISED OF THE POSSIBILITY OF SUCH DAMAGES. END OF TERMS AND CONDITIONS How to Apply These Terms to Your New Programs If you develop a new program, and you want it to be of the greatest possible use to the public, the best way to achieve this is to make it free software which everyone can redistribute and change under these terms.
-
Page 210: Deklaracja Zgodności Ue
Deklaracja zgodności UE My, Intenso GmbH, z siedzibą Diepholzer Str. 15 w 49377 Vechta, Niemcy deklarujemy na władną odpowiedzialność, że produkt: Model: 8“ TAB 824 (artykuł nr 5510863) Opis: komputer typu tablet jest zgodny z następującymi dyrektywami i normami: Dyrektywa R&TTE 1999/5/WE ... - Page 211 Руководство пользователя TAB 824 Мы благодарим Вас за то, что Вы выбрали TAB824. Внимательно прочтите это руководство, чтобы узнать о важнейших функциях устройства. 1.) Содержание 1.) Содержание......................................1 2.) Советы ........................................2 3.) Обзор устройства ....................................4 4.) Содержание упаковки ..................................4 5.) Зарядка...
-
Page 212: Советы
Данное устройство не может содержать все особенности вашего устройства. Для использования приложений от сторонних и третьих компаний, пожалуйста, свяжитесь с производителем. Обратите внимание, что все детали могут быть изменены. Актуальную информацию можно найти на сайте www.intenso.de Торговый знак Google™, логотип Google™ и Android™ являются торговыми марками Google™. Все остальные названия продуктов и... - Page 213 Эксплуатируйте сетевой адаптер только с заземленными розетками с AC 100-240В~, 50/60 Гц. Если вы не уверены в обеспечении качества проводимого напряжения, обратитесь к вашему поставщику электроэнергии. Используйте только оригинальный сетевой адаптер и сетевой кабель для подключения. Для прекращения подачи электроэнергии к вашему устройству вытяните сетевой кабель из...
-
Page 214: Обзор Устройства
камера заднего Разъем для карт памяти Micro SD Встроенные громкоговорители 4.) Содержание упаковки Проверьте обязательно полноценность содержания и устройств в упаковке: TAB 824 Наушники Stereo USB кабель Сетевой адаптер 5В 2.0A Инструкция по эксплуатации Чехол с текстурой кожи... -
Page 215: Зарядка Аккумулятора
5.) Зарядка аккумулятора Полностью зарядите аккумуляторную батарею устройства перед первым использованием. Для этого соедините сетевой блок питания, входящий в комплект поставки, с устройством, и вставьте его в розетку. Полная зарядка аккумулятора занимает примерно 5 часов. Индикатор зарядки расположен в передней левой части корпуса устройства. Во время зарядки светодиодный индикатор... -
Page 216: Сенсорный Экран
Для деактивации накопителя следует выбрать «Деактивировать USB-накопитель». Для отключения устройства выберите на компьютере функцию «Безопасное извлечение» Внимание: Установленная на системе устройства операционная система Android™ занимает часть внутренней памяти устройства – примерно 1 Гб. По этой причине вам доступен не весь размер внутренней памяти. 8.) Сенсорный... -
Page 217: Wifi
9.) WIFI Для выхода в Интернет используйте соединение WIFI. Для установки соединения используйте иконку WIFI в стартовом окне, или выберите пункт Настройки WIFI в меню Настройки. Внимание: Соблюдайте расстояние сети WLAN и вашего устройства для обеспечения соединения в актуальной позиции Автоматическое... -
Page 218: Пусковой Экран
10.) Пусковой экран Вид Разблокирование экрана Если сенсорный экран не используется в течение двух минут, устройство переходит в режим ожидания. Нажмите на кнопку вкл. / выкл., не удерживая ее, и устройство перейдет в рабочий режим. Дисплей защищен от непреднамеренного ввода данных. Прикоснитесь к символу «закрытый... -
Page 219: Строка Состояния
Строка состояния Строка состояния расположена в нижней части стартового окна. Она имеет следующие функциональные возможности: Последние использованные программы Время Статус батареи Шаг назад Домашняя страничка WLAN соединения В строке состояния можно узнать: последние использовавшиеся программы мощность сигнала текущего соединения WIFI ... -
Page 220: Использование Разных Пусковых Экранов
Использование разных пусковых экранов У Вас есть возможность персонализировать пять видов стартовых экранов. Чтобы выбрать нужный стартовый экран, пролистайте по экрану слева направо или наоборот. Нажав кнопку Home вы всегда возвращайтесь в средний исходный пусковой экран Предустановленные приложения на пусковом экране A Ярлык... -
Page 221: Поисковая Панель Google
a) Поисковая панель Google™ Коротко нажмите на Лупу для запуска Поиска в Google™. При помощи виртуальной клавиатуры введите необходимый поисковый запрос и нажмите Поиск. Отобразятся имеющиеся результаты Поиска в Google™. Совет: Если вы очень быстро произведете движения вверх или вниз и отпустите... -
Page 222: Аналоговые Часы (Widget)
c) Аналоговые часы (Widget) Коснитесь слегка пальцем иконки аналоговые часы, чтобы установить или отменить действие приложения будильник, или же чтобы добавить дополнительный будильник. d) Галерея / приложение Фотогалерея (Widget) Для того чтобы открыть Галерею, слегка коснитесь пальцем иконки Галерея в списке приложений или приложения... -
Page 223: Предустановленные Приложения На Пусковом Экране
e) Предустановленные приложения на пусковом экране Здесь Вы найдете список уже установленных приложений. aa) Отправка / прием электронных писем На этом устройстве установленная программа для работы с электронной почтой. С этой программой вы можете использовать уже ваш существующий электронный адрес, для того чтобы отправлять и принимать... -
Page 224: Управление Учетными Записями Электронной Почты
Управление учетными записями электронной почты Добавление нового почтового ящика: (1) Для появления других элементов управления откройте приложение Email и нажмите на кнопку Меню . Для введения нового почтового ящика выберите пункт Меню Настройки и далее «Новая учетная запись». (2) Для создания нового почтового ящика следуйте инструкциям мастера настроек. Удаление... -
Page 225: Bb) Календарь
bb) Календарь Чтобы просмотреть список календарей, слегка коснитесь иконки Календарь. Для того чтобы управлять встречами и напоминаниями, необходимо синхронизировать уже имеющийся календарь с календарем Google™ или же создать новый календарь Google™. Если календарь Google™ еще не установлен на Вашем устройстве, то при первой работе с календарем следуйте указаниям ассистента... -
Page 226: Ee) Интернет Браузер
ee) Интернет браузер Для запуска интернет браузера нажмите на иконку с символом браузера в режиме активного использования на пусковом экране. Для открытия интернет странички нажмите на верхнее поле ввода и введите в это поле адрес и название вашей интернет странички. Появится виртуальная клавиатура и вы сможете ввести адрес и название... -
Page 227: Использование Интернет Браузера
Использование интернет браузера Вы имеете возможность прокрутить экран вниз. Для этого выполните вертикальное движение пальцем вниз. Не начинайте выполнять движение прокрутки на кнопке меню или ссылке, иначе будет открыта следующая программа вместо прокрутки дисплея. Для того, чтобы открыть ссылку в интернет, нажмите просто на ссылку. Страница будет открыта автоматический. -
Page 228: Музыка / Музыкальное Приложение (Widget)
Нажмите на , чтобы начать воспроизведение видео. Нажмите на , чтобы остановить воспроизведение видео. Нажмите на , чтобы открыть настройки отображения видео. Нажмите на любую точку на временной строке для быстрого перехода на это место или продолжения... - Page 229 Экран воспроизведения (1) Актуальное воспроизведение (2) Случайное воспроизведение активировать деактивировать (3) Опции повтора: Повторить все файлы Повторить актуальный файл Деактивировать повторение (4) Детальная информация о файле (5) Предыдущий / следующий файл (6) Играть / Пауза (7) Панель времени Нажмите на символ Пауза для...
-
Page 230: Системные Настройки
11.) Системные настройки Для вызова системы установок нажмите в меню приложений на иконку Настройки. На левой стороне меню находятся отдельные категории. Для вызова списка настроек необходимо коротко нажать на соответствующий элемент меню. Обратите внимание, что, возможно, не все функции, предлагаемые , представлены... -
Page 231: Управление Приложениями
12.) Управление приложениями Установленные приложения Устройство поставляется с уже заранее установленными программами. Обзор этих приложений находиться в обзоре приложений . К этим программам относятся видео проигрыватель, аудио проигрыватель, интернет браузер, будильник, калькулятор и еще несколько других программ. Для открытия одного из этих приложений, просто нажмите на него или соответствующий логотип. Уствновка... -
Page 232: Использовать Инструментальную Панель
С помощью вертикального скользящего движения вы можете прокручивать все папки и файлы. Откройте файл или папку в помощью легкого нажатия. Вы можете возратиться всегда на шаг назад или вперед с помощью нажатия на соответствующюю иконку. Для перемещения на один уровень выше в структуре данных , нажмите коротко на иконку Выше... -
Page 233: Менеджер Приложений И Задач
14.) Менеджер приложений и задач Это устройство имеет способность выполнять несколько задач одновременно. Это означает что вы имеете возможность открывать несколько приложений и программ одновременно. Например вы можете слушать музыку и одновременно находится в интернете и искать вам необходимые вещи. Может... -
Page 234: Технические Данные
16.) Технические данные 1.6 GHz Dualcore based on Cortex A9 Оперативная память 1 GБ DDR 3 Операционная система Android 4.1.1 Windows XP / Vista / 7 / 8 / Linux 2,4 или выше / Mac 10.6 или Совместимые системы выше Подключения... -
Page 235: Лице ́ Нзия Информа ́ Ция
20.) лице ́ нзия информа ́ ция Notice of GNU GENERAL PUBLIC LICENSE and LESSER GENERAL PUBLIC LICENCE Dear Customer, If interested, you and any third party can download the source code of used GPL / LGPL from Intenso Webpage http://www.intenso.de . - Page 236 medium, provided that you conspicuously and appropriately publish on each copy an appropriate copyright notice and disclaimer of warranty; keep intact all the notices that refer to this License and to the absence of any warranty; and give any other recipients of the Program a copy of this License along with the Program. You may charge a fee for the physical act of transferring a copy, and you may at your option offer warranty protection in exchange for a fee.
- Page 237 law if you do not accept this License. Therefore, by modifying or distributing the Program (or any work based on the Program), you indicate your acceptance of this License to do so, and all its terms and conditions for copying, distributing or modifying the Program or works based on it. 6.
- Page 238 PARTY HAS BEEN ADVISED OF THE POSSIBILITY OF SUCH DAMAGES. END OF TERMS AND CONDITIONS How to Apply These Terms to Your New Programs If you develop a new program, and you want it to be of the greatest possible use to the public, the best way to achieve this is to make it free software which everyone can redistribute and change under these terms.
-
Page 239: Ес Заявление О Соответствии Товара
ЕС Заявление о соответствии товара Мы, компания Интензо ГмбХ, с местонахождением в Германии, город Вехта, улица Дипхольцерштрассе 15, заявляем на собственной ответственности , что следующий продукт: Модель: 8“ TAB 824 (Номер артикула 5510863) Описание: Компьютер-планшет соответствует следующим директивам и стандартам: Директива R&TTE 1999/5/ЕС...