Table des Matières

Publicité

Les langues disponibles

Les langues disponibles

Liens rapides

As an ENERGY STAR
determined that this product meets the ENERGY STAR
guidelines for energy effi ciency.
À titre de participant au programme ENERGY STAR
Panasonic a déterminé que cet appareil respecte les
directives ENERGY STAR
d'énergie.
Como socio de ENERGY STAR
cumple con las directrices de la ENERGY STAR
PP
®
Partner, Panasonic has
For Canada only: The word "Participant" is used in
place of the word "Partner".
®
en matière d'économie
®
, Panasonic ha determinado que este producto
®
para el rendimiento energético.
Instrucciones de funcionamiento
Model No. / Modèle / N
If you have any questions contact
®
In the U.S.A and Puerto Rico:
1-800-211-PANA (7262)
In Canada:
1-800-561-5505
®
,
Pour toute demande de
renseignements, appeler au
1-800-561-5505
Operating Instructions
Manuel d'utilisation
Clock Radio
Radio-réveil
Radio Reloj
RC-DC1
o
de modelo
RQTX1207-Y

Publicité

Table des Matières
loading

Sommaire des Matières pour Panasonic RC-DC1

  • Page 1 For Canada only: The word “Participant” is used in In Canada: place of the word “Partner”. 1-800-561-5505 ® À titre de participant au programme ENERGY STAR Panasonic a déterminé que cet appareil respecte les Pour toute demande de ® directives ENERGY STAR en matière d’économie renseignements, appeler au d’énergie.
  • Page 2 THAT NO OBJECTS FILLED WITH LIQUIDS, Responsible Party: SUCH AS VASES, SHALL BE PLACED ON THE Panasonic Corporation of North America APPARATUS. One Panasonic Way • USE ONLY THE RECOMMENDED Secaucus, NJ 07094 ACCESSORIES.
  • Page 3: Important Safety Instructions

    IMPORTANT SAFETY INSTRUCTIONS Read these operating instructions carefully before using the unit. Follow the safety instructions on the unit and the applicable safety instructions listed below. Keep these operating instructions handy for future reference. 1) Read these instructions. 10) Protect the power cord from being walked on or pinched particularly at plugs, convenience receptacles, and the 2) Keep these instructions.
  • Page 4: Table Des Matières

    The model number and serial number of this product can be found on either the back or the bottom of the unit. Please note them in the space provided below and keep for future reference. RC-DC1 MODEL NUMBER SERIAL NUMBER...
  • Page 5: Compatible Ipod And Iphone

    Directory (United States and Puerto Rico)” on page 16. electronic accessory has been designed to connect In Canada, contact the Panasonic Canada Inc. Customer specifi cally to iPod, or iPhone, respectively, and has been Care Centre at 1-800-561-5505, or visit the website certifi...
  • Page 6: Overview Of Controls

    Overview of controls [SNOOZE/DIMMER] Snooze: To stop the alarm for 9 minutes. Dimmer: To adjust the display panel’s brightness [SET/PRESET] (High (default), Medium or Low). To set the clock. [ALARM OFF] To perform automatic presetting or to view preset channels To turn off the alarm.
  • Page 7: Making The Connections

    Making the connections Setting the clock The clock is displayed once the main unit is connected to the Rear view household AC outlet. Reset the clock regularly to maintain accuracy (monthly accuracy + /– 60 seconds). Press and hold [SET/PRESET] for 2 seconds. Press [2/–, ADJ] or [+/6, ADJ] to select the day.
  • Page 8: Using An Ipod Or Iphone

    Note: Synchronizing clock with iPod or iPhone time When docking an iPod touch or iPhone for the fi rst time, a message will be displayed on your iPod touch or iPhone if the This function allows you to set the clock’s time to be the same Memory Loader application has not been installed (Z page 11).
  • Page 9: Using The Radio

    Using the radio Manual presetting Press [2/–, ADJ] or [+/6, ADJ] to select the desired frequency. Manual tuning Press and hold [SET/PRESET] for 2 seconds to display the preset number. Press [SOURCE] to select “RADIO FM” or “RADIO AM”. Press [2/–, ADJ] or [+/6, ADJ] to select a preset number.
  • Page 10: Using The Alarm

    Using the alarm Setting radio alarm Press [2/–, ADJ] or [+/6, ADJ] to adjust the You can set two different alarm times. Before setting the alarm, volume level. make sure to set the clock (Z page 7, “Setting the clock”). Press [ALARM 1] or [ALARM 2] to confi...
  • Page 11: Using The Memory Loader Application

    Using the Memory Loader application • You can set a short nap timer or countdown on your iPod touch or iPhone. This main unit is designed to operate with the Memory Loader application which can be downloaded from the App Store Daylight saving time (DST) (search for MemoryLoader).
  • Page 12: Troubleshooting Guide

    Note: Troubleshooting guide • Insert with poles aligned. • Do not touch the terminals (+ and –) with metal objects. Before requesting service, make the following checks. If you • Do not recharge, disassemble, remodel, heat or throw into are in doubt about some of the check points, or if the solutions fi...
  • Page 13: Maintenance

    ■ iPod or iPhone Reset The iPod or iPhone cannot be operated with this unit. This function enables you to restore the main unit to the original • Make sure the iPod or iPhone has been securely connected factory settings or when it is behaving abnormally. and turned on (Z page 8).
  • Page 14: Specifi Cations

    Specifi cations GENERAL Power supply (AC adaptor) AC 100 to 240 V, 50/60 Hz DC Output 7.5 V AMPLIFIER SECTION Power consumption (with iPod or iPhone charging) RMS Output Power (Mono) Main unit Front channel 2.6 W per channel (8 ), 1 kHz, 10% THD Dimensions (W x H x D) 112 mm x 80 mm x 150 mm "...
  • Page 15: Limited Warranty (Only For U.s.a. And Puerto Rico)

    Limited Warranty (ONLY FOR U.S.A. AND PUERTO RICO) Panasonic Consumer Electronics Company, Division of Panasonic Corporation of North America One Panasonic Way, Secaucus, New Jersey 07094 Panasonic Audio Products Limited Warranty Limited Warranty Coverage (For USA and Puerto Rico Only)
  • Page 16 Obtain Product Information and Operating Assistance; Purchase Parts, Accessories and Instruction Books online locate your nearest Dealer or Service Center; purchase for all Panasonic Products by visiting our Web Site at: Parts and Accessories; or make Customer Service and http://www.pstc.panasonic.com...
  • Page 17: Limited Warranty (Only For Canada)

    Ninety (90) days This warranty is given only to the original purchaser, or the person for whom it was purchased as a gift, of a Panasonic brand product mentioned above sold by an authorized Panasonic dealer in Canada and purchased and used in Canada, which product was not sold “as is”, and which product was delivered to you in new condition in the original packaging.
  • Page 18 LIQUIDE, COMME PAR EXEMPLE DES VASES. l’arrière, ou sous le fond de l’appareil, et de conserver ce manuel pour référence ultérieure. • UTILISER EXCLUSIVEMENT LES RC-DC1 ACCESSOIRES RECOMMANDÉS. NUMÉRO DE MODÈLE • NE PAS RETIRER LE COUVERCLE (OU LE NUMÉRO DE SÉRIE PANNEAU ARRIÈRE);...
  • Page 19: Importantes Mises En Garde

    IMPORTANTES MISES EN GARDE Avant d’utiliser l’appareil, lire attentivement les instructions qui suivent. Se conformer tout particulièrement aux avertissements inscrits sur l’appareil et aux consignes de sécurité indiquées ci-dessous. Conserver le présent manuel pour consultation ultérieure. 1) Lire attentivement ces instructions. 10) S’assurer que le cordon est placé...
  • Page 20: Accessoires Fournis

    Table des matières Accessoires fournis IMPORTANTES MISES EN GARDE ......3 Vérifi er les accessoires en les cochant. Utiliser les numéros indiqués entre parenthèses lors de la Accessoires fournis .............4 commande de pièces de rechange. (Les numéros iPod et iPhone compatibles .........5 de produits sont en date de juin 2010.
  • Page 21: Ipod Et Iphone Compatibles

    Demande d’informations Pour toutes réparations, renseignements ou conseils sur le fonctionnement du produit : Veuillez contacter le service à la clientèle de Panasonic Canada Inc. au 1-800-561-5505, son site web (www.panasonic.ca) ou le centre de service agréé le plus proche.
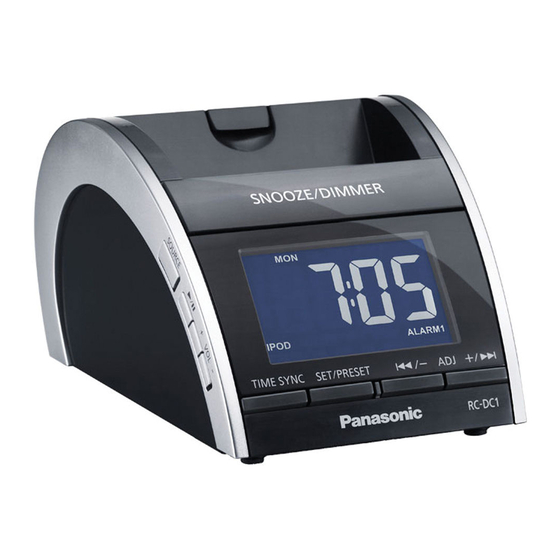
  • Page 22: Emplacement Des Commandes

    Emplacement des commandes [SNOOZE/DIMMER] Auto-vigile : Pour différer le réveil de 9 minutes. Atténuateur : Pour régler la luminosité de l’affi chage [SET/PRESET] (Haut (par défaut), Moyen ou Bas). Réglage de l’horloge. [ALARM OFF] Effectue le préréglage automatique des chaînes ou permet Mise hors marche du réveil.
  • Page 23: Réglage De L'horloge

    Raccordements Réglage de l’horloge L’horloge s’affi che lorsque l’appareil est alimenté sur la prise Vue arrière secteur. Régler l’horloge périodiquement pour maintenir l’exactitude ( + ou – 60 secondes par mois). Appuyer et maintenir [SET/PRESET] enfoncée pendant 2 secondes. Vers une Appuyer sur [2/–, ADJ] ou [+/6, ADJ] pour prise secteur Antenne FM...
  • Page 24: Utilisation D'un Ipod Ou D'un Iphone

    Nota : Synchronisation de l’horloge avec un iPod ou Un message s’affi chera à l’écran de l’iPod touch ou de l’iPhone un iPhone si l’application Memory Loader n’est pas installée lorsque celui-ci est mis en place pour la première fois (Z page 11). Cette fonction permet de synchroniser l’horloge de l’appareil Chargement de l’iPod ou de l’iPhone avec celle de votre iPod ou iPhone (Z page 5, «...
  • Page 25: Utilisation De La Radio

    Utilisation de la radio Présyntonisation manuelle Appuyer sur [2/–, ADJ] ou sur [+/6, ADJ] pour sélectionner la fréquence souhaitée. Syntonisation manuelle Appuyer et maintenir [SET/PRESET] enfoncée pendant 2 secondes pour affi cher le numéro de la position de présyntonisation. Appuyer sur [SOURCE] et sélectionner « RADIO FM » ou «...
  • Page 26: Utilisation Du Réveil

    Utilisation du réveil Réglage du mode de réveil radio Appuyer sur [2/–, ADJ] ou [+/6, ADJ] pour Il est possible de régler deux réveils distincts. Avant de régler ajuster le volume. le réveil, s’assurer de régler l’horloge (Z page 7, « Réglage de Appuyer sur [ALARM 1] ou [ALARM 2] pour valider.
  • Page 27: Utilisation De L'application Memory Loader

    Utilisation de l’application Sieste • Il est possible de régler une minuterie pour une courte sieste Memory Loader ou un compte à rebours sur votre iPod touch ou votre iPhone. Heure avancée (DST) Cet appareil est conçu pour opérer avec l’application Memory •...
  • Page 28: Guide De Dépannage

    Nota : Guide de dépannage • Insérer la pile en respectant la polarité. • Ne pas permettre aux terminaux (+ et –) d’entrer en contact Avant d’appeler un centre de service, faire les vérifi cations avec des objets de métal. décrites ci-dessous.
  • Page 29: Réinitialisation

    ■ iPod ou iPhone Réinitialisation L’iPod ou l’iPhone ne peut être piloté à partir de cet appareil. Cette fonction permet de restaurer les réglages d’usine de • S’assurer que l’iPod ou l’iPhone a été bien mis en place, puis l’appareil lorsque celui-ci fonctionne anormalement. mis en marche (Z page 8).
  • Page 30: Spécifi Cations

    Spécifi cations DONNÉES GÉNÉRALES Alimentation (adaptateur secteur) 100 à 240 V c.a, 50/60 Hz Sortie c.c. 7,5 V SECTION AMPLIFICATEUR Consommation d’énergie (avec iPod ou iPhone en recharge) Puissance de sortie effi cace (mono) Appareil principal Canal avant 2,6 W par canal (8 ), 1 kHz, 10% DHT Dimensions (L x H x P) 112 mm x 80 mm x 150 mm po x 3...
  • Page 31: Certifi Cat De Garantie Limitée

    La présente garantie n’est fournie qu’à l’acheteur original d’un des produits de marque Panasonic indiqués plus haut, ou à la personne l’ayant reçu en cadeau, vendu par un détaillant Panasonic agréé au Canada et utilisé au Canada. Le produit ne doit pas avoir été...
  • Page 32 NE COUVRE PAS l’usure normale ni les dommages esthétiques. La présente garantie NE COUVRE PAS NON PLUS les dommages subis pendant le transport, les défaillances causées par des produits non fournis par Panasonic Canada Inc. ni celles résultant d’un accident, d’un usage abusif ou impropre, de négligence, d’une manutention inadéquate, d’une mauvaise application, d’une altération, d’une installation ou de réglages impropres, d’un mauvais réglage des contrôles de l’utilisateur, d’un mauvais...
  • Page 33 MÉMO...
  • Page 34 COLOQUE ENCIMA DEL MISMO OBJETOS deseada. CON LÍQUIDOS COMO, POR EJEMPLO, FLOREROS. Parte responsable: Panasonic Corporation of North America • UTILICE SOLAMENTE LOS ACCESORIOS One Panasonic Way RECOMENDADOS. Secaucus, NJ 07094 • NO QUITE LA CUBIERTA (O EL PANEL Contacto de Soporte: TRASERO);...
  • Page 35: Instrucciones Importantes De Seguridad

    INSTRUCCIONES IMPORTANTES DE SEGURIDAD Lea estas instrucciones de funcionamiento minuciosamente antes de usar la unidad. Siga las instrucciones de seguridad en la unidad y las instrucciones de seguridad aplicables enumeradas abajo. Mantenga estas instrucciones de funcionamiento a mano para consultas futuras. 1) Lea estas instrucciones.
  • Page 36: Accesorios Suministrados

    El número de modelo y número de serie de este producto se puede encontrar en la parte posterior o inferior del mismo. Por favor, anótelo en el espacio suministrado a continuación y guárdelo para consultas futuras. RC-DC1 MODELO NÚMERO NÚMERO DE SERIE...
  • Page 37: Compatible Con El Ipod Y El Iphone

    Compatible con el iPod y el iPhone Servicio del producto • iPod nano 5ª generación (cámara de video) (8GB, 16GB) 1. Daños que ameritan servicio – La unidad sólo debe recibir • iPod touch 2ª generación (8GB, 16GB, 32GB, 64GB) servicio por un personal cualifi...
  • Page 38: Panorama De Los Controles

    Panorama de los controles [SNOOZE/DIMMER] Repetición de alarma: Para detener la alarma durante [SET/PRESET] 9 minutos. Para confi gurar el reloj. Atenuador de luz: Para ajustar el brillo del panel de Para realizar una preconfi guración automática o para visualización (Alto (predeterminado), Medio o Bajo). visualizar los canales preconfi...
  • Page 39: Cómo Realizar Las Conexiones

    Cómo realizar las conexiones Confi guración de la hora El reloj se visualizará una vez la unidad principal esté Vista posterior conectada a la red eléctrica del hogar. Vuelva a poner en hora el reloj frecuentemente para mantener su exactitud (exactitud mensual + /– 60 segundos). Pulse y mantenga pulsado [SET/PRESET] durante 2 segundos.
  • Page 40: Cómo Usar Un Ipod O Iphone

    Nota: Sincronización del reloj con la hora del iPod Cuando coloque un iPod touch o iPhone en la unidad de o del iPhone acoplamiento por primera vez, se visualizará un mensaje en su iPod touch o en su iPhone si no se ha instalado la aplicación Memory Loader (Z página 11).
  • Page 41: Cómo Usar El Radio

    Cómo usar el radio Presintonización manual Pulse [2/–, ADJ] o [+/6, ADJ] para seleccionar la frecuencia deseada. Sintonización manual Pulse y mantenga pulsado [SET/PRESET] durante 2 segundos para visualizar el número preconfi gurado. Pulse [SOURCE] para seleccionar “RADIO FM” o Pulse [2/–, ADJ] o [+/6, ADJ] para seleccionar un “RADIO AM”.
  • Page 42: Cómo Usar La Alarma

    Cómo usar la alarma Cómo confi gurar la alarma del radio Pulse [2/–, ADJ] o [+/6, ADJ] para ajustar el nivel del volumen. Usted puede confi gurar dos horas de alarma diferentes. Antes de confi gurar la alarma, asegúrese de confi gurar el reloj Pulse [ALARM 1] o [ALARM 2] para confi...
  • Page 43: Cómo Usar La Aplicación Memory Loader

    Cómo usar la aplicación Memory Loader Siesta • Puede establecer un tiempo de temporizador corto para una siesta en su iPod touch o iPhone. Esta unidad principal ha sido diseñada para operar con la aplicación Memory Loader, que puede ser descargada del App Horario de ahorro de energía diurno (DST) Store (realice una búsqueda con MemoryLoader).
  • Page 44: Guía Para La Solución De Problemas

    Nota: Guía para la solución de problemas • Inserte con los polos alineados. • No toque los terminales (+ y –) con objetos metálicos. Antes de solicitar el servicio de reparaciones haga las • No recargue, desarme, remodele, caliente o lance al fuego. comprobaciones indicadas en la tabla de abajo.
  • Page 45: Mantenimiento

    ■ iPod o iPhone Reiniciar El iPod o iPhone no funciona con esta unidad. Esta función le permite restaurar la unidad principal a la • Asegúrese de que el iPod o el iPhone estén conectados de confi guración predeterminada cuando funciona anormalmente. manera segura y encendidos (Z página 8).
  • Page 46: Especifi Caciones

    Especifi caciones GENERALIDADES Fuente de alimentación (Adaptador de CA) CA 100 a 240 V, 50/60 Hz SECCIÓN DEL AMPLIFICADOR Salida de CC 7.5 V Potencia de Salida RMS (Mono) Consumo de energía (con el iPod o iPhone cargándose) Canal frontal 2.6 W por canal (8 ), 1 kHz, 10% THD Unidad principal Dimensiones (An x Al x Prf)
  • Page 47: Información Útil

    Sitio Web para América Latina: http://www.lar.panasonic.com Además puede contactarnos directamente a través de nuestro Contact Center: Panama 800-PANA (800-7262) Colombia 01-8000-94PANA (01-8000-947262) Ecuador 1800-PANASONIC (1800-726276) Costa Rica 800-PANA737 (800-7262737) El Salvador 800-PANA (800-7262) Guatemala 1-801-811-PANA (1-801-811-7262) Chile 800-390-602 Desde teléfono Celular: 797-5000...
  • Page 48 Panasonic Consumer Electronics Panasonic Canada Inc. Company, Division of Panasonic 5770 Ambler Drive Corporation of North America Mississauga, Ontario L4W 2T3 One Panasonic Way, Secaucus, www.panasonic.ca New Jersey 07094 http://www.panasonic.com © Panasonic Corporation 2010 Printed in China RQTX1207-Y Imprimé en Chine...

Table des Matières