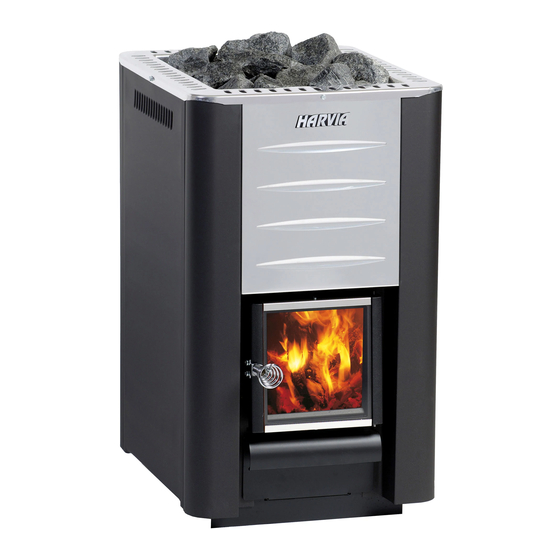
Harvia M3 Instructions D'utilisation Et D'installation
Masquer les pouces
Voir aussi pour M3:
- Instructions d'installation et d'utilisation (76 pages) ,
- Instructions d'installation et d'utilisation (20 pages) ,
- Instructions d'installation et d'utilisation (16 pages)

Manuels Connexes pour Harvia M3


Sommaire des Matières pour Harvia M3
- Page 1 WOODBURNING STOVE POÊLE À BOIS Instructions for Installation and Use Instructions d’utilisation et d’installation 27082009...
-
Page 2: Table Des Matières
3.3.6. Installing a Stove with a Front Water supérieure ..........12 Container (Harvia 20 ES Pro / ES Pro S) ..14 3.3.5. Raccordement du poêle à une cheminée 3.4. Installation of the Water Heater ....14 en acier Harvia ........... -
Page 3: Instructions For Use
1.3. Utilisation du poêle 1.3.1. First Heating 1.3.1. Première mise en service The outer casing of Harvia stoves has been painted L’enveloppe des poêles Harvia est recouverte d’une with heat-resistant paint, which reaches its final peinture résistante à la chaleur, qui atteint son état cured state during the first heating. -
Page 4: Sauna Stones
These include vent être utilisées en tant que pierres de sauna. Vous Harvia stones, which are either peridotite, olivine- pouvez notamment utiliser des pierres Harvia, qui sont dolerite or olivine. en péridotite, en dolérite olivine ou en olivine. -
Page 5: Sauna Water
8–12 cm. Fill ca 2/3 of the fire chamber with diamètre compris entre 8 et 12 cm. Remplissez firewood (consider the thermal value of wood, le foyer environ aux deux tiers de bois de chauf- 1.3.3.). SL/Duo stoves: Place the firewood on fage (en tenant compte de la valeur thermique du the grate at back of the fire chamber. -
Page 6: Sauna Room
2. SaUNa ROOM 2. CaBINE DU SaUNa 2.1. Effects that Heating the Stove has on 2.1. Effets du poêle chaud sur la cabine de the Sauna Room sauna Light-coloured floor materials will become dirty from Les sols de couleur claire seront salis par les cen- the ash, particles of stone and metal flakes that fall dres, les particules de pierre et les paillettes de métal from the stove. -
Page 7: Instructions For Installation
Harvia protective sheath and bed- tenir le sol au sec. Vous pouvez aussi utiliser ding ( 3.2.3.). la gaine et la couche de protection Harvia ( Tile floor. The floor glues and plasters and 3.2.3.). waterproof materials used below the tiles are Sol en carrelage : les colles et enduits de sol et not resistant to the heat radiation of the stove. -
Page 8: Safety Distance To The Ceiling
3.1.2. Safety Distance to the Ceiling 3.1.2. Distance de sécurité par rapport au plafond From the top of the stove to the ceiling: at least Entre le haut du poêle et le plafond : au moins 1200 mm (figure 4). 1200 mm (Figure 4). -
Page 9: Double Light Protective Cover For The Walls
Figure 7. Harvia protective sheath and bedding (all dimensions in in millimeters) millimeters) Figure 6. Plaques de protection (toutes Figure 7. Gaine et couche de protection Harvia (toutes les dimensions les dimensions sont fournies en sont fournies en millimètres) millimètres) -
Page 10: Installation Of The Stove
(modèles : Harvia 20 Pro / Pro S / SL / Duo, Harvia 20 ES Pro / Pro S, Harvia 26 Pro / Pro S and Harvia 20 ES Pro / Pro S, Harvia 26 Pro / Pro S et Harvia... -
Page 11: Connecting The Stove To A Chimney
Ensure that the connecting pipe fits tightly in its de raccordement qui se trouve à l’arrière du poêle. place (Figure 10). In the M3 model you must first Assurez-vous que le conduit de raccordement tient open the cover hatch in the back and bend the flap fermement en place (Figure 10). -
Page 12: Connecting The Stove To A Masonry Flue Via The Upper Connection Opening
(figure 13). In the M3 model you must first à ce que le bouchon ne tombe pas (Figure 13). Sur open the cover hatch, then install the blocking plug. -
Page 13: Connecting The Stove To A Harvia Steel Chimney
être utilisée avec des évacuations de fumée inclinées différemment. 3.3.5. Connecting the Stove to a Harvia Steel 3.3.5. Raccordement du poêle à une cheminée en Chimney acier Harvia A CE-marked Harvia steel chimney can be used Une cheminée en acier Harvia étiquetée CE peut... -
Page 14: Installing A Stove With A Front Water Container (Harvia 20 Es Pro / Es Pro S)
Harvia stoves can be equipped with a side model (30 Les poêles Harvia peuvent être équipés d’un chauffe- l) (not suitable for the M3 model) or a pipe model eau de modèle latéral (30 l) (non adapté au modèle water heater (22 l). When protective sheath is used... -
Page 15: Changing The Opening Direction Of The Stove Door
with pipe model water heater, an extra radiation protection avec le chauffe-eau tubulaire, une protec- cover should be placed according figure 14. tion contre le rayonnement supplémentaire doit être When installing the container of the side model, mise en place, conformément au Figure 14. remove the side plate of the stove and suspend the Si vous installez le chauffe-eau latéral, retirez la container from the angle iron against the frame of...