LEXIBOOK DJA100 Mode D'emploi
Masquer les pouces Voir aussi pour DJA100:
Table des Matières

Publicité

Les langues disponibles
  • FR

Les langues disponibles

  • FRANÇAIS, page 1

Liens rapides

Move Cam
MODE D'EMPLOI
INSTRUCTION MANUAL
DJA100
www.lexibook.com
DJA100IM1363_6Sept_V06.indb 1
06/09/2013 5:38 PM

Publicité

Table des Matières
loading

Sommaire des Matières pour LEXIBOOK DJA100

  • Page 1 Move Cam MODE D’EMPLOI INSTRUCTION MANUAL DJA100 www.lexibook.com DJA100IM1363_6Sept_V06.indb 1 06/09/2013 5:38 PM...
  • Page 2 Image  1 Image   Image  2 DJA100IM1363_6Sept_V06.indb 2 06/09/2013 5:38 PM...
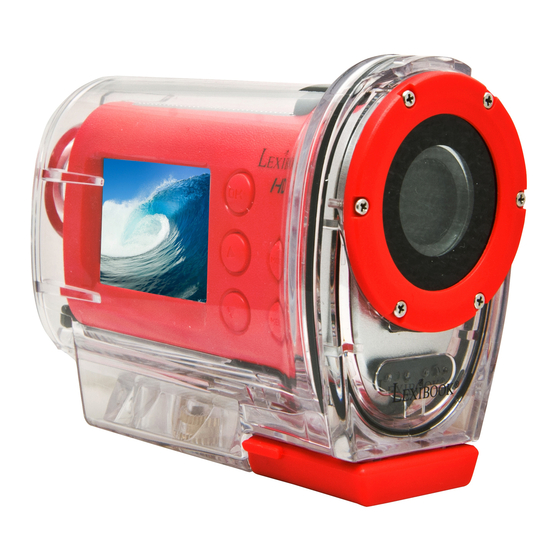
  • Page 3 Image  3 DJA100IM1363_6Sept_V06.indb 3 06/09/2013 5:38 PM...
  • Page 4: Présentation De Votre Caméra

    PRÉSENTATION  DE  VOTRE  CAMÉRA Guide  des  touches Remarqu Image  1  :   A ppareil  sans  accessoires 1.  Port  USB 2.  Bouton  Marche-­Arrêt  +  déclencheur comme  su 3.  Voyant  LED  d’alimentaion 4.  Haut-­parleur 2.  Ouvrez 5.  Micro 6.  Bouton  OK 7.  Bouton  Haut  /  Bouton  Wi-­Fi s’allume  e 8.
  • Page 5: Recharger Les Batteries

    RECHARGER  LES  BATTERIES Remarque  :  Avant  d’utiliser  cette  caméra  pour  la  première  fois,   comme  suit  :   2.  Ouvrez  le  capuchon  en  caoutchouc  protégeant  le  port  USB.   s’allume  en  rouge  pendant  la  recharge  des  batteries  et  s’éteint   Remarque  : rechargez-­les.
  • Page 6: Allumer Et Éteindre La Caméra

    Remarqu ALLUMER  ET  ÉTEINDRE  LA  CAMÉRA nous  vous la  caméra.  Quand  vous  allumez  la  caméra,  le  voyant  LED   bon  foncti Attention sur  votre  o pour  éteindre  la  caméra.   Remarque  :   Vous  pouv disponible allemand   INSÉRER  UNE  CARTE  MÉMOIRE Pour  pouvoir  enregistrer  des  vidéos  et  des  photos,  vous  devez  ...
  • Page 7: Configurer La Langue

    Remarques  : nous  vous  recommandons  de  la  reformater  pour  garantir  son   ED   bon  fonctionnement. Attention  :  Le  formatage  efface  toutes  les  photos  et  vidéos   sur  votre  ordinateur  avant  de  formater  une  carte  mémoire.   CONFIGURER  LA  LANGUE Vous  pouvez  changer  la  langue  des  menus  de  l’appareil,  7  sont  ...
  • Page 8 Prendre  d allumer  la Remarques  : Photo   varier  en  fonction  de  l’espace  mémoire  disponible  sur  la  carte   micro  SD. une  photo s’enregist champs  suivants  : Movie  Size Plus  la  résolution  est  élevée,  plus  grande  est  la  taille  d’image.   champs  s Resolution Video  Quality...
  • Page 9 PRENDRE  DES  PHOTOS  (Mode  Photo) Prendre  des  photos allumer  la  caméra.   A ppuyez  sur  le  bouton  Mode  autant  de  fois   Photo   a  carte   une  photo. s’enregistre  sur  la  carte  SD. image.   champs  suivants  : Resolution ne,  ...
  • Page 10 Exposure Paramétr d’intérieur,  des  arrière-­plans  sombres  ou  une  forte  luminosité   en  arrière-­plan.   surbrillanc Effect Driver  Mode Paramétr Les  options  suivantes  sont  disponibles  :  Off,  2s,  10s. la  prise  d’image. Burst  Mode Les  options  suivantes  sont  disponibles  :  Off,  3,  5,  10. surbrillanc Date  Stamp Redimme...
  • Page 11: Mode Webcam

    Paramétrer  le  diaporama nosité   surbrillance.   Paramétrer  les  effets surbrillance.   Redimmensionner  les  images   Lecture) surbrillance.    de  fois   outon  OK   surbrillance.   outon   MODE  WEBCAM 1.  En  mode  Photo,  Vidéo  ou  Lecture  appuyez  sur  le  bouton   surbrillance.
  • Page 12: Paramétrer L'appareil

    Reset  all UTILISE Vous  pouv PARAMÉTRER  L’APPAREIL et  télécha 1.  En  mode  Photo,  Vidéo  ou  Lecture  appuyez  sur  le  bouton   Installer  l champs  suivants  : via  3  poss Sounds Permet  de  d’activer/désactiver  les  moments  où  l’appareil  joue   2.  L’applic des  sons.
  • Page 13 Vous  pouvez  contrôler  votre  caméra  depuis  un  smartphone  ou   et  télécharger  vos  clichés  ou  contrôler  vos  paramètres  de   uton   Installer  l’application  «  Lexibook  Move  Cam  » via  3  possibilités  : eil  joue   2.  L’application  est  aussi  disponible  sur  le  CD  d’installation  fourni  ...
  • Page 14: Charger Les Fichiers Sur Un Ordinateur

    CHARGER  LES  FICHIERS  SUR  UN  ORDINATEUR BRAN ordinateur. Connection  via  cable  USB 2.   A llumez vous  pour téléviseur. Objectif   répertorie  vos  photos  et  vidéos. Mode  d’o Déclench TÉLÉCHARGEMENT  DE  VOS  PHOTOS  ET  VIDEOS Écran  LC Utiliser  «  MAGIX  Photo  Manager  10  »  :   Stockage Resolutio USB  d’un  ordinateur.
  • Page 15: Brancher La Caméra À Un Téléviseur Hdtv

    s’ouvre.   terminer  le  téléchargement. BRANCHER  LA  CAMÉRA  À  UN  TÉLÉVISEUR  HDTV 2.   A llumez  le  téléviseur  HDTV  et  réglez-­le  sur  le  mode  HDMI. vous  pourrez  naviguer  au  sein  de  votre  appareil  sur  votre   téléviseur. SPÉCIFICATIONS  TECHNIQUES Objectif   Mode  d’opération Mode  Vidéo,  Mode  Photo,  Mode  Lecture Déclencheur  ...
  • Page 16 SUPPORT  DE  V  ÉLO  (Assemblage)   21   27             19   22   23     24   Support  d 3.  Pour  utiliser  le  boîtier  étanche,  insérez  la  caméra  dans  le   3.  Vous  po adaptant  a et  déplacez  la  caméra  vers  le  haut  ou  le  bas,  puis  revissez  la  ...
  • Page 17: Support De Casque (Assemblage)

    SUPPORT  DE  CASQUE  (Assemblage)   18   27   25   28   19   26   Support  de  casque  avec  sangle   ns  le   3.  Vous  pouvez  régler  l’angle  de  la  caméra  en  dévissant  puis   adaptant  avec  précaution  la  partie  amovible  où  se  situe  la   sez  la  ...
  • Page 18: Declaration De Conformite

    DECLARATION  DE  CONFORMITE Protéger  l 2,  avenue  de  Scandinavie pas  tenter Désignation  :  Move  Cam toute  mise détériorati Note  :  Ve d’importan ci-­dessus  est  en  conformité  avec  les  directives  de  l’Union   peut  chan ne  doit  êtr 1622 Directeur  du  développement  du  produit LEXIBOO Hong  Kong,  le  09/08/2013 2,  avenue...
  • Page 19: Entretien

     informations.  Le  contenu  de  ce  mode  d’emploi   on   peut  changer  sans  préavis.   A ucune  partie  de  ce  mode  d’emploi   ne  doit  être  reproduite  sans  le  consentement  écrit  du  fabricant. LEXIBOOK  SA 2,  avenue  de  Scandinavie France Ce  produit  ...
  • Page 20: Packaging Contents

    PRESENTING   Y OUR  CAMERA Button  Guide Remark:   Image  1:  The  device  without  accessories 1.  USB  port 2.  On/Off  button  +  shutter  release 1.  Verify  th 2.  Open  th 5.  Microphone 6.  OK  button 7.  Up  button  /  Wi-­Fi  button 8.
  • Page 21: Recharging The Batteries

    RECHARGING  THE  BATTERIES Remark:   1.  Verify  that  the  camera  has  been  turned  off.   2.  Open  the  rubber  cover  shielding  the  USB  port.   fully  recharged. recharging,  but  unplug/turn  off  the  device  in  cases  of   cables  other  than  those  provided. Remark:  ...
  • Page 22: Inserting A Memory Card

    INSERTING   A  MEMORY  CARD In  order  to  record  videos  and  photos,  you  must  insert  a  Micro   is  highligh This  came Inserting  a  Memory  Card: 1.  Turn  off  the  camera.   2.  Open  the  rubber  cover  shielding  the  Micro  SD  slot. 3.
  • Page 23  Micro   is  highlighted. CHANGING    MODE This  camera  includes  three  modes: Video  Mode  –  Filming  Videos ,  and  then   correspond  to  one  of  the  3  modes  above. rchase  a   FILMING  VIDEOS  (Video  Mode) do  not  directly  access  the  Video  mode,  press  the  Mode  button    is  displayed  in  ...
  • Page 24 Image  Quality Image  Qu storage. the  video. Measurement   Measurem determine  the  luminosity. determine White  Balance White  Bal Tungsten,  Fluor  H. Tungsten, conditions. conditions Effect 800. This  option  is  used  to  add  effects  to  your  recording. This  optio Seamless   Exposure +2,0.
  • Page 25 Image  Quality the  video. Measurement   determine  the  luminosity. White  Balance Tungsten,  Fluor  H. conditions. 800. This  option  is  used  to  determine  the  level  of  light  sensitivity. Exposure +2,0. Effect o  access   This  option  is  used  to  add  effects  to  your  pictures. n  the  ...
  • Page 26 the  videos  and  photos. is  highligh 4.  Connec 3.  Select  Single  or   A ll  according  to  your  preference  and  then   Sounds Start,  Bee sounds. Power  Sa shuts  off  t Date  &  Tim Resizing  the  Images   on  the  pho dates  and Language being  ava...
  • Page 27: Webcam Mode

    WEBCAM  MODE is  highlighted. 4.  Connect  your  device  to  a  computer  via  the  USB  cable   d  then   CONFIGURING  THE  DEVICE Sounds Start,  Beep,  Volume. sounds. Power  Save shuts  off  to  conserve  battery  life.   Date  &  Time on  the  photos  and  videos  (see  previous  sections  to  activate  this   dates  and  times.
  • Page 28 To  return  to  the  device’s  original  settings. a.  Plug  the USING  WI-­FI  /  REMOTE  CONTROL in  a  card  r Connecti Installing  the  “Lexibook  Move  Cam”   A pplication application: DOWN Using  “M 2.  The  application  is  also  available  on  the  installation  CD  ...
  • Page 29 The  password  is  “1234567890”. LOADING  FILES  ONTO   A  COMPUTER computer: a.  Plug  the  USB  cable  provided  into  the  camera  and  the   in  a  card  reader  and  connect  the  card  reader  to  your  computer. Connection  via  USB  Cable DOWNLOADING  ...
  • Page 30: Specifications Techniques

    CONNECTING  THE  CAMERA  TO   A N  HDTV  TELEVISION 21   1.  Plug  the  camera  to  the  television  using  an  HDMI  cable  (sold   2.  Turn  on  the  HDTV  television  and  set  it  to  HDMI  mode.   television.   SPECIFICATIONS  TECHNIQUES Sensor  ...
  • Page 31 BICYCLE  MOUNT  (Assembly)   VISION 21   ble  (sold             19   22   23     24   to  ensure  effective  fastening. ensuring  that  the  latch  is  fully  re-­closed. attached. once  the  camera  has  been  adjusted  to  the  desired  position.   uor  H  ...
  • Page 32 HELMET  MOUNT  (Assembly) 2,  avenue Kind  of  pr 18   27   25   28   19   26   We  hereb Helmet  Mount  with  Strap   European it  in  to  ensure  effective  fastening. Product  D to  ensure  effective  fastening. 5.
  • Page 33: Conformity Declaration

    CONFORMITY  DECLARATION 2,  avenue  de  Scandinavie Kind  of  product:  Move  Cam We  hereby  declare  that  the  above  mentioned  product  is  in   European  Commission. 1622 Product  Development  Manager and  of   hesive   ctivities. DJA100IM1363_6Sept_V06.indb 33 06/09/2013 5:38 PM...
  • Page 34 MAINTENANCE Only  use  a  soft,  slightly  damp  cloth  to  clean  the  unit.  Do  not  use   WARRANTY covers  material  or  installation-­related  defects  attributable  to  the   reference. NOTE: information.   Designed  in  Europe  –  Made  in  China For  any  further  information,  please  call  our  Helpline:  0808   1003015 This  product  is  ...
  • Page 35: Contenido Del Embalaje

    PRESENTACIÓN  DE  SU  CÁMARA Guía  de  controles Imagen  1:  Dispositivo  sin  accesorios 1.  Puerto  USB 2.  Botón  de  encendido/apagado  +  botón  de  obturación 3.  Indicador  LED  de  alimentación 4.   A ltavoz 5.  Micrófono 6.   A ceptar 8.  Modo 9.
  • Page 36: Recargar Las Baterías

    RECARGAR  LAS  BATERÍAS Nota: la  siguiente  manera:   cuando  es 2.   A bra  la  tapa  de  goma  protectora  del  puerto  USB.   Nota: de  espera cargando,  ni  utilice  cables  distintos  a  los  suministrados. Nota: Insertar  u 2.   A bra  la   los  contactos  de  la  pila.
  • Page 37: Encendido Y A Pagado De La Cámara

    ENCENDIDO   Y   A PAGADO  DE  LA  CÁMARA cuando  esta  y  la  pantalla  se  enciendan.   Nota: de  espera  tras  varios  minutos  de  inactividad.  Pulse  el   INSERTAR  UNA  TARJETA  DE  MEMORIA Insertar  una  tarjeta  de  memoria: 2.   A bra  la  tapa  de  goma  protectora  de  la  ranura  micro  SD. 3.
  • Page 38: Ajuste Del Idioma

    Notas: la  pantalla le  recomendamos  volver  a  formatearla  para  garantizar  su   funcionamiento  correcto. todos  los  archivos  importantes  en  su  ordenador  antes  de   Notas: formatear  la  tarjeta  de  memoria.   cuando  se AJUSTE  DEL  IDIOMA espacio  lib El  menú  del  dispositivo  puede  aparecer  en  7  idiomas  diferentes:   Movie  Siz resaltado.
  • Page 39 la  pantalla  mientras  prosigue  la  grabación  (el  indicador  de   su   de   Notas: cuando  se  agote  el  espacio  libre  disponible  en  la  tarjeta  de   espacio  libre  disponible  en  la  tarjeta  micro  SD. iferentes:   Movie  Size Video  Quality Metering ualizar  ...
  • Page 40 Driver  Mo TOMAR  FOTOS  (MODO  DE  FOTO) Opciones   Tomar  fotos Burst  Mod Opciones   de  foto   pantalla. Date  Stam Incluye  la   VISUALIZA tomar  una  foto. reproducc de  la  pant Image  Size para  most Image  Quality Measurement    Opciones  disponibles:  Center,  Multi,  Spot.
  • Page 41 Driver  Mode Opciones  disponibles:  Off,  2s,  10s. Burst  Mode Opciones  disponibles:  Off,  3,  5,  10. Date  Stamp Incluye  la  fecha  de  captura  en  sus  fotos:  Off,  On. VISUALIZACIÓN   Y   G ESTIÓN   D E   V ÍDEOS   Y   F OTOS   ( MODO   D E   L ECTURA) reproducción  ...
  • Page 42 Parámetros  de  efectos aparezca  resaltado.   generales Redimensionar  las  imágenes   Sounds Permite  a aparezca  resaltado.   Power  Sa 3.  El  tamaño  de  la  imagen  se  puede  ajustar  a  los  valores   Opciones   Permite  e Añadir  el  sonido  a  un  archivo Date  &...
  • Page 43: Parámetros Del Dispositivo

    PARÁMETROS  DEL  DISPOSITIVO generales  del  dispositivo. Sounds Permite  activar  o  desactivar  el  sonido  en  determinados   Power  Save   es   Opciones  disponibles:  Off,  1  min,  3  min,  5  min. Permite  establecer  un  tiempo  de  inactividad  después  del  cual  el   Date  &...
  • Page 44 USO  DE  LA  FUNCIÓN  WIFI  /  CONTROL   A  DISTANCIA dos  mane de  tarjetas maneras: a.  Según  utilice  su  periférico  el  sistema  iOS  o   A ndroid,  usted   disco  rem transferir  la  aplicación  desde  su  ordenador  a  un  periférico  iOS/ Android  si  este  no  tiene  lector  de  CD.
  • Page 45 ANCIA TRANSERIR   A RCHIVOS   A  SU  ORDENADOR dos  maneras: de  tarjetas  y  conecte  el  lector  a  su  ordenador. usted   disco  removible  adicional.  Haga  clic  sobre  ese  icono  para  ver   ico  iOS/ CÓMO   D ESCARGAR   S US   F OTOGRAFÍAS   Y   S US   V ÍDEOS   E N   E L   O RDENADOR puerto  USB  libre  de  su  ordenador.
  • Page 46: Conectar La Cámara A Un Televisor Hdtv

    21   para  terminar  de  cargar  los  archivos. CONECTAR  LA  CÁMARA   A  UN  TELEVISOR  HDTV Los  archivos  pueden  verse  en  su  televisor  mediante  un  cable       2.  Encienda  el  televisor  HDTV  y  cambie  a  la  fuente  HDMI   correspondiente.
  • Page 47 MONTURA  PARA  BICICLETA  (ENSAMBLAJE)   21             19   22   23     24   pestillo  esté  bien  cerrado. asegurar  una  buena  sujeción.  la  carcasa  debe  cerrarse  correctamente.  Su   DJA100IM1363_6Sept_V06.indb 47 06/09/2013 5:38 PM...
  • Page 48 MONTURA  PARA  CASCO  (ENSAMBLAJE)   2,  avenue 18   Tipo  de  pr 27   25   28   19   26   Montura  para  casco  con  la  correa   el  producto. Apriétala  bien  para  asegurar  una  buena  sujeción. asegurar  una  buena  sujeción. casco.
  • Page 49: Declaración De Conformidad

    )   DECLARACIÓN  DE  CONFORMIDAD 2,  avenue  de  Scandinavie Tipo  de  producto:  Move  Cam 1622 ambién   u   DJA100IM1363_6Sept_V06.indb 49 06/09/2013 5:38 PM...
  • Page 50 MANTENIMIENTO Utilice  únicamente  un  paño  suave  ligeramente  humedecido  para   GARANTÍA contacto  con  su  distribuidor  y  preséntele  una  prueba  de  compra.   futuras  consultas. En  nuestro  empeño  por  mejorar  nuestros  servicios  los  colores   NOTA: información  importante.   Diseñado  y  desarrollado  en  Europa  –  Fabricado  en  China España Servicio  atención  al  cliente:  902  760  049 Este  ...
  • Page 51: Conteúdo Da Embalagem

    APRESENTAÇÃO  DA  SUA  CÂMARA Guia  dos  botões 1.  Porta  USB 2.  Botão  de  ligar/desligar  +  obturador 3.  Indicador  LED  da  alimentação 4.   A ltifalante 5.  Microfone 6.  Botão  OK 7.  Botão  para  cima  /  Botão  Wi-­Fi 8.  Botão  do  Modo 9.
  • Page 52 RECARREGAR   A  BATERIA do  seguinte  modo:   automatic completamente  carregada. utilize  outros  cabos  para  além  dos  fornecidos. recarregue-­a. ou  com  derrames  com  muito  cuidado.  Se  esta  entrar  em   cartão  mic 3.  Insira  c 4.  Para  re Quando  eliminar  uma  bateria,  contacte  as  autoridades  locais   baterias.
  • Page 53: Ligar E Desligar A Câmara

    LIGAR  E  DESLIGAR   A  CÂMARA automaticamente  passados  alguns  minutos  de  inactividade.   INSERIR  UM  CARTÃO  DE  MEMÓRIA cartão  micro  SD. 3.  Insira  com  cuidado  um  cartão  micro  SD  no  compartimento,   4.  Para  retirar  o  cartão,  prima  ligeiramente  para  dentro  para  o   e  fotos.
  • Page 54 o  seu  bom  funcionamento. computador  antes  de  formatar  um  cartão  de  memória.   cartão  mic CONFIGURAR   A  LÍNGUA alemão  e  holandês. campos: Movie  Siz aparelho. Video  Qua estiver  realçada. ALTERAR  O  MODO Fine. Modo  de  foto  -­  Para  tirar  fotos   Measurem determina White  Bal...
  • Page 55 cartão  micro  SD. campos: Movie  Size Video  Quality Fine. Measurement   determinar  a  luminosidade. White  Balance Tungsten,  Fluor  H. Effect   Seamless   e  no   Date  Stamp DJA100IM1363_6Sept_V06.indb 55 06/09/2013 5:38 PM...
  • Page 56 TIRAR  FOTOGRAFIAS  (Modo  de  foto) iluminação luminosida Driver  Mo da  imagem Burst  Mod Date  Stam cartão  SD. VISUALIZ campos: Image  Size do  ecrã. Image  Quality começar  u Fine Measurement   Apagar  fo determinar  a  luminosidade. White  Balance 3.  Escolha Tungsten,  Fluor  H. 400,  800.
  • Page 57 iluminação  de  interior,  fundos  escuros  ou  uma  forte   luminosidade  de  fundo. Driver  Mode   da  imagem. Burst  Mode   Date  Stamp   VISUALIZAR   E   G ERIR   O S   V ÍDEOS   E   F OTOS   ( Modo   d e   r eprodução) do  ecrã.
  • Page 58 realçado.   campos: Sounds   Redimensionar  as  imagens reproduz  s Power  Sa se  desliga Date  &  Tim Permite  a realçado.   entre  os  a Language MODO  WEBCAM alemão  e   Antes  de  l pode  esco MSDC:  Pa suas  fotos estiver  realçado. 4.
  • Page 59 DEFINIÇÕES  DO   A PARELHO campos: Sounds   reproduz  sons. Power  Save   se  desliga  para  poupar  a  bateria.   Date  &  Time   Permite  acertar  a  data  e  a  hora  actuais  para  as  indicar  a  seguir   entre  os  anos,  data  e  hora. Language  ...
  • Page 60 UTILIZAR   A  FUNÇÃO  Wi-­Fi  /  CONTROLO  À  DISTÂNCIA TRAN leitor  de  c 1.  De  acordo  com  o  seu  periférico  iOS/Android,  descarregue  o   computad computador  para  o  seu  periférico  iOS/Android,  caso  este  não   tenha  leitor  de  CD. Usar  o  “M descarregar.
  • Page 61 ÂNCIA TRANSFERIR  FICHEIROS  PARA  UM  COMPUTADOR leitor  de  cartões  e  ligue  o  leitor  de  cartões  ao  seu  computador. regue  o   computador”  no  ambiente  de  trabalho  do  seu  computador.   te  não   DESCARREGAR   A S  SUAS  FOTOS  E  VÍDEOS   Usar  o  “MAGIX  Photo  Manager  10”:  ...
  • Page 62: Características Técnicas

    7.   A  seguir,  siga  as  indicações  apresentadas  no  ecrã  para   terminar  o  carregamento. LIGAR   A  CÂMARA   A  UMA  TELEVISÃO  HDTV 21   2.  Ligue  a  televisão  HDTV  e  regule-­a  para  o  modo  HDMI. navegar  no  seu  aparelho  através  da  sua  televisão.
  • Page 63 SUPORTE  DE  BICICLETA  (Montagem) ara   21             19   22   23     24   desejada.   A parafuse  bem  esta  parte,  de  modo  a  assegurar  uma   ténio,   profundidade. DJA100IM1363_6Sept_V06.indb 63 06/09/2013 5:38 PM...
  • Page 64 SUPORTE  PARA  O  CAPACETE  (Montagem)   2,  avenue 18   seguinte  p Tipo  de  pr 27   25   28   19   26   Suporte  para  o  capacete  com  correia Comissão o  capacete. Suporte  para  o  capacete  sem  correia 1.
  • Page 65: Declaração De Conformidade

    m)   DECLARAÇÃO  DE  CONFORMIDADE 2,  avenue  de  Scandinavie seguinte  produto: Tipo  de  produto:  Move  Cam Comissão  Europeia. 1622   nte,  se   DJA100IM1363_6Sept_V06.indb 65 06/09/2013 5:38 PM...
  • Page 66 MANUTENÇÃO GARANTIA Este  produto  é  abrangido  pela  nossa  garantia  de  dois  anos.   Para  utilizar  a  garantia  ou  o  serviço  pós-­venda,  por  favor,   contacte  o  seu  revendedor  e  apresente  uma  prova  de  compra.   A  nossa  garantia  cobre  defeitos  de  material  ou  de  mão-­de-­obra   NOTA:  Por  favor,  guarde  este  manual  de  instruções,  pois  ...
  • Page 67: Presentazione Dell'apparecchio

    PRESENTAZIONE  DELL’APPARECCHIO Guida  ai  tasti Figura  1:  apparecchio  senza  accessori 1.  Porta  USB 2.  Pulsante  acceso/spento  +  pulsante  di  ripresa 3.  Spia  LED  di  alimentazione 4.   A ltoparlante 5.  Microfono 6.  Pulsante  OK 7.  Pulsante  Su  /  pulsante  Wi-­Fi 8.
  • Page 68: Ricarica Delle Batterie

    RICARICA  DELLE  BATTERIE ACCEN Nota: togliere  la  pellicola  protettiva  dal  display  LCD.   l’apparecc accendon l’uso.  Per   2.  Togliere  il  tappo  in  gomma  che  protegge  la  porta  USB.   Nota: sono  completamente  cariche. 4.  Durante  la  ricarica  è  normale  che  la  videocamera  si  scaldi   leggermente.
  • Page 69: Accensione E Spegnimento Dell'apparecchio

    ACCENSIONE  E  SPEGNIMENTO  DELL’APPARECCHIO l’apparecchio.  Quando  l’apparecchio  è  acceso,  la  spia  LED   accendono,  per  confermare  che  la  videocamera  è  pronta  per   l’uso.  Per  spegnere  l’apparecchio,  tenere  premuto  a  lungo  il   B.   Nota: scaldi   o,   spegnimento  automatico.
  • Page 70: Impostazione Della Lingua

    Nota:  non  estrarre  la  scheda  durante  la  formattazione,   ripresa  e  s formattata,  si  consiglia  di  riformattarla  per  garantirne  il  corretto   Nota:  l’ap funzionamento. Attenzione:  la  formattazione  cancella  tutte  le  foto  e  video   può  variar micro  SD. importanti  sul  computer  prima  di  formattare  la  scheda  di   memoria.
  • Page 71 ripresa  e  salvare  automaticamente  il  video. corretto   Nota:  l’apparecchio  smette  automaticamente  di  riprendere   eo   può  variare  a  seconda  dello  spazio  disponibile  sulla  scheda   micro  SD. di   al  menu  di  impostazione. rtoghese,   seguenti: Movie  Size Più...
  • Page 72 Exposure   SCATTO  DI  FOTO  (modalità  Foto) L’intervallo Scatto  di  foto e  +2,0. Consente compensa   interne,  sf appare  nell’angolo  superiore  sinistro  del  display. Driver    Mo Le  opzion premere  il  pulsante  di  ripresa  (2,  stesso  pulsante  acceso/ la  cattura   3.
  • Page 73 Exposure   L’intervallo  di  regolazione  dell’esposizione  è  compreso  tra  -­2.0   e  +2,0. Consente  di  regolare  manualmente  l’esposizione  per   compensare  condizioni  di  illuminazione  inusuali,  ad  esempio  luci     interne,  sfondi  scuri  oppure  molto  luminosi.     Driver    Mode   Le  opzioni  disponibili  sono:  Off,  2s,  10s.
  • Page 74 Impostazione  della  proiezione  di  diapositive accedere  al  menu  di  impostazione. generali  d 3.  È  possibile  impostare  l’intervallo  tra  le  immagini  (da  1  a  10   seguenti: Sounds   Impostazione  degli  effetti Consente accedere  al  menu  di  impostazione. eventi. Power  Sa Le  opzion 3.
  • Page 75: Impostazione Dell'apparecchio

    IMPOSTAZIONE  DELL’APPARECCHIO generali  dell’apparecchio. 1  a  10   seguenti: Sounds   Consente  di  attivare/disattivare  il  suono  associato  a  determinati   eventi. Power  Save   Le  opzioni  disponibili  sono:  OFF,  1min,  3  min,  5  min. gini:    blu  vivo. l’apparecchio  si  spegne  automaticamente  per  risparmiare   energia.
  • Page 76  due  mo a.  collega visualizzazione  senza  toccare  la  videocamera.  Questa  funzione   b.  togliere lettore  di  s Installazione  dell’applicazione  “Lexibook  Move  Cam” Collegam Move  Cam”. 1.   A  seconda  del  sistema  operativo  del  proprio  dispositivo,   suppleme 2.  L’applicazione  è  anche  disponibile  sul  CD  di  installazione  ...
  • Page 77: Scaricare Le Foto E I Video

    MOTA CARICAMENTO  DI  FILE  SU  UN  COMPUTER one   Per  collegare  la  videocamera  al  computer,  è  possibile  procedere   ,   in  due  modi: a.  collegare  il  cavo  USB  fornito  alla  videocamera  e  al  computer   funzione   b.  togliere  la  scheda  micro  SD  dalla  videocamera,  inserirla  in  un   lettore  di  schede  e  collegare  il  lettore  di  schede  al  computer.
  • Page 78: Specifiche Tecniche

    7.  Segui  poi  le  indicazioni  che  appaiono  sullo  schermo  per   COLLEGAMENTO   D ELLA   V IDEOCAMERA   A   U N   T ELEVISORE   H DTV 21   1.  Collegare  la  videocamera  al  televisore  tramite  un  cavo  HDMI   HDMI.
  • Page 79 SUPPORTO  PER  BICI  (montaggio)   per   RE   H DTV 21   vo  HDMI           o  si     19   mo  del   22   23     24   sorreggano  bene  la  staffa. saldamente  bloccato.
  • Page 80 SUPPORTO  PER  CASCO  (montaggio)   2,  avenue 18   seguente   Tipo  di  pro 27   25   28   19   26   Supporto  per  casco  con  cinghia   3.  È  possibile  impostare  l’angolo  della  videocamera  allentando   la  vite  e  regolando  con  delicatezza  la  parte  mobile  dove  è   che  sorreggano  bene  la  staffa.
  • Page 81: Dichiarazione Di Conformità

    DICHIARAZIONE  DI  CONFORMITÀ 2,  avenue  de  Scandinavie seguente  prodotto: Tipo  di  prodotto:  Move  Cam entando   1622 e  è   Manager  Sviluppo  prodotto o   dicata.   utilizzare   hiuso   DJA100IM1363_6Sept_V06.indb 81 06/09/2013 5:38 PM...
  • Page 82 MANUTENZIONE GARANZIA Questo  prodotto  è  coperto  dalla  nostra  garanzia  di  due  anni. del  servizio  post  vendita,  contattare  il  rivenditore  presentando  la   o  di  fabbrica,  ad  eccezione  di  eventuali  deterioramenti  dovuti   al  mancato  rispetto  delle  istruzioni  contenute  nel  manuale   o  ad  azioni  sconsiderate  cui  è...
  • Page 83: Ihre Neue Kamera

    IHRE  NEUE  KAMERA   Die  Tasten Abbildung  1:  Kamera  ohne  Zubehör   1.  USB-­Anschluss 2.   A n-­/Aus-­Schalter  +   A uslöser   3.  LED-­Stromanzeige 4.  Lautsprecher 6.  OK 8.  Modus 9.  Menu 11.  LCD-­Display 13.  Micro  SD-­Kartenanschluss   14.  HDMI-­Anschluss   Abbildung  2:  Kamera  in  Halterung  ...
  • Page 84: Wiederaufladen Der Batterien

    WIEDERAUFLADEN  DER  BATTERIEN Hinweis:  Vor  der  erstmaligen  Benutzung  der  Kamera  entfernen   anzuscha leuchten  a 1.  Überprüfen  Sie,  dass  die  Kamera  ausgeschaltet  ist.   3.  Verbinden  Sie  das  USB-­Kabel  mit  Ihrer  Kamera  (5   Hinweis: bis  zum  a und  benutzen  nur  die  im  Lieferumfang  enthaltenen  Kabel. Hinweis: einlegen,  ...
  • Page 85: Einlegen Einer Speicherkarte

    AN-­  UND   A USSCHALTEN  DER  KAMERA entfernen   anzuschalten.  Wenn  Sie  die  Kamera  anschalten,  leuchtet   leuchten  auf  und  signalisieren  Betriebsbereitschaft. Hinweis: bis  zum  automatischen   A usschalten  unter  der  Option   EINLEGEN  EINER  SPEICHERKARTE bel. einlegen,  um  die  entsprechenden  Dateien  abspeichern  zu   Einlegen  einer  Speicherkarte: 1.
  • Page 86: Modusauswahl

    Hinweise: beenden  u Achtung:  Die  Formatierung  löscht  alle  schon  auf  der  Karte   gespeicherten  Fotos  und  Videos.  Speichern  Sie  vor  dem   Hinweise Computer.   Verfügung SPRACHEINSTELLUNG Movie  Siz Kameraeinstellungen  zu  gelangen.   Video  Qua MODUSAUSWAHL Diese  Kamera  beinhaltet  3  Modi: des  Video Modus  Foto  –...
  • Page 87 beenden  und  das  Video  automatisch  zu  speichern.   arte   m   Hinweise:  Die  Kamera  stoppt  den   A ufnahmevorgang   Verfügung  stehendem  Speicherplatz  variieren.   Movie  Size Video  Quality des  Videos. Metering Die  folgenden  Optionen  stehen  zur  Verfügung:  Center,  Multi,    ...
  • Page 88 Exposure FOTOAUFNAHMEN  (Fotomodus) Fotoaufnahmen Beleuchtu den  Fotomodus  zu  gelangen.  Das  Fotosymbol    erscheint   Beleuchtu Driver  Mo Die  folgen Burst  Mod Die  folgen auf  der  SD-­Karte  abgespeichert.   Datierung Hinzufüge ANSEH Stellen  sie einliegt.   Ansehen  d Image  Size Abspielsy Image  Quality Super  Fine.
  • Page 89 Exposure Beleuchtungsbedingungen,  zum  Beispiel  eine   scheint   Beleuchtung  im  Hintergrund  auszugleichen.   Driver  Mode Die  folgenden  Optionen  stehen  zur  Verfügung:  Off,  2s,  10s. Burst  Mode Die  folgenden  Optionen  stehen  zur  Verfügung:  Off,  3,  5,  10. Datierung Hinzufügen  des  Datums  zur  Fotoaufnahme:   A n,   A us. ANSEHEN  ...
  • Page 90 gelangen. Einstellung  der  Effekte   Sounds   Die  folgen Power  sav Die  folgen min,  5  min Neuformatierung  der  Bilder   Batterielad Date  &  Tim und  auf  de   Language WEBCAMMODUS MSDC:  Ve Ihre  Fotos gelangen. Computer das  Symb Format alle  Ihre  D 4.
  • Page 91: Einstellen Der Kamera

    EINSTELLEN  DER  KAMERA gelangen. Sounds   Die  folgenden  Optionen  stehen  zur  Verfügung:  Shutter  release   Power  save Die  folgenden  Optionen  stehen  zur  Verfügung:  OFF,  1  min,  3   min,  5  min. Batterieladung  zu  sparen.   Date  &  Time   und  auf  den  Fotos  und  Videos  angezeigt  (siehe  vorhergehende   Language  ...
  • Page 92 Ihre  Fotoaufnahmen  durchsehen  und  herunterladen  und   a.  Verbind b.  Entneh legen  sie   Computer Installation  der   A nwendung  „Lexibook  Move  Cam“ 1.  Verbind Wege  besorgen: Schalten  S Installations-­CD  enthalten.  Sie  müssen  diese  dann  lediglich   ausgestattet  ist.  ...
  • Page 93 NUNG   ÜBERTRAGEN  DER  DATEIEN   A UF  EINEN  COMPUTER   n,   d   a.  Verbinden  Sie  mit  dem  im  Lieferumfang  enthaltenen  USB-­ b.  Entnehmen  Sie  die  Micro  SD-­Karte  aus  der  Kamera  und   legen  sie  in  einen  Kartenleser  ein,  den  Sie  dann  mit  Ihrem   Computer  verbinden.
  • Page 94: Technische Daten

    sich.   um  das  Hochladen  zu  beenden. ANSCHLUSS  DER  KAMERA   A N  EINEN  HDTV-­FERNSEHER 21   2.  Schalten  Sie  den  HDTV-­Fernseher  an  und  stellen  den  HDMI-­   Modus  ein.     TECHNISCHE  DATEN Sie  daran Sensor   Operation  modes Shutter Electronic LCD  screen...
  • Page 95 FAHRRADHALTERUNG    (Zusammenbau)   NSEHER 21             19   22   23     24   Sie  daran,  diese  für  einen  sicheren  Halt  fest  nachzuziehen.   diese  für  einen  sicheren  Halt  fest  nachzuziehen. Achtung: geschlossen  sein  und  verfügt  über  eine  auf  10  Meter  Tiefe   or  H  ...
  • Page 96 HELMHALTERUNG  (Zusammenbau)   2,  avenue 18   27   25   28   19   26   Helmhalterung  mit  Schlaufe übereinsti diese  für  einen  sicheren  Halt  fest  nachzuziehen. diesen  Teil  für  einen  sicheren  Halt  fest  nachzuziehen.   Helmhalterung. 5.  Legen  Sie  die  Schlaufe  um  den  Helm  oder  eine  andere  Stütze   und  ziehen  die  Enden  fest,  bis  sie  fest  angebracht  ist.
  • Page 97: Konformitätserklärung

    KONFORMITÄTSERKLÄRUNG 2,  avenue  de  Scandinavie übereinstimmt. 1622 ere  Stütze   en.    benutzen   efe   DJA100IM1363_6Sept_V06.indb 97 06/09/2013 5:38 PM...
  • Page 98 WARTUNG GEWÄHRLEISTUNG ANMERKUNG: Dieses  Produkt   ist  kein   Spielzeug. Hinweise  zum  Umweltschutz DJA100IM1363_6Sept_V06.indb 98 06/09/2013 5:38 PM...
  • Page 99: Inhoud Van De Verpakking

    VOORSTELLING  VAN  UW  CAMERA Toetsengids Figuur  1:   A pparaat  zonder  toebehoren 1.  USB-­poort 3.  LED-­stroomcontrolelampje 5.  Microfoon 11.  LCD-­scherm 12.  Lens 14.  HDMI-­poort Figuur  2:   A pparaat  zonder  bevestigingssteun 16.  Openingssysteem  voor  bevestigingssteun 18.  Waterdichte  behuizing  tot  10  meter 19.
  • Page 100: De Batterijen Opladen

    DE  BATTERIJEN  OPLADEN Opmerking:   de  beschermfolie  van  het  LCD-­display.   rood  tijdens  het  opladen  van  de  batterijen  en  dooft  eenmaal   Opmerkin deze  volledig  zijn  opgeladen. Opmerking:  Laad  het  apparaat  op  zodra  het  lege  batterij-­ het  opnem Een  gehe deze  uit  d Opmerkin of  recyclen  van  batterijen.
  • Page 101 DE  CAMERA  IN-­/  UITSCHAKELEN maal   Opmerking:  Om  batterijvermogen  te  besparen,  gaat  de   erij-­ EEN  GEHEUGENKAART  INBRENGEN het  opnemen  van  video’s  en  nemen  van  foto’s.   Een  geheugenkaart  inbrengen: deze  uit  de  sleuf  te  ontgrendelen.   Opmerkingen: Een  geheugenkaart  formatteren: DJA100IM1363_6Sept_V06.indb 101 06/09/2013 5:38 PM...
  • Page 102: De Taal Instellen

    Opmerkingen: stoppen  e Opmerkin Opgelet:   formatteert.   DE  TAAL  INSTELLEN instelmen volgende  7  talen:  Frans,  Engels,  Spaans,  Portugees,  Italiaans,   Movie  Siz algemene  instellingen  van  het  apparaat  te  openen. Hoe  hoge de  vloeiba een  video geheugen Video  Qua DE  MODUS  WIJZIGEN geheugen Deze  camera  heeft  drie  modi: Metering...
  • Page 103 stoppen  en  de  video  automatisch  op  te  slaan. Opmerkingen:   instelmenu  te  openen. aliaans,   Movie  Size Hoe  hoger  de  resolutie,  hoe  groter  de  beeldgrootte.  FPS   de  vloeibaarheid  van  de  video.  Hoe  hoger  de  resolutie  van   een  video  en  aldus  het  FPS-­niveau,  hoe  groter  de  vereiste   geheugenruimte.
  • Page 104 FOTO’S  NEMEN  (Fotomodus) Foto’s  nemen achtergron Driver  Mo de  Fotomodus  te  openen.  Het  Fotopictogram     Burst  Mod neemt. Date  Stam te  nemen.   VIDEO’ instelmenu  te  openen. Afspeelmo Image  Size Hoe  groter  het  beeldformaat,  hoe  groter  de  vereiste   geheugenruimte.
  • Page 105 achtergrond  te  compenseren.   Driver  Mode   Burst  Mode   neemt. Date  Stamp   VIDEO’S   &   F OTO’S   B EKIJKEN   E N   B EHEREN   ( Afspeelmodus) Afspeelmodus  te  openen.  Het   A fspeelpictogram   om  af  te  sluiten.
  • Page 106 De  diashow  instellen instelmenu  te  openen. apparaat  t De  effecten  instellen instelmenu  te  openen. Sounds   Power  sav De  grootte  van  de  foto’s  wijzigen   instelmenu  te  openen. van  het  ap Date  &  Tim Deze  optie stellen  om Geluid  aan  een  bestand  toevoegen instelmenu  te  openen.
  • Page 107: Het A Pparaat Instellen

     pictogram   HET   A PPARAAT  INSTELLEN apparaat  te  openen. Sounds   Power  save van  het  apparaat  na  een  bepaalde  periode  van  inactiviteit  in  te   Date  &  Time   Deze  optie  stelt  u  in  staat  om  de  huidige  datum  en  tijd  in  te   stellen  om  deze  vervolgens  op  de  foto’s  en  video’s  aan  te  geven  ...
  • Page 108 Reset   A ll   computer   DE  Wi-­Fi  /  BEDIENING  OP   A FSTAND-­FUNCTIE  GEBRUIKEN 2.  Eenma De  toepassing  “Lexibook  Move  Cam”  installeren en  video’s die  met  het  apparaat  is  meegeleverd.  Breng  de  toepassing   Het  gebru poort  van  ...
  • Page 109 BESTANDEN  NAAR  EEN  COMPUTER  OVERDRAGEN   computer  aansluiten: BRUIKEN 2.  Eenmaal  de  verbinding  tot  stand  is  gebracht,  open  de  map   en  video’s  inventariseert. UW  FOTO’S  DOWNLOADEN sing   Het  gebruik  van  ‘MAGIX  Photo  Manager  10’: poort  van  de  computer  aan. verschijnen.
  • Page 110 DE  CAMERA  OP  EEN  HD  TELEVISIE   A ANSLUITEN 21   1.  Sluit  de  camera  op  een  televisie  aan  met  behulp  van  een   HDMI-­bron  in.     SPECIFICATIONS  TECHNIQUES Sensor   Werkingsmodi Videomodus,  Fotomodus,   A fspeelmodus Sluiter   zijn  vastge blijft  zitten 1.5”...
  • Page 111: Fietsbeugel (Montage)

    FIETSBEUGEL  (Montage)   ITEN 21    een             19   22   23     24   modus zijn  vastgedraaid  zodat  dat  de  beugel  stevig  rond  het  stuur   blijft  zitten. vast. 5.  Om  de  positie  van  de  camera  te  regelen,  draai  de  schroef   dat  de  beugel  stevig  rond  het  stuur  blijft  zitten.
  • Page 112 HELMBEUGEL  (Montage)   2,  avenue 18   volgende   Soort  prod 27   In  overeen 25   28   19   26   Helmbeugel  met  riem   de  Europe vervolgens  voorzichtig  aan  te  passen.  Schroef  vervolgens   helmbeugel. Helmbeugel  zonder  riem 1.
  • Page 113: Verklaring Van Overeenstemming

    VERKLARING  VAN  OVEREENSTEMMING 2,  avenue  de  Scandinavie volgende  product: Soort  product:  Move  Cam In  overeenstemming  is  met  de  volgende  normen: de  Europese  Commissie. 1622 ens   n.  U   DJA100IM1363_6Sept_V06.indb 113 06/09/2013 5:38 PM...
  • Page 114 ONDERHOUD GARANTIE Voor  claims  betreffende  de  garantie  of  nazorg,  neem  contact  op   uitzondering  van  slijtage  als  gevolg  van  het  niet  naleven   OPMERKING:   Dit  product   is  geen   speelgoed. Richtlijnen  voor  milieubescherming aan  de  bescherming  van  ons  milieu  te  leveren  en   dit  apparaat  op  de  voorziene  verzamelplaatsen  ...
  • Page 115 DJA100IM1363_6Sept_V06.indb 115 06/09/2013 5:38 PM...
  • Page 116 DJA100IM1363_6Sept_V06.indb 116 06/09/2013 5:38 PM...

Table des Matières