Publicité
Les langues disponibles
Les langues disponibles
Liens rapides
Publicité
Chapitres
Dépannage

Manuels Connexes pour Eluktronics PRO15SE

Sommaire des Matières pour Eluktronics PRO15SE
-
Page 3: Introduction (English)
Introduction (English) Introducción (Español) This Concise User’s Guide introduces the main features Esta Guía del Usuario Concisa le presenta las caracterís- of your computer. The English version of this guide be- ticas principales de su ordenador. La versión española de gins on page 1. -
Page 4: Table Des Matières
Contents Inhalt About this Concise User Guide ............1 Über das Ausführliche Benutzerhandbuch ........41 System Startup ................... 4 Schnellstart ..................44 RAID Setup ..................6 RAID Setup ..................46 System Map: Front View with LCD Panel Open Systemübersicht: Ansicht von vorne mit geöffnetem LCD-Bildschirm (Models A &... - Page 5 Sommaire Contenidos Acerca de esta Guía del Usuario Concisa ........121 A propos de ce Guide Utilisateur Concis ......... 81 Guía rápida para empezar .............. 124 Guide de démarrage rapide .............. 84 Configuración RAID ..............126 Configuration RAID ................ 86 Mapa del sistema: Vista frontal con panel LCD abierto Carte du système: Vue de face avec l’écran LCD ouvert (Modèles A &...
- Page 6 Sommario Informazioni sulla Guida Rapida per l'Utente ....... 161 Guida di avvio rapido ..............164 Configurazione RAID ..............166 Descrizione del sistema: Vista anteriore con pannello LCD aperto (Modelli A & B) ................168 Indicatori LED ................169 Tastiera & tasti funzione ..............170 Control Center ................
-
Page 7: About This Concise User Guide
About this Concise User Guide This quick guide is a brief introduction to getting your system started. This is a supplement, and not a substitute for the expanded English language User’s Manual in Adobe Acrobat format on the Device Drivers & Utilities + User’s Manual disc supplied with your computer. -
Page 8: Instructions For Care And Operation
Instructions for Care and Opera- • The AC/DC adapter may have either a 2-prong or a 3-prong grounded plug. The third prong is an important safety feature; do tion not defeat its purpose. If you do not have access to a compatible outlet, have a qualified electrician install one. - Page 9 Polymer Battery Precautions Cleaning Note the following information which is specific to poly- • Use a soft clean cloth to clean the computer, but do not apply cleaner directly to the computer. mer batteries only, and where applicable, this overrides •...
-
Page 10: System Startup
System Startup 1. Remove all packing materials. 2. Place the computer on a stable surface. 3. Securely attach any peripherals you want to use with the computer Shut Down (e.g. keyboard and mouse) to their ports. Note that you should always 4. -
Page 11: Model Differences
Model Differences This notebook series includes two different model types that mainly differ as indicated in the table below. Model A Model B Feature Design I Design II Design III Design IV Design V Design I Design II Design III 15.6"... -
Page 12: Raid Setup
RAID Setup Prepare the following before setting up your serial ATA hard disks in RAID mode: You may use your hard disks in combination with Striping (RAID 0), Mirroring (RAID 1) or Recovery for either • The Microsoft Windows OS disc. •... - Page 13 12. Type a name of your choice for your RAID volume and press 21. The RAID volume will then be created and the RAID information <Enter>. will be displayed under Intel(R) Rapid Storage Technology (in the Advanced menu). Figure 4 Figure 2 -Name the RAID Volume (Advanced >...
-
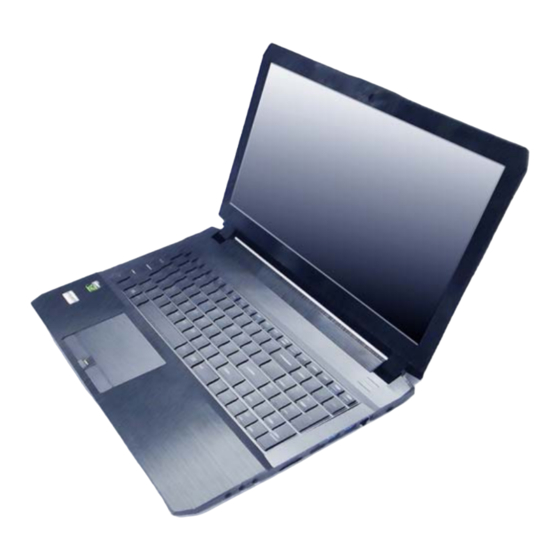
Page 14: System Map: Front View With Lcd Panel Open (Models A & B)
System Map: Front View with LCD Panel Open (Models A & B) Model A Model A Model B Designs IV & V Designs I, II & III 15.6” (39.62cm) 17.3” (43.94cm) 15.6” (39.62cm) Model B Figure 5 - Front View with LCD Panel Open (Models A & B) 1. -
Page 15: Led Indicators
LED Indicators The LED indicators on the computer display helpful infor- *The powered USB 3.0 port (see page 17) may be toggled mation about the current status of the computer. on /off by means of the Fn + Power Button key combina- tion. -
Page 16: Keyboard & Function Keys
Keyboard & Function Keys The keyboard includes a numeric keypad for easy numeric data input. Pressing NumLk turns on/off the numeric key- Function Keys ScrLk & pad. It also features function keys to allow you to change NumLk operational features instantly. The function keys (F1 - F12 etc.) will act as hot keys when pressed while the Fn Numeric key is held down. -
Page 17: Control Center
Control Center Power Modes Power Status The Power Status icon will show You can set a Power Mode by click- Press the Fn + Esc key combination, whether you are currently powered by ing the appropriate icon at the top of or double-click the icon in the no- the battery, or by the AC/DC adapter... - Page 18 Power Conservation Left Windows Key above. The Display Utility allows you to adjust text size on the screen to This system supports Energy Star power management features that place make it easier to view. Click Disable to disable the Windows computers (CPU, hard drive, etc.) into Logo Key on the left side of the key- Display Switch...
-
Page 19: Flexikey® Application
Flexikey® Application Profiles The menus on the left side of the application relate to Pro- The Flexikey® application is a quick hotkey configura- files. You can Add or Delete profiles (you can maintain tion application, which allows you to assign a single key 12 active Profiles), Export and Import profiles from the to launch multiple key combinations, or to launch pro- menus. -
Page 20: Mouse Settings
Keyboard Settings by clicking in the Name box, and click in Tool Tips to type in a note to remind you of the action’s function. The keyboard settings allow you to configure actions for any single key (or a combination of keys). Click the key and then select the Action Type (Express Key, Launch App, Express Text or Disable) from the menu at the bot- tom of the page. - Page 21 Keyboard Settings - Express Key If you want to clear all the settings click Restore to return to the default key setting. To configure a single key to send multiple key combina- 10. Any assigned Express Keys will appear in orange. tions, or to create more useful shortcut keys, use Express Key.
- Page 22 Keyboard Settings - Express Text Keyboard Settings - Disable A single key can be set to send a string of text within any You can use the program to disable any keys not required. application using Express Text. Enable and select the keyboard under your chosen profile, click to select a key to disable, and then click to select Disable in 1.
-
Page 23: System Map: Front, Left & Right Views (Model A )
System Map: Front, Left & Right Views (Model A ) Front USIM Card Ejection Simply press on the Left USIM card to eject it, however do not do this while a connec- tion is in progress. Right If you do eject the card while a 3G/4G con- nection is ongoing, you will need to shut... -
Page 24: System Map: Front, Left & Right Views (Model B)
System Map: Front, Left & Right Views (Model B) Front Left Right Inserting Cards into the Card Reader Note that the cards should be inserted with the readable side of the card facing upwards, as illustrated on the right. Figure 16 - Front, Left &... -
Page 25: System Map: Bottom & Rear Views (Model A)
System Map: Bottom & Rear Views (Model A) Figure 17 - Bottom & Rear Views (Model A) 1. Vent 2. DC-In Jack 3. Combined eSATA/USB 3.0 Port Designs lV & V Designs I & III Designs I & III Rear Design Il Designs IV &... -
Page 26: System Map: Bottom & Rear Views (Model B)
System Map: Bottom & Rear Views (Model B) Overheating To prevent your com- puter from overheating make sure nothing blocks any vent while the computer is in use. Bottom Cover Removal Warning Do not remove any cov- er(s) and/or screw(s) for the purposes of device upgrade as this may vi- olate the terms of your... -
Page 27: Windows 10 Start Menu, Context Menu, Taskbar, Control Panel And Settings
Windows 10 Start Menu, Context Menu, Taskbar, Control Panel and Settings Most of the apps, control panels, utilities and programs within Windows 10 can be accessed from the Start Menu by clicking the icon in the taskbar in the lower left corner of the screen (or by pressing the Windows Logo Key on the key- board). -
Page 28: Windows 8.1 Start Screen, Desktop And Charms Bar
Windows 8.1 Start Screen, Desktop and Charms Bar The Apps, control panels, utilities and programs within Windows 8.1 are accessed from the Start screen and/or Win- dows Desktop app. The Desktop (which runs as an app within the Start screen) can be accessed by clicking the Desk- top item in the Start screen (or by using the Windows Logo Key + D key combination). -
Page 29: Video Features
Video Features The system features both an Intel’s Integrated GPU (for To access the Intel® Iris Graphics Control Panel: power-saving) and an NVIDIA’s discrete GPU (for per- (Windows 8.1 Only) Click the icon (Intel® Iris Graphics Con- trol Panel) on the Apps screen. formance). -
Page 30: Display Devices
Display Devices Power Options Besides the built-in LCD, you can also use an external Flat The Power Options (Hardware and Sound menu) con- Panel Display or TV (connected to the HDMI-Out port/ trol panel icon in Windows allows you to configure power Mini DisplayPort) as your display device. -
Page 31: Audio Features
Audio Features Sound Blaster Audio Sound Blaster Install the application to allow you to You can configure the audio options on your computer configure the audio settings to your requirements for the from the Sound control panel in Windows, or from the best performance in games, music and movies. -
Page 32: Pc Camera
PC Camera Windows 8.1 Run the Camera app from the Start screen by click- When the PC Camera is in use the PC Camera LED will ing on the Camera icon be illuminated (see page The camera interface will display two buttons on the right side of the screen. -
Page 33: Driver Installation
Driver Installation Driver Page# The Device Drivers & Utilities + User’s Manual disc con- Chipset page 28 tains the drivers and utilities necessary for the proper op- Video (VGA) page 28 eration of the computer. Insert the disc and click Install Drivers (button), or Option Drivers (button) to access NVIDIA Video (NVIDIA VGA) page 28... - Page 34 Chipset CardReader 2. (Windows 10)Click Next > Install. (Windows 8.1) Click Next. 1. Click Install Drivers (button). 1. Click 5.Install Cardreader Driver > Yes. 3. Click Finish to restart the com- 2. Click 1.Install Chipset Driver > Yes. 2. Click Finish. puter.
-
Page 35: Wireless Lan Module (Option)
Wireless LAN Module (Option) WLAN Configuration in Windows Make sure the Wireless LAN module is turned on (and not Make sure the Wireless LAN module is turned on (and not in Airplane Mode) before configuration begins. in Airplane Mode). Click the icon in the notification area of the taskbar. -
Page 36: Wireless Display
Wireless Display Wireless Display Configuration Press the + P (or Fn + F7) key combination. Wireless Display (Miracast) uses your Wireless LAN An on-screen menu will pop up. module/WLAN/Bluetooth Combo module (you need to Click Add a wireless display. make sure that your video adapter/display device is com- The system will then search for compatible display devices patible with your particular WLAN/Combo module) in (this may take up to 60 seconds so allow time for this to... -
Page 37: Bluetooth Module (Option)
Bluetooth Module (Option) Bluetooth Configuration in Windows Make sure the Bluetooth module is turned on (and not in Make sure the Bluetooth module is turned on (and not in Airplane Mode) before configuration begins. Airplane Mode). Windows 10 Bluetooth Driver Installation Click the Settings item in the Start Menu and then click Devices. -
Page 38: Intel® Smart Response Technology (Windows 8.1 Only)
Intel® Smart Response Tech- Enabling Intel Smart Response Tech- nology nology (Windows 8.1 Only) Click the icon (Intel® Rapid Storage Technology) on the Intel® Smart Response Technology is an Intel® Rapid Apps screen. Storage Technology (RST) caching feature that acceler- Click Enable acceleration under Performance >... -
Page 39: Intel® Rapid Start Technology (Windows 8.1 Only)
Intel Rapid Start Technology Intel® Rapid Start Technology Config- ® uration (Windows 8.1 Only) Enable/disable Intel(R) Rapid Start Technology from the Intel® Rapid Start Technology can resume power from BIOS. Hibernation within 7 to 9 seconds and can remember your Go the Windows Control panel and double-click computer's previous state with zero power. - Page 40 Intel® Rapid Start Technology Driver Instal- 14. Type “select Volume #” (# is volume of your storage partition so refer to results obtained from "detail disk" for the exact lation volume number). 1. Click Option Drivers (button). 15. The message “Volume # is now the selected volume.” will appear.
-
Page 41: Fingerprint Reader (Option)
(Option) Fingerprint Reader Install the driver and enroll your fingerprints as instructed Figure 25 below before use. The fingerprint reader module uses the Accounts - Sign-in options configuration of the Windows Account. Sign-in op- tions Fingerprint Reader Driver Installation 1. Click Option Drivers (button). 2. -
Page 42: Trusted Platform Module
Trusted Platform Module The TPM Management window allows you to configure the TPM within Windows. As TPM is usually administered within Before setting up the TPM functions you must initialize large enterprises and organizations, your system administrator will need to assist you in managing the information here. the security platform. -
Page 43: Troubleshooting
Troubleshooting Problem Possible Cause - Solution The Wireless LAN/Bluetooth The modules are off as the computer is in Airplane Mode. Check the LED indicator to see if it modules cannot be detected. is in Airplane Mode (see Table 3 on page 9). -
Page 44: Specifications
Specifications 6MB L3 Cache, 22nm, DDR3L-1600MHz, Models A & B - Design II TDP 47W NVIDIA® GeForce GTX 980M Video Adapter Options 4GB GDDR5 Video RAM Intel® Integrated GPU and NVIDIA® Microsoft DirectX®12 Compatible Latest Specification Information Discrete GPU Models A- Designs III &... - Page 45 Storage Keyboard M.2 Slots Slot 1 for Combo WLAN and Bluetooth (Factory Option) Two SATA M.2 2280 SSDs Full-size Winkey Illuminated White-LED Module supporting RAID level 0/1 Keyboard (with numeric keypad) Slot 2 for SATA or PCIe SSD Audio (Factory Option) One PCIe M.2 2280 SSD Slot 3 for SATA SSD High Definition Audio Compliant Interface S/PDIF Digital Output...
- Page 46 Power Embedded 4-Cell Polymer Battery Pack, 60WH Full Range AC/DC Adapter AC Input: 100 - 240V, 50 - 60Hz Model A - Designs I & V DC Output: 19.5V, 7.7A (150W) or 19.5V, 9.23A or 19V, 9.5A (180W) Model A - Design Il and Model B - Designs I &...
-
Page 47: Über Das Ausführliche Benutzerhandbuch
Über das Ausführliche Benutzerhandbuch Diese Kurzanleitung soll einen Überblick über die Schritte geben, die dazu notwendig sind, das System zu starten. Dieses ist nur eine Ergänzung und kein Ersatz für das erweiterte englischsprachige Benutzerhandbuch, das auf der mitgelieferten Disc Device Drivers & Utilities + User's Manual im Adobe-Acrobat-Format vorliegt. Diese Disc enthält auch die Treiber und Utility-Programme, die für einen einwandfreien Betrieb des Computers notwendig sind (Hinweis: Das Unternehmen behält sich das Recht vor, diese Publikation ohne Vorankündigung zu überarbeiten und den Inhalt zu verändern). - Page 48 Hinweise zu Pflege und Betrieb chene Stromversorgung. Wenn Sie sich über Ihre lokalen Stromspezifikationen nicht im klaren sind, wenden Sie sich an Ihren Der Computer ist zwar sehr stabil, kann aber dennoch be- Servicevertreter oder Ihre lokale Stromgellschaft. schädigt werden. Damit es nicht dazu kommt, sollten Sie die •...
- Page 49 Polymer Akku Sicherheitshinweise Reparatur Beachten Sie die folgenden Hinweise, die sich speziell auf Nehmen Sie vor dem Reinigen des Wenn Sie versuchen, den Polymer Akkus beziehen. Diese Hinweise haben zudem Vor- Computer selbst zu reparieren, können Ihre Garantieansprüche rang gegenüber den Allgemeinen Akku Sicherheitshinweisen. verloren gehen.
-
Page 50: Schnellstart
Schnellstart 1. Entfernen Sie das gesamte Verpackungsmaterial. 2. Legen Sie den Computer auf eine stabile Unterlage. Herunterfahren 3. Schließen Sie alle Peripheriegeräte, die Sie mit dem Computer verwenden wollen (z. B. Tastatur und Maus), an die entsprechenden Schnittstellen an. Bitte beachten Sie, daß... - Page 51 Modellunterschiede Diese Notebookserie umfasst zwei verschiedene Modelltypen, die sich hauptsächlich in Folgendem unterscheiden. Modell A Modell B Funktion Design I Design II Design III Design IV Design V Design I Design II Design III 15,6" (39,62cm), 15,6" (39,62cm), 16:9, 16:9, QFHD 15,6"...
-
Page 52: Raid Setup
RAID Setup • Eine Festplatte im primären HDD-Schacht installiert und eine zweite (identisch) Festplatte im sekundären HDD-Schacht Sie können Ihre Festplatten für jede beliebige Fehlertoleranz installiert. oder Leistung in Kombination mit Striping (RAID 0), Mirro- Oder ring (RAID 1) oder Recovery verwenden. Zwei identische SSDs. - Page 53 19. Wenn Sie Recovery (Wiederherstellung) gewählt haben, können 12. Geben für das RAID-Volumen einen beliebigen Namen ein und drücken Sie auf die Eingabetaste. Sie die Synchronization (Synchronisierung) auf “On Request” (Nach Bedarf) oder “Continuous” (Kontinuierlich) einstellen. 13. Wechseln Sie zu RAID Level: und drücken Sie auf die Eingabetaste.
-
Page 54: Systemübersicht: Ansicht Von Vorne Mit Geöffnetem Lcd-Bildschirm (Modelle A & B)
Systemübersicht: Ansicht von vorne mit geöffnetem LCD-Bild- schirm (Modelle A & B) Modell A Modell A Modell B Designs IV & V Designs I, II & III 15,6” (39,62cm) 17,3” (43,94cm) 15,6” (39,62cm) Model B Abb. 5 - Ansicht von vorne mit geöffnetem LCD-Bildschirm (Modelle A & B) 1. -
Page 55: Led-Anzeigen
LED-Anzeigen Die LED-Anzeigen auf dem Computer zeigen wichtige *Der eingeschaltete USB 3.0 Anschluss (siehe Seite Informationen über den aktuellen Status des Computers. kann mit der Tastenkombination Fn + Netzschalter ein- bzw. ausgeschaltet werden. Wenn der eingeschaltete USB Symbol Farbe Beschreibung Anschluss eingeschaltet ist, kann er andere Geräte auch bei ausgeschaltetem System mit Strom versorgen (jedoch nur zum Aufladen, nicht für den Betrieb der Geräte), sofern... -
Page 56: Tastatur & Funktionstasten
Tastatur & Funktionstasten Die Tastatur hat eine eingebettete Nummerntastatur für einfache Zahleneingabe. Durch Drücken auf Num wird die Num & Rollen Funktionstasten Nummerntastatur ein- und ausgeschaltet. Zusätzlich gibt es Funktionstasten, über die Sie direkt zwischen den Funk- tionen umschalten können. Wenn die Funktionstasten (F1 - F12) gleichzeitig mit der Fn-Taste gedrückt werden, funktio- Fn Taste nieren sie wie Hotkeys. -
Page 57: Control Center
Control Center Energiemodi Energiestatus Das Energiestatus-Symbol zeigt an, ob Sie können einen Energiemodus ein- Drücken Sie auf die Tastenkombination die Stromversorgung aktuell über den stellen, indem Sie im Control Center Fn + Esc, oder doppelklicken Sie auf Akku oder über das an das Stromnetz auf das entsprechende Symbol klicken. - Page 58 Strom sparen wird nur im Systemprogramm Menü duls auch vom ausgewählten Ener- Dieses System unterstützt die Energy angezeigt, wenn die Bildschirmauflö- giemodus abhängen. Star-Stromsparfunktionen, die Compu- sung QHD oder höher ist. Das Linke Windows Taste ter (CPU, Festplatte usw.) nach einer Systemprogramm ermöglicht Ihnen die Klicken Sie auf Deaktiviere, um die längeren Zeit der Inaktivität in einen...
-
Page 59: Flexikey® Anwendung
Flexikey® Anwendung Profile Die Menüs auf der linken Seite der Anwendung gelten für “Flexikey®” eine Direkttasten-Konfigurationsan- Profile. Sie können Profile in den Menüs Hinzufügen oder wendung, mit der Sie eine Einzeltaste für das Ausführen Löschen (Sie können 12 aktive Profile speichern), Expor- mehrerer Tastenkombinationen zuweisen können, oder tieren und Importieren. - Page 60 Tastatureinstellungen Infos klicken, um eine Notiz zu tippen, die Sie an die Funk- tion der Aktion erinnert. Die Tastatureinstellungen erlauben die Konfiguration von Aktionen für jede einzelne Taste (oder einer Kombination von Tasten). Klicken Sie auf die Taste und wählen Sie an- schließend Aktionstyp (Express-Taste, APP ausführen, Express-Text oder Deaktivieren) aus dem Menü...
- Page 61 Tastatureinstellungen - Express-Taste 8. Wenn Sie eine einzelne Taste entfernen möchten, klicken Sie zur Auswahl auf die Taste, und klicken Sie auf Löschen. Wenn Sie eine einzelne Taste für das Senden mehrerer 9. Wenn Sie sämtliche Einstellungen löschen möchten, klicken Sie Tastenkombinationen konfigurieren möchten, oder um nütz- auf Wiederherstellen, um zu den Standard Tasteneinstellungen lichere Tastenkürzel zu erstellen, verwenden Sie Express-...
- Page 62 5. Die Taste wird jetzt zum Senden von Textnachrichten im 4. Die Taste wird jetzt zum Öffnen der ausgewählten Anwendung in Ihrem ausgewählten Profil konfiguriert und die Taste in Grün Zielprogramm in Ihrem ausgewählten Profil konfiguriert und die angezeigt. Taste in Blau angezeigt. 5.
-
Page 63: Systemübersicht: Ansicht Von Vorne, Links Und Rechts (Modell A)
(Modell A) Systemübersicht: Ansicht von vorne, links und rechts Vorderseite USIM Kartenauswurf Drücken Sie einfach auf Linke Seite die USIM-Karte, um sie auszuwerfen. Tun Sie dies allerdings nicht, wenn gerade eine Ver- bindung besteht. Rechte Seite Wenn Sie die Karte bei einer bestehenden 3G/ 4G-Verbindung aus-... -
Page 64: Systemübersicht: Ansicht Von Vorne, Links Und Rechts (Modell B)
Systemübersicht: Ansicht von vorne, links und rechts (Modell B) Vorderseite Linke Seite Rechte Seite Karten in den Kartenleser einlegen Beachten Sie, dass die Karten mit der lesbaren Seite der Karte nach oben zeigend wie rechts abgebildet, eingelegt werden muss. Abb. -
Page 65: Systemübersicht: Ansicht Von Unten Und Hinten (Modell A)
Systemübersicht: Ansicht von unten und hinten (Modell A) Abb. 17 Ansicht von unten und hinten (Modell A) 1. Luftungsoffnung 2. DC-Eingangsbuchse 3. Kombinierter eSATA/USB 3.0 Anschluss Designs lV & V Designs I & III Designs I & III Rear Design Il Designs IV &... -
Page 66: Systemübersicht: Ansicht Von Unten Und Hinten (Modell B)
Systemübersicht: Ansicht von unten und hinten (Modell B) Keine Gehäuseteile entfernen oder öffnen Entfernen keine Gehäuseteile und/oder Schrauben, um das Gerät aufzurüsten, ande- renfalls Ihre Garantiean- sprüche verloren gehen. Ist es erforderlich, die Festplatte, den RAM usw. auszuwechseln oder zu entfernen, wenden sich an Ihren Vertrags-... -
Page 67: Start-Menü, Kontextmenü, Taskleiste, Systemsteuerung Und Einstel- Lungen Von Windows 10
Start-Menü, Kontextmenü, Taskleiste, System- steuerung und Einstellungen von Windows 10 Auf die meisten Apps, Control Panels, Utilities und Programme in Windows 10 können Sie über das Start-Menü gelangen. Klicken Sie dazu auf das Symbol in der Taskleiste in der linken unteren Ecke des Bildschirms (oder drücken Sie auf die Windows-Logo-Taste der Tastatur). -
Page 68: Windows 8.1 Start-Bildschirm, Desktop Und Charms-Leiste
Charms-Leiste Windows 8.1 Start-Bildschirm, Desktop und Die Apps, Bedienfenster, Dienstprogramme und andere Software erreichen Sie bei Windows über den Start-Bildschirm und/ oder die Windows Desktop-App. Der Desktop (der im Start-Bildschirm eine App startet) wird geöffnet durch Anklicken des Desktop-Eintrags im Start-Bildschirm (oder durch Drükken der Tastenkombination Windows-Logo-Taste + D). -
Page 69: Grafikfunktionen
Grafikfunktionen So rufen Sie die Steuerung für Intel® Iris-Grafik auf: 1. (Nur Windows 8.1) Klicken Sie auf das Symbol (Steuerung für Dieses System verfügt sowohl über eine integrierte GPU Intel® Iris-Grafik) auf dem Apps-Bildschirm. von Intel (zum Energie sparen) und eine diskrete GPU von Oder NVIDIA (für die Leistung). -
Page 70: Energieoptionen
Anzeigegeräte Energieoptionen Neben dem integrierten LCD-Monitor können Sie auch Die Energieoptionen von Windows ermöglichen Ihnen die einen externen Flachbildschirm oder ein Fernsehgerät (an Konfiguration der Optionen für das Energiemanagement des den HDMI-Ausgangsanschluss/Mini DisplayPort Anschluss Computers. Sie können Strom sparen, indem Sie Ener- angeschlossen) als Anzeigegerät anschließen. -
Page 71: Audiofunktionen
Audiofunktionen Sound Blaster Audio Sound Blaster Mit der Anwendung können Sie die Audio- Die Audioeinstellungen können Sie bei Windows durch An- einstellungen nach Ihren Anforderungen konfigurieren, um klicken des Soundsymbols oder des Realtek HD Audio eine bestmögliche Audioleistung bei Spielen und der Manager-Symbols im Infobereich/in der System- Wiedergabe von Musik und Videos zu erreichen. -
Page 72: Pc-Kamera
PC-Kamera Mit der Tastenkombination Fn + F10 können Sie das PC- Windows 8.1 Kameramodul ein- oder ausschalten. Wenn die PC-Kamera 1. Führen Sie die Kamera-App von dem Start-Bildschirm aus durch Klicken auf das Kamera-Symbol verwendet wird, leuchtet die LED der PC-Kamera (siehe 2. -
Page 73: Installation Der Treiber
Installation der Treiber Treiber Seite# Die Disc Device Drivers & Utilities + User's Manual enthält Chipsatz (Chipset) Seite 68 die Treiber und Hilfsprogramme, die für das einwandfreie Video (VGA) Seite 68 Funktionieren des Computers notwendig sind. Möglicherweise wurden diese bereits vorinstalliert. Ist das nicht der Fall, legen NVIDIA Video (NVIDIA VGA) Seite 68 Sie die Disc ein, und klicken Sie auf Install Drivers oder Op-... -
Page 74: Chipsatz (Chipset)
Chipsatz (Chipset) Kartenleser (Cardreader) Windows 8.1 Klicken Sie auf Next 1. Klicken Sie auf Install Drivers. 1. Klicken Sie auf 5.Install Cardreader 3. Klicken Sie auf Finish, um den 2. Klicken Sie auf 1.Install Chipset Driver > Ja. Computer neu zu starten. Driver >... -
Page 75: Wireless-Lan-Modul (Option)
Wireless-LAN-Modul (Option) WLAN-Konfiguration in Windows Stellen Sie vor der Konfiguration sicher, dass das WLAN- Stellen Sie sicher, dass das WLAN-Modul eingeschaltet ist Modul eingeschaltet ist (Flugzeugmodus deaktiviert). (Flugzeugmodus deaktiviert). 1. Klicken Sie auf das Symbol im Infobereich auf der Installieren des WLAN-Treibers Taskleiste. -
Page 76: Wireless Display
Wireless-Display Wireless-Display-Konfiguration 1. Drücken Sie die Tastenkombination + P (oder Fn + F7). Das Wireless-Display (Miracast) verwendet Ihr Wireless 2. Auf dem Bildschirm erscheint ein Menü. LAN-Modul/WLAN/Bluetooth-Combo-Modul (Sie müs- 3. Klicken Sie auf Drahtlose Anzeige hinzufügen. sen sicherstellen, dass Ihre Grafikkarte/Anzeige-Gerät 4. -
Page 77: Bluetooth-Modul (Option)
Bluetooth-Modul (Option) Bluetooth-Konfiguration in Windows Stellen Sie vor der Konfiguration sicher, dass das Bluetooth- Stellen Sie sicher, dass das Bluetooth-Modul eingeschaltet Modul eingeschaltet ist (Flugzeugmodus deaktiviert). ist (Flugzeugmodus deaktiviert). 1. Windows 10 Installieren des Bluetooth-Treibers Klicken Sie auf den Eintrag Einstellungen im Startmenü und klik- Führen Sie die folgenden Schritte aus: ken Sie dann auf Geräte. -
Page 78: Intel® Smart Response-Technologie (Nur Windows 8.1)
Intel® Smart Response-Techno- Aktivieren der Intel® Smart Response- logie (Nur Windows 8.1) Technologie Die Intel® Smart Response-Technologie ist eine Caching- Funktion der Intel® Rapid Storage-Technologie (RST), mit 1. Klicken Sie auf das Symbol (Intel® Rapid Storage-Technologie) auf dem Apps-Bildschirm. der die Systemleistung des Computers durch die Ver- 2. -
Page 79: Intel® Rapid Start-Technologie
Intel® Rapid Start-Technologie Konfiguration der Intel® Rapid Start- (Nur Windows 8.1) Technologie Die Intel(R) Rapid Start-Technologie aktiviert den Status 1. Aktivieren/deaktivieren Sie die Intel(R) Rapid Start Technology im BIOS. vor einem Ruhezustand ohne Strom innerhalb von 7 bis 9 2. Rufen Sie die Windows-Systemsteuerung auf, und klicken Sie Sekunden wieder. - Page 80 Installieren des Intel® Rapid Start-Technolo- 13. Geben Sie "detail disk" ein. 14. Geben Sie "select Volume #" ein (# ist das Volumen Ihrer gie Treibers Speicherpartition. Entnehmen Sie deshalb die genaue 1. Klicken Sie auf Option Drivers Schaltfläche Volumennummer auf die mit "detail disk" ermittelten 2.
-
Page 81: Fingerabdruckleser (Option)
Fingerabdruckleser (Option) 10. Sie können nun Ihren Fingerabdruck scannen lassen, um sich am Computer anzumelden. Installieren Sie die Treiber und melden Sie Ihre Fingerab- drücke vor dem Benutzen wie unten beschrieben an. Das Fingerabdrucklesemodul verwendet die Anmeldeoption Abb. 25 Konfiguration des Windows Kontos. Konten - Anmeldeop- Installieren des Fingerabdruckleser-... -
Page 82: Tpm (Trusted Platform Module)
TPM (Trusted Platform Module) 4. Im Fenster TPM-Verwaltung können Sie TPM unter Windows verwalten. Da ein TPM normalerweise in großen Unternehmen Bevor Sie die TPM-Funktionen einrichten, müssen Sie die und Organisationen verwaltet wird, benötigen Sie bei der Verwaltung der hiesigen Informationen die Hilfe Ihres Sicherheitsplattform initialisieren. -
Page 83: Fehlerbehebung
Fehlerbehebung Problem Mögliche Ursache - Lösung Die Module Wireless-LAN/Bluetooth Im Flugzeugmodus sind die Module ausgeschaltet. Prüfen Sie der LED-Anzeige , ob können nicht erkannt werden. der Computer im Flugzeugmodus ist (siehe Tabelle 3 auf Seite 49). Mit der Tastenkombination Fn + F11 können Sie den Flugzeugmodus ein- oder ausschalten (siehe Tabelle 4 auf Seite 50). -
Page 84: Technische Daten
Technische Daten i7-4870HQ (2,50GHz), i7-4720HQ Modelle A & B - Design lI (2,60GHz) NVIDIA® GeForce GTX 980M 6MB L3 Cache, 22nm, DDR3L-1600MHz, 4GB GDDR5 Video-RAM On Board TDP 47W Kompatibel mit MS DirectX® 12 Videoadapter-Optionen Aktualität der technischen Daten Integrierte GPU von Intel®... - Page 85 Speichereinheiten Tastatur Kartenleser (Werkseitige Option) Zwei SATA M.2 2280 Mit weißen LED beleuchtete Festes Multi-in-1 Push-Push Kartenleser- SSDs, die RAID Level 0/1 unterstützen WinkeyTastatur in Originalgröße (mit Modul Nummerntastatur) Oder MMC (MultiMedia Card) / RS MMC Audio (Werkseitige Option) Eine PCIe M.2 2280 SD (Secure Digital) / Mini SD / SDHC/ High-Definition-Audio-kompatible Schnittstelle SDXC...
- Page 86 Umgebungsbedingungen Abmessungen und Gewicht Temperatur Modell A - Designs I & III In Betrieb: 5ºC – 35ºC 385 (B) x 271 (T) x 25 (H) mm Bei Aufbewahrung: -20ºC – 60ºC 2,5kg (Barebone mit 60WH -Akku) Relative Luftfeuchtigkeit Modell A - Design II In Betrieb: 20 –...
-
Page 87: A Propos De Ce Guide Utilisateur Concis
A propos de ce Guide Utilisateur Concis Ce guide rapide est une brève introduction à la mise en route de votre système. Il s’agit d’un supplément, et non pas d’une alternative au Manuel de l’Utilisateur en Anglais complet au format Adobe Acrobat sur le disque Device Drivers & Utilities + User's Manual fourni avec votre ordinateur. -
Page 88: Instructions D'entretien Et D'utilisation
Instructions d’entretien et d’utilisation électrique local, consultez notre représentant de service ou la compagnie électrique locale. L’ordinateur est robuste, mais il peut toutefois être endomma- • L’adaptateur AC/DC que vous utilisez, peut être à 2 broches ou à 3 gé. Afin d’éviter ceci, veuillez suivre ces recommandations : broches, comprenant une prise de terre. -
Page 89: Précautions Concernant Les Batteries Polymères
Précautions concernant les batteries polymères Révision Notez les informations suivantes spécifiques aux batteries po- Si vous essayez de réparer l'ordinateur par vous-même, votre lymères, et le cas échéant, celles-ci remplacent les informa- garantie sera annulée et vous risquez de vous exposer et d'ex- tions générales de précaution sur les batteries. -
Page 90: Guide De Démarrage Rapide
Guide de démarrage rapide 1. Enlevez tous les emballages. 2. Posez l’ordinateur sur une surface stable. 3. Connectez fermement les périphériques que vous souhaitez utiliser avec votre ordinateur (par ex. clavier et souris) à leurs ports respectifs. Arrêt 4. Branchez l'adaptateur AC/DC à la prise d'entrée DC à l’arrière de Veuillez noter que vous devriez l’ordinateur, branchez ensuite le cordon secteur à... -
Page 91: Différences De Modèles
Différences de modèles Cette série d’ordinateurs portables inclut deux types de modèles dont les principales différences sont indiquées dans le ta- bleau ci-dessous. Modèle A Modèle B Caractéristique Design I Design II Design III Design IV Design V Design I Design II Design III 15,6"... -
Page 92: Configuration Raid
Configuration RAID Avant de configurer votre disque dur Serial ATA en mode RAID, vous devrez préparer ce qui suit : Vous pouvez utiliser vos disques durs en RAID 0 (Striping), • Le disque de SE Microsoft Windows. RAID 1 (Mirroring) ou Recovery (Récupération) pour amé- •... - Page 93 11. Allez à Name: et appuyez sur Entrée. 18. Si vous avez sélectionné RAID 0 (Stripe) (Bande) alors vous pouvez ajuster la «Strip Size» (Taille de bande) pour qu'elle 12. Tapez un nom de votre choix pour votre volume RAID et appuyez corresponde à...
-
Page 94: Carte Du Système: Vue De Face Avec L'écran Lcd Ouvert (Modèles A & B)
Carte du système: Vue de face avec l’écran LCD ouvert (Modèles A & B) Modèle A Modèle A Modèle B Designs IV & V Designs I, II & III 15,6” (39,62cm) 17,3” (43,94cm) 15,6” (39,62cm) Model B Figure 5 - Vue de face avec l’écran LCD ouvert (Modèles A & B) 1. -
Page 95: Indicateurs Led
Indicateurs LED Les indicateurs LED sur votre ordinateur affichent des infor- *Le port USB 3.0 alimenté (voir la page 97) peut être activé/ mations utiles sur l’état actuel de votre ordinateur. désactivé par le biais de la combinaison de touches Fn + Bouton d’alimentation. -
Page 96: Clavier & Touches Fonction
Clavier & touches fonction Le clavier est doté d'un pavé numérique intégré pour une saisie des données numériques plus facile. Le fait d'appuyer sur Verr Num active ou désactive le pavé numérique. Il est également Verr Num & Touches Fonction doté... -
Page 97: Control Center
Control Center Modes d’alimentation État d'alimentation L'icône État d'alimentation indique si Vous pouvez définir un Mode d’ali- Appuyez sur la combinaison de touches vous êtes actuellement alimenté par la mentation en cliquant sur l'icône appro- Fn + Échap ou double-cliquez sur batterie, ou par l'adaptateur AC/DC priée au dessus du Control Center. - Page 98 Économie d'énergie Touche Windows gauche tra seulement dans le menu Programme Ce système prend en charge les fonc- système si la résolution de votre affi- tionnalités de gestion d’alimentation chage est QHD ou supérieure. L'Utili- Cliquez sur Désactiver pour désactiver Energy Star qui placent les ordinateurs taire d'affichage vous permet de régler la la Touche du logo Windows sur le côté...
-
Page 99: Application Flexikey
Application Flexikey® Profils Les menus sur le côté gauche de l'application portent sur les « Flexikey® » est une application de configuration de Profils. Vous pouvez Ajouter ou Supprimer des Profils touches de raccourci rapide, qui vous permet d'attribuer une (vous pouvez conserver 12 profils actifs), Exporter et Im- touche unique aux combinaisons de plusieurs touches de porter des profils dans les menus. -
Page 100: Paramètres Du Clavier
Paramètres du clavier zone Nom, puis cliquez dans les Info-Bulles pour taper dans une note pour vous rappeler la fonction de l'action. Les paramètres du clavier vous permettent de configurer des actions pour toute touche unique (ou une combinaison de touches). -
Page 101: Paramètres Du Clavier - Lancer App
Paramètres du clavier - Touche Express 7. Cliquez sur Sauvegarder pour enregistrer les paramètres de votre profil choisi. Pour configurer une touche unique pour envoyer plusieurs 8. Si vous voulez retirer une touche individuelle cliquez pour la combinaisons de touches, ou pour créer les touches de rac- sélectionner, puis cliquez sur Supprimer. - Page 102 4. La touche est maintenant configurée pour ouvrir l'application 4. Cliquez sur la touche Envoyer si nécessaire (la touche Envoyer sélectionnée sous votre Profil choisi, et la touche s'affichera en est la touche utilisée dans votre programme cible destinée à vert.
-
Page 103: Carte Du Système: Vues De Face, Gauche Et Droite (Modèle A)
Carte du système: Vues de face, gauche et droite (Modèle A) Face Ejection de la carte USIM Gauche Il suffit d'appuyer sur la carte USIM pour l'éjec- ter, cependant ne faites cela lorsqu'une connexion Droit cours. Si vous éjectez la carte alors qu'une connexion 3G/4G est en cours, vous devrez arrêter le... -
Page 104: Carte Du Système: Vues De Face, Gauche Et Droite (Modèle B)
Carte du système: Vues de face, gauche et droite (Modèle B) Face Gauche Droit Insertion des cartes dans le lecteur de carte Notez que les cartes doivent être insérées avec la face li- sible de la carte vers le haut, comme illustré sur la droite. Figure 16 - Vues de face, gauche et droite (Modèle B) 1. -
Page 105: Carte Du Système: Vues De Dessous Et Arrière (Modèle A)
Carte du système: Vues de dessous et arrière (Modèle A) Figure 17 Vues de dessous et ar- rière (Modèle A) 1. Ventilation 2. Prise d'entrée DC 3. Port combiné eSATA et USB 3.0 Designs lV & V Designs I & III Designs I &... -
Page 106: Carte Du Système: Vues De Dessous Et Arrière (Modèle B)
Carte du système: Vues de dessous et arrière (Modèle B) Surchauffe Afin de ne pas causer une surchauffe de votre ordi- nateur, verifiez que rien ne bouche la (les) ventila- tion(s) quand le systeme est allumé. Avertissement de retrait du capot inférieur Ne pas retirer le(s) ca- pot(s) et/ou la (les) vis... -
Page 107: Menu Démarrer, Menu Contextuel, Barre Des Tâches, Panneau De Con- Figuration Et Paramètres De Windows 10
Menu Démarrer, Menu contextuel, Barre des tâches, Panneau de Configuration et Paramètres de Windows 10 La plupart des applications, panneaux de configuration, utilitaires et programmes dans Windows 10 sont accessibles depuis le Menu Démarrer en cliquant sur l'icône dans la barre des tâches dans le coin inférieur gauche de l'écran (ou en appuyant sur la Touche du logo Windows sur le clavier). -
Page 108: Écran D'accueil, Bureau Et Barre Des Charmes De Windows 8.1
Écran d'accueil, bureau et Barre des charmes de Windows 8.1 Les applications, les panneaux de contrôle, les utilitaires et les programmes dans Windows sont accessibles depuis l'écran d'accueil et/ou l'application Bureau de Windows. Le Bureau (qui fonctionne comme une application dans l'écran d'accueil) est accessible en cliquant sur l'élément Bureau dans l'écran d'accueil (ou en utilisant la combinaison de touches Touche du logo Windows + D). -
Page 109: Caractéristiques Vidéo
Caractéristiques vidéo Le système comporte à la fois un GPU intégré Intel (pour Pour accéder au Panneau de configuration des graphiques l’économie d’énergie) et un GPU discret NVIDIA (pour les Intel® Iris: performances). Vous pouvez changer de périphérique d’affi- 1. (Windows 8.1 seulement) Cliquez sur l’icône (Panneau de configuration des graphiques Intel®... -
Page 110: Périphériques D'affichage
Périphériques d’affichage Options d’alimentation En plus du LCD intégré, vous pouvez aussi utiliser un écran Le panneau de configuration Options d'alimentation de plat externe ou TV (connecté au Mini DisplayPort ou à la Windows vous permet de configurer la gestion d'alimenta- prise de sortie HDMI) comme périphérique d'affichage. -
Page 111: Caractéristiques Audio
Caractéristiques audio Audio Sound Blaster Installez l'application Sound Blaster afin de pouvoir confi- Vous pouvez configurer les options audio sur votre ordinateur gurer les paramètres audio adéquats permettant d’obtenir les à partir du panneau de configuration de Sons dan Windows, meilleures performances de jeux, de musique et de films. -
Page 112: Caméra Pc
Caméra PC Utilisez la combinaison de touches Fn + F10 pour basculer Windows 8.1 l'alimentation sur le module de caméra PC. Quand la caméra 1. Exécutez l'application Caméra à partir de l'écran PC est en cours d'utilisation le indicateur LED de caméra PC d'accueil en cliquant sur l'icône Caméra s'allumera (voir la page... -
Page 113: Installation Du Pilote
Installation du pilote Pilote Page# Le disque Device Drivers & Utilities + User’s Manual Chipset page 108 contient les pilotes et les utilitaires nécessaires pour un bon Vidéo (VGA) page 108 fonctionnement de votre ordinateur. Insérez le disque et cliquez sur Install Drivers (bouton) ou cliquez sur Option NVIDIA Vidéo (NVIDIA VGA) page 108 Drivers (bouton) pour accéder au menu de pilote optionnel. - Page 114 Chipset Lecteur de carte (Cardreader) (Windows 8.1) Cliquez sur Next. 1. Cliquez sur Install Drivers. 1. Cliquez sur 5.Install Cardreader Dri- 3. Cliquez sur Finish pour redémarrer ver > Oui. votre ordinateur. 2. Cliquez sur 1.Install Chipset Driver > Oui. 2.
-
Page 115: Module Lan Sans Fil (Option)
Module LAN sans fil (Option) Configuration WLAN dans Windows Assurez-vous que le module LAN sans fil est activé (et non Assurez-vous que le module LAN sans fil est activé (et non en Mode Avion) avant que la configuration commence. en Mode Avion). Installation du pilote de LAN sans fil 1. -
Page 116: Affichage Sans Fil
Affichage sans fil Configuration de Configuration de l'affi- chage sans fil Affichage sans fil (Miracast) utilise votre module LAN sans fil/module Combo Bluetooth/WLAN (vous devez 1. Appuyez sur la combinaison de touches + P (ou Fn + F7). vous assurer que votre adaptateur vidéo/périphérique d'affi- 2. -
Page 117: Module Bluetooth (Option)
Module Bluetooth (Option) Configuration Bluetooth dans Windows Assurez-vous que le module Bluetooth est activé (et non en Assurez-vous que le module Bluetooth est activé (et non en Mode Avion) avant que la configuration commence. Mode Avion). 1. Windows 10 Installation du pilote de Bluetooth Cliquez sur l'élément Paramètres dans le Menu Démarrer, puis Suivez les instructions ci-dessous: cliquez sur Paramètres. -
Page 118: Technologie Intel® Smart Response (Windows 8.1 Seulement)
Technologie Intel® Smart Activation de la technologie Intel Smart Response Response (Windows 8.1 1. Cliquez sur l’icône (Technologie de stockage Intel® Rapid) seulement) dans l'écran Applications. 2. Cliquez sur Activer l'accélération sous Performance > La technologie Intel® Smart Response (technologie de ré- Technologie de réponse intelligente (Notez que vous aurez ponse intelligente) est une fonctionnalité... -
Page 119: Technologie Intel® Rapid Start (Windows 8.1 Seulement)
Technologie Intel® Rapid Start Configuration de la technologie Intel® Rapid Start (Windows 8.1 seulement) 1. Activer/désactiver Intel(R) Rapid Start Technology dans le La technologie Intel® Rapid Start peut sortir de la veille BIOS. prolongée en moins de 7 à 9 secondes et se souvenir de l'état 2. - Page 120 Installation du pilote de la technologie In- 14. Tapez “select volume #” (# est le volume de votre partition de stockage, aussi référez-vous aux résultats obtenus à partir de « tel® Rapid Start detail disk » pour le numéro du volume exact). 15.
-
Page 121: Lecteur D'empreintes Digitales (Option)
Lecteur d'empreintes digitales 8. Cliquez sur Fermer lorsque vous avez terminé. 9. Vous pouvez choisir d'Ajouter un autre doigt (ce qui est (Option) recommandé) ou de Supprimer la lecture actuelle de l'empreinte. 10. Vous pouvez maintenant scanner votre empreinte pour ouvrir une Installez le pilote et enregistrez vos empreintes digitales session sur l'ordinateur. -
Page 122: Tpm (Trusted Platform Module)
TPM (Trusted Platform Module) 4. La fenêtre de gestion du TPM vous permet de configurer le TPM dans Windows. Comme le TPM est généralement administré au Avant de paramétrer les fonctions TPM vous devez initialiser sein de larges enterprises et organisations, votre administrateur système devra vous assister pour la gestion des données. -
Page 123: Dépannage
Dépannage Problème Cause possible - résolution Les modules LAN sans fil/Bluetooth Les modules sont désactivés quand l'ordinateur est en Mode Avion. Vérifiez l'indicateur LED ne peuvent pas être détectés. pour voir si l'ordinateur est en Mode Avion (voir le Tableau 3 à la page 89). -
Page 124: Spécifications
Spécifications i7-4870HQ (2,50GHz), i7-4720HQ Modèles A & B - Design Il (2,60GHz) NVIDIA® GeForce GTX 980M Cache L3 6Mo, 22nm, DDR3L-1600MHz, RAM Vidéo interne GDDR5 4Go TDP 47W Compatible avec MS DirectX® 12 Dernières informations de Options d'adaptateurs vidéo spécification Modèle A - Designs III &... - Page 125 Stockage de données Clavier Logements M.2 (Option d’usine) Deux SSD M.2 2280 SATA Clavier LED blanc illuminé pleine taille avec Logement 1 pour module combo Bluetooth prenant en charge la configuration RAID pavé numérique et LAN sans fil niveau 0/1 Logement 2 pour lecteur SSD SATA ou PCIe Interface conforme HDA (Son Haute Logement 3 pour lecteur SSD SATA...
- Page 126 Mise en marche Batterie polymère à 4 cellules intégrée, 60WH Adaptateur AC/DC pleine bande Entrée AC: 100-240V, 50-60Hz Modèle A - Designs I & V Sortie DC: 19,5V, 7,7A (150W) ou 19,5V, 9,23A ou 19V, 9,5A (180W) Modèle A - Design ll et Modèle B - Designs l &...
-
Page 127: Acerca De Esta Guía Del Usuario Concisa
Acerca de esta Guía del Usuario Concisa Esta guía rápida es una breve introducción para poner su sistema en funcionamiento. Es un suplemento y no un sustituto del Manual del usuario completo en inglés en formato Adobe Acrobat del disco Device Drivers & Utilities + User's Manual suministrado con el ordenador. -
Page 128: Instrucciones Para El Cuidado Y Funcionamiento
Instrucciones para el cuidado y internacionales, pero puede que necesite una fuente de alimentación continuada. Si no está seguro de las especificaciones de alimentación funcionamiento locales, consulte con el servicio de asistencia o compañía de electricidad del lugar. El ordenador es muy robusto, pero puede dañarse. Para evitar •... - Page 129 Precauciones para baterías de polímero Servicio Tenga en cuenta la información siguiente específica para Si intenta reparar el ordenador usted mismo, podría anular baterías de polímero; además, donde corresponda, invalida la garantía y exponerse usted y el ordenador a descarga la información sobre precauciones para baterías normales.
-
Page 130: Guía Rápida Para Empezar
Guía rápida para empezar 1. Quite todos los materiales del embalaje. 2. Coloque el ordenador en una superficie estable. Apagar 3. Conecte en los puertos correspondientes los periféricos que desee Por favor, tenga en cuenta que utilizar con el ordenador (p. ej. teclado y ratón). debería siempre apagar el or- 4. -
Page 131: Diferencias De Modelos
Diferencias de modelos Esta serie de portátil incluye dos tipos de modelos distintos que principalmente se diferencian según se indica en la siguiente tabla. Modelo A Modelo B Característica Diseño I Diseño II Diseño III Diseño IV Diseño V Diseño I Diseño II Diseño III 15,6"... -
Page 132: Configuración Raid
ación RAID • Un disco duro instalado en la bahía HDD primaria y un Configur segundo (idéntico) disco duro instalado en la bahía HDD Puede utilizar sus discos duros combinando en Tira (RAID 0), secundaria. Espejo (RAID 1) o Recovery (Recuperación) para tolerancia de fallo o rendimiento. - Page 133 21. El volumen RAID será creado y la información RAID aparecerá 13. Vaya a RAID Level: y presione Entrar. bajo Intel(R) Rapid Storage Technology (en el menú 14. Elija el nivel RAID Level requerido (vea la Tabla 2 en la Advanced).
-
Page 134: Mapa Del Sistema: Vista Frontal Con Panel Lcd Abierto (Modelos A & B)
Mapa del sistema: Vista frontal con panel LCD abierto (Modelos A & B) Modelo A Modelo A Modelo B Diseños IV & V Diseños I, II & III 15,6” (39,62cm) 17,3” (43,94cm) 15,6” (39,62cm) Model B Figura 5 - Vista frontal con panel LCD abierto (Modelos A & B) 1. -
Page 135: Indicadores Led
Indicadores LED Los indicadores LED en su ordenador muestran una valiosa El puerto USB 3.0 alimentado (vea la página 137) puede ser información sobre el estado actual del ordenador. activado o desactivado con la combinación de teclas Fn + botón de encendido. Cuando el puerto USB alimentado está Icono Color Descripción... -
Page 136: Teclado & Teclas De Función
Teclado & teclas de función El teclado incluye un teclado numérico (en la parte derecha del teclado) para una entrada fácil de datos numéricos. Al presionar Bloq Num el teclado numérico se habilita o Teclas de función Bloq Num & inhabilita. -
Page 137: Control Center
Control Center Modos de energía Estado de energía El icono Estado de energía mostrará si Puede ajustar el Modo de energía Presione la combinación de teclas Fn + la alimentación actual viene dada por la haciendo clic en el icono apropiado en la Esc o haga doble clic en el icono batería o por el adaptador AC/DC parte superior del Control Center. - Page 138 Ahorro de energía Tecla de Windows izquierda (Programas del sistema) si la resolución Este sistema soporta las características de de su pantalla es QHD o superior. La administración de energía Energy Star Utilidad de pantalla le permite ajustar el Haga clic Deshabilitar para...
-
Page 139: Aplicación Flexikey
Aplicación Flexikey® Perfiles Los menús de la izquierda de la aplicación indican los “Flexikey®” es una aplicación de configuración de teclas Perfiles. Puede Añadir o Eliminar perfiles (puede directas rápidas, que le permite asignar una única tecla para mantener hasta 12 perfiles activos), Exportar o Importar lanzar varias combinaciones de teclas o abrir programas perfiles de los menús. - Page 140 Configuración del teclado haciendo clic en Consejos de herramientas en una nota para recordarle la función de la acción. La configuración del teclado le permite configurar acciones para una única tecla (o una combinación de teclas). Haga clic en la tecla y seleccione el Tipo de acción (Tecla express, Figura 11 Abrir APP, Texto Express o Deshabilitar) en el menú...
- Page 141 Configuración del teclado - Tecla express 8. Si desea quitar una tecla individual haga clic para seleccionarla, y luego haga clic en Eliminar. Para configurar una única tecla para enviar varias 9. Si desea borrar toda la configuración, haga clic en Restaurar para combinaciones de teclas, o para crear más teclas de acceso volver a la configuración de teclas predeterminada.
- Page 142 5. La tecla estará configurada para enviar el mensaje de texto al 5. Si desea quitar una tecla Abrir APP, selecciónela y haga clic en Restaurar. programa destinado bajo el perfil elegido, y la tecla aparecerá en azul. 6. Haga clic en Guardar para guardar la configuración dentro del perfil elegido.
-
Page 143: Mapa Del Sistema: Vistas Frontal, Izquierda Y Derecha (Modelo A)
Mapa del sistema: Vistas frontal, izquierda y derecha (Modelo A) Parte frontal Expulsión de la tarjeta USIM Lateral izquierdo Simplemente presione la tarjeta USIM para expulsarla, pero no lo haga mientras la tarjeta está trabajando. Lateral derecho Si expulsa la tarjeta mientras conexión 3G/4G... -
Page 144: Mapa Del Sistema: Vistas Frontal, Izquierda Y Derecha (Modelo B)
Mapa del sistema: Vistas frontal, izquierda y derecha (Modelo B) Parte frontal Lateral izquierdo Lateral derecho Insertar tarjetas en el lector de tarjetas Tenga en cuenta que las tarjetas deberían insertarse con el lado legible de la tarjeta hacia arriba, como aparece a la derecha. Figura 16 - Vistas frontal, izquierda y derecha (Modelo B) 1. -
Page 145: Mapa Del Sistema: Vistas Inferior Y Posterior (Modelo A)
Mapa del sistema: Vistas inferior posterior (Modelo A) Figura 17 Vistas inferior y posterior (Modelo A) 1. Rejilla 2. Conector de entrada DC 3. Puerto combinado eSATA/USB 3.0 Diseños lV & V Diseños I & III Diseños I & III Rear Diseño Il Diseños IV &... -
Page 146: Mapa Del Sistema: Vistas Inferior Y Posterior (Modelo B)
Mapa del sistema: Vistas inferior posterior (Modelo B) Advertencia sobre quitar la tapa inferior No quite ninguna tapa y/o tornillo para actualizar el dispositivo, pues podría violar los términos de su garantía. Si necesita colocar o quitar el disco duro/SSD/ RAM, etc. -
Page 147: Menú Inicio, Menú Contextual, Barra De Tareas, Panel De Control Y Configuración De Windows 10
Menú Inicio, Menú contextual, Barra de tareas, Panel de Control y Configuración de Windows Se puede acceder a la mayoría de las apps, paneles de control, utilidades y programas en Windows 10 desde el Menú Inicio haciendo clic en el icono de la barra de tareas en la esquina inferior izquierda de la pantalla (o pulsando la Tecla del logotipo de Windows... -
Page 148: Pantalla Inicio, Escritorio Y Barra Charms De Windows 8.1
Pantalla Inicio, escritorio y barra Charms de Windows 8.1 A las apps, paneles de control, utilidades y programas en Windows se accede desde la pantalla Inicio y/o desde la app Escritorio de Windows. Al Escritorio (que se ejecuta como una app dentro de la pantalla Inicio) se puede acceder haciendo clic en Escritorio en la pantalla Inicio (o usando la combinación Tecla del logotipo de Windows + tecla D). -
Page 149: Parámetros De Vídeo
Parámetros de vídeo El sistema incluye una GPU integrada de Intel (para el Para acceder al Panel de control de los gráficos Intel® Iris: ahorro de energía) y una GPU discreta NVIDIA (para 1. (Sólo Windows 8.1) Haga clic en el icono (Panel de control de los gráficos Intel®... -
Page 150: Opciones De Energía
Dispositivos de pantalla Opciones de energía Además del LCD incorporado, también puede utilizar una El panel de control de las opciones de energía (menú pantalla plana o TV (conectado al puerto de salida de HDMI Hardware y sonido) de Windows permite configurar las o al puerto Mini DisplayPort) como dispositivo de pantalla. -
Page 151: Características De Audio
Características de audio Audio Sound Blaster Instale la aplicación Sound Blaster para poder ajustar la Puede configurar las opciones de audio de su ordenador en el configuración de audio según sus necesidades para obtener el panel de control de Sonido , o desde el icono de mejor rendimiento en juegos, música y películas. -
Page 152: Cámara Pc
Cámara PC Utilice la combinación de teclas Fn + F10 para cambiar la Windows 8.1 energía al módulo cámara PC. Cuando la cámara PC esté en 1. Ejecute la app Cámara en la pantalla Inicio haciendo clic en el icono Cámara uso, el indicador LED de cámara PC se iluminará... -
Page 153: Instalación De Controladores
Instalación de controladores Controlador Página # El disco Device Drivers & Utilities + User’s Manual Chipset página 148 contiene los controladores y utilitarios necesarios para Vídeo (VGA) página 148 utilizar el ordenador correctamente. Inserte el disco y haga clic en Install Drivers (botón), u Option Drivers (botón) NVIDIA Vídeo (NVIDIA VGA) página 148 para acceder al menú... - Page 154 Chipset Lector de tarjetas (Cardreader) 3. Haga clic en Finish para reiniciar el sistema. 1. Haga clic en Install Drivers (botón). 1. Haga clic en 5.Install Cardreader 2. Haga clic en 1.Install Chipset Driver Driver > Sí. > Sí. 2. Haga clic en Finalizar. 1.
-
Page 155: Módulo Lan Wireless (Opción)
Módulo LAN Wireless (Opción) Configuración de WLAN en Windows Asegúrese de que el módulo LAN inalámbrica esté encendi- Asegúrese de que el módulo LAN inalámbrica esté do (y no en Modo de avión) antes de comenzar la configura- encendido (y no en Modo de avión). ción. -
Page 156: Pantalla Inalámbrica
Pantalla inalámbrica Configuración de pantalla inalámbrica 1. Pulse la combinación de teclas + P (o Fn + F7). Pantalla inalámbrica (Miracast) utiliza su módulo de 2. Aparecerá un menú en pantalla. LAN inalámbrica de Intel o módulo WLAN/Bluetooth 3. Haga clic en Agregar una pantalla inalámbrica. Combo de Intel (deberá... -
Page 157: Módulo Bluetooth (Opción)
Módulo Bluetooth (Opción) Configuración de Bluetooth en Windows Asegúrese de que el módulo Bluetooth esté encendido (y no Asegúrese de que el módulo Bluetooth esté encendido (y no en Modo de avión) antes de comenzar la configuración. en Modo de avión). 1. -
Page 158: Tecnología Intel® Smart Response (Sólo Windows 8.1)
Tecnología Intel® Smart Habilitar la tecnología Intel® Smart Response (Sólo Windows 8.1) Response 1. Haga clic en el icono (Tecnología de almacenamiento Intel® La tecnología Intel® Smart Response (tecnología de Rapid) en la pantalla Aplicaciones. respuesta inteligente) es una característica de caché de la 2. -
Page 159: Tecnología Intel® Rapid Start (Sólo Windows 8.1)
Tecnología Intel® Rapid Start Configuración de la tecnología Intel® Rapid Start (Sólo Windows 8.1) 1. Habilite/deshabilite Intel(R) Rapid Start Technology en el BIOS. La tecnología Intel® Rapid Start puede reanudar la 2. Vaya al Panel de control de Windows y haga doble clic en alimentación desde el estado de Hibernación de 7 a 9 Herramientas administrativas (Sistema y Seguridad) >... - Page 160 Instalación del controlador tecnología Intel® 13. Escriba “detail disk”. 14. Escriba “select volume #” (# es el volumen de su partición de Rapid Start almacenamiento, consulte los resultados obtenidos en "detail 1. Haga clic en Option Drivers (botón). disk" para el número de volumen exacto). 2.
-
Page 161: Lector De Huellas Digitales (Opción)
Lector de huellas digitales 9. Puede elegir Agregar otro dedo (recomendado) o Quitar la lectura de la huella digital actual. (Opción) 10. Ahora puede escanear su huella digital para iniciar sesión en el ordenador. Instale el controlador y registre sus huellas digitales como se describe a continuación antes de usarlo. -
Page 162: Tpm (Trusted Platform Module)
TPM (Trusted Platform Module) 4. La ventana Administración del TPM le permite configurar el TPM desde Windows. Como la TPM normalmente es administrada en Antes de configurar las funciones del TPM deberá iniciar la empresas y organizaciones grandes, su administrador de sistemas deberá... -
Page 163: Solución De Problemas
Solución de problemas Problema Posible causa - Solución Los módulos WLAN y Bluetooth no pueden Los módulos están apagados cuando el equipo está en Modo de avión. Compruebe el detectarse. indicador LED para ver si el equipo está en Modo de avión (vea la Tabla 3 en la página 129). -
Page 164: Especificaciones
Especificaciones i7-4870HQ (2,50GHz), i7-4720HQ Modelos A & B - Diseño II (2,60GHz) NVIDIA® GeForce GTX 980M Caché de nivel 3 de 6MB, 22nm, DDR3L- 4GB de RAM de vídeo GDDR5 1600MHz, TDP 47W Compatible con DirectX® 12 Información actualizada de Opciones de adaptadores de vídeo Modelo A - Diseños III &... - Page 165 Dispositivos de almacenamiento Dispositivo puntero Lector de tarjetas (Opción de fábrica) Dos SSDs M.2 2280 Touchpad incorporado (funcionalidad de Módulo lector de tarjetas Push-Push multi en SATA con soporte para RAID nivel 0/1 tecla de desplazamiento integrada) Teclado MMC (MultiMedia Card) / RS MMC (Opción de fábrica) Un SSD M.2 2280 PCIe SD (Secure Digital)/Mini SD/SDHC/SDXC Teclado Winkey de tamaño completo...
- Page 166 Especificaciones del ambiente Dimensiones y peso Temperatura Modelo A - Diseños I & III En funcionamiento: 5°C - 35°C 385 (a) x 271 (l) x 25 (h) mm Apagado: -20°C - 60°C 2,5kgs (Barebone con batería de 60WH ) Humedad relativa Modelo A - Diseño II En funcionamiento: 20% - 80% 385 (a) x 271 (l) x 28,8 (h) mm...
-
Page 167: Informazioni Sulla Guida Rapida Per L'utente
Informazioni sulla Guida Rapida per l'Utente Questo manuale rappresenta un’introduzione rapida all’avvio del sistema. Si tratta di un supplemento e non di una sostituzione del Manuale per l'utente completo in lingua inglese nel formato Adobe Acrobat, memorizzato sul disco Device Drivers &... -
Page 168: Istruzioni Per La Custodia E Il Funzionamento
Istruzioni per la custodia e il Se non si è certi delle specifiche elettriche locali, consultare l'assi- stenza tecnica o la società locale di fornitura elettrica. funzionamento • L'adattatore di alimentazione deve avere una spina dotata di messa a terra a due o tre poli. Il terzo polo costituisce un'importante funziona- Il computer è... - Page 169 Precauzioni relative alla batteria ai polimeri Assistenza Le informazioni seguenti sono molto importanti e si Ogni tentativo di riparare da soli il computer può annullare la riferiscono unicamente alle batterie ai polimeri e, ove garanzia ed esporre l'utente a scosse elettriche. Per applicabile, hanno priorità...
-
Page 170: Guida Di Avvio Rapido
Guida di avvio rapido 1. Eliminare tutti i materiali di imballo. 2. Appoggiare il computer su una superficie stabile. 3. Collegare bene le periferiche che si desidera usare con il computer Spegnimento (per esempio tastiera e mouse) alle porte corrispondenti. 4. -
Page 171: Differenze Dei Modelli
Differenze dei modelli Questa serie di notebook comprende due tipi di modelli differenti che variano tra loro principalmente per le caratteristiche indicate nella tabella seguente. Modello A Modello B Funzionalità Design I Design II Design III Design IV Design V Design I Design II Design III... -
Page 172: Configurazione Raid
Configurazione RAID dario. È possibile combinare i dischi rigidi in modalità Striping Due SSD identiche. (RAID 0), Mirroring (RAID 1) o Recovery (Ripristino) per • Il disco Device Drivers & Utilities + User’s Manual. ottenere la protezione di fault tolerance o maggiore prestazioni. - Page 173 13. Passare a RAID Level: e premere Invio. 14. Scegliere il livello RAID richiesto (vedere la Tabella 2 a pagina 166) e premere Invio. Figura 4 Informazioni • RAID 0 (Stripe)/ RAID 1 (Mirror)/ Recovery (Ripristino) RAID (Advanced 15. Passare in uno dei dischi elencati in Select Disks: e selezionare il >...
-
Page 174: Descrizione Del Sistema: Vista Anteriore Con Pannello Lcd Aperto (Modelli A & B)
Descrizione del sistema: Vista anteriore con pannello LCD aperto (Modelli A & B) Modello A Modello A Modello B Design IV & V Design I, II & III 15,6” (39,62cm) 17,3” (43,94cm) 15,6” (39,62cm) Model B Figure 5 - Vista anteriore con pannello LCD aperto (Modelli A & B) 1. -
Page 175: Indicatori Led
Indicatori LED Gli indicatori LED sul computer segnalano importanti *La porta USB 3.0 alimentata (vedere la pagina 177) può informazioni relative allo stato corrente del computer. essere attivata e disattivata con la combinazione di tasti Fn + Pulsante di alimentazione. Quando la porta USB alimentata Icona Colore Descrizione... -
Page 176: Tastiera & Tasti Funzione
Tastiera & tasti funzione La tastiera è dotata di un tastierino numerico (sul lato destro della tastiera) per facilitare l'immissione di dati numerici. Premere Bloc Num per commutare l’attivazione e la Tasti funzione Bloc Num & disattivazione della tastiera numerica. Dispone anche di tasti Bloc Scorr funzione che consentono di cambiare istantaneamente le funzionalità... -
Page 177: Control Center
Control Center Modalità risparmio energia Stato di alimentazione L'icona Stato di alimentazione viene È possibile impostare una Modalità Premere la combinazione di tasti Fn + visualizzata se attualmente il computer è risparmio energia facendo clic Esc oppure fare doppio clic sull'icona alimentatore con la batteria, oppure sull'icona corrispondente nella parte nell'area di notifica della barra... - Page 178 Conservazione dell'energia Utilità di visualizzazione Si noti che lo stato di risparmio energetico di un modulo e la potenza del Touchpad viene influenzato anche dalla Il sistema supporta le funzionalità della L'icona dell'Utilità di visualizzazione Modalità di risparmio energetico gestione energetica Energy Star che apparirà...
-
Page 179: Applicazione Flexikey
Applicazione Flexikey® Profili I menu sul lato sinistro dell'applicazione si riferiscono ai “Flexikey®” è un'applicazione per la configurazione rapida Profili. Potete Aggiungere o Eliminare Profili (potete dei tasti di scelta rapida che vi permette di assegnare un mantenere fino a 12 profili attivi), Esportare e Importare singolo tasto per lanciare combinazione multiple di tasti, profili dai menu. - Page 180 Impostazioni tastiera facendo clic nella casella Nome, e facendo clic nella casella Suggerimenti per digitare un appunto per ricordare la Le impostazioni della tastiera consentono di configurare funzione dell'azione. azioni per ogni singolo tasto (o una combinazione di tasti). Fare clic sul tasto e quindi selezionare il Tipo di azione (Tasto expresso, Lancia APP, Testo expresso, Disattiva) dal menu nella parte inferiore della pagina.
- Page 181 Impostazioni tastiera - Tasto expresso 9. Se si desidera cancellare tutte le impostazioni, fare clic su Ripristina per tornare all'impostazione tasto predefinita e fare clic Per configurare un singolo tasto per inviare più combinazioni su Eliminare. di tasti, o per creare tasti di scelta rapida, usare il tasto 10.
- Page 182 Impostazioni tastiera - Testo expresso 6. Se si desidera rimuovere qualsiasi tasto Testo expresso, selezionarlo e fare clic su Ripristina. Un singolo tasto può essere impostato per l'invio di una Left 7. Fare clic su Salva per salvare le impostazioni nel profilo scelto. stringa di testo all'interno di qualsiasi applicazione che utilizza Testo expresso.
-
Page 183: Descrizione Del Sistema: Vista Anteriore, Sinistra E Destra
Descrizione del sistema: Vista anteriore, sinistra e destra (Modello A) Lato anteriore Espulsione scheda USIM Lato sinistro Premere la scheda USIM per espellerla, tuttavia eseguire questa operazione quando connessione è in corso. Lato destro Se espellete la scheda mentre una connessione 3G/4G è... -
Page 184: Descrizione Del Sistema: Vista Anteriore, Sinistra E Destra
Descrizione del sistema: Vista anteriore, sinistra e destra (Modello B) Lato anteriore Lato sinistro Lato destro Inserimento di schede nel lettore Si noti che le schede devono essere inserite con il lato leggibile della scheda rivolto verso l'alto , come illustrato a destra. Figura 16 - Vista anteriore, sinistra e destra (Modello B) 1. -
Page 185: Descrizione Del Sistema: Vista Inferiore E Posteriore (Modello A)
Descrizione del sistema: Vista inferiore e posteriore (Modello A) Figura 17 Vista inferiore e posterio- re (Modello A) 1. Ventola 2. Jack di ingresso DC 3. Porta eSATA/USB 3.0 combinata Design lV & V Design I & III Design I & III Rear Design Il Design IV &... -
Page 186: Descrizione Del Sistema: Vista Inferiore E Posteriore (Modello B)
Descrizione del sistema: Vista inferiore e posteriore (Modello B) Avviso di rimozione coperchio inferiore rimuovere il/i coperchio/i e/o vite/viti ai fini dell'aggiornamento dispositivo poiché così facendo si possono violare i termini della garanzia. Se avete necessità di sostituire/rimuovere HDD/ SSD/RAM ecc., qualsiasi... -
Page 187: Menu Start, Menu Contestuale, Barra Delle Applicazioni, Pannello Di Controllo E Impostazioni Di Windows 10
Menu Start, Menu contestuale, Barra delle applicazioni, Pannello di controllo e Impostazioni di Windows 10 La maggioranza delle app, pannelli di controllo, utilità e programmi all’interno di Windows sono accessibili dal Menu Start cliccando l’icona nella barra delle applicazioni nell’angolo inferiore sinistro dello schermo (oppure premendo il Tasto logo Windows sulla tastiera). -
Page 188: Charms Bar
Schermata Start, Desktop e di Windows 8.1 Charms Bar Le app, i pannelli di controllo, utilità e programmi dentro Windows sono accessibili dalla schermata Start e/o Windows Desktop app. Il Desktop (che viene eseguito come app all'interno della schermata Start) è accessibile cliccando l'ogget- to del Desktop nella schermata Start (o tramite la combinazione di tasti + D). -
Page 189: Funzioni Video
Funzioni video Il sistema è dotato sia di una GPU integrata Intel (per il Per accedere al Pannello di controllo della Grafica Intel® risparmio energetico) sia di una GPU discreta NVIDIA (per Iris: le prestazioni). È possibile modificare le Impostazioni di 1. -
Page 190: Dispositivi Di Visualizzazione
Dispositivi di visualizzazione Opzioni risparmio energia Oltre allo schermo LCD integrato, è possibile utilizzare un Il pannello di controllo delle Opzioni risparmio energia LCD a schermo piatto o televisore (collegato alla porta uscita (menu Hardware e suoni) di Windows consente la HDMI o alla porta Mini DisplayPort) come periferica di configurazione delle funzioni di risparmio energetico del visualizzazione. -
Page 191: Funzionalità Audio
Funzionalità audio Audio Sound Blaster Installare l'applicazione Sound Blaster per consentire È possibile configurare le opzioni audio del computer dal all'utente di configurare le impostazioni audio in base ai pannello di controllo Audio di Windows, oppure propri requisiti per ottenere le prestazioni migliori in giochi, dall'icona Gestione Audio Realtek HD nell'area di musica e filmati. -
Page 192: Camera Pc
Camera PC Utilizzare la combinazione di tasti Fn + F10 per accendere/ Windows 8.1 spegnere il modulo camera PC. Quando si utilizza la camera 1. Avviare l'app Fotocamera dalla schermata Start scegliendo l'icona Fotocamera PC, l'indicatore LED della camera PC si accenderà (vedere 2. -
Page 193: Installazione Driver
Installazione driver Driver Pagina# Il disco Device Drivers & Utilities + User’s Manual Chipset pagina 188 contiene i driver e le utilità necessari per il corretto Video (VGA) pagina 188 funzionamento del computer. Inserire il disco e fare clic su Install Drivers (pulsante), oppure il pulsante Option NVIDIA Video (NVIDIA VGA) pagina 188... -
Page 194: Chipset
Chipset Lettore di schede (Cardreader) 2. (Windows 10) Fare clic su Next > 1. Fare clic su Install Drivers. 1. Fare clic su 5.Install Cardreader Install. Driver > Sì. (Windows 8.1) Fare clic su Next. 2. Fare clic su 1.Install Chipset Driver >... -
Page 195: Modulo Lan Wireless (Opzione)
Modulo LAN Wireless (Opzione) Configurazione WLAN in Windows Accertarsi che il modulo Wireless LAN sia attivato (e non in Accertarsi che il modulo Wireless LAN sia attivato (e non in Modalità aereo) prima di iniziare la configurazione. Modalità aereo). 1. Fare clic sull'icona nell'area di notifica della barra delle Installazione del driver WLAN applicazioni. - Page 196 Wireless Display Configurazione di Wireless Display 1. Premere la combinazione di tasti + P (o Fn + F7). Wireless Display (Miracast) utilizza il modulo Wireless 2. Viene visualizzato un menu a comparsa. LAN/WLAN/ Bluetooth Combo (occorre accertarsi che 3. Fare clic su Aggiungi uno schermo wireless. scheda video e schermo siano compatibili con il modulo 4.
-
Page 197: Modulo Bluetooth (Opzione)
Modulo Bluetooth (Opzione) Configurazione Bluetooth in Windows Accertarsi che il modulo Bluetooth sia attivato (e non in Mo- Accertarsi che il modulo Bluetooth sia attivato (e non in dalità aereo) prima di iniziare la configurazione. Modalità aereo). 1. Windows 10 Installazione del driver Bluetooth Fare clic sull’elemento Impostazioni nel menu Start, e quindi fare Seguire le seguenti istruzioni:... -
Page 198: Tecnologia Intel® Smart Response (Solo Windows 8.1)
Tecnologia Intel® Smart Attivazione della tecnologia Intel® Smart Response Response (Solo Windows 8.1) 1. Fare clic sull'icona (Tecnologia Intel® Rapid Storage) nella La tecnologia Intel® Smart Response è una funzionalità di schermata della App. cache della tecnologia Intel® Rapid Storage (RST) che 2. -
Page 199: Tecnologia Intel® Rapid Start (Solo Windows 8.1)
Tecnologia Intel® Rapid Start Configurazione della tecnologia Intel® Rapid Start (Solo Windows 8.1) 1. Attivare/disattivare la Intel(R) Rapid Start Technology dal BIOS. La tecnologia Intel® Rapid Start può riprendere 2. Aprire il Pannello di controllo di Windows e fare doppio clic su l'alimentazione a partire dall'Ibernazione entro 7/9 secondi e Strumenti di amministrazione (Sistema e sicurezza) >... - Page 200 Installazione del driver tecnologia Intel® Ra- 13. Digitare “detail disk”. 14. Digitare “select Volume #” (# è il volume della partizione di pid Start archiviazione, pertanto fare riferimento ai risultati ottenuti da 1. Fare clic su Option Drivers. "detail disk" per il numero di volume esatto). 2.
-
Page 201: Lettore D'impronte Digitali (Opzione)
Lettore d’impronte digitali 9. Potete scegliere di Aggiungere un altro dito (consigliato) oppure di Rimuovere la lettura digitale corrente. (Opzione) 10. Adesso effettuate la scansione dell'impronta digitale per accedere al computer. Installare il driver e registrare le proprie impronte seguendo le istruzioni seguenti prima dell'uso. -
Page 202: Tpm (Trusted Platform Module)
TPM (Trusted Platform Module) 4. La finestra di gestione TPM vi consente di configurare il TPM dall'interno di Windows. Dato che in genere il TPM è amministrato Prima di configurare le funzioni TPM è necessario all'interno delle organizzazioni e delle imprese di grandi dimensioni, l'amministratore di sistema dovrà... -
Page 203: Risoluzione Dei Problemi
Risoluzione dei problemi Problema Possibile causa - Soluzione Non è possibile rilevare i moduli I moduli sono disattivati quando il computer si trova nella modalità aereo. Controllare il LED LAN Wireless e Bluetooth. indicatore per vedere se il computer è in modalità aereo (vedere la Tabella 3 a pagina 169). -
Page 204: Specifiche Tecniche
Specifiche tecniche i7-4870HQ (2,50GHz), i7-4720HQ (2,60GHz) Modelli A & B - Design II Cache L3 da 6MB, 22nm, DDR3L- NVIDIA® GeForce GTX 980M 1600MHz, TDP 47W 4GB GDDR5 Video RAM On Board Opzioni di adattatori video Compatibile con MS DirectX® 12 Ultimi aggiornamenti delle GPU integrata Intel®... - Page 205 Periferiche di memorizzazione Periferica di puntamento Lettore di schede (Opzione di fabbrica) Due SSD M.2 2280 Touchpad incorporato (funzionalità tasto di Modulo lettore di schede Push-Push multi- SATA con supporto RAID livelli 0/1 scorrimento integrata) in-1 MMC (MultiMedia Card) / RS MMC Tastiera (Opzione di fabbrica) Un SSD M.2 2280 SD (Secure Digital)/Mini SD/SDHC/SDXC...
- Page 206 Requisiti ambientali Dimensioni fisiche & peso Temperatura Modello A - Design I & III ° ° In esercizio: 5 C - 35 385 (larghezza) x 271 (profondità) x 25 ° ° (altezza) mm Non in esercizio: -20 C - 60 2,5kg (Barebone con batteria 60WH) Umidità...