
Manuels Connexes pour Racer C-11-213030


Sommaire des Matières pour Racer C-11-213030
- Page 1 Notice d’utilisation Instructions for use Instrucciones de uso Régulateur de pH pH regulator Regulador de pH PAPI004174-CASHM - Version 20.02...
-
Page 2: Table Des Matières
SOMMAIRE FRANCAIS 1. SCHEMA D’INSTALLATION ............................3 2. COFFRET ELECTRONIQUE ............................. 4 2.1. Interface ................................4 2.2. Mise en marche et mise à l’arrêt ......................... 4 2.3. Réglage de la consigne pH ............................ 4 2.4. Etalonnage de la sonde pH ........................... 4 2.5. -
Page 3: Schema D'installation
1. SCHEMA D’INSTALLATION Le bidon de correcteur pH doit être suffisamment éloigné de tout appareillage électrique et de tout autre produit chimique. 1 : Coffret électronique 2 : Filtre lesteur 3 : Porte-sonde 4 : Raccord d’injection 5 : Sonde pH 6 : Support 7 : Tuyau semi-rigide ELEMENTS NON FOURNIS :... -
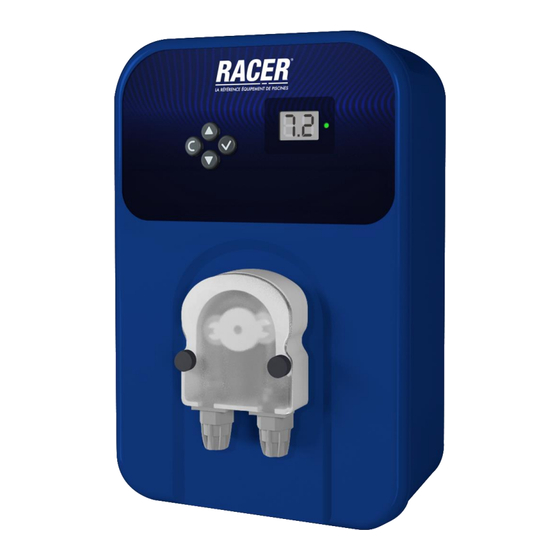
Page 4: Coffret Electronique
2. COFFRET ELECTRONIQUE 2.1. Interface 1 : Touches de commande 8. 8 . 2 : Voyant rouge Si allumé en continu : coffret électronique à l’arrêt. Si clignotant : alarme AL déclenchée. 3 : Ecran Affichage par défaut : mesure du pH. 4 : Voyant vert Si allumé... - Page 5 1) Mettre à l’arrêt la filtration (et donc le coffret électronique). 2) Ouvrir les 2 sachets "Solutions étalon pH 7 et pH 10" (n’utiliser que des solutions étalon à usage unique). 3) Si la sonde est déjà installée : a) Extraire la sonde du porte-sonde, sans la débrancher. b) Retirer l’écrou du porte-sonde et le remplacer par le bouchon fourni.
-
Page 6: Réglage Du Type De Correcteur Ph
2.5. Réglage du type de correcteur pH • Réglage : A[ (acide), bA (basique). • Réglage par défaut : A[. • Pour régler le type de correcteur pH : jusqu’à ce que le message MA clignote. a) Faire un appui long sur jusqu’à... -
Page 7: Réglage Du Volume Du Bassin
2.8. Réglage du volume du bassin • Réglage : par code, suivant les tableaux ci-dessous. Volume du bassin Code Volume du bassin Code Volume du bassin Code de 0 à 1 m de 10 à 15 m de 60 à 70 m de 1 à... -
Page 8: Garantie
3. GARANTIE Avant tout contact avec votre revendeur, merci de bien vouloir vous munir : - de votre facture d’achat. - du n° de série du coffret électronique. - de la date d'installation de l'équipement. - des paramètres de votre piscine (salinité, pH, taux de chlore, température d'eau, taux de stabilisant, volume de la piscine, temps de filtration journalier, etc.). - Page 9 TABLE OF CONTENTS ENGLISH 1. INSTALLATION DIAGRAM ............................. 3 2. ELECTRONICS UNIT ............................... 4 2.1. Interface ................................4 2.2. Switching on and off ............................. 4 2.3. Setting the pH setpoint ............................4 2.4. Calibrating the pH probe ............................4 2.5. Setting the pH corrector type ..........................6 2.6.
-
Page 10: Installation Diagram
1. INSTALLATION DIAGRAM The pH corrector container must be installed a safe distance away from any electrical device or any other chemicals. 1 : Electronics unit 2 : Filter with ballast 3 : Probe holder 4 : Injection connector 5 : pH probe 6 : Bracket 7 : Semi-flexible tubing... -
Page 11: Electronics Unit
2. ELECTRONICS UNIT 2.1. Interface 1 : Control keys 8. 8 2 : Red LED If lit continuously : electronics unit powered off. If flashing : alarm AL activated. 3 : Screen Default display : pH measurement. 4 : Green LED If lit continuously : electronics unit in operation. - Page 12 1) Turn off the filtration (and therefore the electronics unit). 2) Open the 2 sachets of "pH 7 and pH 10 calibration solutions" (use only single-use calibration solutions). 3) If the probe is already installed : a) Remove the probe from the probe holder, without disconnecting it. b) Remove the probe holder nut and replace it with the stopper supplied.
-
Page 13: Setting The Ph Corrector Type
2.5. Setting the pH corrector type • Setting : A[ (acid), bA (basic). • Default setting : A[. • Setting the pH corrector type : a) Press and hold down until the message MA flashes. b) Press x times on until the message (o flashes. -
Page 14: Setting The Pool Volume
2.8. Setting the pool volume • Setting : by code, according to the tables below. Volume of the pool Code Volume of the pool Code Volume of the pool Code from 0 to 1 m from 10 to 15 m from 60 to 70 m from 1 to 2 m from 15 to 20 m... -
Page 15: Guarantee
3. GUARANTEE Before contacting your dealer, please have the following to hand : - your purchase invoice. - the serial no. of the electronics unit. - the installation date of the equipment. - the parameters of your pool (salinity, pH, chlorine levels, water temperature, stabilizer level, pool volume, daily filtration time, etc.) Every effort and all our technical experience has gone into designing this equipment. - Page 16 ÍNDICE ESPAÑOL 1. DIAGRAMA DE INSTALACIÓN ............................3 2. CUADRO ELÉCTRICO ..............................4 2.1. Interfaz ................................. 4 2.2. Puesta en funcionamiento y parada ........................4 2.3. Ajuste del valor de referencia pH ......................... 4 2.4. Calibración de la sonda pH ........................... 4 2.5.
-
Page 17: Diagrama De Instalación
1. DIAGRAMA DE INSTALACIÓN El bidón corrector pH debe estar suficientemente alejado de todos los aparatos eléctricos y los productos químicos. 1 : Cuadro eléctrico 2 : Filtro de lastre 3 : Portasonda 4 : Conexión de inyección 5 : Sonda pH 6 : Soporte 7 : Tubo semi rígido... -
Page 18: Cuadro Eléctrico
2. CUADRO ELÉCTRICO 2.1. Interfaz 1 : Teclas de mando 8. 8 . 2 : Piloto rojo Si encendido fijo : cuadro eléctrico apagado. Si parpadea : alarma AL activada. 3 : Pantalla Visualización por defecto : medición del 4 : Piloto verde Si encendido fijo : cuadro eléctrico en funcionamiento. - Page 19 1) Detener la filtración (y el cuadro eléctrico también). 2) Abrir las 2 bolsas "Solución tampón pH 7 y pH 10" (utilizar únicamente soluciones tampón de un solo uso). 3) Si la sonda ya está instalada : a) Extraer la sonda del portasonda, sin desconectarla. b) Retirar la tuerca del portasonda y sustituirla por el tapón suministrado.
-
Page 20: Ajuste Del Tipo De Corrector Ph
2.5. Ajuste del tipo de corrector pH • Ajuste : A[ (ácido), bA (básico). • Ajuste predeterminado : A[. • Para ajustar el tipo de corrector pH : a) Mantener pulsada la tecla hasta que parpadee el mensaje MA. b) Pulsar x veces en hasta que parpadee el mensaje (o. -
Page 21: Ajuste Del Volumen De La Piscina
2.8. Ajuste del volumen de la piscina • Ajuste : por código, siguiendo las tablas a continuación. Volumen de la piscina Código Volumen de la piscina Código Volumen de la piscina Código de 0 a 1 m³ de 10 a 15 m de 60 a 70 m de 1 a 2 m de 15 a 20 m... -
Page 22: Garantía
3. GARANTÍA Antes de ponerse en contacto con su distribuidor, tenga a mano : - la factura de compra. - el número de serie del cuadro eléctrico. - la fecha de instalación del equipo. - los parámetros de su piscina (salinidad, pH, índice de cloro, temperatura del agua, índice de estabilizante, volumen de la piscina, tiempo de filtrado diario, etc.). - Page 24 Distribué par : Distributed by : Distribuido por : CASH PISCINES 13, Avenue Neil Armstrong 33700 Mérignac France...