Table des Matières
Publicité
Les langues disponibles
Les langues disponibles
Publicité
Chapitres
Table des Matières

Manuels Connexes pour HDC ELSA 201


Sommaire des Matières pour HDC ELSA 201
- Page 1 NOTICE D’UTILISATION INSTRUCTION OF USE MANUALE D’ISTRUZIONE ELSA 201...
-
Page 2: Table Des Matières
Chère cliente, cher client, Nous vous remercions de la confiance que vous nous avez accordée en choisissant notre table de cuisson vitrocéramique à induction. Afin de bien connaître cet appareil, nous vous recommandons de lire attentivement cette notice d’utilisation dans son intégralité et de la conserver pour une consultation ultérieure. SOMMAIRE SECURITE............................. -
Page 3: Securite
SECURITE Précautions avant utilisation en cuisson Retirez toutes les parties de l’emballage. L’installation et le branchement électrique de l’appareil sont à confier à des spécialistes agrées. Le fabricant ne saurait être tenu responsable des dommages résultant d’une erreur d’encastrement ou de raccordement. ... -
Page 4: Précautions Pour Ne Pas Détériorer L'appareil
Précautions pour ne pas détériorer l’appareil Les casseroles à semelles brutes (fonte non émaillée,…) ou abîmées peuvent endommager la vitrocéramique. La présence de sable ou d’autres matériaux abrasifs peut endommager la vitrocéramique. Evitez de faire chuter des objets, mêmes petits, sur la vitrocéramique. ... -
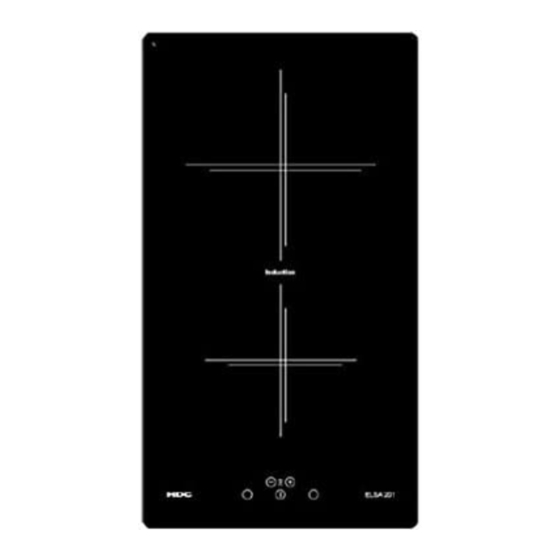
Page 5: Description De L'appareil
Avant 160 mm 1400 W 100 mm ELSA 201 3400 W Arrière 200 mm 1400 W 2000 W 110 mm * la puissance peut varier en fonction des dimensions et des matériaux des casseroles. Bandeau de commande... -
Page 6: Ventilation
Ventilation Le ventilateur de refroidissement a un fonctionnement entièrement automatique. Il se met en route à petite vitesse dès que les calories dégagées par l’électronique dépassent un certain seuil. La ventilation enclenche sa seconde vitesse lorsque la table de cuisson est utilisée intensivement. -
Page 7: Detection De Recipient
Détection de récipient La détection de récipient assure une sécurité parfaite. L’induction ne fonctionne pas : Lorsqu’il n’y a pas de récipient sur la zone de cuisson ou lorsque ce récipient est inadapté à l’induction. Dans ce cas il est impossible d’augmenter la puissance et dans l’afficheur le symbole [ U ] apparaît. -
Page 8: Verrouillage Du Bandeau De Commande
Arrêter la fonction minuterie cuisson : Action Bandeau de commande Afficheur Sélectionner appuyer sur la touche sélection de la zone le voyant de la zone s’allume Sélectionner « Minuterie » appuyer simultanément temps restant sur [ - ] et [ + ] Désactiver «... -
Page 9: Conseils De Cuisson
Déverrouillage : Action Bandeau de commande Afficheur Mise en route appuyer sur [ 2 x [ L ] Dans les 5 secondes après la mise en route : Déverrouiller la table appuyer simultanément 2 x [ L ] sur [ - ] et la touche sélection de la zone avant ré-appuyer [ - ] les afficheurs sont éteints... -
Page 10: Dimension Des Casseroles
Dimension des casseroles Les zones de cuisson s’adaptent automatiquement à la dimension du fond de la casserole jusqu’à une certaine limite. Le fond de cette casserole doit cependant avoir un diamètre minimum en fonction du diamètre de la zone de cuisson correspondante. Afin d’obtenir le rendement maximum de votre table de cuisson, veuillez placer la casserole bien au centre de la zone de cuisson. -
Page 11: Que Faire En Cas De Probleme
QUE FAIRE EN CAS DE PROBLEME Le symbole [ E 4 ] s’affiche : I) La table doit être reconfigurée suivant la procédure ci-dessous : Avant de commencer la procédure, il faut : S’assurer qu’il n’y ait pas de récipients sur la table à induction. ... -
Page 12: Protection De L'environnement
Le symbole [ E ] s’affiche : d’ébranchez et rebranchez la table de cuisson appelez le Service Après-ventes L’une des zones ou l’ensemble du plan de cuisson se déclenche : le déclenchement de sécurité a fonctionné celui-ci s’actionne dans le cas ou vous avez oublié de couper une des zones de chauffe ... -
Page 13: Instructions D'installation
La découpe du plan de travail sera suivant le modèle de table de : Appareil Découpe ELSA 201 280 x 490 mm La distance entre la table de cuisson et le mur doit être au minimum de 50mm. -
Page 14: Connexion Electrique
CONNEXION ELECTRIQUE L’installation de cet appareil et son branchement au réseau électrique ne doit être confiés qu’à un électricien parfaitement au fait des prescriptions normatives. La protection contre les pièces sous tension doit être assurée après le montage. ... - Page 15 Dear customer, Thank you for having chosen our induction ceramic hob. In order to make the best use of your appliance, we would advise you to read carefully the following notes and to keep them for a later consulting. SUMMARY SAFETY............................
-
Page 16: Safety
SAFETY Precautions before using Unpack all the materials. The installation and connecting of the appliance have to be done by approved specialists. The manufacturer can not be responsible for damage caused by building-in or connecting errors. To be used, the appliance must be well-equipped and installed in a kitchen unit and an adapted and approved work surface. -
Page 17: Precautions Not To Damage The Appliance
Precautions not to damage the appliance Raw pan bottoms or damaged saucepans (not enamelled cast iron pots,) may damage the ceramic glass. Sand or other abrasive materials may damage ceramic glass. Avoid dropping objects, even little ones, on the vitroceramic. ... -
Page 18: Description Of The Appliance
Power heating zone Power* detection Front 160 mm 1400 W 100 mm ELSA 201 3400 W Rear 200 mm 1400 W 2000 W 110 mm * The given power may change according to the dimensions and material of the pan... -
Page 19: Starting-Up And Appliance Management
STARTING-UP AND APPLIANCE MANAGEMENT Before the first use Clean your hob with a damp cloth, and then dry the surface thoroughly. Do not use detergent which risks causing blue-tinted colour on the glass surface. Induction principle An induction coil is located under each heating zone. When it is engaged, it produces a variable electromagnetic field which produces inductive currents in the ferromagnetic bottom plate of the pan. -
Page 20: Residual Heat Indication
Residual heat indication After the switch off of a heating zone or the complete stop of the hob, the heating zones are still hot and indicates [ H ] on the display. The symbol [ H ] disappears when the heating zones may be touched without danger. As far as the residual heat indicators are on light, don’t touch the heating zones and don’t put any heat sensitive object on them. -
Page 21: Control Panel Locking
Control panel locking To avoid modifying a setting of cooking zones, in particular with within the framework of cleaning the control panel can be locked (with exception to the On/Off key [ Locking: Action Control panel Display Start Press key [ [ 0 ] or [ H ] Hob locking Press simultaneously [ - ] and... -
Page 22: Cooking Advices
COOKING ADVICES Pan quality Adapted materials: steel, enamelled steel, cast iron, ferromagnetic stainless-steel, aluminium with ferromagnetic bottom. Not adapted materials: aluminium and stainless-steel without ferromagnetic bottom, cupper, brass, glass, ceramic, porcelain. The manufacturers specify if their products are compatible induction. To check if pans are compatibles: ... -
Page 23: Examples Of Cooking Power Setting
Examples of cooking power setting (the values below are indicative) 1 to 2 Melting Sauces, butter, chocolate, gelatine Reheating Dishes prepared beforehand 2 to 3 Simmering Rice, pudding, sugar syrup Defrosting Dried vegetables, fish, frozen products 3 to 4 Steam Vegetables, fish, meat 4 to 5 Water... -
Page 24: Environment Preservation
4) Wait until [ E ] symbols stop blinking. 5) After few seconds, [ E ] are automatically transformed in [ C ]. The existing setup has been cancelled. III) Second step: new setup 1) Take a ferromagnetical pot with a minimum diameter of 16 cm 2) Select a cooking zone by pushing on the corresponding [ O ] key 3) Place the pot on the area to be set 4) Wait until the [ C ] display becomes a [ - ]. -
Page 25: Installation Instructions
The cut out sizes are: Reference Cut-size ELSA 201 280 x 490 mm Ensure that there is a distance of 50 mm between the hob and the wall or sides. The hobs are classified as “Y” class for heat protection. Ideally the hob should be installed with plenty of space on either side. -
Page 26: Electrical Connection
ELECTRICAL CONNECTION The installation of this appliance and the connection to the electrical network should be entrusted only to an electrician perfectly to the fact of the normative regulations and which respects them scrupulously. Protection against the parts under tension must be ensured after the building-in. ... - Page 27 Gentile Cliente, Grazie per avere scelto nostro il nostro piano di cottura a induzione. Per ottenere il meglio dal Suo piano cottura, La preghiamo di leggere con attenzione le presenti istruzioni, e di conservarle per un’eventuale consultazione futura. INDICE SICUREZZA ..........................28 ..................
-
Page 28: Sicurezza
SICUREZZA Precauzioni prima del primo utilizzo Sballare eliminando tutti i materiali di imballo. L’installazione e connessione dell’apparecchio devono essere effettuate da personale specializzato. Il Fabbricante declina ogni responsabilità civile e penale per danni causati da installazione e/o connessione non realizzate a regola d’arte. ... -
Page 29: Precauzioni In Caso Di Malfunzionamento Dell'apparecchio
Precauzioni onde non danneggiare l’apparecchio Pentole con fondo graffiato o danneggiato (non di ghisa smaltata) possono danneggiare il vetro ceramico. Sabbia o altre sostanze abrasive possono danneggiare il vetro ceramico. Evitare di far cadere oggetti, anche piccoli, sul vetro ceramico. ... -
Page 30: Descrizione Dell'apparecchio
Anteriore 160 mm 1400 W 100 mm ELSA 201 3400 W Posteriore 200 mm 1400 W 2000 W 110 mm * La Potenza dichiarata può cambiare a seconda delle dimensioni e del material della pentola. Pannello di controllo... -
Page 31: Ventilazione
Ventilazione Il sistema di raffreddamento è completamente automatico. La ventola entra in funzione a basso regime di rotazione quando il calore interno raggiunge un determinate livello. La ventilazione arriva ad elevati regimi di rotazione se l’apparecchio è utilizzato intensivamente. La ventola rallenta e si spegne automaticamente quando la temperatura interna del circuito elettronico scende sotto il livello prestabilito. -
Page 32: Identificazione Della Pentola
Identificazione della pentola L’identificazione della pentola assicura la totale sicurezza. L’induzione non funziona: Se non c’è pentola sulla piastra, o se la pentola non è adatta all’induzione. In questo caso è impossibile aumentare la Potenza è il display mostra [ U ]. Questo simbolo scompare quando si posiziona una pentola adatta sulla piastra. -
Page 33: Blocco Del Pannello Di Controllo
Arresto automatico alla fine del tempo di cottura Quando viene raggiunto il tempo impostato per la cottura, il display del timer lampeggia su [ 00 ], viene prodotto un segnale acustico e la piastra si spegne. Per arrestare il segnale acustico è sufficiente premere un tasto. -
Page 34: Suggerimenti Di Cottura
SUGGERIMENTI DI COTTURA Qualità delle pentole Materiali adatti : acciaio, acciaio smaltato, ghisa, acciaio inox ferromagnetico, alluminio con fondo ferromagnetico. Materiali non adatti: alluminio e acciaio inox con fondo non ferromagnetico, rame, ottone, vetro, ceramica, porcellana. Il fabbricante degli utensili specifica se essi sono compatibili con piani di cottura a induzione. Per verificare se gli utensili (pentole) sono compatibili: ... -
Page 35: Esempi Di Regolazione Della Potenza
Esempi di regolazione della potenza (I valori sotto sono indicativi) Da 1 a 2 Sciogliere Salse, burro, cioccolata, gelatine Riscaldare Piatti preparati in precedenza Da 2 a 3 Cuocere a fuoco lento Riso, budini, sciroppi di zucchero Scongelare Verdure liofilizzate, pesce, prodotti congelati Da 3 a 4 Vapore... -
Page 36: Cosa Fare In Caso Di Problemi
COSA FARE IN CASO DI PROBLEMI Appare il simbolo [ E 4 ] : I) L’apparecchio deve essere configurato secondo la procedura seguente: Ogni pentola o utensile deve essere rimossa dall’apparecchio. Scollegare l’apparecchio dalla rete elettrica rimuovendo il fusibile o staccando la spina. ... -
Page 37: Protezione Dell'ambiente
Una delle piastre viene disattivata È entrato in funzione il sistema di sicurezza. Si è dimenticato di disattivare la piastra per un certo periodo. Uno o più tasti a sfioramento sono coperti da qualcosa. La pentola è vuota e il fondo si è surriscaldato. ... -
Page 38: Istruzioni Di Installazione
Inserimento – installazione Le misure di incasso sono: Tipo Foro incasso ELSA 201 280 x 490 mm Assicurarsi che ci sia una distanza di almeno 50 mm tra l’apparecchio e il muro o le pareti o paratie laterali. -
Page 39: Connessione Elettrica
CONNESSIONE ELETTRICA L’installazione di questo apparecchio e la connessione alla rete elettrica devono essere affidate esclusivamente a personale qualificato e autorizzato, nel rispetto della normativa in vigore. Dopo l’installazione, una adeguata protezione delle parti sotto tensione deve essere garantita. - Page 40 15746/0...