Publicité

Les langues disponibles
  • FR

Les langues disponibles

Liens rapides

MML30G – DOUBLE-LINED 2 x 16 GREEN LED MESSAGE BOARD
1. Introduction & Features
To all residents of the European Union
Important environmental information about this product
This symbol on the device or the package indicates that disposal of the device after its lifecycle could harm
the environment.
Do not dispose of the unit (or batteries) as unsorted municipal waste; it should be taken to a specialised
company for recycling.
This device should be returned to your distributor or to a local recycling service.
Respect the local environmental rules.
If in doubt, contact your local waste disposal authorities.
Thank you for buying the MML30G! Please read the manual thoroughly before bringing this device into service. If the
device was damaged in transit, don't install or use it and contact your dealer. Features include:
• Colours and font sizes
• Visual text effects and graphics
• Dependable and durable
• Large memory and message storage
• Schedule display function
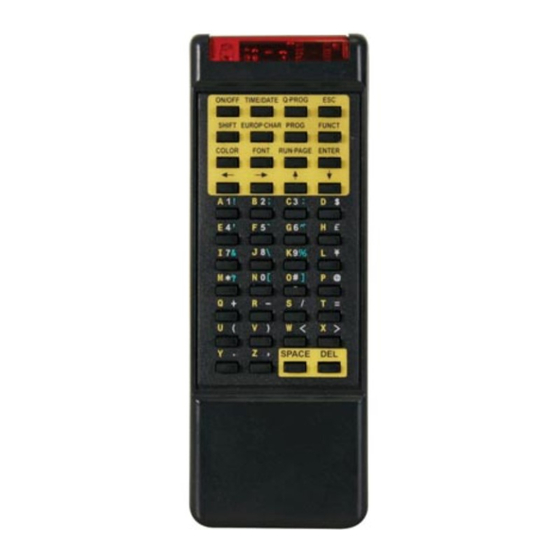
2. Remote Control
1. Command keys
2. Character keys
• Upper case keys (A – Z)
• Lower case keys (a – z)
• Numeric keys (0 – 9)
• Symbols (! ; ...)
• European (Ă)
3. Getting started by Remote Control
• Press [ON/OFF]
• Press [TIME/DATE] to display the time and date message only. Press [ESC] to cancel time/date display function.
Programming a simple message.
Step
Key to press
1.
[Q-PROG]
2.
[A1]
[H][E][L][L][O]
3.
[SPACE]
4.
[ENTER]
• Repeat step 1 to 4 to edit line [B2].
MML30G
Description
Stop the sign and wait for message input
Press [1] or [2] to select the line number
Key in [HELLO] using the character keys
Tip: If you key in a wrong character, press [DEL] to
delete the last character
Run the message
- 1 -
Fig. 1
Display
[HELLO]
[HELLO HELLO]
VELLEMAN

Publicité

Table des Matières
loading

Sommaire des Matières pour Velleman MML30G

  • Page 1 If in doubt, contact your local waste disposal authorities. Thank you for buying the MML30G! Please read the manual thoroughly before bringing this device into service. If the device was damaged in transit, don't install or use it and contact your dealer. Features include: •...
  • Page 2 Link display pre-loaded message Step Key to press Description Display Stop the sign and wait page data [STOP MODE] [RUN-PAGE] [A] [B] [E] Display page A, B, E [PG:A, B, E] [ENTER] Run your message MML30G - 2 - VELLEMAN...
  • Page 3: Advanced Features

    2. To cancel, press [ESC] and wait 3 seconds. The display will return to normal message display. Running combined pages using [RUN-PAGE] This feature allows you to link up to 26 pages as one long message. Program your messages before setting this feature. MML30G - 3 - VELLEMAN...
  • Page 4: Pc System Requirements

    The USB RS232 converter can convert a USB1.1 interface to an RS232 serial interface. Installing the Drivers The enclosed CD-ROM contains the converter port drivers. The drivers are located at \usb driver\WIN on the CD- ROM. MML30G - 4 - VELLEMAN...
  • Page 5: Software Installation

    • Identify the COM port on the back of your computer. Connect the 9-pin connector to this port. If the 9-pin connector is not connected to the correct port, computer communication to your sign will not work. MML30G - 5 -...
  • Page 6 Display Effect how the text will display Display Time how long the message will display Speed control the leading and closing speed Closing how the text will disappear Special insert the TIME, DATE and BEEP MML30G - 6 - VELLEMAN...
  • Page 7: Functions

    Schedule Table Delete all delete all the messages 7.6. Software Configuration • Go to “File”, “SetComm”. • Select the COM port. • Click on “OK” when your settings are complete. MML30G - 7 - VELLEMAN...
  • Page 8: Sending A Message

    Current selected colour Graphic Data Function Save save the current graphic displayed in the Graphic Window Delete delete a graphic from the Graphic Library Insert insert the current graphic from the Graphic Window into your message MML30G - 8 - VELLEMAN...
  • Page 9 • Under “Manufacturers”, search for “Generic” and click on “Next”. If prompted “A driver is already installed to this printer”, select “Keep existing driver” and click “Next”. • Select the COM port on the RSC the display will connected to and click on “Next”. MML30G - 9 - VELLEMAN...
  • Page 10 • Start the software and create your message. • Click on for “Send via Network”. Enter the “Sign ID Number” and “Page Number” and click “OK”. • Select the Display Printer Driver from the “Printer Name” box and click “OK”. MML30G - 10 - VELLEMAN...
  • Page 11 An 8-pixel display block moves from right to left Random Random pixels appear to build the image Pen Writing Hello World Pen Writing Welcome L = Leading effect (how the message will appear) T = Closing effect (how the message will disappear) MML30G - 11 - VELLEMAN...
  • Page 12 Clear the display by schedule and reset the system. • The software is not communicating with the sign. Refer to sections “Setup” and “Sending a Message”. Do not extend the 9-pin connection cable with another cable. MML30G - 12 - VELLEMAN...
  • Page 13: Technical Specifications

    You will need to purchase a USB SERIAL ADAPTER, a device that will convert one of your available USB ports into a working COM port. However, Velleman do not guarantee that this device will work with all laptops due to other devices installed by the user and varying manufacturers’...
  • Page 14 OPMERKING: De bovenkastmode is de standaard mode wanneer u een bericht programmeert. Wanneer u de [SHIFT]–toets indrukt, bent u niet langer in de bovenkastmode. Volg stap 3 tot 6 om tussen de verschillende modes te schakelen. 7. Druk [ENTER] om het bericht weer te geven. MML30G - 14 - VELLEMAN...
  • Page 15 6. Druk opnieuw op [FONT] om de verschillende lettergroottes weer te geven en kies de lettergrootte. De lettergrootte blijft actief tot u een andere lettergrootte kiest. 7. Druk [ENTER] om het bericht weer te geven. OPMERKING: Raadpleeg de tabel met de kleuren en lettergroottes in “Kort overzicht”. MML30G - 15 - VELLEMAN...
  • Page 16 4. Druk [ENTER] om uw boodschap weer te geven. Het systeem resetten met [FUNCT] 1. Druk [FUNCT] om u in de set-up te begeven. 2. Druk [↓] om alles te wissen. Er verschijnt [Clear all Y]. Druk [ENTER] om te bevestigen. MML30G - 16 - VELLEMAN...
  • Page 17 • Druk op “Finish” om de installatie van de USB drivers te beëindigen. USB RS232 convertor seriële interface Nadat u de driver hebt geïnstalleerd, klik op “Start/Settings/Control Panel/System/Device Manage”. Er verschijnt een USB-poort als COM-poort in de Device Manager. MML30G - 17 - VELLEMAN...
  • Page 18: De Software Installeren

    • Koppel de 9-pin aansluiting aan de toegewezen poort van uw computer. De communicatie naar het bord werkt niet wanneer de 9-pin aansluiting niet in de juiste poort zit. 7.5. Het scherm Knoppenbalk Menubalk Berichtenvenster Aantal karakters MML30G - 18 - VELLEMAN...
  • Page 19 Display Effect weergave van de boodschap Display Time hoe lang de boodschap zal verschijnen Speed snelheden van in- en uitvoegeffecten Closing hoe de boodschap verdwijnt Special geef TIME (uur), DATE (datum) en BEEP (pieptoon) in European MML30G - 19 - VELLEMAN...
  • Page 20: Functions

    • Klik op “OK” om de boodschap naar het bord te zenden. Probeer opnieuw als de lichtkrant de boodschap niet heeft gekregen. 7.8. BMP Graphic Editor Gebruik dit venster om grafische boodschappen te ontwerpen. Om dit venster te openen, klik op “Bmp Graphics” in de Menubalk en klik vervolgens op “Edit Graphics”. MML30G - 20 - VELLEMAN...
  • Page 21 Het geselecteerde gebied wordt rond. Verplaats dit stuk door de linker muisknop op de gewenste plaats ingedrukt te houden. Laat de muisknop los. Klik met de rechter muisknop om vast te zetten. Polygon Pointer Tool: Zie Pointer Tool. MML30G - 21 - VELLEMAN...
  • Page 22 • Selecteer de printer die u zojuist hebt aangemaakt. Ga naar “File” en klik op “Properties”. • Klik op de tab “Details” en klik vervolgens op “Port Settings”. • Zorg dat de instellingen als volgt zijn ingegeven. Klik op “OK” wanneer u klaar bent. Aantal baud Stel in als volgt MML30G - 22 - VELLEMAN...
  • Page 23: Kort Overzicht

    É Ê È Ë Ñ Ï Î Ì Í ó ô ò ö õ ø Ñ Þ Ö Ó Ò Ô Õ Ø ú ù û ü Þ ÿ ŷ Ú Ü Û Ù Ÿ Ŷ MML30G - 23 - VELLEMAN...
  • Page 24 T = Uitvoegeffect (hoe de boodschap van de lichtkrant verdwijnt) Weergave-effect normaal knipperen Beweegsnelheid snel medium 1 medium 2 traag Duur van de pieptoon kort medium 1 medium 2 lang Tijd van weergave 0.5s ~ 25s Formaat datum DD/MM/JJ Formaat tijd uu/mm MML30G - 24 - VELLEMAN...
  • Page 25: Probleemoplossing

    U heeft een SERIELE ADAPTER nodig om de beschikbare USB- poorten om te zetten naar werkende COM poorten. Velleman garandeert de werking van dit toestel op uw laptop niet omwille van andere toepassingen door de gebruiker geïnstalleerd en verschillende randapparatuur. Neem contact op met de fabrikant van de laptop indien u vragen heeft over de installatie.
  • Page 26: Mml30G - Journal Lumineux Led 2 X 16 A Double Ligne

    MML30G – JOURNAL LUMINEUX LED 2 x 16 A DOUBLE LIGNE 1. Introduction & caractéristiques Aux résidents de l'Union Européenne Des informations environnementales importantes concernant ce produit Ce symbole sur l'appareil ou l'emballage indique que, si l'appareil est jeté après sa vie, il peut nuire à...
  • Page 27: La Programmation De Différents Caractères

    Arrêtez le message et attendez les données de la [RUN-PAGE] [STOP MODE] page Affichage de la page A [PG:A] [ENTER] Affichage du message REMARQUE: Il y 26 pages (de A à Z) dans lesquelles il est possible de mémoriser des messages. MML30G - 27 - VELLEMAN...
  • Page 28: Plus De Caractéristiques

    7. Répétez, après avoir confirmé à l’aide de la touche [ENTER], les étapes 5 et 6 pour programmer les effets de fermeture. La mention [*] apparaît. 8. Enfoncez une touche de A à Z pour entrer la page. Enfoncez [ENTER] pour confirmer. MML30G - 28 - VELLEMAN...
  • Page 29: Exigences Du Système

    7. Enfoncez [ESC] pour revenir à l’écran normal. 7. Le logiciel 7.1. Exigences du système • Système d’exploitation: Win98/WinME/WinNT/Win2000/WinXP • CPU: Pentium 166 ou plus • RAM: 32 MB ou plus • Moniteur: VGA ou plus • Sortie sérielle: port RS232 MML30G - 29 - VELLEMAN...
  • Page 30: Le Convertisseur Usb Rs232

    • Identifiez le port COM situé à l’arrière de votre ordinateur. Insérez la fiche à 9 broches dans celui-ci. Si la fiche à 9 broches n’est pas connectée au port correct, la communication de l’ordinateur vers votre journal lumineux sera impossible. MML30G - 30 - VELLEMAN...
  • Page 31 Display Effect affichage du texte Display Time temps d’affichage du texte Speed vitesse d’ouverture et de fermeture du texte Closing fermeture du texte Special instauration de TIME (heure), DATE (date) et BEEP (bip sonore) MML30G - 31 - VELLEMAN...
  • Page 32: Configuration Du Logiciel

    ‘’Schedule Table’’ (la Table des Programmations) Delete all effacez tous les messages 7.6. Configuration du logiciel • Dirigez-vous vers “File”, “SetComm”. • Sélectionnez le port COM. • Cliquez sur “OK” après avoir instauré la configuration. MML30G - 32 - VELLEMAN...
  • Page 33: Envoi D'un Message

    Sélection des Fonctions des Données Graphiques Save sauvegardez le graphique actuellement affiché dans la Fenêtre Graphique Delete effacez un graphique dans la Bibliothèque Graphique Insert insérez le graphique actuellement affiché dans la Fenêtre Graphique dans votre message MML30G - 33 - VELLEMAN...
  • Page 34: La Communication Par Rle

    • Localisez “Generic” sous “Manufacturers” et cliquez sur “Next”. Si le message “A driver is already installed to this printer” s’affiche, sélectionnez “Keep existing driver” et cliquez “Next”. • Sélectionnez le port COM sur le RSC auquel le journal lumineux sera relié et cliquez “Next”. MML30G - 34 - VELLEMAN...
  • Page 35 RLE (“Send via Network”). Entrez “Sign ID Number” (numéro d’ID du journal) et “Page Number” (la page) et cliquez sur “OK”. • Sélectionnez le pilote d’imprimante du journal dans le champ “Printer Name” et cliquez sur “OK”. MML30G - 35 - VELLEMAN...
  • Page 36 Une case de 8 pixels défile de droite à gauche Random Des pixels arbitraires forment l’image Pen Writing Hello World Pen Writing Welcome L = Effet d’ouverture (apparition du message) T = Effet de fermeture (disparition du message) MML30G - 36 - VELLEMAN...
  • Page 37: Solutions Aux Problèmes

    Effacez la programmation et remettez le système à zéro. • Le logiciel ne communique pas avec le journal lumineux. Consultez “La configuration” et “Envoi d’un message”. Ne rallongez pas le câble à 9 broches à l’aide d’un autre câble. MML30G - 37 - VELLEMAN...
  • Page 38: Spécifications Techniques

    USB (consultez la notice de votre ordinateur). Il suffit de vous procurer un ADAPTATEUR SERIEL USB, un appareil permettant le transcodage d’un port USB en port COM. Notez que Velleman ne garantit pas le fonctionnement de cet appareil sur votre ordinateur portable dû à l’installation d’appareillage périphérique par l’utilisateur ou le matériel varié...
  • Page 39 CONSEJO: Para volver a los caracteres normales, mantenga pulsado la tecla [EUROP-CHAR]. Pulse una tecla para visualizar el carácter en tipo normal. Repita los pasos 2 y 3 si quiere visualizar un carácter en el tipo europeo. 4. Pulse [ENTER] para visualizar el mensaje. MML30G - 39 - VELLEMAN...
  • Page 40: Características Importantes

    3. Pulse [→] para seleccionar la página A. Es posible seleccionar hasta 26 páginas (de A a Z). 4. Pulse [↑] [↓] para programar la página. [PAG: A] se visualiza. 5. Pulse [ENTER] para editar la página. 6. Pulse [A1] para seleccionar la línea. 7. Introduzca una palabra. Pulse [ENTER]. MML30G - 40 - VELLEMAN...
  • Page 41 2. Pulse [↓] [↓] [↓] para entrar en la función. 3. Pulse [→] para seleccione el campo de claridad. 4. Ajuste la claridad con [↑] [↓]. 5. Pulse [ENTER] para confirmar. Pulse [ESC] para volver a la pantalla normal. MML30G - 41 - VELLEMAN...
  • Page 42: Exigencias Del Sistema

    Introduzca el CD en el lector. El CD se ejecutará automáticamente y la pantalla de bienvenida aparecerá. Haga clic en “Install” para instalar el software, haga clic en “Read Me” para ver las exigencias del sistema y haga clic en “Exit” para salirse del procedimiento de instalación. MML30G - 42 - VELLEMAN...
  • Page 43 Envíe el mensaje por RLE. La Barra de Menú File (Fichero) abra una nueva pantalla Open abra un fichero existente Save guarde el fichero actualmente abierto Set Comm configurar los ajustes de comunicación Exit sálgase del software MML30G - 43 - VELLEMAN...
  • Page 44: Funciones

    Run Page visualización de una página especifica Links Pages to Run conectar varias páginas, p.ej. introduzca A, B y C para visualizar las páginas A, B y C Set ID seleccionar el ID del mensaje rodante MML30G - 44 - VELLEMAN...
  • Page 45 Zoom in/out Selección de los Colores Selección de las Funciones de Datos Gráficos Seleccione una Pantalla Gráfica al hacer clic en uno de las imágenes de la lista “Select Graphic”. Puede guardar máx. 16 páginas gráficas. MML30G - 45 - VELLEMAN...
  • Page 46 Función ‘clear’Borrar: Haga clic en el botón para borrar la composición Gráfica entera. Función Fichero BMP: Haga clic en el botón para exportar e importar un fichero BMP. Zoom IN/OUT Haga un zoom de 1 a 8, 1 de pequeño a grande. MML30G - 46 - VELLEMAN...
  • Page 47 • Haga clic en el tab “Sharing” y haga clic en “Shared As”. En la pantalla “Share Name”, introduzca el “Printer Name” (nombre de la impresora) utilizada antes. Introduzca una contraseña si quiere. • La configuración del driver impresora de RSC está terminada. MML30G - 47 - VELLEMAN...
  • Page 48 Ö Ó Ò Ô Õ Ø ú ù û ü Þ ÿ ŷ Ú Ü Û Ù Ÿ Ŷ Lista de efectos especiales Después de haber escrito el texto, seleccione un efecto de entrada y salida. MML30G - 48 - VELLEMAN...
  • Page 49 1 medio 2 lento Duración del bip sonoro corto medio 1 medio 2 largo Duración de la visualización 0.5s ~ 25s Formato de visualización de la fecha JJ/MM/AA Formato de visualización de la hora hh/mm MML30G - 49 - VELLEMAN...
  • Page 50: Solución De Problemas

    USB (consulte el manual del usuario de su ordenador). Necesita un ADAPTADOR SERIE USB, un aparato que permite convertir un puerto USB en un puerto COM. No olvide que Velleman no garantiza el funcionamiento de este aparato con su ordenador portátil por la instalación de otras aplicaciones y aparatos periféricos por el usuario.
  • Page 51 Falls Zweifel bestehen, wenden Sie sich für Entsorgungsrichtlinien an Ihre örtliche Behörde. Danke für den Kauf der MML30G! Bitte lesen Sie vor Inbetriebnahme diese Bedienungsanleitung sorgfältig durch. Überprüfen Sie, ob Transportschäden vorliegen. Sollte dies der Fall sein, verwenden Sie das Gerät nicht und wenden Sie sich an Ihren Händler.
  • Page 52 Darstellung einer vorprogrammierten Mitteilung oder einer graphischen Seite. Beispiel: Eine vorprogrammierte Mitteilung auf Seite A. Schritt Taste Erklärung Schirm [RUN-PAGE] die Mitteilung unterbrechen, warten auf die Seitendaten [STOP MODE] Wiedergabe der Seite A [PG:A] [ENTER] Wiedergabe einer Mitteilung MML30G - 52 - VELLEMAN...
  • Page 53 3. Drücken Sie [→] um den Programmiermodus zu öffnen. 4. Drücken Sie [↑] um den Zeitpunkt einzuführen. Sie können bis zu 5 Mitteilungen programmieren auf den Seiten A bis E. Drücken Sie [ENTER] zum Bestätigen. MML30G - 53 - VELLEMAN...
  • Page 54 4. Geben Sie die Jahreszahl mit [↑] [↓] ein. Drücken Sie [ENTER] zum Bestätigen. 5. Drücken Sie [↓] um auf Monat umzuschalten. 6. Wiederholen Sie Schritt 3, 4 und 5 geben Sie Monat, Tag, Stunde und Minute ein. 7. Drücken Sie [ESC] um zum normalen Schirm zurückzukehren. MML30G - 54 - VELLEMAN...
  • Page 55: Systemanforderungen

    Installation des Virtual COM Port Driver in Windows XP. • Legen Sie die CD-ROM in das Laufwerk ein. Schließen Sie den Host-Computer an die MML30G mittels des USB- Kabels an. • Windows öffnet ein “Found New Hardware Wizard” Fenster. Drücken Sie “Next >” um weiter zu gehen.
  • Page 56 Sendet eine Mitteilung aus dem Mitteilungsfenster an die Laufschrift. Sendet die Mitteilung über LAN. Die Menüleiste File (Datei) öffnet ein neues Fenster Open öffnet eine bestehende Datei Save speichert die aktuelle Datei Set Comm das Konfigurieren der Kommunikationseinstellungen Exit das Programm verlassen MML30G - 56 - VELLEMAN...
  • Page 57 Sie verschiedene Seiten, z.B. tippen Sie in A, B en C um Seiten A, B und C zu zeigen. Set ID Einstellen der ID der Laufschrift Set Clock Einstellung Datum/Zeit Set Brightness Einstellung der Helligkeit der Mitteilung in 4 Niveaus MML30G - 57 - VELLEMAN...
  • Page 58 Funktionen Graphisches Layout Tastenleiste Bibliothek Ein- und Auszoomen Farbauswahl Funktion grapische Daten Wählen Sie ein graphisches Fenster, indem Sie auf irgendeine Abbildung in der Liste “Select Graphic” klicken. Sie können max. 16 graphische Seiten speichern. MML30G - 58 - VELLEMAN...
  • Page 59 Clear Function: Klicken Sie hier mit der linken Maustaste um das "graphische Layout' zu löschen. Bmp File Function: Klicken Sie hier mit der linken Maustaste um BMP-Dateien zu exportieren und zu importieren. Ein- und Auszoomen Wählen Sie Zoom von 1 bis 8, von klein nach groß. MML30G - 59 - VELLEMAN...
  • Page 60 • Klicken Sie “Next”. Wählen Sie “Network Printer” und klicken Sie “Next”. • Wählen Sie dann “No” um ab “MS DOS based programs” zu drucken. Klicken Sie “Browse”. • Doppelklicken Sie den Namen des RSC im Netzwerk und selektieren Sie den “Display Printer Driver”. MML30G - 60 - VELLEMAN...
  • Page 61 L, T Scroll Left Mitteilung scrollt von rechts nach links L, T Scroll Right Mitteilung scrollt von links nach rechts L, T V Open Mitteilung erscheint in der Mitte und geht nach den zwei oberen Ecken. MML30G - 61 - VELLEMAN...
  • Page 62 Mitteilung programmiert ist, Wenn Sie eine Mitteilung auf einer Seite programmieren, wird die Demomitteilung nicht mehr erscheinen. • Wieviel Text kann ich pro Mitteilung eingeben? Sie können bis zu 250 Zeichen pro Seite eingeben. Es gibt 26 Seiten und 16 graphische Seiten. MML30G - 62 - VELLEMAN...
  • Page 63: Technische Daten

    Manche neuen Laptops haben keine COM-Ports und unterstützen nur USB-Geräte (siehe Bedienungsanleitung des Laptops). Sie brauchen einen seriellen Adapter um die verfügbaren USB-Ports in funktionierende COM-Ports umzuwandeln. Velleman kann das Funktionieren der Laufschrift mit Ihrem Laptop-Computer nicht gewährleisten wegen anderer, vom Anwender installierter Applikationen und verschiedener Zusatzgeräte. Wenden Sie sich an den Hersteller Ihres Laptops wenn Sie Fragen über die Installation haben.

Table des Matières