Publicité

Les langues disponibles

Les langues disponibles

Liens rapides

6x
Safe
Comby 4 in 1
Manuale d'uso
User manual
Bedienungsanleitung
Manuel d'utilisation
IT
EN
DE
FR
10898

Publicité

Table des Matières
loading

Sommaire des Matières pour J BIMBI Comby 4 in 1

  • Page 1 Safe Comby 4 in 1 Manuale d’uso User manual Bedienungsanleitung Manuel d’utilisation 10898...
  • Page 3 FULL SIZE COMPACT LARGE COMPACT...
  • Page 4: Avvertenze Di Sicurezza

    13. Pinze 7. Cavo di alimentazione Grazie per aver scelto un prodotto J BIMBI®. Lo sterilizzatore elettrico a vapore Comby 4 in 1 è uno strumento pratico e compatto per la sterilizzazione di biberon e accessori. La sterilizzazione a vapore è...
  • Page 5 sterilizzazione potrebbe risentirne. Nel caso si verifichi uno scollegamento involontario durante il ciclo di sterilizzazione, togliere l’acqua rimanente, riempire nuovamente il serbatoio con la quantità di acqua fredda consigliata e ricollegare la spina alla presa elettrica. Una volta collegata, si avvierà automaticamente un nuovo ciclo e si accenderà...
  • Page 6 spegneranno automaticamente. · Per evitare il rischio di scottature, lasciare raffreddare lo sterilizzatore per almeno 2 minuti. · Dopo 2 minuti di raffreddamento, lo sterilizzatore sarà comunque ancora caldo. Tutte le sue parti devono essere maneggiate con attenzione per evitare scottature. ·...
  • Page 7: Assistenza Clienti

    · Posizionare il tiralatte e le altre parti del tiralatte sulla griglia superiore (2). · I passaggi successivi sono identici al processo di sterilizzazione dei biberon (vedi sezione “STERILIZZAZIONE DEI BIBERON”). STERILIZZARE CON IL MICROONDE Trasformare lo sterilizzatore elettrico in uno sterilizzatore per microonde è semplice grazie ai compo- nenti aggiuntivi “griglia centrale”...
  • Page 8: Risoluzione Dei Problemi

    RISOLUZIONE DEI PROBLEMI Lo sterilizzatore non si accende Verificare che la spina sia inserita correttamente. Il biberon presenta delle macchie dopo il ciclo di sterilizzazione Lo sterilizzatore deve essere pulito dal calcare. Fare riferimento alla sezione “DECALCIFICAZIONE DELLO STERILIZZATORE” di questo manuale. L’indicatore luminoso di funzionamento si accende una volta collegato lo sterilizzatore alla presa elet- trica L’interruttore di questo dispositivo è...
  • Page 9: Parts Description

    The modular design of the Comby 4 in 1 allows it to be used in various ways according to the needs: at home or while traveling, for feeding bottles, breast pumps or small items such as pacifiers.
  • Page 10 with the recommended amount of cold water and connect the power plug to the wall socket again. A new cycle should restart automatically with the indicator light turned on once the power cord is connected to the socket. · Use of any extension cords is not recommended as if may cause fire, electric shock or injury. ·...
  • Page 11 STERILIZING FEEDING BOTTLES Refer to the diagrams on page 3 · Before sterilizing, disassemble all parts of the bottle and wash them with mild soapy water and rinse. · Measure exactly 200 ml of water with the measuring cup or a feeding bottle (a) and then pour the water in the sterilizer base (b).
  • Page 12 USE OF THE STERILIZER IN THE MICROWAVE OVEN It is easy to convert your electric steam sterilizer to a microwave steam sterilizer by using the additional components: “Central Rack” (9) and “Microwave Base” (10) provided in the package. The microwave sterilizer is good for sterilizing 4 sets of the most common feeding bottle sizes.
  • Page 13: Technical Specifications

    TROUBLESHOOTING Sterilizer not working at all Check that the power plug is connected to the supply line. [UK only] Check fuse in the plug if there is any. Bottle with marks after sterilizing The sterilizer needs de-scaling. Refer to the “DESCALING YOUR STERILIZER” section. The power indicator turned on once connected to the supply line The switch of this unit is designed for a “switch on”...
  • Page 14: Sicherheitshinweise

    13. Zange 7. Netzkabels Vielen Dank, dass Sie sich für ein Produkt von J BIMBI entschieden haben. Der elektrische Dampfsterilisator Comby 4-in-1 ist ein praktisches und kompaktes Gerät zum Sterilisieren von Fläschchen und Zubehör. Die Dampfsterilisation ist natürlich, schnell und sicher und wird vor allem in den ersten Lebensmonaten für die Sicherheit der Kinder empfohlen.
  • Page 15 · Wartungsarbeiten dürfen NUR von einem autorisierten Service-Center durchgeführt werden. · Ziehen Sie den Sterilisator während des Sterilisierungszyklus NICHT heraus, da die Qualität des Sterilisationsprozesses beeinträchtigt werden kann. Wenn die Stromversorgung während des Sterilisationszyklus unterbrochen wird, das restliche Wasser entnehmen, den Behälter mit der empfohlenen Menge an kaltem Wasser füllen und den Stecker wieder an die Steckdose anschließen.
  • Page 16 Sterilisator automatisch ausgeschaltet. · Lassen Sie den Sterilisator mindestens zwei Minuten lang abkühlen, um das Risiko einer Verbrennung zu vermeiden. · Nach zwei Minuten Abkühlen bleibt der Sterilisator noch heiß. Alle Teile müssen sorgfältig behandelt werden, um Verbrennungen zu vermeiden. ·...
  • Page 17: Kundendienst

    · Legen Sie die Milchpumpe (in das dafür vorgesehene Fach) und die anderen Teile der Milchpumpe auf das obere Gitter (2). · Die nächsten Schritte sind identisch mit dem Sterilisationsprozess der Fläschchen (siehe Abschnitt “STERILISIERUNG DER FLÄSCHCHEN”). STERILISIEREN MIT DER MIKROWELLE Der elektrische Sterilisator lässt sich dank der zusätzlichen Komponenten „mittleres Gitter“...
  • Page 18: Technische Daten

    Sie den Abschnitt “FEHLERBEHEBUNG” in diesem Handbuch; andernfalls wenden Sie sich an ein autorisiertes Service-Center. FEHLERBEHEBUNG Der Sterilisator lässt sich nicht einschalten Überprüfen Sie, ob der Stecker richtig eingesteckt ist. Das Fläschchen weist nach dem Sterilisierungszyklus Flecken auf Der Sterilisator muss vor Kalk gereinigt werden. Lesen Sie den Abschnitt “ENTKALKUNG DES STERILISATORS” in diesem Handbuch.
  • Page 19: Consignes De Sécurité

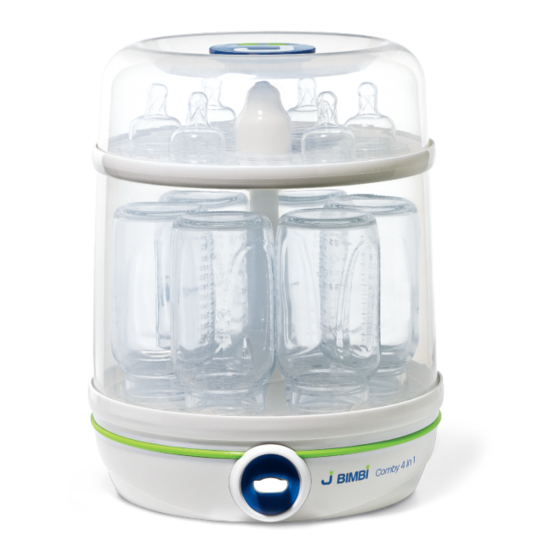
    13. Pince 7. Câble d’alimentation Merci d’avoir choisi un produit J BIMBI®. Le stérilisateur électrique à vapeur Comby 4 en 1 est un dispositif pratique et compact pour stériliser biberons et accessoires. La stérilisation à la vapeur est naturelle, rapide et sûre. Elle est recommandée notamment durant les premiers mois de vie pour la sécurité...
  • Page 20: Avant De Brancher Le Stérilisateur

    · NE PAS débrancher le stérilisateur durant le cycle de stérilisation, la qualité de la stérilisation pourrait être compromise. En cas de débranchement involontaire durant le cycle de stérilisation, vider l’eau restante, remplir à nouveau le réservoir avec la quantité d’eau froide recommandée et rebrancher l’appareil au secteur.
  • Page 21: Stérilisation Des Biberons

    · Pour éviter tout risque de brûlure, laisser refroidir le stérilisateur pendant au moins 2 minutes. · Après ce délai de refroidissement, le stérilisateur sera encore chaud. Toutes les parties du stérilisateur doivent être manipulées avec précaution pour éviter tout risque de brûlure. ·...
  • Page 22: Stérilisation Au Micro-Ondes

    STÉRILISATION AU MICRO-ONDES La transformation de l’appareil en stérilisateur pour micro-ondes est facile grâce aux composants supplémentaires “panier central” (9) et “base pour micro-ondes” (10). Au micro-ondes, le stérilisateur peut stériliser jusqu’à 4 biberons des tailles les plus courantes. TABLEAU POUR L’UTILISATION DU MICRO-ONDES À DIFFÉRENTES PUISSANCES Puissance Temps de stérilisation au micro-ondes Temps de refroidissement...
  • Page 23: Résolutions Des Problèmes

    RÉSOLUTIONS DES PROBLÈMES Le stérilisateur ne s’allume pas Vérifier que la fiche est correctement branchée. Le biberon présente quelques taches après le cycle de stérilisation. Le stérilisateur doit être détartré. Voir la section “DÉTARTRAGE DU STÉRILISATEUR” de ce manuel. Le voyant lumineux s’allume quand le stérilisateur est branché au secteur. L’interrupteur de cet appareil est conçu pour la fonction “mise sous tension uniquement”...
  • Page 24 MADE IN P.R.C. jbimbi.com Imported by: COLPHARMA s.r.l. Via Mantova 92 · 43122 Parma · Italy...

Table des Matières