
Sommaire des Matières pour Ruroc ATLAS SHOCKWAVE
- Page 1 INSTRUCTION MANUAL MODE D’EMPLOI BEDIENGSANLEITUNG MANUAL DE INSTRUCCIONES 使用說明書 ИНСТРУКЦИЯ ПО ЭКСПЛУАТАЦИИ...
- Page 2 The above operation may cause the battery to catch fire or burn. 6. If do not comply with this warning, Ruroc does not accept any liability. 3. Use of the battery’s electrolyte (fluid) enters the eye, it can lead to blindness. If you...
-
Page 3: Warranty Information
Before you return any product, please go to www.ruroc.com/returns and follow on-line returns process Ruroc warrants all products to be free of defects in material or workmanship for a period of one year from the date of purchase, subject to the provisions Ensure that the returned product is washed, clean and dry before below. - Page 4 FITTING YOUR SHOCKWAVE Remove the magnetic bluetooth cover Withdraw the AUX jack cable [A] and antenna cable [B] from the Shockwave cavity Connect the 2 cables to the Shockwave module, fitting the AUX cable [A] to the larger black connector, and the antenna cable [B] to the smaller gold connector Slide the unit into the Shockwave cavity until it clips into place and sits flat with the bottom surface of the helmet...
-
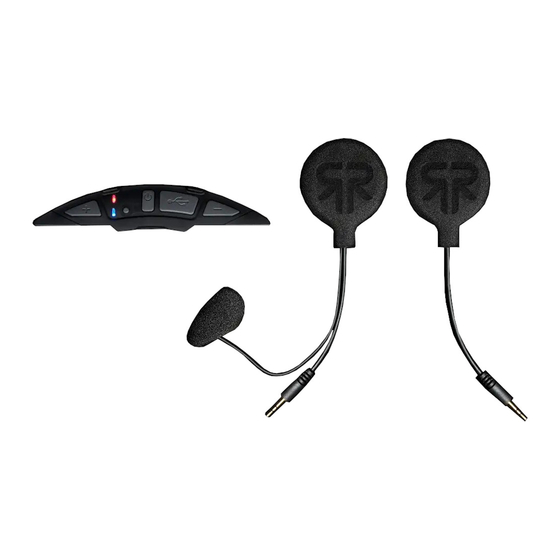
Page 5: Connecting Your Speakers
CONNECTING YOUR SPEAKERS Gently release the poppers on the cheek pads and remove them from the helmet Plug the Mic+Speaker cable [A] into the AUX jack port on the left (as viewed with the helmet as shown) Plug the Speaker-only cable [B] into the AUX jack port on the right... - Page 6 FITTING YOUR SPEAKERS Attach each of the Shockwave speakers where velcro [A] is located (in the orientation shown in the diagram) Attach the Shockwave Mic where velcro [B] is located to the side of the chin vent (in the orientation shown in the diagram) Carefully re-attach the cheek pads over the top of the speakers and mic...
- Page 7 SHOCKWAVE CONTROL Volume down: one step (single click) / multi steps (hold) Previous track (double click) USB-C charging port & cover Power (ON/OFF) (hold) Bluetooth pairing (from OFF) - (long hold) Intercom pairing (from pairing mode) - (double click) Cancel/End/Reject call (single click) Play/Pause music Bluetooth LED (blue) Power LED (red)
-
Page 8: Bluetooth Connection
“Power Off” message. The unit the Shockwave looks for a connection to a device will turn off automatically after 5 minutes of inactivity From your device, enter the Bluetooth® menu and select ‘Ruroc Atlas Shockwave Audio’ Charging... -
Page 9: Audio Control
INTERCOM AUDIO DRIVER-PILLION CONTROL When connecting two Shockwave units for Driver-Pillion Intercom for When connected, the Shockwave will automatically play any the first time, put the unit into Bluetooth® pairing mode (see Bluetooth music that is played on the synced device Connection section for details) To skip track forward, double-press the Volume up [G] button Once in pairing mode, double-press the centre button [C] to... - Page 10 8. Accessories and batteries: and Volume up [G] buttons together* Please only use accessories and batteries approved by Ruroc. Using other accessories and batteries may damage the product & cause harm. 9.
- Page 11 ATTENTION Bluetooth Version: 5.0 1. Installing equipment on the helmet is a modification of the helmet, which Support: Qualcomm®aptX™,CVc noise cancellation technology 3D may cause the helmet’s warranty to fail or hinder the helmet’s function. This sound effects may cause danger in the event of accidents. 2. Before using the Shockwave Electric Parameter: DC 5V/1A bluetooth system, please ensure that the product is firmly and correctly installed in the helmet.
-
Page 12: Précautions D'utilisation De La Batterie
PRÉCAUTIONS ne pressez pas, ne chauffez pas et ne brûlez pas la batterie à l’intérieur du produit. Il est strictement interdit d’utiliser des objets pointus, des tournevis ou d’autres appareils pour percer ou faire levier sur la batterie. L’opération D’UTILISATION DE LA ci-dessus peut provoquer un incendie ou une brûlure de la batterie. -
Page 13: Informations De Garantie
2. Si la législation locale interdit l’utilisation d’écouteurs pendant la conduite, concernant nos produits ou la garantie ci-dessus, n’hésitez pas à contacter ne les utilisez pas. Si vous ne respectez pas cet avertissement, Ruroc décline notre centre de service par e-mail à: warranty@ruroc.com toute responsabilité. - Page 14 Vous pouvez également retourner votre produit au magasin où vous l’avez Faites glisser l’appareil dans la cavité Shockwave jusqu’à ce qu’il acheté à l’origine. Tout concessionnaire Ruroc est en mesure de gérer le se clipse en place et repose à plat avec la surface inférieure processus de garantie en votre nom.
-
Page 15: Connecter Les Haut-Parleurs
CONNECTER LES HAUT-PARLEURS Relâchez doucement les boutons-pression sur les coussinets de joue et retirez-les du casque Branchez le câble micro + haut-parleur [A] dans le port de prise AUX sur la gauche (comme vu avec le casque comme illustré) Branchez le câble de haut-parleur uniquement [B] dans le port de prise AUX sur la droite. -
Page 16: Montage Des Haut-Parleurs
MONTAGE DES HAUT-PARLEURS Fixez chacune des enceintes Shockwave à l’emplacement du velcro [A] (dans l’orientation indiquée sur le schéma) Fixez le Shockwave Mic à l’endroit où le velcro [B] est situé sur le côté de l’évent du menton (dans l’orientation indiquée sur le schéma). - Page 17 CONTROLE SHOCKWAVE Baisser le volume: une étape (simple clic) / plusieurs étapes (maintenir) Piste précédente (double clic Port de chargement USB-C et couvercle Alimentation (ON / OFF) (maintenir)Appairage Bluetooth (depuis OFF) - (longue attente) Appairage intercom (depuis le mode d’appairage) - (double clic) Annuler / Terminer / Rejeter l’appel (un seul clic Lecture / Pause de la musique LED Bluetooth (bleue)
-
Page 18: Shockwave Les Bases
Lorsque l’appareil est complètement chargé, la LED rouge [F] s’éteint et la LED bleue [E] s’allume Depuis votre appareil, accédez au menu Bluetooth® et sélectionnez «Ruroc Atlas Shockwave Audio» Chargé Lorsque l’appareil est complètement chargé, la LED rouge [F] Vous entendrez le message «Connecté» pour confirmer la s’éteint et la LED bleue [E] s’allume... -
Page 19: Contrôle Audio
INTERCOM CONTRÔLE AUDIO CONDUCTEUR-PASSAGER Lorsque vous connectez deux unités Shockwave pour Une fois connecté, le Shockwave lira automatiquement toute l’interphone conducteur-passager pour la première fois, musique jouée sur l’appareil synchronisé mettez l’unité en mode de couplage Bluetooth® (voir la section pour sauter la piste vers l’avant, appuyez deux fois sur le bouton Connexion Bluetooth pour plus de détails) d’augmentation du volume [G]... -
Page 20: Appeler Recevoir Des Appels
8. Accessoires et batteries: Veuillez n’utiliser que des accessoires même temps * et des batteries agréés par Ruroc. L’utilisation d’autres accessoires et batteries peut endommager le produit et causer des dommages. 9. Connexion à d’autres Si votre téléphone prend en charge la fonction de numérotation / commande appareils: lors de la connexion à... - Page 21 ATTENTION Version Bluetooth: 5.0Support: Qualcomm®aptX ™, technologie de suppression du bruit CVc 3D Paramètre électrique: DC 5V / 1AFormat audio d’encodage: SBC, AAC et aptXDistance de 1. L’installation de l’équipement sur le casque est une modification communication de l’interphone conducteur-passager: jusqu’à du casque, qui peut entraîner l’échec de la garantie du casque ou 100 mètresDistance de communication du casque Bluetooth: entraver le fonctionnement du casque.
- Page 22 VORSICHTSMASSNAHMEN Sie den Akku des Produktes nicht. Es ist strengstens untersagt scharfe Gegenstände, Schraubendreher oder andere Geräte zum Durchstechen oder Öffnen der Batterie zu verwenden. Der oben beschriebene Vorgang BEI DER kann dazu führen, dass der Akku Feuer fängt oder verbrennt. 6. Sollten die Batterieelektrolyte in das Auge gelangen, kann dies zur Erblindung führen.
- Page 23 Die Verwendung dieses Gerätes im öffentlichen (Nah-)Verkehr ist möglicherweise nicht gesetzlich gestattet. Bitte überprüfen Sie Ihre örtliche Ruroc garantiert, dass alle Produkte für einen Zeitraum von einem Jahr Gesetzgebung und verwenden Sie dieses Produkt nur im Privatbereich. 2. ab dem Kaufdatum frei von Material- oder Verarbeitungsfehlern sind , Wenn die örtliche Gesetzgebung die Verwendung von Kopfhörern während...
-
Page 24: Garantie-Prozess
Telefonnummer beizufügen UND stellen Sie bitte sicher, dass Sie eine kurze Erklärung des Garantie-Problems beifügen. Alternativ können Sie Ihr Produkt über das Geschäft zurückschicken, in dem Sie dieses ursprünglich erworben haben. Jeder Ruroc-Händler ist befugt den Garantie-Prozess in Ihrem Namen durchzuführen. - Page 25 DER EINBAU IHRES SHOCKWAVES Entfernen Sie die magnetische Bluetooth-Abdeckung Ziehen Sie das AUX-Buchsenkabel [A] und das Antennenkabel [B] aus dem Shockwave-Hohlraum Verbinden Sie die beiden Kabel mit der Shockwave-Einheit, indem Sie das AUX-Kabel [A] mit dem größeren schwarzen Stecker und das Antennenkabel [B] mit dem kleineren goldenen Stecker verbinden Lassen Sie die Einheit in den für das Shockwave vorgesehenen...
- Page 26 VERBINDUNG IHRER LAUTSPRECHER Lösen Sie die Druckknöpfe an Ihrer Kinnpolsterung behutsam und entnehmen Sie diese aus Ihrem Helm Schließen Sie das Kabel für Mikrofon und Lautsprecher an den AUX-Buchsenanschluss auf der linken Seite ( bei einer Betrachtung des Helmes wie hier demonstriert) an Schließen Sie das alleinige Lautsprecherkabel [B] an den AUX- Buchsenanschluss auf der rechten Seite an...
- Page 27 DIE BEFESTIGUNG IHRER LAUTSPRECHER Bringen Sie den jeweiligen Shockwave-Lautsprecher dort an, wo sich ein entsprechendes Klettband [A] befindet (die Ausrichtung des Diagramms befolgend) Befestigen Sie das Shockwave-Mikrofon dort, wo sich das entsprechende Klettband [B] an der Seite der Kinnbelüftung befindet (die Ausrichtung des Diagramms befolgend) Befestigen Sie die Kinnpolsterung vorsichtig über den Lautsprechern und dem Mikrofon.
- Page 28 Verringerung der Lautstärke: um eine Stufe ( einfacher DIE BEDIENUNG DES Klick) / um mehrere Stufen (halten) Vorheriger Titel ( Doppelklick) SHOCKWAVES USB-C Ladebuchse & -Abdeckung Power ( EIN/ AUS) ( halten) Bluetooth-Kopplung ( von AUS)- (lange halten) Intercom-Kopplung (von Kopplungsmodus)- (Doppelklick) Widerruf/Beendigung/Anrufsablehnung (einfacher Klick) Play/Pause der Musik Bluetooth LED (blau)
-
Page 29: Bluetooth Verbindung
Schließen Sie das USB-C-Kabel an die Ladebuchse [B] an, das Öffnen Sie das Bluetooth® -Menü in dem entsprechenden Gerät rote [F] LED wird aufleuchten und anzeigen, dass das System und wählen Sie “Ruroc Atlas Shockwave Audio” aus aufgeladen wird Sie werden die Ansage “Connected” als Beleg der Verbindung Aufgeladen Sobald das Gerät vollständig aufgeladen ist, schaltet sich das rote [F]... - Page 30 INTERCOM AUDIO FAHRER-BEIFAHRER BEDIENUNG Wenn Sie zwei Shockwaves zum ersten Mal bezüglich des Fahrer-Beifahrer- Wenn verbunden, wird das Shockwave automatisch jedwede Intercoms verbinden, setzen Sie das System bitte in den Bluetooth®- Musik, die auf einem synchronisierten Gerät gespielt wird, Kopplungsmodus ( siehe Bluetooth-Verbindungsabschnitt für Details) wiedergeben Sobald sich das System im Kopplungsmodus befindet, drücken Sie Um einen Titel weiterzuspringen, drücken Sie den Knopf zur...
- Page 31 Tankstelle oder dort wo Kraftstoffe oder chemische Arbeitsstoffe gelagert werden. Zur Rufwiederholung, drücken Sie den Knopf zur Verringerung der Lautstärke 8. Zubehör und Batterien: Bitte verwenden Sie nur von Ruroc zugelassene(s) [A] und den Knopf zur Erhöhung der Lautstärke [G] zweimal gemeinsam* Zubehör und Batterien.
- Page 32 ACHTUNG Bluetooth-Version: 5.0 1. Das Installieren von Ausrüstung am Helm ist eine Modifikation des Unterstützung: Qualcomm®aptX TM, CVc-Geräuschunterdrückungstechn Helmes, die dazu führen kann, dass die Garantie des Helms verfällt oder ologie 3D die Funktion des Helms beeinträchtigt wird. Dies kann zu Gefahren im Soundeffekte Falle eines Unfalles führen.
- Page 33 PRECAUCIONES prohibido utilizar objetos afilados, destornilladores u otros dispositivos para perforar o abrir la batería. La operación anterior puede hacer que la batería se incendie o se queme. 6. Si el electrolito (líquido) de la batería entra en el SOBRE EL USO DE LA ojo, puede provocar ceguera.
-
Page 34: Información De La Garantía
2. Si la ley local prohíbe el uso de auriculares mientras conduce, de atención por correo electrónico a: warranty@ruroc.com no los utilice. Si no cumple con esta advertencia, Ruroc no acepta ninguna responsabilidad. 3. El uso de este producto a un volumen alto durante un período prolongado puede causar daños en los oídos y la audición. - Page 35 Alternativamente, también puede devolver su producto a la tienda donde lo compró originalmente. Cualquier distribuidor de Ruroc puede manejar el proceso de garantía en su nombre. NOTA: Daños debidos al desgaste, accidente, uso indebido o negligencia, o si no almacena o usa un producto que no sea de acuerdo con las instrucciones proporcionadas, o daños...
- Page 36 CONECTANDO LOS ALTAVOCES Suelte suavemente los botones del acolchado de las mejillas y quítelo del casco. Enchufe el cable del micrófono + altavoz [A] en el puerto del conector AUX de la izquierda (como se muestra en la imagen) Enchufe el cable del altavoz [B] en el puerto AUX jack de la derecha.
- Page 37 ENCAJANDO LOS ALTAVOCES Coloque cada uno de los altavoces Shockwave donde se encuentra el velcro [A] (en la orientación que se muestra en el diagrama) Coloque el micrófono Shockwave donde se encuentra el velcro [B] al lado de la ventilación de la barbilla (en la orientación que se muestra en el diagrama) Vuelva a colocar con cuidado el acolchado en la parte superior de los altavoces y el micrófono.
- Page 38 CONTROL DEL Bajar volumen: un paso (un solo clic) / varios pasos (mantener) Canción anterior (doble clic) SHOCKWAVE Puerto de carga USB-C y cubierta Encendido (ON/OFF) (mantener) Emparejamiento Bluetooth (estando APAGADO) - (presión prolongada) Emparejamiento de intercomunicador (desde modo de emparejamiento) - (doble clic) Cancelar / Finalizar / Rechazar llamada (un solo clic) Reproducir / Pausar música...
-
Page 39: Conexión Bluetooth
Desde su dispositivo, ingrese al menú de Bluetooth® y seleccione Cargar Enchufe el cable USB-C en el puerto de carga [B], el LED rojo [F] "Ruroc Atlas Shockwave Audio" se iluminará indicando que la unidad se está cargando Escuchará el mensaje "Connected" para confirmar la Cargado Cuando el dispositivo esté... -
Page 40: Control De Audio
CONTROL DE AUDIO INTERCOMUNICADOR CONDUCTOR-PASAJERO Cuando esté conectado, Shockwave reproducirá automáticamente cualquier música que se reproduzca en el dispositivo sincronizado Cuando conecte dos unidades Shockwave para el intercomunicador conductor-pasajero por primera vez, ponga la unidad en modo de Para saltar a la siguiente pista, presione dos veces el botón Subir emparejamiento Bluetooth®... - Page 41 Bajar volumen [A] y Subir volumen [G] juntos y baterías: Utilice únicamente accesorios y baterías aprobados por * para activarlo* Ruroc. El uso de otros accesorios y baterías puede dañar el producto *debe realizarse SÓLO cuando esté parado.
- Page 42 y causar daños. 9. Conexión a otros dispositivos: cuando se conecte a otros dispositivos, lea atentamente las instrucciones del dispositivo Bluetooth Version: 5.0 para obtener instrucciones de seguridad detalladas y el funcionamiento Support: Qualcomm®aptX™,CVc noisecancellation technology 3D correcto producto. conecte productos incompatibles.
- Page 43 注意事項 電池使用 警告 1.請勿將丟棄的電池與一般家庭垃圾放在一起。在有關廢舊電池回收和處置 1.法律未授權在公共交通工具上使用本設備。請檢查您當地的法律,並僅 的法律法規的地區,請遵守 以下法規。 2.請勿使電池短路。當金屬物體(鑰 在私人空間中使用本產品。2.如果當地法律禁止騎車時使用耳機,請不要使 匙,珠寶,電線,硬幣或其他導體)意外連接電池的 正極和負極時,就會發 用。如果您不遵守此警告,Ruroc不承擔任何責任。 3.長 時間大量使用本產品 生短路。短路會損壞電池或連接器,並可能造成重大財產損失或人身傷害。 可能會損壞您的耳朵和聽力。請保持適當的音量。 請 妥善保管電池,不要將其放在口袋,皮夾或有金屬物品的包中。 3.請勿將 電池放在火上或放在高溫處 ,以免過熱,爆裂或燃燒。 4.請勿拆卸,焊接或 改裝電池。請勿用硬物刺穿電池,否則可能會導致電 池漏液,過熱,爆炸或 著火。 5.請勿取出,擠壓,加熱或燃燒產品內部的電池。嚴禁使用鋒利的物 體 ,螺絲起子或其他裝置刺穿或撬開電池。上述操作可能導致電池著火或燃 燒。 6.如果電池的電解液( 液體)進入眼睛,則可能導致失明。如果將電池 電解液(液體)濺入眼睛,請勿用手摩擦眼睛。立即 用水徹底沖洗並就醫。 如果電池的電解液(液體)粘在皮膚和衣服上,請立即用肥皂水和清水清 洗, 必要時就醫。 7.請勿轉移其他產品的電池。請勿使用任何損壞的充電器 或電池。如果在使用,充電或 存放期間電池溫度過高,或者電池中發生異常 現象,例如變色,變形,鼓起和漏液,請停止使用和更 換電池,以避免安全...
- Page 44 保固訊息 1.法律未授權在公共交通工具上使用本設備。請檢查您當地的法律,並僅 在私人空間中使用本產品。2.如果當地法律禁止騎車時使用耳機,請不要使 用。如果您不遵守此警告,Ruroc不承擔任何責任。 3.長 時間大量使用本產品 可能會損壞您的耳朵和聽力。請保持適當的音量。 保修流程 1.在退回任何產品之前,請訪問www.ruroc.com/returns並遵循在線退貨流程 2.在運輸之前,請確保退回的產品已清洗,清潔並乾燥。臟的和/或有臭味的 安全帽將未經處理退回, 否則可能會延遲整個過程,並額外收費 3.請記住 在備註中寫上您的姓名,地址和電話號碼,並確保附上簡短的說明來解釋保 修問題。 或者,您也可以將產品退回最初購買產品的商店。任何Ruroc經銷 商都可以代表您處理保修過程。 注意:由於磨損,事故,誤用或疏忽引起的 損壞,或者如果您未按照提供的說明進行存儲或使用產品 ,或者由於您或第 三方進行的任何維修而造成的損壞,經我們授權,不在保修範圍內。如有任 何疑問 ,請聯繫我們的保修部門。...
- Page 45 安裝您的SHOCKWAVE 拆下磁性藍牙蓋子 從Shockwave腔中拔出AUX插孔電纜[A]和天線電纜[B] 將2根電纜連接到Shockwave模塊,將AUX電纜[A]插入較大的黑色接 頭,將天線電纜[B]插入較小的金色接頭。 將裝置滑入Shockwave空腔,直到其卡入到位並與安全帽的底部表 面平齊 連接您的揚聲器 輕輕鬆開臉頰墊上的扣子,然後將其從安全帽中取出 將麥克風和揚聲器電纜[A]插入左側的AUX插孔端口(如安全帽所 示) 將僅揚聲器電纜[B]插入右側的AUX插孔端口...
- Page 46 安裝您的揚聲器 將每個Shockwave揚聲器安裝到魔術貼[A]所在的位置(按圖中所示 的方向) 將魔術貼[B]所在的Shockwave麥克風連接到下巴通風口的側面(如 圖所示的方向) 小心地將臉頰墊重新安裝在揚聲器和麥克風的頂部...
- Page 47 SHOCKWAVE 控制 降低音量:一格(單擊)/ 多格(按住) 上一曲目(雙擊) USB-C充電端口和蓋子 電源(開/關)(按住) 藍牙配對(從關閉)-(長按) 對講機配對(從配對模式)-(雙擊) 取消/結束/拒絕通話(單擊) 播放/暫停音樂 藍牙LED(藍色) 電源指示燈(紅色) 調高音量:一格(單擊)/ 多格(按住) 下一首(雙擊) 接聽電話(單擊) 藍牙配對(開啟時)-(按住) A + G 語音撥號(單擊)/ 重撥上次號碼(雙擊)...
- Page 48 藍芽 連接 SHOCKWAVE 基礎 首次將Shockwave系統連接到設備*時,按住“開啟”按鈕** 3秒 鐘,直到聽到“配對” 開啟 按下中央按鈕[C] 1-2秒以打開Shockwave系統,您會 當Shockwave尋找與設備的連接時,紅色[F]和藍色[E] LED指示燈 聽到一聲 將開始交替閃爍。 “開機”消息 在您的設備上,進入藍芽選單,然後選擇“ Ruroc Atlas Shockwave 按住中央按鈕[C] 3秒鐘手動關閉,您將聽到“ Power 關機 Audio” Off”消息。閒置5分鐘後,本機 您將聽到“已連接”消息以確認連接,並且在設備保持配對狀態 將自動關閉 時,藍色的[E] LED會定期閃爍一次 充電 將USB-C電纜插入充電端口[B],紅色[F] LED會亮起,表 *您的Shockwave開機後會自動連接到先前連接的設備(在範圍內)。 明設備正在充電 **如果本機已經開啟,同時按下降低音量[A]和提高音量[G]按鈕5秒鐘將使 本機進入配對模式。 充飽電 設備充滿電後,紅色的[F] LED熄滅,藍色的[E] LED點亮...
- Page 49 對講機 駕駛模式 撥打電話 接聽電話 首次為對講機模式連接兩個Shockwave主機時,將其置於藍芽配對模式(有關 如果Shockwave連接到電話並撥打了電話,它將自動通過揚聲器引 詳細信息,請參閱藍芽連接部分 。 導呼叫並激活麥克風 進入配對模式後,按兩下中央按鈕[C]進入對講機配對模式,您將聽 當連接的電話打來電話時,Shockwave將關閉任何音樂/對講機音 到“對講機配對”消息 頻,並且該電話將通過揚聲器響鈴 當Shockwave尋找另一個要連接的裝置時,紅色[F]和藍色[E] LED燈 要接聽來電,請按提高音量[G]按鈕 將開始同時閃爍。 要拒絕來電,請按中心的[C]按鈕 在第二個Shockwave主機上重複步驟1-3 要取消或結束通話,請按中心的[C]按鈕 您將聽到“對講機已連接”消息以確認連接,並且在設備保持配對 要撥打最後撥出的電話號碼,請同時按下降低音量[A]和提高音 狀態時,紅色的[E] LED會定期閃爍一次。 量[G]按鈕* 語音 控制 如果您的電話支持語音撥號/命令功能,請同時按下降低音量[A] 和提高音量[G] **以激活 *僅在靜止時才可進行。 連接後,Shockwave將自動播放同步設備上播放的任何音樂 要跳過向前的曲目,請按兩次調高音量[G]按鈕 要向後跳過曲目,請雙擊降低音量[A]按鈕 要調高音量,請按住調高[G]按鈕 要調低音量,請按住音量調低[A]按鈕 要播放和暫停音樂,請按小播放/暫停[D]按鈕...
- Page 50 在視野清晰的空曠地方使用 該系統。 5.在下雨的情況下,請保持設備正面朝 5.在醫療設備附近關機:醫院 和醫療保健機構可能裝有對射頻敏感的設備。 下,並在使用過程中將USB橡膠塞緊緊安裝,以防止 水進入設備。 6.產品包 請有效地遵守任何醫療機構的規章制度,並在必要時關 閉產品。 6.在飛機上 含3.7V / 500mAh電池,該電池會隨溫度變化。在較低的環境溫度(低於0ºC) 使用無線設備會干擾飛機,因此在飛行過程中請關閉電子設備。 7.請勿在加 下 使用電池時,產品的電池壽命可能會暫時縮短,存在永久損壞的風險。 油站 (服務站)附近或存儲燃料或化學製劑的地方使用本產品。 8.配件和電 7.如果電子功能失敗,請關閉 電源,然後重試。 池:請僅使用Ruroc認可的配件 和電池。使用其他配件和電池可能會損壞產 品並造成傷害。 9.連接到其他設備:連接到其他設備時, 請仔細閱讀設備的 藍牙版本:5.0 說明,以獲取詳細的安全說明和正確的產品操作。請勿連接不兼容的產品。 支持:Qualcomm®aptX™,CVc取消噪音技術3D聲音特效 電氣參數:DC 5V / 1A 音頻編碼格式:SBC,AAC和aptX 駕駛員-對講機通訊距離:最長100米 藍牙耳機通訊距離:10米以上 充電接口:USB Type-C 推薦工作溫度:-20-50ºC...
- Page 51 МЕРЫ ПРЕДОСТОРОЖНОСТИ Категорически запрещается использовать острые предметы, отвертки или другие приспособления, чтобы проткнуть аккумулятор или вскрыть ИСПОЛЬЗОВАНИЯ его. Вышеуказанные манипуляции могут привести к возгоранию аккумулятора. 6. Если электролит аккумулятора (жидкость) попадет АККУМУЛЯТОРА в глаз, это может привести к слепоте. Если вы пролили электролит (жидкость) в...
- Page 52 дополнительную доплату. 3. Не забудьте указать свое имя, адрес, с даты покупки при соблюдении нижеизложенных положений. Если телефонный номер и обязательно включите короткое заявление, продукт Ruroc выходит из строя из-за дефектов изготовления или объясняющее причину гарантийного случая. Кроме того, Вы материалов, в пределах гарантийный срок, мы отремонтируем или...
- Page 53 ПРИМЕЧАНИЕ. На повреждения из-за износа, несчастного случая, неправильного использования или небрежного обращения, или если вы не хранили или использовали продукт иначе, чем в соответствии с инструкциями, или повреждение из-за любого ремонта, выполненного Вами или третьей стороной, не авторизованные нами, гарантия не распространяется.
- Page 54 ПОДКЛЮЧЕНИЕ СПИКЕРА Осторожно отстегните кнопки подкладки в области щек и выймите их из шлема. Подключите кабель микрофона + динамика [A] к разъему AUX слева (если смотреть нашлем, как показано на картинке). Подключите кабель только для динамика [B] к разъемуAUX справа.
- Page 55 УСТАНОВКА СПИКЕРА Прикрепите каждый из динамиков Shockwave на липучке [A]. (расположен в ориентации, показанной на схеме) Прикрепите микрофон Shockwave к месту на липучке [B].с внутренней стороны, вместе отверстия для подбородка (как в ориентации, показанной на схеме). Снова, осторожно прикрепите подщечные подкладки к верхней...
- Page 56 Уменьшение громкости: один шаг (один нажим) / несколько SHOCKWAVE шагов (удержать) Предыдущий трек (двойной нажим) КОНТРОЛЬ Порт USB-C и крышка для зарядки Питание (ВКЛ / ВЫКЛ) (удерживать) Сопряжение Bluetooth (выключено) - (долгое удержание) Сопряжение по интеркому (из режима сопряжения) - (двойной...
- Page 57 по мере того, как Shockwave ищет соединение с устройством. загорится красный светодиод [F], показывая, что устройство На своем устройстве войдите в меню Bluetooth® и выбирите заряжается. «Ruroc Atlas. Shockwave Audio». Уровень Когда устройство полностью заряжено, красный светодиод Вы услышите сообщение «Подключено» для подтверждения...
- Page 58 АУДИО КОНТРОЛЬ ВНУТРЕННЯЯ СВЯЗЬ DRIVER-PILLION При подключении Shockwave автоматически воспроизводит любую музыку, которая воспроизводится на При подключении двух устройств Shockwave для внутренней синхронизированном устройстве. связи Driver-Pillion впервые,переведите устройство в режим Чтобы перейти к следующему треку, дважды нажмите кнопку сопряжения Bluetooth® (см. Раздел Bluetooth Сопряжение, увеличения...
-
Page 59: Меры Безопасности
одновременно нажмите кнопки уменьшения громкости [A] и увеличения или где хранится топливо или химические вещества. 8. Аксессуары громкости [G] *, чтобы активировать. и аккумуляторы: используйте только одобренные аксессуары и * данное действие должно выполняться ТОЛЬКО в неподвижном состоянии. аккумуляторы Ruroc. Использование других аксессуаров и батарей... - Page 60 может повредить продукт и причинить вред. 9. Подключение устанавливается во время использования для предотвращения к другим устройствам: при подключении к другим устройствам, попадания воды в устройство. 6. Продукт содержит батарейку 3,7 В пожалуйста, внимательно прочтите инструкцию к устройству для / 500 мАч, которая меняется в зависимости от температуры. Когда получения...
- Page 61 (2) this device must accept any interference received, including interference that may cause undesired operation. Hereby Ruroc Ltd declares that this product is in compliance with essential requirements and other relevant provisions of Directive 2014/53/EU. Any change or modifications not expressly approved by the party responsible for compliance could void the user’s authority to operate...
- Page 62 Designed in the UNITED KINGDOM Made in China Ruroc Ltd, Unit 2, Barnett Way, Barnwood Estate, Gloucester GL4 3RT UK www.ruroc.com...