Publicité
Liens rapides
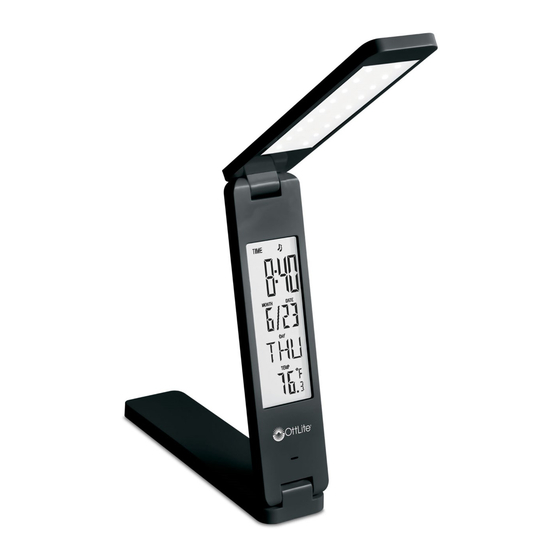
Rechargeable LED Travel Light
48500C 4850NC 48400B
484G5B
484KIT12
INS140151
D
C
D
ENGLISH
CONGRATULATIONS! You've purchased the finest in natural lighting
technology with your new OttLite
product.
®
PRODUCT REGISTRATION FORM
Please complete the enclosed Product Registration Form and return it today by
mail, or register online by going to: OttLite.com/warranty.
NOTE: THIS UNIT IS FULLY ASSEMBLED
1. Remove lamp from packing placing lamp body base (A) flat on a steady surface.
2. To open lamp, hold lamp body base (A) firmly and lift middle body section
(B) upward to a triangle shape manner as pictured (or horizontal, if
desired), then place LED Light Source (C) as needed.
3. Turn the lamp ON & OFF by using power switch (D) located in the front-
upper side of LED Light Source (C).
4. Switch (D) also controls the lamp's light dimming function. Slightly touch
switch (D) to engage dimming function from "high" to "low".
5. Charge product using included USB cable or AC adapter.
B
6. To set calendar and alarm see "Setting Calendar and Alarm" section.
7. To install or remove button cell battery see "Battery Install" section.
8. To set temperature transfer see "Temperature Transfer" section.
Operation for setting calendar, alarm, temperature transfer, and
battery install
SETTING DATE AND TIME:
1. Under normal mode, press SET key and enter date and time setting mode,
press SET again to enter the next setting. The sequence of setting is:
HOUR-MINUTE-YEAR-MONTH-DAY-BACK.
2. Press UP and DOWN setting, the day of the week will vary accordingly.
3. Under setting mode, press MODE key or no operation in 60 seconds will
A
back from set mode, and display the time.
4. Under normal mode, press UP transfer 12 and 24 hours format.
5. A CR2025, 3V Lithium battery is needed to power calendar.
SNOOzE ALARM FUNCTION
1. Under normal mode, press MODE enter alarm mode.
2. Under alarm mode, press "SET" enter alarm setting, press "SET" again
and enter the next setting, the sequence of setting is the following:
HOUR-MINUTE-SNOOZE-MUSIC-BACK.
3. Press UP and DOWN key to set.
4. Under alarm mode, press UP and DOWN to open and close the function
of alarm & snooze function, press it again and enter the next function in
sequence, OPEN the alarm-open the snooze-close alarm and snooze.
5. When "alarm time" is reached, the alarm will last 1 minute, snooze time
reach, alarm will ring again, press "SET" key or any button can stop alarm.
Temperature Transfer and Battery installation
1. Under normal mode, press DOWN key transfer Celsius and Fahrenheit.
2. To remove/install button cell battery: remove battery compartment door
located in the lower half of middle body section (B) back-side of lamp.
Turn door clock-wise to remove and counter clock-wise to install. Button
cell battery is to be installed with the "+" or flat side facing upward.
NOTE: The important safety instructions appearing in this instruction sheet
HZ-710
are not meant to cover all possible conditions and situations that may occur. It
Rechargeable LED Travel Light
must be understood that common sense, caution, and care must be used with
any electrical product.
Caution! Any change or modification to product not expressly
recognized by OttLite Technologies voids OttLite's responsibility for
proper function of product.
FCC Part 15
NOTE: This equipment has been tested and found to comply with the
limits for a Class B digital device, pursuant to Part 15 of the FCC rules.
These limits are designed to provide reasonable protection against harmful
interference in a residential installation. This equipment generates, uses
and can radiate radio frequency energy and, if not installed and used in
accordance with the instructions, may cause harmful interference to radio
communications. However, there is no guarantee that the interference will
not occur in a particular installation. If this equipment does cause harmful
interference to radio or television reception, which can be determined by
turning the equipment off and on, the user is encouraged to try to correct
the interference by one or more of the following measures:
• Reorient or relocate the receiving antenna.
• Increase the separation between the equipment and receiver.
• Connect the equipment into an outlet on a circuit different from that of
the receiver.
• Consult the dealer or an experienced radio/TV technician for help.
CAN ICES-3 (B)/NMB-3 (B)
CAUTION :
This Product contains a built-in Lithium-ion (Li-ion)
battery. This is a non-replaceable battery. In the event of faulty battery,
entire product shall be properly disposed.
Li-ion Battery
Model: TY-523450A
Capacity: 1000mAh.(3.7Wh) Output Voltage: 3.7V
NOTICE:
Never disassemble by yourself.
Use the authorized charger only.
Exposure of battery to open flames could cause explosion.
Do not expose the battery pack out of the temperature range 32°F to 113°F
(0°C~45°C)
MADE IN CHINA
Specifications
USB: 5V, 500mA / Input power: 5V/500mA
Battery: Lithium, 3.7V / 1000mAh (power for LED Lights)
AC Adapter: Input: 100-240V, 50/60 Hz, 0.3A / Output: 5.0V DC, 500mA
Accessories:
• USB cord
• AC Adaptor
• Wall mount with adhesive
REV102114
Publicité

Sommaire des Matières pour OttLite HZ-710
- Page 1 Caution! Any change or modification to product not expressly Please complete the enclosed Product Registration Form and return it today by recognized by OttLite Technologies voids OttLite’s responsibility for mail, or register online by going to: OttLite.com/warranty. proper function of product.
- Page 2 Attention! Tout changement ou toute modification à cet appareil qui n’est pas mismo, o regístrese en línea visitando: www.OttLite.com/warranty. www.Ottlite.Com/warranty. expressément approuvé par OttLite Technologies peut faire annuler la garantie NOTA: ESTA UNIDAD ESTÁ COMPLETAMENTE ENSAMBLADA ¡Cuidado! Cualquier cambio o modificación al producto que no sea expresamente de bon fonctionnement d’OttLite.