Publicité
Liens rapides
Model: GEN(X)
1
1.3*
1.1
2
3
2.1
2.3
2.2
2.4
4
4.1
4.2
4.3
5
6
5.3
5.1
5.2
7
8
9
10
11
Important: Read these warnings and instructions for use carefully to
familiarize yourself with the appliance before connecting it to its gas container.
Keep these instructions for future reference. USE OUTDOORS ONLY
If you smell gas:
1. Do not attempt to light
appliance.
2. Extinguish any open flame.
3. Disconnect from fuel supply.
DANGER
1.2*
If there is a leak on your appliance (smell of gas), move it to a well-ventilated, flame-free location where
the leak may be detected and stopped. Check for leaks on your appliance outside. Do not use a flame to
detect leaks; use soapy water. ONLY USE IN WELL VENTILATED AREA. Accessible parts may
1.4*
become very hot. Keep young children away. Stove must be operated on a horizontal surface, at least
1m/3.3ft away from any combustible materials. Do not move, lift, or tilt stove with lit burner(s).
1.5*
Gas category: Propane under vapor pressure. This appliance should only be used with 16.4 oz
disposable propane cylinders (sold separately). The LP-gas cylinder(s) used with this stove must be
constructed and marked in accordance with the specifications for LP-gas cylinders of the U.S.
Department of Transportation or Transport Canada, CAN/CSA B339. Refillable Bulk LP-Gas Tanks with a
maximum capacity of 20 pounds may also be used with an optional bulk tank adapter hose (use Eureka!
model 2572182 to connect to bulk tank). Jet Size: 0.39mm Gas Consumption (per burner): 10.4
MJ/hr (AU) || 210 g/hr [2.9 kW] (EU) || 10,000 BTU/hr (CA)
1.6
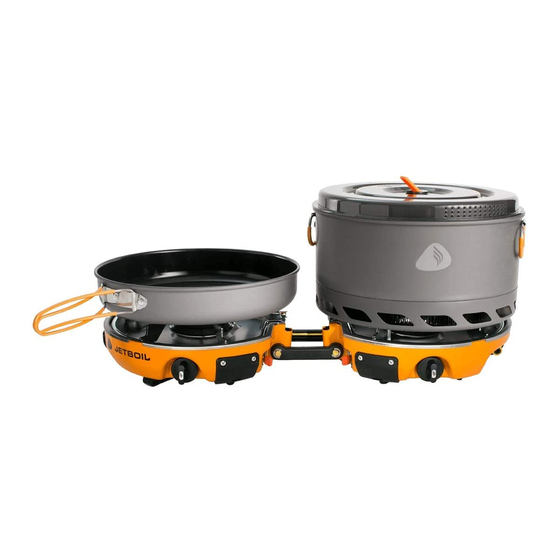
Refer to the following diagrams shown on Page 1 when assembling and operating Genesis:
1.
Fully Assembled Stove System
2.
Latched Stove
3.
Burner Detail
4.
Fuel Cylinder Attachment
5.
Windscreen Attachment
6.
Grate End Removal
3.3
Remove packed contents from bag (10). *Note that Strainer Lid (1.2), 5L Flux Pot (1.3) and 10" Fry Pan
3.4
(1.5) are included only with the Genesis Stove System or sold separately as accessories. Place latched
Stove (2) on a flat, level surface, and then gently pull rubber latches (2.1) free from plastic catches (2.2).
Rotate the Top Stove (2.3) to open stove. Latches may be rotated under the Bottom Stove (2.4) if desired.
Ensure that both control valves (3.1) are closed firmly (rotate clockwise). Check the seals (O-ring (4.1))
between the appliance and the gas container (cartridge). Do not use the appliance if it has damaged or
worn seals. Do not use an appliance which is leaking, damaged, or which does not operate properly.
Securely screw Fuel Regulator (4.1) to the Fuel Input port (4.2) located on the back of the Left Stove.
Securely screw Propane Cylinder (4.3) into Fuel Regulator, in the orientation shown in (4). Never operate
stove with Propane Cylinder in an inverted position. To attach Windscreen (1.4), press Windscreen arms
into slots in four Bumpers (5.1) located on the back and sides of stove until the dimple (5.2) snaps into
3.1
3.2
place inside each Bumper. Prior to initial use, remove plastic backing on both sides of Windscreen.
Do not leave stove unattended while in use. Keep stove area clear and free from combustible materials,
gasoline, and other flammable vapors and liquids. Do not obstruct the flow of combustion and ventilation
air to the stove. Check the seals before connecting a new gas container to the appliance. The gas
container/canister shall be changed in a well ventilated location, preferably outside, away
from any sources of ignition, such as naked flames, pilots, electric fires, and away from
other people. If there is a leak on your appliance (smell of gas), take it outside immediately into a well
ventilated, flame free location where the leak may be detected and stopped. If you wish to check for leaks
on your appliance, do it outside. Do not try to detect leaks using a flame, use soapy water. Put some
soapy water on the gas connection points between gas cansister and the appliance, if bubble found,
there is gas leakage. DO NOT fry or cook foods with low moisture content when using Jetboil 5L Flux Pot
(1.3). If heating liquids near maximum capacity, use only low flame settings and exercise caution to
prevent boil-over. Ensure a 1" minimum gap between Windscreen and any cookware used when
Windscreen is attached. Use only windscreen provided with stove. Other windscreens can overheat the
fuel cylinder. If you overheat the cylinder, it can explode.
Ignite burners before placing cookware on grates. Keep burner at arm's length, away from face,
during ignition. Flame can erupt and flare during ignition. Never expose stove to flammable vapors or
liquids while lighting the burner. It can cause an explosion or fire. The stove must not be exposed to
flammable vapors or liquids during lighting.
Lighting the Burners: Test igniter (3.2) before opening valve. If a spark is not observed between
Electrode (3.3) and Burner (3.4), refer to maintenance section. To light, open control valve (3.1)
counterclockwise until fully opened and gas flow can be heard, then flip igniter lever (3.2) until flame is
observed. Do not move, lift, or tilt burner while lit. Fuel can spray and cause flare-ups.
Cooking: Rotate control valve (3.1) clockwise to decrease flame setting. If using Jetboil 5L Flux Pot (1.3),
add liquid or liquid food to the pot before placing on burner - DO NOT HEAT EMPTY COOKING
POT. Set 5L Flux Pot on center of either cooking grate, bottom of the pot will center on the grate to
maximize heating performance.
Expanding your cooking system: This stove comes equipped with a Patent-Pending JetLink™ fuel
6.1
output port (1.6, 5.3), which provides regulated fuel to additional JetLink™-compatible stoves and
6.2
accessories offered by Eureka! or Jetboil. The port is located on the side of the Right Stove. Refer to
instructions accompanying JetLink™ accessories for their use. Do not attempt to use stoves or
accessories that are not certified as JetLink™-compatible by Eureka! or Jetboil.
6.3
Cleaning Stove: Allow stove to cool before cleaning. Pinch tabs of Cooking Grate (6.1) together to
release from Drip Tray (6.2) and Chassis (6.3). Lift up this end of Grate, and pull Tab (7) from under Drip
Tray and Chassis. Set Grate aside. Un-screw Burner (8) by rotating counter-clockwise, taking caution not
to bend the Electrode (3.3). Drip Tray (9) is now free to remove from Chassis.
Cleaning Grate / Drip Tray / 5L Flux Pot / 10" Fry Pan: Do not use a dishwasher or abrasive
compounds to clean. Only wash by hand with soapy water.
Turn off control valves (3.1) (tighten clockwise) to extinguish flame to each burner. EXPOSED METAL
PARTS MAY BE HOT. ALWAYS CHECK THAT THE BURNERS ARE EXTINGUISHED BEFORE
DISCONNECTING THE FUEL CYLINDER. Disconnect Fuel Cylinder and then Fuel Regulator. Allow
stove to cool, and store all components in Carry bag as shown (10). Always disconnect fuel cylinder
from Regulator after use. Fuel cylinders can explode. Store fuel cylinders outdoors in a dry,
well-ventilated area, away from heat, and out of reach of children.
TROUBLESHOOTING AND MAINTENANCE
Do not modify this appliance. Modification of the product and/or using the product not in accordance
with the instructions and recommended use may be hazardous and will void the warranty. This
appliance must only be serviced by an authorized person. If an issue cannot be corrected using these
instructions, see Limited Warranty below. Contact your local dealer, distributer, or Jetboil for parts and/or
service. If stove is operating poorly, check mix tube to ensure that air holes are not blocked, and that the
jet is not dirty or contaminated. Ensure that Fuel Input and JetLink™ Output ports are kept clean and
debris-free at all times. If the stove flash back to the burner tube or lift, turn off stove, call supplier.
Flame does not extinguish: Valve is damaged. Tighten valve as much as possible, blow out flame,
and immediately detach fuel cartridge. Return to dealer.
Igniter fails to spark: If igniter will not spark, check positioning of electrode in relation to burner (11).
If not positioned as shown in instructions, re-position the electrode accordingly. If igniter still fails to
spark, use matches or a lighter. See your dealer or contact Jetboil for service. If stove is wet, igniter may
fail to spark.
USA: Jetboil Genesis has a 1-year limited warranty. Should this product not function properly under
normal use within 1 year of purchase, contact the dealer or Jetboil for return process information. Jetboil
alone will determine if the problem is covered by this warranty. If so, Jetboil will repair or replace the unit
at its discretion and return it to you free of charge. This warranty does not cover any damage or
malfunction arising from misuse, modification, improper maintenance, negligence, normal wear and tear,
accident, or use other than as described in these instructions. This warranty applies only to the original
purchaser. Proof of purchase is required. Except as provided herein, there are no other warranties,
express or implied, including but not limited to the implied warranties of merchantability and fitness for
a particular purpose. Jetboil shall not be liable for any consequential or incidental damages whatsoever.
This warranty gives you specific legal rights. You may also have other rights that vary from state to state.
Some states do not allow the exclusion or limitation of incidental or consequential damages, or limitation
or exclusion of implied warranties, so the above exclusions or limitations may not apply to you.
INTERNATIONAL: Contact your local retailer or distributor for information regarding any warranties
covering your Genesis. For a list of distributors, refer to the list provided elsewhere on this sheet, or visit
jetboil.com. Do not modify the appliance. Modification of the product and/or using the product not in
accordance with the instructions and recommended use may be hazardous and will void the warranty.
Genesis must only be serviced by an authorized person. Return to your local retailer or distributor if a
fault cannot be corrected using these instructions.
ANSI Z21.72-2011 / CSA 11.2 – 2011
For additional diagrams and FAQs, visit: www.jetboil.com
Jetboil
1/4"
Johnson Outdoors Gear, Inc.
540 N. Commercial St.
Manchester, NH 03101
T: 1-603-518-1600 / 1-888-611-9905
F: 1-603-518-1619
Do not store or use gasoline or
any other liquids with flammable
vapors in the vicinity of this or
any other appliance.
This appliance can produce carbon
monoxide, which has no odor.
Using it in an enclosed space can kill you.
Never use this appliance in an enclosed
space such as a camper, tent, car, or home.
SPECIFICATIONS
ASSEMBLY
7.
Grate Tab Removal
8.
Burner Removal
9.
Drip Tray Removal
10.
Packing Order
11.
Proper Electrode Positioning
OPERATION WARNINGS
OPERATING INSTRUCTIONS
STORAGE AFTER USE
WARRANTY INFORMATION
V
1
Publicité

Sommaire des Matières pour Genesis GEN
- Page 1 INTERNATIONAL: Contact your local retailer or distributor for information regarding any warranties covering your Genesis. For a list of distributors, refer to the list provided elsewhere on this sheet, or visit jetboil.com. Do not modify the appliance. Modification of the product and/or using the product not in accordance with the instructions and recommended use may be hazardous and will void the warranty.
- Page 2 5 l (1.3) et la poêle de 25 cm (1.5) sont fournis uniquement avec le système de réchaud Genesis, ou vendus 5 l (1.3) y la sartén de 25 cm (1.5) solo se incluyen en el sistema de hornillo Genesis (Genesis Stove System) o séparément en tant qu’accessoires.