Table des Matières
Publicité
Les langues disponibles
Les langues disponibles
Liens rapides
FM/AM
Compact Disc
Player
Owner's Record
The model and serial numbers are located on the bottom of the unit.
Record the serial number in the space provided below.
Refer to these numbers whenever you call upon your Sony dealer
regarding this product.
Model No. CDX-GT270MP
To cancel the demonstration (DEMO) display, see page 4.
Pour annuler l'affichage de démonstration (DEMO), reportez-
vous à la page 4.
CDX-GT270MP
Serial No.
4-426-948-11(1)
Operating Instructions GB
Mode d'emploi
FR
Publicité
Chapitres
Table des Matières
Dépannage

Manuels Connexes pour Sony CDX-GT270MP


Sommaire des Matières pour Sony CDX-GT270MP
- Page 1 Owner’s Record The model and serial numbers are located on the bottom of the unit. Record the serial number in the space provided below. Refer to these numbers whenever you call upon your Sony dealer regarding this product. Model No. CDX-GT270MP Serial No.
- Page 2 You are cautioned that any changes or Be sure to install this unit in the modifications not expressly approved in dashboard of the car for safety. this manual could void your authority to For installation and connections, operate this equipment. see the supplied installation/connections manual.
-
Page 3: Table Des Matières
Table of contents Getting Started ........... . . 4 Canceling the DEMO mode . -
Page 4: Getting Started
Detaching the front panel Getting Started You can detach the front panel of this unit to prevent theft. Canceling the DEMO Press and hold . mode The unit is turned off. Press the front panel release button , You can cancel the demonstration display which appears while this unit is turned off. -
Page 5: Location Of Controls
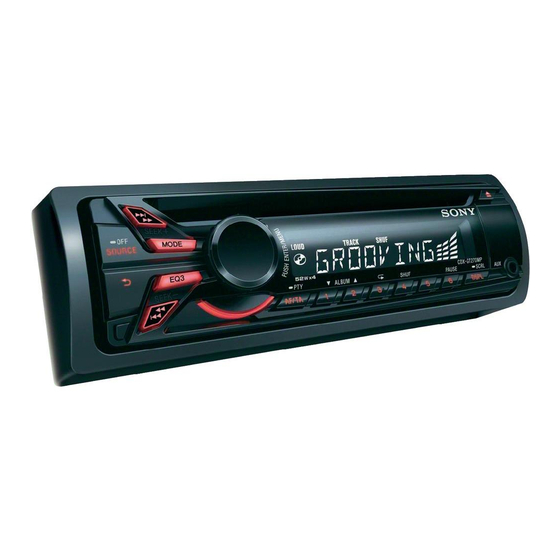
Location of controls Main unit RM-X201 Remote This section contains instructions on the location of controls and basic operations. commander SOURCE/OFF button Press to turn on the power; select the source (Radio/CD/AUX). Press and hold for 1 second to turn off the power. - Page 6 Control dial/ENTER/MENU button SOURCE button page 10 Press to turn on the power; select the Rotate to adjust volume. source (Radio/CD/AUX). Press to enter setup mode. ()/ () buttons Receptor for the remote To control radio/CD, the same as ...
-
Page 7: Tuning Automatically
Tuning automatically Radio Select the band, then press +/– to search for the station. Storing and receiving Scanning stops when the unit receives a station. Repeat this procedure until the stations desired station is received. Caution When tuning in stations while driving, use If you know the frequency of the station you want Best Tuning Memory (BTM) to prevent an to listen to, press and hold ... -
Page 8: Playing A Disc
Type of programs NEWS (News), INFORM (Information), SPORTS (Sports), TALK (Talk), ROCK (Rock), CLS ROCK (Classic Rock), ADLT Playing a disc HIT (Adult Hits), SOFT RCK (Soft Rock), TOP 40 (Top 40), COUNTRY (Country), OLDIES (Oldies), SOFT (Soft), NOSTALGA This unit can play CD-DA (also containing (Nostalgia), JAZZ (Jazz), CLASSICL CD TEXT) and CD-R/CD-RW (MP3/ (Classical), R AND B (Rhythm and Blues),... -
Page 9: Playing Tracks In Various Modes
Playing tracks in various Sound Settings and modes Setup Menu You can listen to tracks repeatedly (repeat play) or in random order (shuffle play). During playback, press ( ) or (SHUF) repeatedly until the Customizing the equalizer desired play mode appears. curve —... -
Page 10: Adjusting Setup Items
Adjusting setup items BTM* (page 7) Press , rotate the control dial *1 When the unit is turned off. until the desired category appears, then *2 When the tuner is selected. press it. SOUND: Rotate the control dial until the desired item appears, then press it. -
Page 11: Using Optional Equipment
AUX VOL* (AUX Volume Level) Adjusts the volume level for each Using optional connected auxiliary equipment: equipment “+18 dB” – “0 dB” – “–8 dB.” This setting negates the need to adjust the volume level between sources. Auxiliary audio equipment *1 When EQ3 is activated (page 9). -
Page 12: Additional Information
• Discs that this unit CANNOT play – Discs with labels, stickers, or sticky tape or Additional paper attached. Doing so may cause a malfunction, or may ruin the disc. Information – Discs with non-standard shapes (e.g., heart, square, star). Attempting to do so may damage the unit. -
Page 13: Maintenance
Do not apply – lossless compression too much force. Otherwise, the connectors – copyright-protected may be damaged. If you have any questions or problems concerning your unit that are not covered in this manual, consult your nearest Sony dealer. -
Page 14: Specifications
Power amplifier section Notes Output: Speaker outputs • For safety, turn off the ignition before cleaning Speaker impedance: 4 – 8 ohms the connectors, and remove the key from the Maximum power output: 52 W × 4 (at 4 ohms) ignition switch. -
Page 15: Troubleshooting
During playback or reception, Troubleshooting demonstration mode starts. If no operation is performed for 5 minutes The following checklist will help you remedy with “DEMO-ON” set, demonstration mode problems you may encounter with your unit. starts. Before going through the checklist below, –... -
Page 16: Error Displays/Messages
– Check the connection. If the error indication MP3/WMA files take longer to play back than remains on in the display, consult your others. nearest Sony dealer. The following discs take a longer time to start playback. PUSH EJT (Push Eject) –... - Page 17 If these solutions do not help improve the situation, consult your nearest Sony dealer. If you take the unit to be repaired because of CD playback trouble, bring the disc that was used at the time the problem began.
- Page 18 Avertissement si le contact de votre Pour plus de sécurité, installez cet véhicule ne comporte pas de position appareil dans le tableau de bord de votre véhicule. Pour de plus amples Veillez à régler la fonction Auto Off informations sur l’installation et les (page 12).
- Page 19 Table des matières Préparation ............4 Annulation du mode DEMO .
-
Page 20: Préparation
Appuyez sur après avoir réglé les minutes. Préparation Le réglage est terminé et l’horloge démarre. Annulation du mode Pour afficher l’horloge, appuyez sur . DEMO Vous pouvez désactiver l’affichage de démonstration qui apparaît lorsque cet Retrait de la façade appareil est éteint. -
Page 21: Installation De La Façade
Installation de la façade Insérez la partie de la façade dans la partie de l’appareil, tel qu’illustré, puis poussez sur le côté gauche jusqu’au déclic de mise en place. -
Page 22: Emplacement Des Commandes
Emplacement des commandes Appareil principal Télécommande RM-X201 Cette section contient les instructions relatives à l’emplacement des commandes et aux opérations de base. Touche SOURCE/OFF Appuyez pour mettre l’appareil en marche; sélectionner la source (Radio/ CD/AUX). Appuyez et maintenez enfoncée pendant 1 seconde pour éteindre l’appareil. - Page 23 CD : CD : / : ALBUM / (pendant la Permettent de sauter une plage (appuyez); de sauter des plages en lecture de fichiers MP3/WMA) continu (appuyez, puis appuyez de Permettent de sauter un album nouveau dans un délai d’environ (appuyez);...
-
Page 24: Radio
Touche ATT (Atténuation du son) Permet d’atténuer le son. Pour annuler Radio l’opération, appuyez à nouveau sur cette touche. Touche SOUND/MENU Mémorisation et Permet d’accéder directement au menu réception des stations SOUND (appuyez); d’accéder au mode de configuration (appuyez sur la touche Attention et maintenez-la enfoncée). -
Page 25: Réception Des Stations Mémorisées
Réception des stations Sélection de PTY (Type mémorisées d’émission) Utilisez la fonction PTY pour afficher ou Sélectionnez la bande, puis appuyez sur chercher un type d’émission souhaité. une touche numérique ( à ). Appuyez sur pendant la réception FM. Syntonisation automatique Le nom du type d’émission en cours apparaît si la station transmet des... -
Page 26: Réglage De Ct (Heure)
Réglage de CT (Heure) Les données CT de la transmission RDS règlent l’horloge. Lecture d’un disque Réglez l’appareil à « CT-ON » dans le menu de configuration (page 12). Cet appareil peut lire des CD-DA (y compris ceux qui contiennent des Remarque informations CD TEXT) et des CD-R/CD- La fonction CT peut ne pas fonctionner... -
Page 27: Lecture Des Plages Dans Divers Modes
Lecture des plages dans Réglages du son et divers modes menu de Vous pouvez écouter les plages en boucle configuration (lecture répétée) ou dans un ordre aléatoire (lecture aléatoire). En cours de lecture, appuyez plusieurs fois sur ( ) ou (SHUF) Personnalisation de la courbe jusqu’à... -
Page 28: Réglage Des Paramètres De Configuration
Réglage des paramètres REAR/SUB* Permet de commuter la sortie audio : de configuration « REAR-OUT » (amplificateur de puissance), « SUB-OUT » (caisson de Appuyez sur , tournez la graves). molette de réglage jusqu’à ce que la catégorie souhaitée s’affiche, puis CT (Heure) appuyez dessus. - Page 29 S.WOOFER* (Caisson de graves) M.DISPLAY (Affichage animé) SW LEVEL (Niveau du caisson de – « ON » : pour afficher les motifs animés. – « OFF » : pour désactiver l’affichage graves) animé. Permet de régler le volume du caisson de graves : «...
-
Page 30: Utilisation D'un Appareil En Option
Démarrez la lecture sur l’appareil audio portatif, avec un niveau de volume modéré. Utilisation d’un Réglez votre appareil sur le volume d’écoute habituel. appareil en option Réglez le niveau d’entrée (page 13). Appareil audio auxiliaire En raccordant un appareil audio portatif en option à... -
Page 31: Informations Complémentaires
• Cet appareil est conçu pour la lecture des disques conformes à la norme Compact Disc Informations (CD). Les DualDiscs et certains disques de musique encodés avec des technologies de complémentaires protection des droits d’auteur ne sont pas conformes à la norme Compact Disc (CD). Précautions Par conséquent, il est possible que ces disques ne soient pas lus par cet appareil. -
Page 32: Ordre De Lecture Des Fichiers
2.3 et 2.4 s’appliquent uniquement au format abordés dans ce mode d’emploi, contactez MP3. L’étiquette ID3 compte 15/30 caractères votre détaillant Sony. (1.0 et 1.1) ou 63/126 caractères (2.2, 2.3 et 2.4). • Lorsque vous nommez un fichier MP3, veillez à... -
Page 33: Caractéristiques Techniques
Remarques sur la pile au lithium Caractéristiques • Tenez la pile au lithium hors de la portée des techniques enfants. En cas d’ingestion de la pile, consultez immédiatement un médecin. • Essuyez la pile avec un chiffon sec pour assurer Radio un bon contact. -
Page 34: Dépannage
Poids : Environ 1,2 kg (2 lb 11 oz) Dépannage Accessoires fournis : Télécommande : RM-X201 Composants destinés à l’installation et aux La liste de vérification suivante vous aidera à raccordements (1 jeu) remédier aux problèmes que vous pourriez rencontrer avec cet appareil. Il est possible que votre détaillant ne dispose Avant de passer en revue la liste ci-dessous, pas de certains accessoires énoncés ci-dessus. -
Page 35: Réception Radio
Réception radio Les stations mémorisées sont effacées et l’heure est remise à zéro. Impossible de capter des stations. Le fusible est grillé. Le son est parasité. Émission de bruit lorsque la position de la clé Le raccordement est incorrect. de contact est modifiée. -
Page 36: Affichage Des Erreurs Et Messages
ERROR Si ces solutions ne permettent pas d’améliorer Le disque est sale ou inséré à l’envers. la situation, contactez votre détaillant Sony le – Nettoyez le disque ou insérez-le plus proche. correctement. Si vous devez faire réparer l’appareil en raison ... - Page 40 ©2012 Sony Corporation Printed in Thailand...