
Manuels Connexes pour Sharp KH-6I19FTPP-EU


Sommaire des Matières pour Sharp KH-6I19FTPP-EU
- Page 1 Home Appliances KH-6I19FTPP-EU Cooking Guide D’utilisatio Handleiding User Manual...
- Page 3 GB: The symbol on the product or on its packaging indicates that this product may not be treated as household waste. Instead it shall be handed over the applicable collection point for recycling of electrical and electronic equip-ment. By ensuring this product is disposed of correctly, you will help prevent potential nega-tive consequences for the environment and hu-man health, which could otherwise be caused by inappropriate waste handling of this product.
-
Page 4: Table Des Matières
CONTENU : Instructions de sécurité Description de l'appareil. Surface de cuisson et panneau de commande des plaques Fonctionnement de l'appareil Mise en route et à arrêt de l'appareil Mise en route et à arrêt des zones de cuisson Pause intelligente/Stop & Go Indicateur de chaleur résiduelle Fonction d'arrêt de sécurité... -
Page 5: Avertissements De Sécurité
et comprennent les AVERTISSEMENTS DE SÉ- CURITÉ risques encourus. Les LISEZ CES INSTRUCTIONS ENTIÈ- enfants doivent REMENT AVEC ATTENTION AVANT pas jouer avec l'appa- D’UTILISER VOTRE APPAREIL, ET reil. Le nettoyage et GARDEZ-LES DANS UN EMPLA- CEMENT PRATIQUE POUR l’entretien ne doivent CONSULTATION ULTÉRIEURE, pas être effectués par... - Page 6 de l’eau, mais coupez cuisson en utilisant l’alimentation de l’ap- leurs commandes et pareil puis recouvrez non en dépendant du les flammes, par ex. détecteur de casse- avec un couvercle ou role. une couverture antifeu. • Pour les plaques incor- •...
- Page 7 verre ou endommager Évitez de frapper ou de heurter le verre avec des accessoires. la surface. • Assurez-vous que le cordon d’ali- • N’utilisez pas de net- mentation ne soit pas coincé du- toyeur à vapeur pour rant l’installation. Si le cordon d’alimentation est endommagé, il nettoyer cet appareil.
-
Page 8: Durant L'utilisation
tionnement. Une plaque doit donc possible après avoir coupé l’appa- être installée en-dessous de ce reil ou les interrupteurs principaux. produit. • POUR MAINTENIR L’EFFICACI- • Durant l’utilisation TÉ ET LA SÉCURITÉ DE VOTRE APPAREIL, NOUS VOUS RE- • Ne placez pas de matériaux in- COMMANDONS DE TOUJOURS flammables ou combustibles dans UTILISER DES PIÈCES DÉTA-... -
Page 9: Description Des Plaques De Cuisson
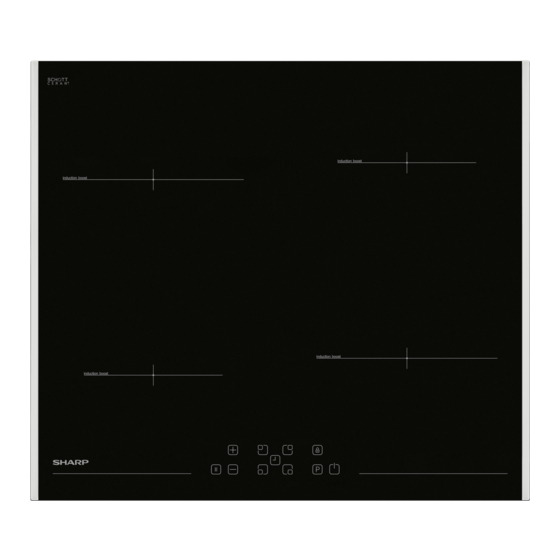
DESCRIPTION DES PLAQUES DE CUISSON Cher client, Veuillez lire les instructions de ce guide d'utilisation avant d'utiliser la plaque de cuisson et pour une consultation ultérieure. Surface de cuissons comprenant 4 foyers : Élément de cuisson à induction Panneau de commandes Note : L’apparence de votre plaque de cuisson peut être différente du modèle présenté, celui-ci pouvant être configuré... -
Page 10: Pause Intelligente/Stop & Go
Panneau de commande pour 4 foyers : 1 - Augmentation du réglage de 8 - Pause intelligente/Stop & Go température / de la minuterie 9 - Diminution du réglage de température / de la minuterie 2 - Affichage du foyer 10 - Sélection du foyer avant gauche 3 - Sélection du foyer arrière gauche 11 - Minuterie... -
Page 11: Utilisation De L'appareil
UTILISATION DE L'APPA- l’affichage clignote et le signal sonore retentit. Le niveau de puissance des REIL autres zones de cuisson reste le même. Utilisez les zones de cuisson à induction Après la mise sous tension de la table avec des articles de cuisine appropriés. de cuisson, la limite de puissance par défaut s’affiche à... -
Page 12: Indicateur De Chaleur Résiduelle
cuisson : la limite de puissance requise en sui- vant les étapes suivantes : Appuyez sur la touche de sélection du 1.Le réglage par défaut s’affiche foyer que vous souhaitez utiliser. Un d’abord à l’écran. (Figure A) point statique apparait sur l'affichage du foyer sélectionner et le point clignotant 2.Après cela, allumez la table de disparait des autres affichages. -
Page 13: Fonction D'arrêt De Sécurité
que la vitre vitrocéramique est dangereu- diminution de la température puis sement chaude autour d'une zone de cuis- appuyez sur la touche d'augmentation son. de la température à nouveau. "L" signifiant verrouillé ("locked") apparait dans tous les affichages de foyer et les Une fois la zone de cuisson éteinte, commandes ne sont plus actives. -
Page 14: Fonction Minuterie
Fonction minuterie : touche à tout moment éteint aussi la minuterie de rappel. La fonction de minuterie dispose de deux versions : Minuterie de cuisson (1 - 99 min) : La minuterie de rappel (1 - 99 Lorsque la plaque est allumée, une mi- min) : nuterie indépendante peut être program- mée pour chaque zone de cuisson. La minuterie de rappel peut être utilisée lorsque les zones de cuisson sont à... -
Page 15: Buzzer
Stop&Go / Pause intelligente Le signal sonore et la LED de minute- rie clignotante s'arrêteront automati- Lorsque la fonction Stop&Go / Pause quement après 30 secondes et/ou en intelligente est activée,elle réduit la puis- appuyant sur une touche quelconque. sance de tous les foyers allumés. Si vous désactivez la fonction Stop&Go Buzzer : / Pause intelligente, les foyers retourne-... -
Page 16: Économies D'énergie
plaques après chaque utilisation. temps de cuisson. Une poêle ou casserole est adaptée Lorsqu'un liquide commence à bouil- aux plaques à inductions si un aimant lir, réduisez le réglage de température. colle à son fond. Minimisez la quantité de liquide ou de gras Les récipients doivent être placées au utilisée pour réduire les temps de cuisson. -
Page 17: Installation De L'appareil
Installation de la plaque de Faites attention à ne pas rayer l'adhé- cuisson dans un plan de travail sif siliconé placé aux bords du verre en utilisant un racloir. La plaque peut être insérée dans Le racloir comprend un rasoir, il doit n'importe quel plan de travail pourvu qu'il supporte des température jusqu'à donc être gardé... - Page 18 DIMENSION DE PER- C1 (mm) C2 (mm) CAGE PROXIMITE D’UN MUR MIN A (mm) MIN B (mm) (Minimum) BOIS/ BETON OU CERAMI- QUE CARRELE DIMENSION DE PER- C1 (mm) C2 (mm) CAGE PROXIMITE D’UN MUR MIN A (mm) MIN B (mm) W (mm) D (mm) H (mm) (Minimum) DIMENSION DU PRODUIT...
-
Page 19: Raccordement Électrique
Appliquez de l’adhésif d’étanchéité fourni tout autour du bord inférieur du plan de travail le long du bord extérieur du pan- Support de montage pour plan de travail neau vitrocéramique. Ne l’étirez pas. Raccordement électrique Vissez les 4 supports de montage sur les parois latérales du produit. -
Page 20: Codes D'erreur
ment accessible une fois la plaque de for 32A use cuisson installée. S’il n’existe pas de circuit dédié et d’interrupteur à fusible pour la plaque de cuisson, ils doivent être installés par un électricien qualifié avant le raccor- dement de la plaque de cuisson. Un câble approprié... - Page 21 est différente de la valeur nominale, éteignez la plaque en appuyant sur , attendez que "H" disparaisse de toutes les zones, allumez la plaque en appuyant sur et continuez Si le problème se répète, éteignez et rallumez la plaque en appuyant sur puis continuez l'utilisation.
- Page 22 INHOUD Veiligheidsinstructies Beschrijving van het apparaat. Kookoppervlak en bedieningspaneel van pitten Bediening van het apparaat In- en uitschakelen van het apparaat De kookzones in- en uitschakelen Smart Pause Restwarmte-indicator Automatische uitschakelfunctie Kinderslot Timer-functie Zoemer Boost-functie Hints en tips Installatie van het apparaat Veilige installatie De kookplaat in een werkblad integreren Een elektrische aansluiting maken...
-
Page 23: Veiligheidswaarschuwingen
manier en op de ho- VEILIGHEIDSWAARSCHU- WINGEN ogte zijn van het ge- LEES DEZE INSTRUCTIES AAN- vaar tijdens het geb- DACHTIG EN VOLLEDIG DOOR VO- ruik. Kinderen mogen ORDAT U UW NIEUWE APPARAAT IN niet met het apparaat GEBRUIK NEEMT EN BEWAAR DEZE OP EEN HANDIGE PLAATS OM HEM spelen. - Page 24 beren om een brand hiervoor niet op de met water te blussen, pandetectie. maar schakel het ap- • Indien de kookplaten paraat uit en bedek voorzien zijn van een het vuur bijvoorbeeld deksel, dienen deze met een deksel of een schoon te zijn voordat branddeken.
-
Page 25: Installatiewaarschuwingen
pervlak. glas kan breken, dient u voorzich- tig te zijn bij het schoonmaken om • Geen stoomreinigers krassen te voorkomen. Vermijd gebruiken voor het re- slaan of kloppen op het glas met accessoires. inigen van het appa- • Zorg ervoor dat het netsnoer niet raat. -
Page 26: Tijdens Het Gebruik
Tijdens het schoonmaken en als zon, regen, sneeuw enz. onderhoud • De omringende materialen apparaat (kast) • Zet het apparaat altijd uit voordat enen temperatuur dergelijke werkzaamheden, 100 °C te kunnen doorstaan. zoals schoonmaken of onderho- ud, worden uitgevoerd. U kunt dit De temperatuur van de onderkant van de kookplaat kan toenemen doen door de stekker van het ap-... -
Page 27: Beschrijving Van De Kookplaat
BESCHRIJVING VAN DE KOOKPLAAT Beste klant, Gelieve de gebruikershandleiding aandachtig te lezen voor gebruik van de kookp- laat. Bewaar de handleiding voor toekomstig gebruik. Kookoppervlak voor 4 pitten: Inductieverwarmingselement Bedieningspaneel Opmerking: Het uiterlijk van uw kookplaat kan misschien anders zijn dan het hierboven weergegeven model vanwege zijn configuratie. - Page 28 Bedieningspaneel voor 4 pitten: 1-Temperatuurinstelling verhogen/timer 8- Smart Pause 2- Pit-display 9-Temperatuurinstelling verlagen/timer 10- Pitselectie linksonder 3- Pitselectie linksboven 4- Timer-display 11- Timer 5- Pitselectie rechtsboven 12- Pitselectie rechtsonder 6- Vergrendelingsslot 13- Boost 7- Vergrendelingsindicator 14- Aan/Uit NL - 7...
-
Page 29: Bediening Van Het Apparaat
BEDIENING VAN HET AP- Werking Als het totale vermogen de bijgestelde PARAAT limiet overschrijdt, zorgt de vermo- Gebruik de inductiekookzones met gensbeheerfunctie voor de automatisc- geschikte kookgerei. he verlaging van de vermogenslimiet van de laatst geselecteerde kookzone. Nadat de stroomvoorziening is aanges- Vervolgens zal de display knipperen loten, gaan alle displays even kort aan. -
Page 30: Restwarmte-Indicator
De kookzones inschakelen: erd en indien nodig worden vervangen. Na de inwerkingstelling van de kookp- Raak de pitselectietoets aan van de pit laat is het in de eerste 60 seconden waarop u wilt gaan koken. Er verschijnt mogelijk om de vereiste vermogensli- een statische punt op het display van miet met de de geselecteerde pit. -
Page 31: Automatische Uitschakelfunctie
Nadat de kookzone is uitgeschakeld, nog heet is, verschijnen "L" en "H" om verschijnt "H" op het desbetreffende en om op het display.) display totdat deze kookzone voldoen- de afgekoeld is. De kookplaat blijft in de vergrendel- de toestand totdat deze ontgrendeld wordt, zelfs wanneer de bediening uit- Automatische uitschakelfunctie: en opnieuw ingeschakeld is. -
Page 32: Zoemer
Kookwekker (1..99 min): voor een kookzone. Er zitten vier leds rondom de timer. Deze geven aan voor De kookwekker kan bediend worden welke kookzone de timer geactiveerd is. als de kookzones uitgeschakeld zijn. De timerdisplay toont "00" met een knipperende punt. 10 seconden na de laatste werking Raak de timerinstellingstoets zal de timer-display veranderen in de... -
Page 33: Hints En Tips
HINTS EN TIPS worden. De Boost-functie kan geactiveerd wor- Kookgerei den als de inductiemodule de instelling · Gebruik kookgerei met dikke, platte, op deze kookzone toestaat. Als de Boost- gladde bodems met dezelfde diameter functie actief is, verschijnt een „P" op het als de pit. -
Page 34: Installatie Van Het Apparaat
Energiebesparing Schoonmaaktips · Inductiekookzones passen zich in ze- · Gebruik geen schuursponsjes, bijtend kere mate automatisch aan aan de gro- reinigingsmiddelen, schoonmaaks- otte van de bodem van het kookgerei. prays of scherpe objecten om de Het magnetische deel van de bodem oppervlakken van de kookplaat schoon dient echter een minimale diameter te te maken. -
Page 35: Veilige Installatie
Veilige installatie · Indien er iets boven de kookplaat op- gehangen wordt, dient dit op minstens 65 cm erboven gehangen te worden. · De afzuigkap dient geplaatst te worden conform de instructies van de fabrikant. · De wand die in contact staat met de achterkant van de kookplaat dient CUT OUT DIMENSION C1 (mm) - Page 36 W (mm) D (mm) H (mm) PRODUCT DIMENSION Breng het meegeleverde eenzijdig zelfklevende afdichtplakband helemaal rond de glazen onderrand van de kookplaat langs de buitenrand van het keramische glaspaneel aan. Rek deze niet uit. CUTOUT DIMENSION C1 (mm) C2 (mm) NEIGHBOUR HOOD WALLS MIN A (mm) MIN B (mm)
-
Page 37: Een Elektrische Aansluiting Maken
· Schroef de 4 werkbladmontagebeu- geïnstalleerd. gels op de zijwanden van het product. Als er geen speciaal kookplaatcircuit en gezekerde schakelaar zijn, dienen deze te worden geïnstalleerd door een erkende elektricien voordat de kookp- laat wordt aangesloten. Op de groepenkast (hoofdzekeringen- kast) moet een geschikte goedgekeur- de kabel worden aangesloten die moet worden beveiligd door een geschikte... -
Page 38: Foutcodes
laat uit door aan te raken, wacht for 32A use tot “H” verdwijnt voor alle kookzones en zet de kookplaat weer aan door aan te raken. Zet het gebruik voort. Als dezelfde foutmelding weergegeven wordt, neem dan contact op met erkende onderho- udsmonteurs. - Page 39 CONTENTS: Safety instructions Appliance description. Cooking surface and control panel of heaters Operation of the appliance Switching the appliance on and off Switching the cooking-zones on and off Smart Pause Residual heat indicator. Safety switch off function Child Lock Timer function Buzzer Boost Function Hints and tips...
-
Page 40: Safety Warnings
maintenance shall not SAFETY WARNINGS be done by children READ THESE INSTRUCTIONS CA- REFULLY AND COMPLETELY BEFO- without supervision. RE USING YOUR APPLIANCE, AND • WARNING: The app- KEEP THEM IN A CONVENIENT PLA- CE FOR REFERENCE WHEN NECES- liance and its acces- SARY. - Page 41 • Do not use harsh ab- avoid the possibility of rasive cleaners electric shock. sharp metal scrapers • For induction hobs, to clean the oven door metallic objects such glass and other sur- as knives, forks, spo-...
- Page 42 signed only for cooking food and is and disposed of immediately. intended for indoor domestic hou- • Protect your appliance against sehold use only and should not be atmospheric effects. Do not expo- used for any other purpose or in se it to effects such as sun, rain, any other application, such as for snow etc.
- Page 43 position when it is not being used. • During cleaning and main- tenance • Always turn the appliance off befo- re operations such as cleaning or maintenance. You can do it after removing the plug for the applian- ce off or turning the main switches off.
-
Page 44: Description Of The Hob
DESCRIPTION OF THE HOB Dear Customer, Please read the instructions in this user guide before using the hob and keep them for future reference. Cooking Surface for 4 heaters: Induction heating element Control panel Note: The appearance of your hob maybe different than the model shown above due to its configuration. - Page 45 Control Panel for 4 heaters: 1- Increase heat setting/timer 8- Smart Pause 2- Heater display 9- Decrease heat setting/timer 10- Lower left heater selection 3- Upper left heater selection 4- Timer display 11- Timer 5- Upper right heater selection 12- Lower right heater selection 6- Key lock 13- Boost 7- Key lock indicator...
-
Page 46: Operation Of The Appliance
OPERATION OF THE decreases the last selected hob zone power limit automatically, then the APPLIANCE display flashs and buzzer signal sounds. Use the induction cooking zones with The power level of other cooking zones suitable cookware. remain the same. After energizing the hob, default power After the power supply is turned on, all limit occurs on the display for 4-5 of displays light up for a moment. -
Page 47: Switching The Cooking-Zones On And Off
2.After this disappear turn on the hob simultaneously turns the temperature by on/off key to ''0'') 3.Touch the ‘A’ and ‘B’buttons at If the cooking zone is hot, "H" will be the same time for 2-3 seconds. Then displayed instead of "0". default power limit will appear again. -
Page 48: Child Lock
Key Lock Key lock functionality is for blocking Heat setting Safety switch and setting the appliance into safe off after mode during operation. Touch 1 - 2 6 Hours modifications as, for example, 3 - 4 5 Hours increasing heat settings and others 4 Hours should not be possible. -
Page 49: Buzzer
signal will be stopped automatically displayed if the cooking zone is hot. after 30 seconds and/or by operating The sound signal and the blinking any key. of the LED timer will be stopped automatically after 30 seconds and/or by operating any key. The minute minder timer can be changed or switched off anytime by operating the increase timer key... -
Page 50: Hints And Tips
have been switched on. get various noises from the pans, this is due to the design of the pans and If you then deactivate the Smart does not effect the performance or Pause, the heaters will automatically safety of the hob. return to the previous level. -
Page 51: Installation Of The Appliance
· Do not use abrasive pads, corrosive instructions. cleaners, aerosol cleaners or sharp · The wall in contact with the rear of objects to clean the surfaces of the the hob must be made of flameproof hob. - Page 52 W (mm) D (mm) H (mm) PRODUCT DIMENSION W (mm) D (mm) H (mm) PRODUCT DIMENSION CUT OUT DIMENSION C1 (mm) C2 (mm) NEIGHBOUR HOOD WALLS MIN A (mm) MIN B (mm) WOOD / CONCRETE OR CERAMIC TILED EN - 14...
-
Page 53: Making An Electrical Connection
Apply one-sided self-adhesive sealing tape supplied all the way round the lower glass edge of the cooking sur- face along the outer edge of the glass ceramic panel. Do not stretch it. · Screw the 4 worktop mounting brac- kets on the side walls of the product. CUTOUT DIMENSION C1 (mm) C2 (mm) - Page 54 as that quoted on the rating plate which tioned away from direct heat sources. is situated at the back of your hob. It should not be to a temperature rise of more than 50°C above room tempe- The circuit can support the appliance rature.
- Page 55 ERROR CODES If there is an error, error code will be showed at heater displays. E1 : The cooling Fan is disabled, call an authorized service agent. E3 : The power supply voltage is over the rated values, turn the hob off by touching ,wait until “H”...
- Page 56 Service & Support Visit Our Website sharphomeappliances.com...