Table des Matières
Publicité
Les langues disponibles
Les langues disponibles
Liens rapides
Publicité
Chapitres
Table des Matières

Manuels Connexes pour Kenwood CR-ST100S


Sommaire des Matières pour Kenwood CR-ST100S
- Page 1 Smart Radio CR-ST100S BEDIENUNGSANLEITUNG JVCKENWOOD Corporation...
-
Page 2: Table Des Matières
Inhaltsverzeichnis Seite Inhalt 1. Vor Einschalten der Spannungsversorgung 2. Inbetriebnahme 3. Komponenten und Funktionen 4. Hauptmenü 5. Internetradio 6. Podcasts 7. Spotify 8. USB-Abspieler 9. Digitalradio DAB+ 10. UKW Radio 11. Bluetooth Audio 12. Analoge Anschlüsse 13. Schlummer (Sleeptimer) 14. Wecker 15. -
Page 3: Vor Einschalten Der Spannungsversorgung
– Dieses Gerät darf nur mit dem mitgelieferten Steckernetzteil an die Netzspannung angeschlossen werden. Verwenden Sie das Steckernetzteil ausschließlich für das Smart Radio CR-ST100S. Achten Sie in jedem Fall darauf, dass die örtliche Netzspannung mit den Angaben auf dem Steckernetzteil übereinstimmen. - Page 4 1.9 Eindringen von Fremdmaterial und Flüssigkeit – Achten Sie darauf, dass niemals Fremdmaterial oder Flüssigkeit durch Belüftungsöffnungen in dieses Gerät eindringt, da es anderenfalls zu Kontakt mit unter hoher Spannung stehenden Bauteilen bzw. zu einem Kurzschluss mit dem sich daraus ergebenden Brand oder elektrischen Schlag kommen kann.
-
Page 5: Automatische Energiesparfunktion
15 Minuten in den Standby-Modus, wenn die Wiedergabe mit einer sehr geringen Laut- stärke erfolgt bzw. das Radio stummgeschaltet ist. Diese Einstellung kann nicht verändert werden. EU-Konformitätserklärung Hiermit erklärt die JVCKENWOOD Corporation, dass der Funkanlagentyp CR-ST100S der Richtlinie 2014/53/EU entspricht. Der vollständige Text der EU-Konformitätserklärung ist unter der folgenden Internetadresse verfügbar: http://www.kenwood.com/cs/eudoc/... -
Page 6: Inbetriebnahme
2. Inbetriebnahme 2.1 Auspacken Packen Sie das Gerät vorsichtig aus und achten Sie darauf, dass alle Zubehörteile vorhanden sind: • Infrarot Fernbedienung • Steckernetzteil • Bedienungsanleitung • 2 x Batterie AAA/LR03 • Audiokabel 1.5 Meter - 3.5mm Klinkenstecker 2.2 Anschließen •... -
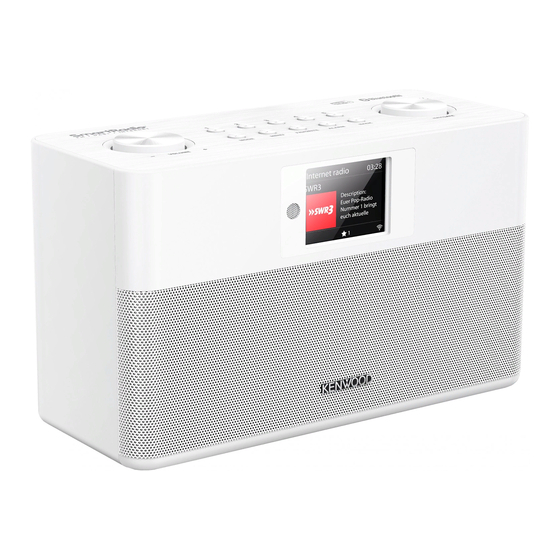
Page 7: Komponenten Und Funktionen
3. Komponenten und Funktionen Vorderseite 1 - Display 2 - UKW / DAB+ Antenne 3 - USB Anschluss 4 - Anschluss Steckernetzteil 5 - Line-Out Anschluss 6 - Aux-In Anschluss Rückseite Draufsicht 1 - Lautstärke / Standby 2 - Stationstasten (1 - 5) 3 - Auswählen / Bestätigen 4 - Modusauswahl 5 - Menü... - Page 8 3.1 Ein- / Ausschalten (Standby) Drücken Sie die <Standby> Taste auf der Fernbedienung oder am Gerät, um das Radio einzuschalten. Drücken Sie die Taste erneut, um das Gerät in den Standby-Modus zu versetzen. Um es vollständig auszuschal- ten, trennen Sie es von der Stromversorgung. 3.2 Navigieren in den Menüs Durch Drücken der Tasten <Hoch/Runter/Links/Rechts>...
-
Page 9: Netzwerkverbindung Halten
3.8 Start des Einrichtungsassistenten Für eine einfache und schnelle Erstinbetriebnahme (Einstellung von Zeit und Datum, Einrichtung der Internet- verbindung, etc.) empfehlen wir Ihnen die Ausführung des Einrichtungsassistenten. Wählen Sie dazu bitte „JA“ aus. Möchten Sie den Einrichtungsassistenten überspringen, wählen Sie „NEIN“. Alle Einstellungen, die mithilfe des Einrichtungsassistenten erfolgen, können später auch einzeln über die Systemeinstellungen vorgenommen werden. -
Page 10: Internetradio
5. Internetradio Das Internetradio bietet eine riesige Auswahl an unterschiedlichsten Angeboten rund um die Welt. Dabei können Sie die Stationen auf vielfältige Weise selektieren. Wählen Sie dazu bitte im Haupt- menü die Quelle „Internetradio“ aus. 5.1 Sendersuche Das Radio bietet verschiedene Möglichkeiten, nach gewünschten Sendern zu suchen. Navigieren Sie innerhalb der Menüpunkte und Optionen. -
Page 11: Lokale Sender
5.1.5 Lokale Sender Um gezielt nach Sendern aus dem Land des aktuellen Standorts des Radios zu suchen, gehen Sie bitte wie folgt vor: Drücken Sie die Taste <Menu>, um die „Senderliste“ aufzurufen. Nach Bestätigung der Auswahl navigie- ren Sie zum Menü mit dem Ländernamen des aktuellen Standorts (z.B. „Deutschland“). Innerhalb dieser lokalen Eingrenzung können Sie zusätzlich nach Genres, lokalen oder populären Sendern suchen. -
Page 12: Podcasts
6. Podcasts Podcasts sind abrufbare Beiträge zu verschiedenen Themen, z.B. Infosendungen, Nachrichten und vieles mehr. Ähnlich wie bei Internetradio, besteht hier die Möglichkeit, Podcasts zu filtern oder in der gesamten Datenbank nach einem Podcast zu suchen. Wählen Sie dazu bitte im Hauptmenü die Quelle „Podcasts“ aus. 6.1 Suchen von Podcasts Das Radio bietet verschiedene Möglichkeiten, nach Podcasts zu suchen. -
Page 13: Spotify
„Verfügbare Geräte“ angezeigt. Drücken Sie auf „Verfügbare Geräte“ um eine Liste mit den im Netzwerk verfügbaren Geräten anzuzeigen. Wählen Sie nun „KENWOOD CR-ST100S“ aus, und die Wiedergabe erfolgt über das Radio. Eine erfolgreiche Verbindung wird durch grüne Schrift angezeigt. Nach erfolgreicher Erstverbindung können Sie das Smartphone auch wie folgt mit dem Radio verbinden: Wählen... -
Page 14: Usb-Abspieler
7.2 Favoriten (Speicherplätze) Zur Speicherung von Playlisten stehen 10 Speicherplätze (Favoriten) zur Verfügung. 7.2.1 Speichern von Playlisten auf den Direktwahltasten 1-5 am Radio: Am Radio können Sie die Speicherplätze 1 – 5 mittels der Zifferntasten belegen. Wählen Sie dazu die ge- wünschte Playlist aus und drücken eine Zifferntaste bis „Gespeichert“... -
Page 15: Digitalradio Dab
8.3 Playlist Sie haben die Möglichkeit eine Playlist für Ihre MP3-Dateien zu erstellen. Dazu stehen 200 Speicherplätze zur Verfügung. Um einen Titel in der Playlist zu speichern, drücken Sie in der Titelübersicht die Taste <OK> so lang, bis im Display „Zur Playlist hinzugefügt“ erscheint. Der Titel ist nun in der Playlist gespeichert. Zum Abspielen der Liste drücken Sie die Taste <MENU>, wählen „Playlist“... - Page 16 9.3 Senderliste Drücken Sie die Taste <MENU> und bestätigen Sie „Senderliste“ mit <OK>. Verwenden Sie die Tasten <HOCH/RUNTER> oder den <NAVIGATE> Regler zur Auswahl eines Senders und drücken Sie <OK> zur Bestätigung. Das Gerät beginnt automatisch mit der Wiedergabe. Hinweis: Die Empfangsqualität eines Senders ist von Faktoren wie Wetter, Aufstellungsort und Antennenausrichtung abhängig.
-
Page 17: Ukw Radio
9.6 DRC (Dynamic Range Control) Manche DAB+ Sender unterstützen DRC, welches den Unterschied zwischen lauten und leisten Tönen redu- ziert. Folgende Einstellungen sind möglich: DRC hoch: Starke Kompression der unterschiedlichen Lautstärken. Die Dynamik wird stark vermindert. DRC tief: Niedrige Kompression, ohne große Verminderung der Dynamik DRC aus: Es erfolgt keine Kompression Um die Einstellungen vorzunehmen, gehen Sie wie folgt vor:... -
Page 18: Audio-Einstellungen
Öffnen Sie jetzt die Bluetooth-Einstellungen auf dem zu koppelnden Endgerät und starten dort die Suche nach verfügbaren Bluetooth-Geräten. Wählen Sie „KENWOOD CR-ST100S“ aus, und starten Sie den Kop- pelungsvorgang. Nach erfolgreichem Pairing erscheint im Display „Verbunden“. Jetzt kann die Musikwie-... -
Page 19: Analoge Anschlüsse
Eine grundlegende Bedienung von Wiedergabe/Pause und Titelsprung vorwärts/rückwärts ist über die ent- sprechenden Tasten auf der Fernbedienung möglich. Hinweis: Manche Endgeräte verlangen bei der Koppelung einen PIN-Code, geben Sie dann „0000“ ein. 11.2 Automatische Verbindung nach bereits erfolgter Koppelung Wenn von der Quelle „Bluetooth Audio“ umgeschaltet oder das Radio ausgeschaltet wird, so erfolgt eine Trennung der Bluetooth-Verbindung. -
Page 20: Schlummer (Sleeptimer)
13. Schlummer Mit dieser Funktion können Sie das Radio nach einer festgelegten Zeitspanne automatisch in den Stand- by-Modus schalten. Sie können dabei zwischen 15, 30, 45 oder 60 Minuten wählen, „Schlummer aus“ löscht die vorher eingestellte Zeitspanne. Drücken Sie dazu bei gewählter Audio-Quelle die Taste <MENU> und wählen Sie „Hauptmenü“. -
Page 21: Systemeinstellungen
14.6 Speichern: Haben Sie alle Einstellungen vorgenommen, drücken Sie bitte die Taste <OK> zum Speichern der Einstellungen. Ein aktivierter Wecker wird mit einem Weckersymbol und der Nummer des aktiven Weckers links unten im Display angezeigt. Im Standby-Modus sehen Sie zusätzlich auch noch die eingestellte Weckzeit. 14.7 Ausschalten des Weckers nach dem Wecken Zum Ausschalten des Weckers bis zum nächsten Weckzyklus drücken Sie bitte die Taste <Standby>... -
Page 22: Interneteinstellungen
15.2 Interneteinstellungen 15.2.1 Netzwerkassistent Der Netzwerkassistent hilft beim Verbinden des Radios mit dem Internet. Um ihn aufzurufen, gehen Sie bitte wie folgt vor: Wählen Sie im Menü „Systemeinstellungen“ die „Interneteinstellungen“ aus und bestätigen danach „Netzwerkassistent“. Das Radio startet nun einen Suchlauf nach verfügbaren WLAN-Verbindungen und listet diese im Anschluss auf. -
Page 23: Netzwerkeinstellungen Anzeigen
15.2.6 WPS überspringen / Einrichtung mittels PSK (Pre-Shared-Key) Wählen Sie „WPS überspringen“ um die Verbindung durch Netzwerkschlüssel herzustellen. Bei Netzwer- ken ohne WPS-Unterstützung gelangen Sie direkt in die Eingabemaske. Geben Sie nun den Schlüssel ein und bestätigen diesen mit der Schaltfläche „OK“. Ist die Eingabe korrekt, so verbindet sich das Radio mit Ihrem Netzwerk und stellt eine Internetverbindung her. -
Page 24: Zeiteinstellungen
15.5 Netzwerkprofil Hier sehen Sie die Liste der im Radio gespeicherten Netzwerkprofile. Sollten Sie mehrere Profile angelegt haben, so wählen sie das mit geringsten Distanz zum entsprechenden Router oder AP. Sie können nicht mehr benötigte Netzwerkprofile löschen, indem Sie den Tasten <HOCH> oder <RUNTER> auf der Fernbedienung, oder dem <NAVIGATE>... -
Page 25: Sprache
16.4 Menü „Uhrzeitformat“ In diesem Menü können Sie festlegen ob die Anzeige der Uhr im Standby-Modus analog oder digital erfol- gen soll. Auswählen mit den Tasten <LINKS> oder <RECHTS>, die Bestätigung erfolgt mit der Taste <OK>. Die aktuell ausgewählte Option ist mit „*“ gekennzeichnet. 17. -
Page 26: Einrichtungsassistent
Die Versionsnummer der installierten Software können Sie Menü „Systemeinstellungen“ unter dem Punkt „Info“ abfragen. Achtung! Achten Sie darauf, dass eine stabile Stromversorgung besteht, bevor Sie ein Softwareupdate starten. Eine Unterbrechung während eines Updates kann irreparable Schäden am Radio hervorrufen! 20. Einrichtungsassistent Im Menü... - Page 27 Es öffnet Sich das WLAN-Menü des Endgerätes, wählen Sie dort das Netzwerk „KENWOOD CR-ST100S“ aus. Nach dem Verbinden steht „Verbunden mit KENWOOD CR-ST100S“ in der App. Folgen Sie den weiteren Anweisungen der App zur vollständigen Einrichtung des Radios. Abschließend verbindet sich das Radio mit dem Netzwerk und Sie können durch Drücken von „Mein Audiosystem verwenden“...
-
Page 28: Wartung Und Pflege
25. Störungsbehebung Bitte überprüfen Sie bei Fehlfunktionen die folgenden Punkte: Kein Ton Stecken Sie den Netzstecker ordnungsgemäß ein. Stellen Sie die Lautstärke auf den richtigen Pegel. Stellen Sie sicher, dass die gewünschte Quelle ausgewählt ist. Das System reagiert nicht auf Tastendruck ... -
Page 29: Entsorgung
27. Entsorgung Entsorgung von gebrauchten elektrischen und elektronischen Geräten und Batterien. Das Symbol (durchgestrichene Mülltonne) auf dem Produkt oder seiner Verpackung weist darauf hin, dass dieses Produkt nicht als normaler Haushaltsabfall behandelt werden darf, sondern an einer Annahmestelle für das Recycling von elektrischen und elektronischen Geräten und Batterien abgegeben werden muss. Durch Ihren Beitrag zur korrekten Entsorgung dieses Produktes schützen Sie die Umwelt und die Gesundheit Ihrer Mitmenschen. -
Page 30: Technische Daten
28. Technische Daten CR-ST100S Spannungsversorgung Wechselspannung 100 – 240 V Eingangswechselstromfrequenz 50/60 Hz Hersteller Netzadapter Dongguan Guanjin Electronics Technology Co.Ltd Marke und Modellkennung Netzadapter KPTEC K25V120200G Ausgangspannung / -strom / -leistung Gleichspannung 12,0 V / 2,0 A / 24,0 W... - Page 31 Bitte bewahren Sie diese Garantiekarte sorgfältig auf. Kenwood gewährt auf dieses Gerät eine Garantie von zwei Jahren ab Kaufdatum laut Rechnung oder Kaufbeleg des Kenwood-Händlers. Diese Garantie erstreckt sich auf Material- und Verarbeitungs-Mängel. Wir behalten uns das Recht vor, das Produkt umzutauschen, falls eine wirtschaftliche Instandsetzung nicht mehr möglich ist.
- Page 33 Smart Radio CR-ST100S OPERATING INSTRUCTIONS JVCKENWOOD Corporation...
- Page 34 Table of contents Page Content 1. Before switching on the power supply 2. Start-up 3. Components and functions 4. Main menu 5. Internet radio 6. Podcasts 7. Spotify 8. Musik player 9. Digital radio DAB+ 10. FM Radio 11. Bluetooth Audio 12.
-
Page 35: Before Switching On The Power Supply
– This device may only be connected to the mains voltage with the supplied mains adapter. Use the plug-in power supply only for the Smart Radio CR-ST100S. In any case, make sure that the local mains voltage matches the specifications on the mains adapter. If you are unsure about the type of power supply in your home, contact your specialised dealer or power company. - Page 36 1.9 Penetration of foreign material and liquid – Be careful not to allow foreign material or liquid to enter this device through ventilation holes, otherwise it may come into contact with high voltage components or short circuit resulting in a fire or electric shock.
-
Page 37: Network Connection
15 minutes if it is played at a very low volume or if the radio is muted. Please note that the setting can´t be changed. EU Declaration of Conformity Hereby, JVCKENWOOD Corporation declares that the radio equipment type CR-ST100S complies with Directive 2014/53/EU. The full text of the EU Declaration of Conformity is available at the following Internet address: http://www.kenwood.com/cs/eudoc/... -
Page 38: Start-Up
2. Start-up 2.1 Unpacking Carefully unpack the device and make sure all accessories are present: • Infrared remote control • Mains adapter • Operating instructions • 2 x AAA/LR03 batteries • Audio cable 1.5 meters - 3.5mm jack plug 2.2 Connecting •... -
Page 39: Components And Functions
3. Components and functions Front side 1 - Display 2 - UKW / DAB+ antenna 3 - USB connection 4 - Power supply connector 5 - Line-out connection 6 - Aux-in connection Backside Top view 1 - Volume / Standby 2 - Station buttons (1 - 5) 3 - Select / Confirm 4 - Mode selection... - Page 40 3.1 Switching On / Off (standby) Press the <Standby> button on the remote control or on the device to switch on the radio. Press the button again to put the device into standby mode. To switch it off completely, disconnect it from the power supply.
-
Page 41: Starting The Setup Wizard
3.8 Starting the setup wizard For a simple and quick initial start-up (setting the time and date, setting up the internet connection, etc.), we recommend that you run the setup wizard. To do this, please select "YES". If you want to skip the setup wizard, select “NO”. -
Page 42: Internet Radio
5. Internet radio The internet radio offers a huge selection of different offers around the world. You can select the stations in a variety of ways. To do this, please select the "Internet radio". 5.1 Station search The radio offers various options for searching for the desired station. Navigate within the menu items and options. -
Page 43: Local Stations
5.1.5 Local stations To specifically search for stations from the country of the current location of the radio, please proceed as follows: Press the <Menu> button to call up the”Station list”. After confirming the selection, navigate to the menu with the country name of the current location (e.g. "Germany"). Within this local limit, you can also search for genres, local or popular stations. -
Page 44: Podcasts
6. Podcasts Podcasts are available articles on various topics, e.g. Information broadcasts, news and much more. As with internet radio, here you can filter Podcasts or search for a Podcast in the entire database. To do this, please select the source "Podcasts" in the main menu. 6.1 Finding podcasts The radio offers various options for searching for podcasts. -
Page 45: Spotify
Press "Available devices" to display a list of the devices available on the network. Now select “KENWOOD CR-ST100S” and the playback will take place on the radio. A successful connection is indicated by green script. After a successful first connection, you can also connect the smartphone to the radio as follows: Select the source “Spotify”... -
Page 46: Playing Mp3 Files
7.2 Favourites (memory locations) 10 memory locations (favourites) are available for storing playlists. 7.2.1 Saving playlists on the direct selection buttons 1-5 on the radio: On the radio, you can assign memory locations 1 - 5 using the number keys. To do this, select the desired playlist and press a number key until "Preset stored"... -
Page 47: Digital Radio Dab
8.3 Playlist You have the option to create a playlist for your MP3 files. 200 memory locations are available for this. To save a track in the playlist, press the <OK> button in the track list until "Added to My play- list"... -
Page 48: Station List
9.3 Station list Press the <MENU> button and confirm "Station list" with <OK>. Use the <UP/DOWN> buttons or the <NAVIGATE> knob to select a station and press <OK> to confirm. The device starts playing automatically. Note: The reception quality of a station depends on factors such as weather, installation location and antenna orientation. -
Page 49: Station Order
9.6 DRC (Dynamic Range Control) Some DAB+ stations support DRC, which reduces the difference between loud and soft tones. The following settings are possible: DRC high: Strong compression of the different volumes. The dynamic is greatly reduced. DRC low: Low compression without much loss of dynamics. DRC off: There is no compression. -
Page 50: Audio Settings
Now open the Bluetooth settings on the terminal device to be paired and start searching for available Bluetooth devices there. Select “KENWOOD CR-ST100S” and start the pairing process. After successful pairing, "Connected" appears on the display. Now the music playback can be con- trolled via the terminal. -
Page 51: Analogue Connections
on the remote control. Note: Some terminal devices require a PIN code when connecting, then enter "0000". 11.2 Automatic connection after pairing has already taken place If the source is switched from "Bluetooth Audio" or the radio is switched off, the Bluetooth connec- tion is disconnected. -
Page 52: Sleep Timer
13. Sleep timer With this function you can switch the radio to standby mode automatically after a set period of time. You can choose between 15, 30, 45 or 60 minutes, "Sleep OFF" deletes the previously set period of time. To do this, press the <MENU> button while the audio source is selected and select "Main menu". -
Page 53: System Settings
14.6 Save: Once you have made all the settings, please press the <OK> button to save the settings. An activated alarm clock is shown with an alarm symbol and the number of the active alarm clock at the bottom left of the display. In standby mode you can also see the set alarm time. 14.7 Switching off the alarm clock after waking up To switch off the alarm clock until the next alarm cycle, please press the <Standby>... -
Page 54: Network Settings
15.2 Network settings 15.2.1 Network wizard The network wizard helps to connect the radio to the Internet. To call it up, please proceed as follows: Select the "Network” in the "System Settings" menu and then confirm "Network wizard". The radio now starts a search for available WLAN connections and then lists them. The various networks can be selected using the <UP>... -
Page 55: Netremote Pin Setup
15.2.6 Skip WPS/Setup using PSK (pre-shared key) Select "Skip WPS" to establish the connection using the network key. In the case of networks wit- hout WPS support, you can go directly to the input mask. Now enter the key and confirm it with the "OK"... -
Page 56: Network Profile
15.5 Network profile Here you can see the list of network profiles saved on the radio. If you have created several profiles, choose the one closest to the corresponding router or AP. You can delete network profiles that are no longer required by pressing the <UP> or <DOWN> but- ton on the remote control or the <NAVIGATE>... -
Page 57: Language
16.4 "Standby format" menu In this menu you can specify whether the clock should be displayed in standby mode in analogue or digital form. Select with the <Left> or <Right> button, the confirmation is made with the <OK>but- ton. The currently selected option is marked with”*”. 17. -
Page 58: Setup Wizard
You can check the version number of the installed software under the "System settings" menu under "Info". Attention! Make sure that there is a stable power supply before you start a software update. An interruption during an update can cause irreparable damage to the radio! 20. - Page 59 "Set up audio system"“. Press "NEXT" and select the menu item "SELECT THE ACCESS POINT"“. The WLAN menu of the terminal device opens up, select the"KENWOOD CR-ST100S" network the- re. After connecting, "Connected to KENWOOD CR-ST100S" appears in the App. Follow the fur- ther instructions of the App to set up the radio completely.
-
Page 60: Maintenance And Care
25. Troubleshooting Please check the following points in case of malfunctions: No sound Plug in the power plug properly. Adjust the volume to the correct level. Make sure the desired source is selected. The system does not respond at the touch of a button ... -
Page 61: Disposal
27. Disposal Disposal of used electrical and electronic equipment and batteries. The crossed-out wheeled bin symbol on the product or its packaging indicates that this product must not be treated as normal household waste, but must be returned to a collection point for the recycling of electrical and electronic equipment and batteries. -
Page 62: Technical Specifications
28. Technical specifications CR-ST100S Power supply AC voltage 100 - 240 V Input AC frequency 50/60 Hz Manufacturer AC Adapter Dongguan Guanjin Electronics Technology Co.Ltd Model identifier KPTEC K25V120200G Output voltage / current / power 12,0 V / 2,0 A / 24,0 W... - Page 63 Dear Customer, We would like to thank you for purchasing this Kenwood product. If this product is found to be defective in material or workmanship under normal operating conditions, in accordance with the provisions of the following warranty, we will rectify these faults free of charge or replace the device.
- Page 65 Smart Radio CR-ST100S NOTICE D’EMPLOI JVCKENWOOD Corporation...
- Page 66 Sommaire Page Sommaire 1. Avant la mise sous tension 2. Mise en service 3. Éléments et fonctions 4. Menu principal 5. Radio Internet 6. Podcasts 7. Spotify 8. Lecteur USB 9. Radio DAB 10. Radio FM 11. Audio Bluetooth 12. Ports analogiques 13.
-
Page 67: Avant La Mise Sous Tension
– Cet appareil ne doit être branché au secteur qu’à l’aide du bloc d’alimentation à fiche fourni. Utili- sez uniquement le bloc d’alimentation à fiche pour la Smart Radio CR-ST100S. Veillez systématique- ment à ce que la tension de secteur locale corresponde aux indications figurant sur le bloc d'alimenta- tion à... - Page 68 1.9. Pénétration de corps étrangers et de liquides – Veillez à ce qu’aucun corps étranger ou liquide ne puisse pénétrer dans l’appareil par les orifices de ventilation. Cela pourrait conduire à un contact avec des éléments sous haute tension ou un court-circuit, qui peuvent occasionner un incendie ou une électrisation.
-
Page 69: Connexion Réseau
Par la présente, la société JVCKENWOOD Corporation déclare que le type de dispositif radio CR- ST100S satisfait aux exigences de la directive 2014/53/UE. Le texte complet de la déclaration de conformité UE est disponible via l’adresse Internet suivante : http://www.kenwood.com/cs/eudoc/ Fabricant : JVCKENWOOD Corporation 3-12. -
Page 70: Mise En Service
2. Mise en service 2.1. Déballage Déballez avec précaution l’appareil en veillant à ce que tous les accessoires soient présents. • Télécommande infrarouge • Bloc d'alimentation à fiche • Notice d’emploi • 2 piles AAA/LR03 • Câble audio 1,5 m – fiche jack de 3,5 mm 2.2. -
Page 71: Éléments Et Fonctions
3. Éléments et fonctions Face avant 1 - Afficheur 2 - Antenne FM / DAB+ 3 - Port USB 4 - Connecteur du bloc d’alimentation à fiches 5 - Port Line-Out 6 - Port Aux-In Face arrière Vue d'en haut 1 - Volume / mode veille 2 - Touches de stations (1 - 5) 3 - Sélectionner / confirmer... - Page 72 3.1. Activer / désactiver (mode veille) Appuyez sur la touche < Standby > (Veille) de la télécommande ou de l’appareil pour allumer la radio. Appuyez une nouvelle fois sur cette touche pour commuter l’appareil en mode veille. Pour éteindre l’appareil entièrement, débranchez-le de l’alimentation électrique. 3.2.
-
Page 73: Démarrage De L'assistant De Configuration
3.8. Démarrage de l’assistant de configuration Pour faciliter la première mise en service (réglage de la date et de l’heure, configuration de la connexion Internet, etc.) et la rendre plus rapide, nous vous recommandons d’exécuter l’assistant de configura- tion. À cet effet, sélectionnez < OUI >. Si vous préférez ne pas exécuter l’assistant de configuration, sélectionnez <... -
Page 74: Radio Internet
5. Radio Internet La radio Internet permet de bénéficier d’un choix énorme d’offres les plus diverses provenant du monde entier. Vous pouvez choisir les stations de différentes manières. Sélectionnez à cet effet la source < Radio Internet > dans le menu principal. 5.1. -
Page 75: Enregistrement De Stations Sur Les Touches D'accès Direct 1-5 De La Radio
5.2. Favoris (emplacements mémoire) Vous disposez de 20 emplacements mémoire pour mémoriser vos stations préférées (favoris). Vous pouvez enregistrer dans vos favoris des stations provenant des sources < Radio Internet > et < Pod- casts >. 5.2.1. Enregistrement de stations sur les touches d’accès direct 1-5 de la radio : Les emplacements mémoire 1 à... -
Page 76: Podcasts Populaires
Podcasts à une vitesse croissante (max. 32 fois) vers l’avant ou l’arrière. Un actionnement bref de la touche < SAUT DE TITRE ARRIÈRE > vous ramène au début du Podcast. 6.1.1. Recherche par pays et régions Appuyez sur la touche < Menu > pour ouvrir la < Podcast list > afin de rechercher des Podcasts provenant de continents, pays et régions spécifiques. -
Page 77: Mémorisation De Podcasts Avec La Télécommande
< Appareils disponibles > s’affichent. Appuyez sur < Appareils disponibles > pour afficher la liste des appareils disponibles sur le réseau. Sélectionnez ensuite < KENWOOD CR-ST100S >. La lecture s’effectue alors depuis la radio. Le succès de la connexion est indiquée par le texte vert. Après le succès de la première connexion, vous pouvez aussi connecter le smartphone à... -
Page 78: Enregistrement De Listes De Titres Sur Les Touches D'accès Direct 1-5 De La Radio
7.2. Favoris (emplacements mémoire) Vous disposez de 10 emplacements mémoire (favoris) pour mémoriser des listes de titres. 7.2.1. Enregistrement de listes de titres sur les touches d’accès direct 1-5 de la radio : Les emplacements mémoire 1 à 5 de la radio peuvent être affectés à l’aide des touches numériques. Sélectionnez à... -
Page 79: Liste De Titres
Les fonctions sont activées comme suit par l’actionnement répété de la touche : Appuyer 1 x : lecture en boucle / Appuyer 2 x : lecture aléatoire Appuyer 3 x : lecture en boucle et aléatoire / Appuyer 4 x : les deux fonctions sont désactivées 8.3. -
Page 80: Réglage Manuel
9.2. Réglage manuel Vous pouvez aussi régler manuellement des ensembles. Appuyez à cet effet sur la touche < MENU > pour ouvrir le menu, puis sélectionnez l’option < Réglage manuel >. Sélectionnez ensuite le canal souhaité et confirmez par < OK >. Les informations au sujet de l’ensemble et de la puissance du sig- nal s’affichent alors. -
Page 81: Ordre D'affichage Des Stations
facilement aux emplacements mémoire en appuyant brièvement sur la touche < FAVORITE > de la radio ou < FAV > de la télécommande. Utilisez les touches < HAUT/BAS > ou le bouton de réglage < NAVIGATE > (Naviguer) pour sélectionner une station, puis appuyez sur < OK > pour confirmer. Remarque : les emplacements mémoire ne peuvent pas être supprimés, mais ils peuvent être écrasés par d’autres stations. -
Page 82: Paramètres Audio
10.3. Paramètres audio Pour les stations à réception faible, le passage en réception mono permet éventuellement d’obtenir une légère amélioration de la qualité. Appuyez à cet effet sur la touche < MENU >, puis sélecti- onnez l’option < Réglages audio >. Dans le menu < Réception FM faible > suivant, vous pouvez répondre à... -
Page 83: Connexion Automatique Après L'appariage
à découvrir >. Ouvrez alors les réglages Bluetooth du terminal à apparier et lancez la recherche d’appareils Bluetooth disponible sur ce terminal. Sélectionnez l’option < KENWOOD CR-ST100S > et lancez le processus d’appariage. Lorsque l’appariage s’est terminé avec succès, l’écran affiche <... -
Page 84: Minuterie De Veille (Sleeptimer)
13. Minuterie de veille Cette fonction vous permet de commuter automatiquement la radio en mode veille après un laps de temps défini. Vous pouvez choisir entre 15, 30, 45 ou 60 min. L’option < mode veille désactivé > efface le laps de temps réglé précédemment. Après avoir sélectionné la source audio, appuyez sur la touche <... -
Page 85: Désactivation Du Réveil Après Le Réveil
14.5. Volume : réglez ici le volume souhaité pour le réveil. 14.6. Enregistrer : lorsque vous avez procédé à tous les réglages, appuyez sur la touche < OK > pour mémoriser les réglages. Un réveil activé est indiqué par le symbole de réveil et le numéro du réveil activé affichés en bas à gauche de l’écran. -
Page 86: Paramètres Internet
15.2 Paramètres Internet 15.2.1. Assistant de réseau L’assistant de réseau vous aide à connecter la radio à Internet. Pour l’ouvrir, procédez comme suit : sélectionnez dans le menu < Configuration > l’option < Réseau >, puis confirmez par < Assistant réseau >. -
Page 87: Connexion Ouverte
se connecte à votre réseau et établit la connexion Internet. 15.2.7. Connexion ouverte Nous vous recommandons de ne pas établir de connexion avec un réseau ouvert. Si le réseau que vous avez choisi n’est pas crypté, vous pouvez le confirmer à l’aide de la touche < OK >. Ensuite, la connexion Internet est établie. -
Page 88: Effacer Les Paramètres Réseau
15.6. Effacer les paramètres réseau? Ce menu permet de supprimer les paramètres réseau du profil actuel. Sélectionnez à cet effet le bouton < OUI > et confirmez votre saisie à l’aide de la touche < OK >. L’actionnement du bouton <... -
Page 89: Langue
17. Langue Le menu < Langue > permet de définir la langue des menus de la radio. Si vous avez mis l’appareil en service avec l’assistant de configuration, vous avez déjà réglé la langue d’affichage de l’appareil. Pour sélectionner une langue, utilisez les touches < HAUT > ou < BAS >, puis confirmez par la tou- che <... -
Page 90: Assistant De Configuration
20. Assistant de configuration Vous pouvez redémarrer l’assistant de configuration depuis le menu < Assistant réglages >. Procé- dez à cet effet comme indiqué au point < 3.8 Démarrage de l’assistant de configuration >. 21. Info Ce menu contient notamment le numéro de version du progiciel actuel. Préparez ce numéro lorsque vous souhaitez vous adresser au service clients. -
Page 91: Appli Undok
Appuyez sur < SUIVANT > et sélectionnez l’option de menu < CHOISIR LE POINT D’ACCÈS >. Le menu Wifi du terminal s’affiche et vous pouvez y sélectionner le réseau < KENWOOD CR- ST100S >. Après la connexion, le message < Connecté à KENWOOD CR-ST100S > s’affiche dans l’appli. -
Page 92: Élimination Des Défaillances
25. Élimination des défaillances En cas de dysfonctionnements, veuillez vérifier les points suivants : Absence de son branchez correctement la fiche d’alimentation. réglez le volume à un niveau adéquat. assurez-vous d’avoir bien sélectionné la source souhaitée. Le système ne réagit pas à l’actionnement des touches débranchez le bloc d’alimentation à... -
Page 93: Mise Au Rebut
27. Mise au rebut Mise au rebut d’appareils électriques et électroniques usagés et de piles Le symbole (poubelle barrée) sur le produit ou son emballage indique que ce produit ne doit pas être jeté aux ordures ménagères, mais doit être remis à un point de collecte pour le recyclage d’appareils électriques et électroniques et de piles. -
Page 94: Caractéristiques Techniques
28. Caractéristiques techniques – CR-ST100S Tension d’entrée Tension alternative 100 - 240 V Fréquence du CA d’entrée 50/60 Hz Fabricant de l’adaptateur secteur Dongguan Guanjin Electronics Technology Co.Ltd Référence du modèle KPTEC K25V120200G Tension de sortie / Courant de sortie / Puissance de sortie 12,0 V / 2,0 A / 24,0 W La consommation d’électricité... -
Page 95: Garantie
Le Produit est garanti pour une durée de deux ans à compter de la date de première acquisition auprès d‘un détaillant de produits Kenwood. La Garantie couvre tant les pièces de rechange que la main d‘oeuvre et la réparation sera effectuée gratuitement. Nous nous réservons le droit de remplacer le Produit si sa réparation ne s‘avère pas possible. - Page 97 Smart Radio CR-ST100S MANUALE DI ISTRUZIONI JVCKENWOOD Corporation...
- Page 98 Indice Pagina Contenuto 1. Prima di attivare la tensione di alimentazione 2. Messa in servizio 3. Componenti e funzioni 4. Menu principale 5. Radio Internet 6. Podcast 7. Spotify 8. Lettore USB 9. Radio digitale DAB+ 10. Radio FM 11. Audio Bluetooth 12.
-
Page 99: Prima Di Attivare La Tensione Di Alimentazione
– Questo apparecchio può essere collegato alla tensione di rete solo con l'alimentatore di rete in dotazione. Utilizzare l'alimentatore di rete solo per la Smart Radio CR-ST100S. In ogni caso, assicurarsi che la tensione di rete locale corrisponda alle specifiche dell'alimentatore. Se non siete sicuri del tipo di alimentazione elettrica della vostra casa, contattate il vostro rivenditore o l'azienda elettrica locale. - Page 100 1.9. Penetrazione di materiale estraneo e liquido – Non permettere che materiali estranei o liquidi entrino nell'apparecchio attraverso le aperture in dotazione, poiché ciò potrebbe causare il contatto diretto dell'apparecchio con elementi soggetti a tensioni eccessive, provocare cortocircuiti, incendi o scosse elettriche. Non versare mai liquidi di alcun tipo su questo apparecchio.
-
Page 101: Connessione Di Rete
15 minuti se la radio è in riproduzione a volume molto basso o se la radio è silenziata. Questa impostazione non può essere modificata. Dichiarazione di conformità UE JVCKENWOOD Corporation dichiara che l'apparecchiatura radio tipo CR-ST100S è conforme alla Direttiva 2014/53/UE. Il testo integrale della dichiarazione di conformità UE è disponibile al seguente indirizzo Internet: http://www.kenwood.com/cs/eudoc/... -
Page 102: Messa In Servizio
2. Messa in servizio 2.1. Sconfezionamento Sconfezionare delicatamente il dispositivo e assicurarsi che tutti gli accessori siano presenti. • Telecomando a infrarossi • Alimentatore di rete • Manuale di istruzioni • 2 x batterie AAA/LR03 • Cavo audio 1.5 metri - spina jack da 3.5 mm 2.2. -
Page 103: Componenti E Funzioni
3. Componenti e funzioni Lato anteriore 1 - Display 2 - Antenna FM / DAB+ antenna 3 - Porta USB 4 - Collegamento alimentatore a spina 5 - Collegamento Line-Out 6 - Collegamento Aux-In Lato posteriore Pianta 1 - Volume / Standby 2 - Tasti stazioni (1 - 5) 3 - Selezione / Conferma 4 - Selezione della modalità... - Page 104 3.1. Accensione/Spegnimento (Standby) Premere il tasto <Standby> sul telecomando p sul dispositivo per accendere la radio. Premere nuovamente il tasto per mettere il dispositivo in modalità standby. Per spegnerlo completa- mente, scollegarlo dall'alimentazione elettrica. 3.2. Navigazione dei menu È possibile navigare fra i menu premendo i pulsanti <Su/Giù/Sinistra/Destra> sul telecomando. Pre- mendo il tasto <OK>...
-
Page 105: Menu Principale
3.8. Avvio della procedura guidata di configurazione Per una semplice e rapida messa in funzione iniziale (impostazione dell'ora e della data, impostazione della connessione Internet, ecc.) vi raccomandiamo di eseguire l’assistente di configurazione. Si prega di selezionare "SÌ". Se si desidera saltare l’assistente di configurazione, selezionare "NO". Tutte le impostazioni effettuate con l'aiuto dell'assistente di configurazione possono essere modi- ficate anche in un secondo momento individualmente tramite le impostazioni di sistema. -
Page 106: Radio Internet
5. Radio Internet La radio via Internet offre una vasta scelta di stazioni diverse in tutto il mondo. È possibile selezionare “ Radio Internet“ dal menu le stazioni in molti modi. Per farlo, si prega di selezionare la sorgente principale. 5.1. - Page 107 5.1.5. Stazioni locali Per cercare specificamente le stazioni del paese in cui si trova attualmente la radio, procedere come segue: Premere il pulsante <Menu>, per richiamare l’"Lista stazioni". Dopo aver confermato la selezione, passare al menu con il nome del paese della località attuale (ad es "Italia"). All'interno di questa restrizione locale è...
-
Page 108: Podcast
6. Podcast I podcast sono contributi recuperabili su vari argomenti, ad esempio trasmissioni di informazioni, notizie e molto altro ancora. Come per la radio via Internet, è possibile filtrare i podcast o cercare un podcast nell'intera banca dati. Per farlo, si prega di selezionare la sorgente“Podcast“ dal menu principale. -
Page 109: Spotify
6.2. Preferiti (spazi di memoria) Sono disponibili 20 posizioni di memoria (Preferiti) per memorizzare i vostri Podcast preferiti. Potete occupare queste posizioni Preferite a vostro piacimento con le stazioni "Radio Internet" e "Pod- cast". 6.2.1. Memorizzazione dei Podcast sulle posizioni di selezione diretta 1-5 della radio: Alla radio, con i tasti numerici si possono assegnare le posizioni di memoria da 1 a 5 con i tasti numerici. - Page 110 Connect e ”Dispositivi disponibili”. Premere il tasto "Dispositivi disponibili" per visualizzare un elenco di dispositivi disponibili in rete. Ora seleziona "KENWOOD CR-ST100S" e la riproduzione avviene via radio. Un collegamento riuscito è indicato da una scritta verde. Dopo una prima connessione iniziale riuscita, è...
-
Page 111: Radio Digitale Dab
8.1. Riproduzione di file MP3 Selezionare la cartella o il brano desiderato dal menu, la riproduzione musicale viene avviata con il tasto <OK>. È possibile utilizzare i tasti <SU/GIU’/SINISTRA/DESTRA> per navigare fra le strutture delle cartelle. Col tasto <PLAY/PAUSE> si mette in pausa e riprende la riproduzione. Premendo in modo permanente i tasti <SALTA TITOLO>... - Page 112 9.1. Scansione stazioni Per cercare le stazioni ricevibili, è possibile avviare una scansione automatica. Per fare questo, richi- amare il menu con il tasto <MENU> per aprire il menu e selezionare "Ricerca completa". Il display mostra "Ricerca" il numero di stazioni trovate finora e una barra di avanzamento corrispondente. Dopodiché...
- Page 113 9.5.2. Memorizzare le stazioni DAB+ con il telecomando: Le posizioni di memoria da 1 a 10 possono essere assegnate tramite i tasti numerici del telecomando. Selezionare la stazione desiderata e premere un tasto numerico sul telecomando fino a quando "Pre- selez.
-
Page 114: Radio Fm
10. Radio FM Nel menu principale, selezionare "FM" per passare alla ricezione FM. 10.1. Scansione stazioni È possibile cercare automaticamente le stazioni FM. Per avviare la ricerca automatica delle stazioni, premere il tasto <OK> sul telecomando o sulla radio. La ricerca si ferma alla stazione successiva trovata e inizia a suonare. -
Page 115: Audio Bluetooth
"Bluetooth" dal menu principale. Il display mostra "Bluetooth rilevabile". A questo punto aprire le impostazioni Bluetooth sul dispositivo da accoppiare e avviare la ricerca dei dispositivi Bluetooth disponibili. Selezionare "KENWOOD CR-ST100S" e iniziare il proces- so di accoppiamento. Dopo il successo dell'accoppiamento, il display mostra "Collegato". -
Page 116: Collegamenti Analogici
11.4. Interruzione della connessione Bluetooth Se si desidera interrompere il collegamento ad un dispositivo accoppiato, premere il tasto <BT PAIR> per 2 secondi sul telecomando. La radio torna quindi in modalità di accoppiamento. 12. Collegamenti analogici 12.1. Aux-In Per riprodurre musica, è possibile collegare alla porta Aux-In dispositivi esterni come lettori MP3, letto- ri DVD o console di gioco. -
Page 117: Impostazioni Di Sistema
14.1. Abilita: Selezionare qui i giorni in cui la sveglia deve essere attivata. È disponibile la seguente selezione: Off / Ogni giorno / Una volta / fine settimana / Giornie della sett. Selezionare "Off" per disattivare una sveglia attivata. 14.2. Ora: Utilizzare i tasti <SU>... -
Page 118: Impostazioni Internet
15.1. Equalizzatore Con l'equalizzatore è possibile regolare il suono della radio a proprio piacimento. È possibile scegliere tra impostazioni preconfigurate o creare un proprio profilo. Procedere nel modo seguente: Premere il tasto <MENU> e selezionare "Config. di sistema" e/o "Equalizzatore". Con i tasti <SU> oppure <GIU’>... -
Page 119: Visualizzare Le Impostazioni Di Rete
15.2.4. Impostazione tramite PBC Selezionare la rete desiderata ”[WPS...]”. In seguito col “Menu WPS” selezionare l'opzione "Pre- mere tasto" e confermare. Ora premete il tasto WPS sul vostro router o punto di accesso (AP). Per la procedura esatta, consultare il manuale d'uso del router o dell'AP. In alternativa, il processo può essere avviato anche nel menu “Impostazioni di rete”... -
Page 120: Profilo Di Rete
15.4. Impostazione del PIN NetRemote In questo menu è possibile impostare un PIN di 4 cifre che viene richiesto la prima volta che viene impostata l'app UNDOK (vedi capitolo 24). L'impostazione predefinita è "1234". Il PIN deve essere cambiato immediatamente. 15.5. -
Page 121: Lingua
16.3. Menu "Imposta formato" In questo menu è possibile determinare se l'orologio viene visualizzato in formato 12 o 24 ore. Selezi- onare con i tasti <SINISTRA> oppure <DESTRA>; la conferma viene fatta col tasto <OK>. L'opzione attualmente selezionata è contrassegnata con “*” marcato. 16.4. -
Page 122: Installazione Guidata
Poi il software viene scaricato e vi verrà richiesto di "Procedere", ossia se l'aggiornamento deve esse- re effettuato. Si prega di selezionare "SÌ" per concedere oppure "NO" per annullare l'aggiornamento. Lampeggiante alternativamente "Attenzione: non rimuovere l’alimentazione" e la versione del software da installare. - Page 123 Premere “AVANTI“ e selezionare la voce di menu “SELEZIONARE PUNTO DI ACCESSO“. Si apre il menu WLAN dell'apparecchio terminale, selezionare la rete "KENWOOD CR-ST100S". Dopo il collegamento, il display mostra "Collegato a KENWOOD CR-ST100S" nell'app. Seguire le istruzioni dell'applicazione per completare la configurazione della radio. Infine, la radio si collega alla rete e si può...
-
Page 124: Risoluzione Dei Problemi
25. Risoluzione dei problemi In caso di malfunzionamenti, verificare i seguenti punti: Nessun suono Inserire correttamente la spina di rete. Impostare il volume al livello corretto. Verificare sempre che sia selezionata la fonte desiderata. Il sistema non risponde alla pressione di un tasto Scollegare e ricollegare l’alimentatore di rete. -
Page 125: Smaltimento
27. Smaltimento Smaltimento delle apparecchiature elettriche ed elettroniche e delle batterie usate. Il simbolo (cestino barrato) sul prodotto o sulla sua confezione indica che questo prodotto non deve essere trattato come un normale rifiuto domestico, ma deve essere riconsegnato ad un punto di rac- colta per il riciclaggio di apparecchiature elettriche, elettroniche e batterie. -
Page 126: Dati Tecnici
28. Dati tecnici CR-ST100S Tensione di ingresso Tensione alternata 100 - 240 V Frequenza di ingresso CA 50/60 Hz Produttore dell'adattatore di rete Dongguan Guanjin Electronics Technology Co.Ltd Identificativo del modello KPTEC K25V120200G Tensione di uscita / Corrente di uscita / Potenza di... - Page 127 La preghiamo di conservare questa Cartolina di Garanzia, dato che le verrà richiesta in caso di reclamo. Il Prodotto è garantito per due anni dalla data di acquisto presso qualsiasi venditore CEE di prodotti Kenwood. La garanzia copre sia i materiali che la mano d‘opera e la reparazione verrà eseguita gratuitamente. Kenwood si riserva il diritto di sostituire il Prodotto con uno identico o, nell‘ipotesi questo non fosse più...
- Page 129 Smart Radio CR-ST100S GEBRUIKSAANWIJZING JVCKENWOOD Corporation...
- Page 130 Inhoudsopgave Pagina Inhoud 1. Vóór het inschakelen van de spanningsvoorziening 2. Ingebruikname 3. Componenten en functies 4. Hoofdmenu 5. Internetradio 6. Podcasts 7. Spotify 8. Muziekspeler 9. Digitale radio DAB+ 10. FM-radio 11. Bluetooth audio 12. Analoge aansluitingen 13. Sluimertijd 14.
-
Page 131: Vóór Het Inschakelen Van De Spanningsvoorziening
– Dit apparaat mag alleen met de bijgeleverde stekkernetvoeding op de netspanning aangesloten worden. Gebruik de stekkernetvoeding uitsluitend voor de Smart Radio CR-ST100S. Let er in ieder geval op dat de lokale netspanning met de gegevens op de stekkernetvoeding overeenstemmen. Als u niet zeker bent van het type van de spanningsvoorziening in uw woning, richt u zich tot uw dealer of tot het lokale energiebedrijf. - Page 132 1.9. Binnendringen van vreemd materiaal en vloeistof – Let erop dat er nooit vreemd materiaal of vloeistof door ventilatieopeningen dit apparaat binnen- dringt, omdat het anders tot contact met onder hoge spanning staande componenten dan wel tot een kortsluiting met de daaruit voortvloeiende brand of elektrische schok kan komen. Mors nooit vloeistoffen van eender welke aard op dit apparaat.
-
Page 133: Eu-Conformiteitsverklaring
Deze instelling kan niet worden gewijzigd. EU-conformiteitsverklaring Hiermee verklaart de JVCKENWOOD Corporation dat de radio-installatie van het type CR-ST100S aan de richtlijn 2014/53/EU voldoet. De volledige tekst van de EU-conformiteitsverklaring is op volgende website beschikbaar: http://www.kenwood.com/cs/eudoc/... -
Page 134: Ingebruikname
2. Ingebruikname 2.1. Uitpakken Pak het apparaat voorzichtig uit en let erop dat alle accessoires aanwezig zijn: • Infrarood-afstandsbediening • Stekkernetvoeding • Gebruiksaanwijzing • 2 x batterij AAA/LR03 • Audiokabel 1.5 meter - 3.5 mm klinkstekker 2.2. Aansluiten • Sluit de stekkernetvoeding op de radio en op de wandcontactdoos aan. •... -
Page 135: Componenten En Functies
3. Componenten en functies Voorzijde 1 - Display 2 - UKW / DAB+ antenne 3 - USB-aansluiting 4 - Aansluiting stekkernetvoeding 5 - Line-Out aansluiting 6 - Aux-In aansluiting Achterzijde Bovenaanzicht 1 - Volume / Stand-by 2 - Stationstoetsen (1 - 5) 3 - Selecteren / Bevestigen 4 - Modusselectie 5 - Menu... - Page 136 3.1. In- / uitschakelen (stand-by) Druk op de <Stand-by> toets op de afstandsbediening of aan het apparaat om de radio in te schakelen. Druk opnieuw op de toets om het apparaat in de stand-by modus te zetten. Om het apparaat volledig uit te schakelen, verbreekt u het van de stroomvoorziening.
-
Page 137: Hoofdmenu
3.8. Start van de instellingsassistent Voor een eenvoudige en snelle eerste ingebruikname (instelling van tijd en datum, instelling van de internetverbinding etc.) adviseren wij u de uitvoering van de instellingsassistent. Gelieve daarvoor „JA“ te selecteren. Wenst u de instellingsassistent over te slaan, dan kiest u „NEE“. Alle instellingen die met behulp van de instellingsassistent plaatsvinden, kunnen later ook individueel via de systeeminstellingen doorgevoerd worden. -
Page 138: Internetradio
5. Internetradio De internetradio biedt een zeer ruime waaier aan de meest uiteenlopende aanbiedingen in de hele wereld. Daarbij kunt u de stations op veelvuldige wijze selecteren. Gelieve daarvoor in het hoofd- menu de bron „Internetradio“ te selecteren. 5.1. Zoeken van zenders De radio biedt verschillende mogelijkheden om naar gewenste zenders te zoeken. - Page 139 5.1.5. Lokale zenders Gelieve, om doelgericht naar zenders uit het land van de actuele locatie van de radio te zoeken, als volgt te werk: Druk op de toets <Menu>, om de „Zenderlijst“ op te roepen. Na bevestiging van de selectie navige- ert u naar het menu met de landnaam van de actuele locatie (bv.
-
Page 140: Podcasts
6. Podcasts Podcasts zijn oproepbare inzendingen over verschillende onderwerpen, bv. informatieve uitzendingen, nieuws- berichten en veel meer. Net zoals bij internetradio bestaat hier de mogelijkheid om podcasts te filteren of in de hele databank naar een podcast te zoeken. Gelieve in het hoofdmenu de bron „Podcasts“ te selecteren. 6.1. -
Page 141: Spotify
Connect-logo en „Beschikbare apparaten“ aangegeven. Druk op „Beschikbare apparaten“ om een lijst met de in het netwerk beschikbare apparaten weer te geven. Selecteer nu „KENWOOD CR-ST100S“ en de weergave vindt plaats via de radio. Een succesvolle verbinding wordt door groene letters aangegeven. Na een succesvolle eerste verbinding kunt u de smartphone ook als volgt met de radio verbinden: Kies in het hoofd- menu de bron „Spotify“... - Page 142 gen worden. 7.2. Favorieten (geheugenplaatsen) Om playlists op te slaan, staan er 10 geheugenplaatsen (favorieten) ter beschikking. 7.2.1. Opslaan van playlists op de directe keuzetoetsen 1-5 aan de radio: Aan de radio kunt u de geheugenplaatsen 1 – 5 door middel van de cijfertoetsen bezetten. Selecteer daarvoor de gewenste playlist en druk op een cijfertoets totdat „Voorkeuze opgeslagen“...
-
Page 143: Digitale Radio Dab
8.3. Playlist U hebt de mogelijkheid om een playlist voor uw MP3-bestanden samen te stellen. Daarvoor staan er 200 geheugenplaatsen ter beschikking. Om een titel in de playlist op te slaan, drukt u tijdens de weergave de toets <OK> zolang in totdat op het display „Toegevoegd aan Mijn afspeellijst“ ver- schijnt. - Page 144 9.3. Zenderlijst Druk op de toets <MENU> en bevestig „Zenderlijst“ met <OK>. Gebruik de toetsen <OMHOOG/ OMLAAG> of de <NAVIGATE> regelaar voor de selectie van een zender en druk op <OK> om te bevestigen. Het apparaat begint automatisch met de weergave. Opmerking: De ontvangstkwaliteit van een zender is van factoren zoals weer, plaats van opstelling en antenne-oriëntering afhankelijk.
-
Page 145: Fm-Radio
9.6. DRC (Dynamic Range Control) Sommige DAB+ zenders ondersteunen DRC dat het verschil tussen luide en stille klanken vermindert. Volgende instellingen zijn mogelijk: DRC hoog: Sterke compressie van de verschillende volumes. De dynamiek wordt in ruime mate verminderd. DRC laag: Lage compressie, zonder aanzienlijke vermindering van de dynamiek DRC uit: Er volgt geen compressie... -
Page 146: Audio-Instellingen
10.3. Audio-instellingen Bij zenders met zwakke ontvangst kan door omschakeling naar mono-ontvangst een lichte kwaliteits- verbetering gerealiseerd worden. Druk daarvoor op de toets <MENU> en selecteer „Audio-instel- ling“ . In het hiernavolgende menu „FM-ontvangst zw.“ kunt u nu de vraag „Alleen luisteren?“ met „JA“... -
Page 147: Analoge Aansluitingen
Bluetooth-apparaten. Selecteer „KENWOOD CR-ST100S“ en start het koppelings- proces. Nadat het Pairing voltooid werd, verschijnt op het display „Verbonden“. Nu kan de muziekweergave via het eindapparaat gestuurd worden. Gebruik daarvoor een mu- ziek-app naar keuze. De basisbediening van weergave/pauze en titelsprong is via de betreffende toetsen op de afstandsbediening mogelijk. -
Page 148: Sluimertijd
13. Sluimertijd Met deze functie kunt u de radio na een vastgelegde tijdspanne automatisch naar de stand-by modus omschakelen. U kunt daarbij tussen 15, 30, 45 of 60 minuten kiezen, „Sluimer UIT“ wist de vooraf ingestelde tijdspanne. Druk daarvoor bij een gekozen audiobron op de toets <MENU> en kies „Hoof- dmenu“. -
Page 149: Systeeminstellingen
14.6. Opslaan: Hebt u alle instellingen doorgevoerd, gelieve dan de toets <OK> in te drukken om de instellingen op te slaan. Een geactiveerde wekker wordt met een wekkersymbool en met het nummer van de actieve wekker links onderaan op het display weergegeven. In de stand-by modus ziet u aanvullend ook nog de ingestelde wektijd. -
Page 150: Internetinstellingen
15.2 Internetinstellingen 15.2.1. Netwerkassistent De netwerkassistent helpt bij de verbinding van de radio met het internet. Gelieve, om deze op te roepen, als volgt te werk te gaan: Selecteer in het menu „Systeeminstellingen“ de „Netwerk“ en bevestig daarna „Netwerkwizard“. De radio gaat nu van start met een afstemming van de zenders volgens beschik- bare WLAN-verbindingen en somt deze vervolgens op. - Page 151 15.2.6. WPS overslaan / totstandkoming door middel van PSK (Pre-Shared-Key) Kies „Sla WPS over“ om de verbinding door een netwerksleutel tot stand te brengen. Bij netwerken zonder WPS-ondersteuning geraakt u direct in het invoermasker. Voer nu de sleutel in en bevestig deze met de knop „OK“.
-
Page 152: Tijdsinstellingen
15.5. Netwerkprofiel Hier ziet u de lijst met de in de radio opgeslagen netwerkprofielen. Indien u meerdere profielen aan- gemaakt hebt, kiest u het profiel met de kortste afstand tot de/het betreffende router of AP. U kunt niet meer benodigde netwerkprofielen wissen doordat u met de toets <OMHOOG> of <OMLAAG>... -
Page 153: Taal
16.4. Menu „Tijdnotatie“ In dit menu kunt u vastleggen, of de weergave van de klok in de stand-by modus analoog of digitaal dient te gebeuren. Selecteren met de toets <LINKS> of <RECHTS>, de bevestiging vindt plaats met de toets <OK>. De op het gegeven moment geselecteerde optie is met „*“ aangegeven. 17. -
Page 154: Informatie
Het versienummer van de geïnstalleerde software kunt u in het menu „Systeeminstellingen“ onder het punt „Info“ opvragen. Let op! Let erop dat er een stabiele stroomvoorziening is voordat u een software-update start. Een onderbreking tijdens een update kan onherstelbare schade aan de radio veroorzaken! 20. - Page 155 Het WLAN-menu van het eindapparaat gaat open, selecteer daar het netwerk „KENWOOD CR- ST100S“ . Na de verbinding staat „Verbonden met KENWOOD CR-ST100S“ in de app. Volg de verdere aanwijzingen van de app voor een complete instelling van de radio. Tot slot wordt de radio met het netwerk verbonden en kunt u door het indrukken van „Mijn audiosysteem gebruiken“...
-
Page 156: Oplossing Van Storingen
25. Oplossing van storingen Gelieve bij functiestoringen de volgende punten te controleren: Geen klank Steek de netstekker naar behoren in. Zet het volume op het juiste niveau. Vergewis u ervan dat de gewenste bron geselecteerd is. Het systeem reageert niet op het indrukken van een toets Trek de stekkernetvoeding af en sluit deze weer aan. -
Page 157: Afvalverwerwijdering
27. Afvalverwerwijdering Afvoer van gebruikte elektrische en elektronische apparaten en batterijen. Het symbool (doorgestreepte vuilnisbak) op het product of op de verpakking daarvan wijst erop dat dit product niet als normaal huishoudelijk afval behandeld mag worden, maar op een recyclingpunt voor de recycling van elektrische en elektronische apparaten en batterijen afgegeven moet worden Door uw bijdrage aan een correcte afvoer van dit product beschermt u het milieu en de gezondheid van uw medemens. -
Page 158: Technische Gegevens
28. Technische gegevens CR-ST100S Voedingsspanning Wisselspanning 100 – 240 V Voedingsfrequentie 50/60 Hz Fabrikant netadapter Dongguan Guanjin Electronics Technology Co.Ltd Typeaanduiding KPTEC K25V120200G Uitgangsspanning / -stroom / -vermogen Gelijkspanning 12,0 V / 2,0 A / 24,0 W Elektriciteitsverbruik in stand-by... - Page 159 Bewaar deze garantiekaart op een veilige plaats. Kenwood geeft een garantie van twee jaar op dit apparaat vanaf de datum van aankoop volgens de factuur of aankoopbon van de Kenwood-dealer. Deze garantie dekt gebreken in materiaal of vakmanschap. Wij behouden ons het recht voor het product te vervangen als economisch herstel niet langer mogelijk is.