Table des Matières
Publicité
Les langues disponibles
Les langues disponibles
Liens rapides
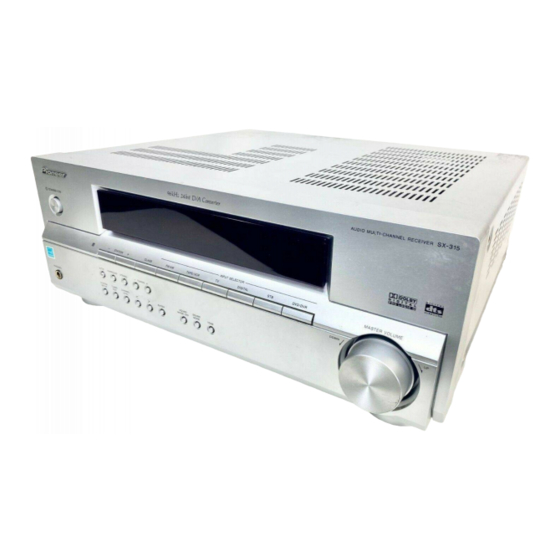
Audio Multi-Channel Receiver
Recepteur Audio A Voies Multi-Canaux
SX-315
Register your product at
www.pioneerelectronics.com
• Protect your new investment
The details of your purchase will be on file for reference in the event of an
insurance claim such as loss or theft.
• Receive free tips, updates and service bulletins on
your new product
• Improve product development
Your input helps us continue to design products that meet your needs.
• Receive a free Pioneer newsletter
Registered customers can opt in to receive a monthly newsletter.
Operating Instructions
Mode d'emploi
Publicité
Chapitres
Table des Matières
Dépannage

Manuels Connexes pour Pioneer SX-315


Sommaire des Matières pour Pioneer SX-315
- Page 1 • Receive free tips, updates and service bulletins on your new product • Improve product development Your input helps us continue to design products that meet your needs. • Receive a free Pioneer newsletter Registered customers can opt in to receive a monthly newsletter. Operating Instructions Mode d’emploi...
-
Page 2: Information To User
Thank you for buying this Pioneer product. CAUTION – PREVENT ELECTRIC SHOCK DO Please read through these operating instructions so you NOT USE THIS (POLARIZED) PLUG will know how to operate your model properly. After WITH AN EXTENSION CORD. RECEPTACLE OR OTHER OUTLET... -
Page 3: Important Safety Instructions
IMPORTANT SAFETY INSTRUCTIONS READ INSTRUCTIONS — All the safety and GROUNDING OR POLARIZATION OBJECT AND LIQUID ENTRY — Never push operating instructions should be read before the • If this product is equipped with a polarized objects of any kind into this product through product is operated. - Page 4 For U.S. and Australia Model WARNING: Handling the cord on this product or cords associated with accessories sold with the product will expose you to lead, a chemical known to the State of California and other governmental entities to cause cancer and birth defects or other reproductive harm.
-
Page 5: Table Des Matières
Contents Contents 01 Before you start 07 Additional information Checking what’s in the box ....6 Troubleshooting......25 Loading the batteries . -
Page 6: Before You Start
Before you start Chapter 01: Before you start Important Checking what’s in the box Incorrect use of batteries may result in such hazards as Please check that you've received the following supplied leakage and bursting. Observe the following precautions: accessories: •... -
Page 7: Connecting Up
Coaxial and Optical digital audio cables Coaxial digital audio cables (standard video cables can DVD recorder/player also be used) or optical cables are used to connect digital components to this receiver. SX-315 Be sure to insert completely. ANTENNA DIGITAL INPUT Coaxial digital audio cable... -
Page 8: Connecting A Satellite Receiver Or Other Digital Set-Top Box
Connect the digital audio output of the set-top box (STB) to the STB input on this SX-315 receiver. Connect the video output from the STB directly to a spare video input on your TV. -
Page 9: Connecting Antennas
One-touch ANTENNA PAL-connector AM loop antenna UNBAL 75Ω 75Ω coaxial cable LOOP FM wire SX-315 antenna ANTENNA To improve AM reception DIGITAL INPUT (COAXIAL) UNBAL DVD/DVR 75Ω Connect a 15–18 ft. (5–6 m) length of vinyl-coated wire to LOOP... -
Page 10: Connecting The Speakers
6–16Ω. Red tab – Front right (R) White tab – Front left (L) Green tab – Center (C) Purple tab – Subwoofer Gray tab – Surround right (R) SX-315 – Blue tab – Surround left (L) ANTENNA DIGITAL INPUT (COAXIAL) -
Page 11: Plugging In
About the wireless speaker outputs To the right of the main speaker terminals there is a pair of WIRELESS OUT jacks for use with the Pioneer XW- HTP550 wireless speaker system. Please do not connect any other component to these jacks. -
Page 12: Controls And Displays
Controls and displays Chapter 03: Controls and displays Front panel SX-315 AUDIO MULTI-CHANNEL RECEIVER STANDBY/ON INPUT SELECTOR – MASTER VOLUME STATION CLASS FM/AM TAPE/VCR DIGITAL DVD/DVR DOWN – AUTO SURROUND STEREO TUNING PHONES SYSTEM TUNER CHANNEL SOUND SOUND SETUP EDIT... - Page 13 Controls and displays Display TONE SOUND PL II SLEEP Lights when the receiver is decoding a Dolby Digital Lights when the receiver is decoding a DTS signal. signal. 2 PL II Lights when the receiver is in 5ch stereo mode. Lights when the receiver is using Dolby Pro Logic II decoding.
-
Page 14: Remote Control
Controls and displays STANDBY/ON This switches between standby and on for this receiver Remote control (page 16). MUTE Press to mute the sound (press again, or adjust the volume, to restore the sound). STATUS Press to display the current surround mode and sound STANDBY/ON MUTE mode. - Page 15 Controls and displays (cursor left/right), VOLUME +/– and ENTER Use to navigate menus and adjust the volume. 13 ROOM SETUP Press to set up surround sound using the Room Setup presets (page 16). 14 TEST TONE Sounds the test tone when setting up the surround sound of the receiver (page 17).
-
Page 16: Surround Sound Setup
Surround sound setup Chapter 04: Surround sound setup Introduction to home theater Quick setup using the Room Setup You are probably used to using stereo equipment to listen The Room Setup feature gives you a very simple way to to music, but may not be used to home theater systems set up your receiver for good surround sound by setting that give you many more options (such as surround the room size and your seating position in the room. -
Page 17: Setting Speaker Distances
Surround sound setup • Room L – Larger than average room (approx. 7.5 x Press SYSTEM SETUP again to select the suround speaker distance setting, then set using the 9.0m) (cursor left/right) buttons. Use the ROOM SETUP button to select a seating The display shows: S c h : followed by the current position setting, then press ENTER. - Page 18 Surround sound setup Setting the channel levels while playing a source The following way of setting the channel levels is best done while playing a multichannel source, such as a DVD. See also the following chapter, Listening to your system on page 19 for more on playing sources. CH LEVEL ENTER Press CH LEVEL on the remote or CHANNEL LEVEL...
-
Page 19: Listening To Your System
Listening to your system Chapter 05: Listening to your system • If the channel level has been raised using the channel level settings (see page 17), it’s possible that Selecting a source the volume level will not go all the way up to MAX You can use either the front panel buttons or the remote with a sound mode on. -
Page 20: Listening In Surround Sound
Listening to your system Note that single channel sources are played through the center speaker and subwoofer only in this mode. Listening in surround sound Using the SURROUND button you can listen to any source in surround sound. STEREO SURROUND •... -
Page 21: Using The Tone Controls
Listening to your system Using the tone controls Dynamic Range Control setting • Default setting: DRC: OFF Using this setting, you can compress the dynamic range TONE of Dolby Digital or DTS sources so that low level sounds can be heard more easily (sounding relatively louder) yet BASS TREBLE louder sounds won’t be too overbearing. -
Page 22: Dual Mono Setting
Listening to your system Dual Mono setting • Default setting: CH1 You may sometimes come across Dolby Digital or DTS discs that are in dual mono format. This is two-channel material, but the channels may be listened to separately or together depending on the situation. In this case you can use the Dual Mono setting to select the channel or channels to listen to. -
Page 23: Using The Tuner
Using the tuner Chapter 06: Using the tuner • Automatic tuning To search for stations in the currently selected band, Listening to the radio press and hold TUNING +/– for about a second. The The following steps show you how to tune in to FM and receiver will start searching for the next station, AM radio broadcasts using the automatic (search) and stopping when it has found one. -
Page 24: Listening To Station Presets
Using the tuner Press CLASS to select a class (A, B or C). Naming station presets Press repeatedly to change the class displayed in the You can name saved presets with four-character names. front panel display. Use the CLASS and STATION +/– buttons to find Use the <... -
Page 25: Additional Information
Sometimes the trouble may lie in another component. Investigate the other components and electrical appliances being used. If the trouble cannot be rectified even after exercising the checks listed below, ask your nearest Pioneer authorized service center or your dealer to carry out repair work. Problem Remedy The power does not turn on. -
Page 26: Cleaning The Unit
Additional information Note Input attenuator setting • If the unit does not operate normally due to external • Default setting: ATT:OFF effects such as static electricity, disconnect the If you experience distortion when you select the TAPE/ power plug from the outlet and insert again to return VCR input it may be that the input level is too high. -
Page 27: Specifications
Additional information Furnished Parts Specifications AM loop antenna ........1 FM wire antenna . - Page 28 D1-4-2-3_Fr Nous vous remercions pour cet achat d’un produit Ce produit est destiné à une utilisation domestique Pioneer. générale. Toute panne due à une utilisation autre Nous vous demandons de lire soigneusement ce qu'à des fins privées (comme une utilisation à des mode d’emploi ;...
- Page 29 Table des matières Table des matières 01 Table des matières 06 Utilisation du tuner Pour écouter la radio ......21 Pour mémoriser des stations préréglées .
-
Page 30: Préparatifs
Préparatifs Chapitre 01 : Préparatifs Important Vérification du contenu de la boîte L’utilisation incorrecte des piles peut entraîner des Veuillez vérifier que vous avez reçu les accessoires accidents tels qu’une fuite et une explosion. Tenez fournis suivants : compte des précautions suivantes : •... -
Page 31: Raccordement
OUT COAX optiques Des câbles audio numériques coaxiaux (des câbles vidéo Lecteur/enregistreur DVD standard peuvent également être utilisés) ou optiques sont utilisés pour raccorder des composants SX-315 numériques à ce récepteur. ANTENNA Assurez-vous de les insérer complètement. DIGITAL INPUT (COAXIAL) -
Page 32: Raccordement D'un Récepteur Satellite Ou D'un Autre Décodeur Numérique
(STB) à l’entrée STB du récepteur. Raccordez pour la sortie du récepteur pour l’enregistrement. la sortie vidéo du décodeur directement à une entrée SX-315 vidéo libre de votre téléviseur. ANTENNA DIGITAL INPUT... -
Page 33: Raccordement D'antennes
Connexion PAL directe Antenne cadre AM UNBAL 75Ω Câble coaxial 75Ω LOOP Antenne filaire SX-315 Pour améliorer la réception AM ANTENNA Raccordez un fil gainé de vinyle de 5 à 6 m de long à la DIGITAL INPUT (COAXIAL) UNBAL DVD/DVR 75Ω... -
Page 34: Raccordement Des Enceintes
Borne rouge – Avant droite (R) Borne blanc – Avant gauche (L) Borne vert – Centrale (C) Borne violette – Caisson de basses Borne gris – Droite Surround (R) – Borne bleu – Gauche Surround (L) SX-315 ANTENNA DIGITAL INPUT (COAXIAL) UNBAL DVD/DVR 75Ω... -
Page 35: À Propos Des Sorties D'enceinte Sans Fil
Vérifiez le cordon d’alimentation de temps en temps. Si le cordon d’alimentation. vous remarquez qu’il est endommagé, adressez-vous au service après-vente Pioneer le plus proche ou au À propos des sorties d’enceinte sans fil revendeur pour le remplacer. Une paire de prises WIRELESS OUT à utiliser avec le système d’enceintes sans fil Pioneer XW-HTP550 se situe... -
Page 36: Commandes Et Afficheur
Commandes et afficheur Chapitre 03 : Commandes et afficheur Panneau avant SX-315 AUDIO MULTI-CHANNEL RECEIVER STANDBY/ON INPUT SELECTOR – MASTER VOLUME STATION CLASS FM/AM TAPE/VCR DIGITAL DVD/DVR DOWN – AUTO SURROUND STEREO TUNING PHONES SYSTEM TUNER CHANNEL SOUND SOUND SETUP... -
Page 37: Affichage Alphanumérique
Commandes et afficheur Afficheur TONE SOUND PL II SLEEP S’allume lorsque le récepteur décode un signal Dolby S’allume lorsque le récepteur décode un signal DTS. Digital. 2 PL II S’allume lorsque le récepteur est en mode stéréo 5 S’allume lorsque le récepteur utilise le décodage canaux. -
Page 38: Télécommande
Commandes et afficheur STANDBY/ON Met le récepteur en veille et sous tension (page 14). Télécommande MUTE Permet de couper le son (appuyez de nouveau sur cette touche ou réglez le volume pour rétablir le son). STATUS Permet d’afficher le mode de son et le mode surround en cours. - Page 39 Commandes et afficheur 11 CH LEVEL Permet de configurer les niveaux des canaux pour le son surround (page 15). (curseur gauche/droite), VOLUME +/– et ENTER Permettent de parcourir les menus et de régler le volume. 13 ROOM SETUP Permet de configurer le son surround à l’aide des préréglages de la fonction de configuration de la pièce (page 14).
-
Page 40: Configuration Du Son Surround
Configuration du son surround Chapitre 04 : Configuration du son surround Présentation du cinéma à domicile Configuration rapide à l’aide de la fonction de configuration de la pièce Vous avez probablement l’habitude d’utiliser un appareil stéréo pour écouter de la musique mais peut-être que La fonction de configuration de la pièce est un moyen vous n’avez pas l’habitude des systèmes cinéma à... -
Page 41: Réglage De La Distance De L'enceinte
Configuration du son surround • Room S : pièce plus petite que la moyenne (env. 3,5 Appuyez de nouveau sur SYSTEM SETUP pour sélectionner le réglage de la distance de l’enceinte x 4,5 m) centrale, puis réglez-le à l’aide des touches •... -
Page 42: Réglage Des Niveaux De Canaux Pendant La Lecture D'une Source
Configuration du son surround Pendant la tonalité de test, utilisez les touches Une fois terminé, appuyez sur ENTER pour sortir. (curseur gauche/droite) pour régler le niveau Si vous n’appuyez sur aucune touche pendant 10 de chaque enceinte. secondes, le réglage du canal se ferme Vous pouvez régler chaque enceinte de –10 (moins fort) automatiquement. -
Page 43: Écoute De Votre Système
Écoute de votre système Chapitre 05 : Écoute de votre système Remarque Sélection d’une source • Le niveau d’entrée de TAPE/VCR peut être réglé s’il Vous pouvez utiliser les touches du panneau avant ou de est trop élevé. Consultez la section Réglage de la télécommande pour choisir ce que vous souhaitez l’atténuateur d’entrée à... -
Page 44: Écoute D'un Son Surround
Écoute de votre système Écoute d’un son surround Écoute en mode stéréo La touche SURROUND permet d’écouter n’importe Outre le fait de pouvoir écouter n’importe quelle source quelle source en son surround. en son surround, vous pouvez choisir d’écouter des sources en mode stéréo. -
Page 45: Utilisation Des Contrôles De Tonalité
Écoute de votre système • Pour désactiver le mode de son, appuyez sur OFF sur la télécommande ou sur SOUND MODE OFF sur le Réglage du contrôle de la plage panneau avant. dynamique • Réglage par défaut : DRC: OFF Ce réglage permet de comprimer la plage dynamique des Utilisation des contrôles de tonalité... -
Page 46: Réglage Double Mono
Écoute de votre système Astuce Réglage double mono • Vous pouvez vérifier le temps de veille restant à tout • Réglage par défaut : CH1 moment en appuyant une fois sur SLEEP. Si vous Il est parfois possible que des disques Dolby Digital ou appuyez plusieurs fois vous passerez toutes les DTS soient au format double mono. -
Page 47: Utilisation Du Tuner
Utilisation du tuner Chapitre 06 : Utilisation du tuner seconde. Le récepteur démarrera la recherche de la station suivante, en s’arrêtant quand il en aura Pour écouter la radio trouvée une. Répétez pour rechercher d’autres Les opérations suivantes vous montrent comment régler stations. -
Page 48: Écoute De Stations Préréglées
Utilisation du tuner Pour nommer des stations préréglées Appuyez sur CLASS pour sélectionner une classe (A, B ou C). Vous pouvez attribuer un nom de quatre caractères aux Appuyez plusieurs fois sur la touche pour modifier la stations préréglées. classe qui apparaît sur l’affichage du panneau avant. Utilisez les touches CLASS et STATION +/–... -
Page 49: Informations Supplémentaires
Parfois le problème peut se trouver dans un autre composant. Examinez les autres composants et les appareils électriques en usage. Si le problème ne peut pas se résoudre malgré les indications ci-dessous, consultez votre service après-vente Pioneer le plus proche pour le faire réparer. -
Page 50: Nettoyage De L'unité
Informations supplémentaires Problèmes Solutions Impossible de faire • Remplacez les piles (consultez la page 4). fonctionner • Utilisez la télécommande dans un rayon de 7 m , dans un angle de 30° du capteur sur le la télécommande. panneau avant (consultez la page 4). •... -
Page 51: Spécifications
Informations supplémentaires Pièces fournies Spécifications Antenne cadre AM ....... . 1 Antenne filaire FM . - Page 52 253 Alexandra Road, #04-01, Singapore 159936 TEL: 656-472-1111 PIONEER ELECTRONICS AUSTRALIA PTY. LTD. 178-184 Boundary Road, Braeside, Victoria 3195, Australia, TEL: (03) 9586-6300 PIONEER ELECTRONICS DE MEXICO S.A. DE C.V. Blvd.Manuel Avila Camacho 138 10 piso Col.Lomas de Chapultepec, Mexico,D.F. 11000 TEL: 55-9178-4270 K002E Printed in China <5707210180491>...