Table des Matières
Publicité
Les langues disponibles
Les langues disponibles
Liens rapides
Take the time to read through this instruction manual.
Familiarity with installation and operation procedures will help you obtain the best performance from your new
Camera.
For your records
Record the serial number, found on the back of the unit, in the spaces designated on the warranty card, and in the space
provided below. Refer to the model and serial numbers whenever you call upon your KENWOOD dealer for information or
service on the product.
Model CMOS-740HD Serial number
US Residence Only
Register your KENWOOD product at www.kenwood.com/usa/
© 2019 JVCKENWOOD Corporation
CMOS-740HD
UNIVERSAL REAR VIEW CAMERA
INSTRUCTION MANUAL
CAMÉRA DE VUE ARRIÈRE UNIVERSELLE
MANUEL D'UTILISATION
UNIVERSAL RÜCKFAHRKAMERA
BEDIENUNGSANLEITUNG
UNIVERSELE ACHTERUITRIJCAMERA
GEBRUIKSAANWIJZING
TELECAMERA PER RETROMARCIA UNIVERSALE
ISTRUZIONI PER L'USO
CÁMARA DE VISTA TRASERA UNIVERSAL
MANUAL DE INSTRUCCIONES
CÂMARA TRASEIRA UNIVERSAL
MANUAL DE INSTRUÇÕES
通用后视摄像头
使用说明书
Register Online
B5A-3444-00 (W)
Publicité
Table des Matières

Manuels Connexes pour Kenwood CMOS-740HD

Sommaire des Matières pour Kenwood CMOS-740HD
- Page 1 Record the serial number, found on the back of the unit, in the spaces designated on the warranty card, and in the space provided below. Refer to the model and serial numbers whenever you call upon your KENWOOD dealer for information or service on the product.
-
Page 2: For Canada
Trade Name: KENWOOD Products: UNIVERSAL REAR VIEW CAMERA Model Name: CMOS-740HD Responsible Party: JVCKENWOOD USA CORPORATION 2201 East Dominguez Street, Long Beach, CA 90810, U.S.A. PHONE: 310 639-9000 THIS DEVICE COMPLIES WITH PART 15 OF THE FCC RULES. - Page 3 Dichiarazione di conformità relativa alla direttiva EMC 2014/30/UE Dichiarazione di conformità relativa alla direttiva RoHS 2011/65/UE Produttore: JVCKENWOOD Corporation Declaration of Conformity with regard to the EMC 3-12, Moriyacho, Kanagawa-ku, Yokohama-shi, Kanagawa Directive 2014/30/EU 221-0022, JAPAN Declaration of Conformity with regard to the RoHS Rappresentante UE: Directive 2011/65/EU JVCKENWOOD Europe B.V.
- Page 4 Before Use/ Installation Procedure • Before finally installing the unit, connect the wiring WARNING temporarily, making sure it is all connected up properly, and the unit and the system work. To prevent injury or fire, take the following • When mounting this unit, make sure none of precautions: the leads are trapped between this unit and the •...
-
Page 5: Accessories
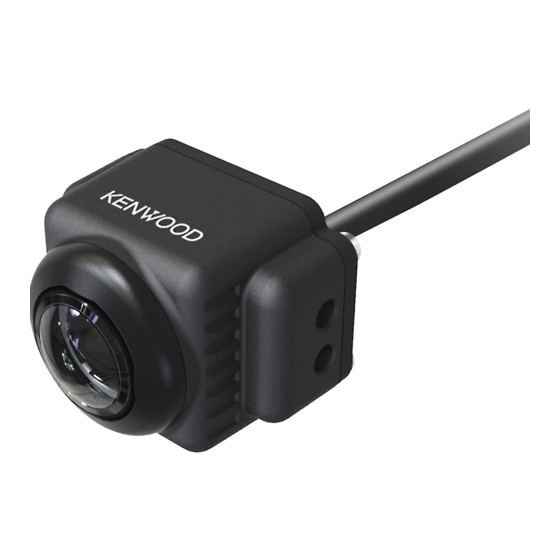
• Do not route wiring in places that get hot, such as WARNING near the heater outlet. If the insulation of the wiring • If you connect the ignition wire (Red) to the car melts or gets torn, there is a danger of the wiring chassis (Ground), you may cause a short circuit, that short-circuiting to the vehicle body. - Page 6 (2 locations on each side) Adjust the angle so that the rear of the vehicle Mount so that the “KENWOOD” or the bumper can be seen at the bottom of the logo appears at the top.
- Page 7 After adjusting the camera angle, tighten the Using a grommet retaining screws firmly. CAUTION Inspect the retaining screws at times. If they are loose, tighten them firmly. • When drilling a hole in the car body to mount the camera, check the positions of fluid lines, tanks, Fix the camera firmly in position.
-
Page 8: Basic Connections
Connections CAUTION • If the engine key of your vehicle does not have the ACC position, branch the wire energized when the engine key is ON and connect it to the accessory power cord. • Before proceeding to connections, make sure that the engine key is not inserted and disconnect the (-) terminal of the battery to prevent the short-circuiting incident. - Page 9 Information on Disposal of Old Electrical Specifications and Electronic Equipment (applicable for countries that have adopted separate waste Camera Unit collection systems) Lens Products with the symbol (crossed-out wheeled bin) cannot be disposed as Wide angle, household waste. Focal length: 1.86 mm, Old electrical and electronic equipment F value 2.0 should be recycled at a facility capable...
-
Page 10: Avant Utilisation / Procédure D'installation
Avant utilisation / Procédure d’installation • Vérifiez le support de montage de la caméra avant AVERTISSEMENT de conduire. Les vis sont-elles desserrées ? Pour éviter toute blessure et/ou incendie, - Le support de la caméra est-il bien fixé ? veuillez prendre les précautions suivantes : - Si la caméra de vue arrière se détache pendant •... -
Page 11: Accessoires
Effectuez les bonnes connexions de câble • Référez-vous au mode d'emploi pour connaître les d'entrée et de sortie pour chaque appareil. détails concernant la connexion à d'autres appareils, puis effectuez les raccordements appropriés. Connectez les fils du câblage de distribution •... -
Page 12: Position D'installation Recommandée
Réglez l'angle de sorte que l'arrière du véhicule (2 emplacements de chaque ou le pare-chocs soient visibles au bas de l'écran. côté) Le montage doit être effectué avec le logo "KENWOOD" vers le haut. (M3 × 5 mm) Arrière du véhicule ou pare-choc 12 |... -
Page 13: Utilisation D'un Passe-Câble
Après avoir réglé l'angle de la caméra, serrez Utilisation d'un passe-câble fermement les vis de fixation. ATTENTION Vérifiez le serrage des vis de fixation de temps à autre. Si elles se desserrent, revissez-les • Lorsque vous percez un trou dans la carrosserie fermement. -
Page 14: Raccordements De Base
Raccordements ATTENTION • Si la clé de contact de votre véhicule n’a pas de position ACC, branchez le câble qui est sous tension lorsque la clé de contact est sur ON et raccordez-le au cordon d'alimentation des accessoires. • Avant d'effectuer les raccordements, vérifiez que la clé de contact n'est pas insérée et débranchez la borne (-) de la batterie pour éviter tout court-circuit. -
Page 15: Bloc D'alimentation
Informations sur la mise au rebut des Spécifications équipements électriques et électroniques usagés (applicable aux pays qui ont adopté Caméra des systèmes de collecte sélective) Objectif Les produits portant le symbole (poubelle à roulettes barrée) ne peuvent pas être jetés Grand angle, avec les déchets ménagers. -
Page 16: Pflege Und Wartung
Vor Inbetriebnahme/ Hinweise zum Einbau • Überprüfen Sie die Halterung der Kamera vor Fahrtbeginn. ACHTUNG Sitzen die Schrauben fest? Zur Vermeidung von Bränden und Verletzungen - Ist die Halterung der Kamera fest angebracht? - Wenn sich die Rückfahrkamera während der Fahrt beachten Sie bitte die folgenden Hinweise: löst, kann dadurch ein Unfall verursacht werden. - Page 17 Stellen Sie sicher, dass Sie bei jedem Gerät die • Nähere Informationen zum korrekten Anschluss der anderen Geräte finden Sie in der Bedienungsanleitung. Ein- und Ausgangskabel richtig anschließen. Nehmen Sie diese Anschlüsse vor. Schließen Sie die Kabel des Kabelbaums • Sichern Sie die Verkabelung mit Kabelklemmen oder in der folgenden Reihenfolge an: Masse, Klebeband.
- Page 18 Klebeband o.Ä. Befestigen Sie die Kamera vorübergehend mit einem Stück Klebeband usw. Kamera so anbringen, 12345 dass das Logo "KENWOOD" sich oben befindet. Kamera einbauen/Kamerawinkel einstellen Legen Sie die Einbauposition für die Kamera fest. Installieren Sie die Kamera in der Mitte des Reinigen Sie die Montagefläche.
- Page 19 Stellen Sie den Kamerawinkel ein. Mit einer Tülle Achten Sie beim Einstellen des Kamerawinkels ACHTUNG darauf, dass das Kamerakabel nicht gespannt wird. • Wenn Sie ein Loch in die Karosserie bohren, um die Stellen Sie den Winkel so ein, dass das Heck des Kamera zu montieren, überprüfen Sie die Positionen Fahrzeugs oder die Stoßstange unten auf dem der Flüssigkeitsleitungen, Tanks, elektrischen...
- Page 20 Anschlüsse ACHTUNG • Wenn die Zündung Ihres Fahrzeugs keine ACC-Stellung hat, verzweigen Sie den Draht, der unter Spannung steht, wenn die Zündung eingeschaltet ist, und schließen Sie ihn an das Zubehör-Stromversorgungskabel an. • Bevor Sie mit den Anschlüssen fortfahren, stellen Sie sicher, dass der Zündschlüssel nicht steckt und trennen Sie den Minuspol (-) von der Batterie ab, um Kurzschlüsse zu vermeiden.
- Page 21 Informationen zur Entsorgung von Elektro- Technische Daten und Elektronikaltgeräten (gültig für Länder, die getrennte Abfallsammelsysteme Kameraeinheit eingeführt haben) Objektiv Produkte mit dem Symbol (durchgestrichene Mülltonne) dürfen nicht Weitwinkel, über den Hausmüll entsorgt werden. Brennweite 1,86 mm, Alte elektrische und elektronische Geräte F-Wert 2,0 sollten in einer Einrichtung recycelt werden, Blickwinkel...
-
Page 22: Installatieprocedure
Voor gebruik/Installatieprocedure • Voordat u het apparaat definitief installeert, sluit u eerst WAARSCHUWING tijdelijk de draden aan om te controleren of alles goed Neem de volgende voorzorgsmaatregelen is bevestigd en of de camera en het systeem werken. om persoonlijk letsel of brand te voorkomen: •... - Page 23 Installeer het toestel in uw auto. • Bevestig de draden met kabelklemmen of kleefband. Bescherm de bedrading door er Sluit de - accu weer aan. kleefband omheen te wikkelen op plaatsen waar de WAARSCHUWING bedrading metalen onderdelen raakt. • Als u de ontstekingsdraad (rood) aansluit op het •...
-
Page 24: Installatie
Monteer de camera op de camerabeugel. Bevestig de camera met de schroef op de beugel. (2 locatie aan beide zijden) Monteer de camera dusdanig, dat het "KENWOOD”-logo aan de bovenkant zichtbaar is. Schroef (M3 × 5 mm) 24 | Nederlands... - Page 25 Pas de hoek van de camera aan. Het gebruik van een tule Tijdens het afstellen van de camerahoek moet u OPGELET voorzichtig zijn om het camerasnoer niet uit te rekken. • Wanneer u een gat boort in de carrosserie van de Pas de hoek aan zodat de achterkant van auto om de camera te monteren, zoek dan naar de het voertuig of de bumper te zien is aan de...
- Page 26 Aansluitingen OPGELET • Wanneer het contactslot van uw auto geen ACC-stand kent, takt u de draad af die van spanning wordt voorzien wanneer het contactslot in de stand ON staat en sluit u deze aan op de accessoirevoedingsdraad. • Voordat u verdergaat, controleert u of de contactsleutel niet in het contactslot is gestoken en koppelt u de massakabel (-) los bij de accu om kortsluitingen te vermijden.
-
Page 27: Technische Gegevens
Informatie over het weggooien Technische gegevens van elektrische en elektronische apparatuur (voor landen die gescheiden Camera afvalverzamelsystemen gebruiken) Lens Producten met dit symbool (doorkruiste vuilnisbak) kunnen niet als gewoon huisvuil Groothoek, worden weggegooid. brandpuntsafstand 1,86 mm, Oude elektrische en elektronische F-waarde 2,0 apparaten moeten worden gerecycled bij Gezichtshoeken... -
Page 28: Cura E Manutenzione
Prima dell'uso / procedura di installazione • Prima di partire, controllare che la staffa della AVVERTENZA telecamera sia stata installata correttamente. Le viti sono allentate? Per evitare lesioni o incendi, osservare le - La staffa della telecamera è fissata saldamente? seguenti precauzioni: - Se la telecamera per retromarcia si stacca durante la •... - Page 29 Collegare i cavi del cablaggio nel seguente • Per ulteriori dettagli sul collegamento di altre unità, ordine: massa, accensione e unità telecamera. fare riferimento alle istruzioni per l'uso e poi eseguire correttamente i collegamenti. Installare l'unità sul veicolo. • Fissare il cablaggio con graffette fermacavo o nastro Ricollegare la - batteria.
- Page 30 Utilizzando un pezzo di nastro adesivo, ecc., fissare la telecamera temporaneamente. Posizionare la telecamera 12345 con il logo "KENWOOD" in alto. Installazione della telecamera/regolazione dell'angolazione Stabilire la posizione di installazione della Installare la telecamera al centro del veicolo senza telecamera.
- Page 31 Regolare l’angolazione della telecamera. Uso di un anello di tenuta Durante la regolazione dell'angolazione della ATTENZIONE telecamera, prestare attenzione a non tirare il cavo della telecamera. • Quando si pratica un foro nella carrozzeria Regolare l’angolazione in modo che la parte dell’automobile per montare la telecamera, posteriore del veicolo o il paraurti siano visibili controllare le posizioni delle linee dei fluidi, di...
-
Page 32: Collegamenti Di Base
Collegamenti ATTENZIONE • Se la chiave motore del veicolo non è dotata di posizione ACC, diramare il filo energizzato quando la chiave motore è ON e collegarlo al cavo di alimentazione accessorio. • Prima di eseguire i collegamenti, assicurarsi che la chiave motore non sia inserita e scollegare il terminale (-) della batteria per prevenire cortocircuiti. -
Page 33: Unità Di Alimentazione
Informazioni sullo smaltimento delle Specifiche apparecchiature elettriche ed elettroniche usate (valide per i Paesi che hanno adottato Unità telecamera sistemi di raccolta differenziata) Obiettivo I prodotti recanti questo simbolo (un contenitore di spazzatura su ruote barrato) Grandangolo, non possono essere smaltiti insieme ai lunghezza focale 1,86 mm, normali rifiuti domestici. - Page 34 Antes de utilizar/procedimiento de instalación • Antes de instalar la unidad definitivamente, conecte ADVERTENCIA el tendido de cables temporalmente, asegurándose Para evitar lesiones o incendios, tome las de que esté todo debidamente conectado y de que la unidad y el sistema funcionen. precauciones siguientes: •...
- Page 35 • No coloque el tendido de cables en lugares que se ADVERTENCIA calientan, tales como la salida del calentador. Si el • Si conecta el cable del encendido (rojo) al chasis del aislamiento del tendido de cables se derrite o se rompe, automóvil (a tierra), puede dar lugar a un cortocircuito hay peligro de cortocircuito del tendido de cables con pudiendo causar un incendio.
- Page 36 Monte la cámara sobre la abrazadera. Asegure la cámara sobre la abrazadera de la cámara con el tornillo de montaje. (2 ubicaciones en cada lado) Móntela de modo que el logotipo "KENWOOD" quede en Tornillo la parte superior. (M3 × 5 mm) 36 | Español...
- Page 37 Ajuste el ángulo de la cámara. Uso de un ojal Al ajustar el ángulo de la cámara, procure no tirar PRECAUCIÓN del cable de la cámara. Ajuste el ángulo de tal manera que la parte • Cuando taladre un agujero en la carrocería del trasera del vehículo o del parachoques pueda automóvil para montar la cámara, compruebe verse en la parte inferior del monitor.
-
Page 38: Conexiones Básicas
Conexiones PRECAUCIÓN • Si la llave del motor de su vehículo no incluye la posición ACC, bifurque el cable activado cuando la llave del motor esté en posición ON y conéctelo al cable de alimentación del accesorio. • Antes de realizar las conexiones, compruebe que la llave del motor no esté introducida y desconecte el terminal (-) de la batería para evitar que se produzcan cortocircuitos. -
Page 39: Unidad De Alimentación
Información sobre el desecho de equipos Especificaciones eléctricos y electrónicos viejos (aplicable a países que han adoptado sistemas de Unidad de la cámara recolección de residuos por separado) Lente Los productos con el símbolo (contenedor con ruedas tachado) no podrán ser Gran angular, desechados como residuos domésticos. - Page 40 Antes de usar/ Procedimentos para instalação • Verifique o suporte de instalação da câmara antes AVISO de conduzir. Os parafusos estão soltos? As seguintes precauções devem ser tomadas - O suporte da câmara está bem fixo? para evitar ferimentos ou incêndio: - Se a câmara de visão traseira se soltar enquanto •...
- Page 41 Faça as ligações adequadas dos fios de • Consulte o Manual de instruções para detalhes sobre entrada e saída para cada unidade. como ligar as outras unidades, em seguida faça as ligações correctamente. Ligue os cabos da cablagem pela seguinte •...
-
Page 42: Instalação
Fixe a câmara temporariamente com fita adesiva, etc. Usando um pedaço de fita, etc., fixe a câmara temporariamente. Monte de forma a que o logótipo"KENWOOD" seja 12345 apresentado no topo. Instalar a câmara/Ajustar o seu ângulo Escolha a posição de instalação da câmara. - Page 43 Ajustar o ângulo da câmara. Usar um passa-cabos Ao ajustar o ângulo da câmara, tenha cuidado CUIDADO para não esticar o cabo da câmara. Ajuste o ângulo de forma a que a traseira do • Ao fazer um orifício na carroçaria para montar a veículo ou o para-choques possa ser visto na câmara, verifique as posições de linhas de líquidos, parte inferior do monitor.
- Page 44 Ligações CUIDADO • Se a chave do motor do seu veículo não tiver a posição ACC, divida o fio com corrente quando a chave do motor estiver na posição ON e ligue-o ao cabo da alimentação de acessório. • Antes de proceder às ligações, certifique-se de que a chave do motor não está inserida e desligue o terminal (-) da bateria para evitar a ocorrência de curto-circuito.
-
Page 45: Especificações
Informação sobre o Descarte de Especificações Equipamentos Elétricos e Eletrónicos Usados (aplicável nos países que adotaram sistemas Unidade da Câmara de recolha de lixo separado) Lente Os produtos com o símbolo (caixote do lixo com um X) não podem ser eliminados Grande angular, como lixo doméstico. - Page 46 使用之前 / 安装步骤 • 如果本机安装在客厢,请可靠固定,防止汽车开 警告 动时脱落造成受伤或事故。 为了防止受伤或火灾,请遵守下列注意事项 : • 如果本机安装在前侧座椅下方,应避免妨碍座椅 • 为了防止短路等事故,请勿将金属物品 ( 硬币、 的移动。小心地布设滑动装置周围的引线和导线, 金属工具等 ) 掉落在本机中。 避免被夹住或挤压造成短路。 • 安装本产品和连接导线需要专业技能和经验。为 维护与保养 了保证安全,应请专业人员完成安装。 • 在打孔安装摄像头时,请检查管道、水箱和布线 • 如果本产品弄脏,请使用硅布或软布擦拭。如果 位置,并避免接触它们。 否则,可能引起火灾。 脏污严重,请用布蘸中性清洁剂擦拭污垢,然后 • 在用钻头打孔时,请佩戴护目镜保护眼睛。 擦掉清洁剂。不得使用硬质的布和 / 或诸如稀释 剂或酒精等挥发性溶剂擦拭,否则可能造成划伤、 小心 变形、劣化、和 / 或损坏。 •...
- Page 47 • 粘贴面潮湿会降低粘贴强度,可能导致本机脱落。 附件 • 不要将摄像头支架安装在经氟碳树脂处理的车身 上或玻璃上。 摄像头 (3.0 m)..1 电源线 (6.0 m )..1 • 可能会造成后视摄像头脱落。 - 不得使本机溅到水。 - 不得使本机淋到雨。 - 不得多摄像头施加不必要的外力。 - 对使用胶带粘贴本机的位置彻底清洁。 • 有关连接其他装置的详细内容,请参照使用说明 书,然后正确连接。 电源装置 ..1 摄像头支架 ..1 • 请使用导线夹或胶带固定导线。为了保护导线, 请使用胶带缠绕与金属部件接触的部位。 • 布设和固定所有导线时,不得与诸如变速杆、手 刹车、以及座椅轨道等活动部件接触。 • 不得将导线布设在暖风出口等较热位置。如果导 线的绝缘融化或破损,导线可能发生与车身短路。 • 更换保险丝时,仅可使用保险丝盒上标明规格的 螺钉...
- Page 48 安装 建议的安装位置 摄像头有两个固定孔,分别位于侧面顶部和底 部。 请根据安装情况相应调整。 在汽车后部正确安装摄像头示例 安装位置 安装示例 使用胶带等临时固定摄像头。 用胶带等临时固定摄像头。 安装时使 “KENWOOD” 徽 12345 标位于顶侧。 正确 错误 安装摄像头 / 调节角度 确定摄像头的安装位置。 将摄像头安装在汽车中央,不要遮蔽车牌。 而 清洁摄像头的安装表面。 且直接朝着汽车前进/后退方向安装。 请注意, 使用市售的清洁剂,擦去粘贴摄像头支架表面 不要使摄像头倾向汽车的其他方向等。 上的灰尘、水分、以及油污。 完成所有需要的连接。 如果需要,从摄像头上取下摄像头支架,按 显示摄像头的视频。 照粘贴表面调节形状。 查看摄像头之前, 请使用停车制动器, 塞住车轮, 调节摄像头支架形状, 弯曲 避免汽车移动。否则可能发生意外事故。 弯曲...
- Page 49 在适当的位置可靠固定摄像头。 使用护线圈 揭下摄像头支架上双面胶带的护纸,然后粘贴。 小心 粘贴后,用手压紧摄像头支架使粘贴牢固。 • 在车身上钻孔以安装摄像头时,请检查流体管路、 不得用手触摸粘贴面、或取下后重新粘贴,否 则会降低粘贴力,导致摄像头支架脱落。如果 油箱、布线等位置,确保不会与它们干涉或接触。 需要,请使用摄像头支架固定螺丝将支架固定 否则,可能会导致火灾、电击或故障。 在车身上。 • 如果需要进行钻孔作业,请务必佩戴护目镜,防 摄像头支架上有两个螺钉孔。 选择其中一个适 止碎片和碎屑进入眼睛。 否则,有受伤危险。 合粘贴位置的孔。 摄像头支架固定螺钉 钻一个 Φ13mm 布线孔。 (Ø3 × 8 mm) φ13mm Ø2 至 在随附护线圈上切一个缺口,然后将摄像头 Ø2.5 mm 侧的电缆连接器穿过该孔。 护线圈 缺口 注意护线圈方向。 使用市售密封剂或类似材料对后门内侧的护 线圈区域进行防水处理。 使用市售密封剂或类...
- Page 50 连接 小心 • 如果汽车的发动机钥匙没有 ACC (附件电源)位置,从发动机钥匙接通时供电的导线分线,与附件电源 导线连接。 • 在开始接线之前,请务必拔出发动机钥匙,并且切断蓄电池 ( - )极端子的连接,防止发生短路。 • 摄像头电源线弯曲直径不得小于 40 mm,半径不得小于 20 mm。 基本连接 与后视摄像头视频输入、或视频显示器的外部视 频输入连接。 视频导线 导航系统/视频监视器与高清摄像头画质兼容 (市售) 摄像头 电源线 将摄像头与摄像头连接导线连接。 摄像头导线长度: 3.0 m (9.84英尺), 电源线: 6.0 m (19.69英尺) * * 包括电源装置 电源装置 发动机钥匙 附件电源...
- Page 51 技术规格 摄像头装置 镜头 广角, 焦距 1.86 mm, 光圈值 2.0 视角 : 水平 : 180° : 垂直 : 103° 防水防尘 : IP67 影像感应器 : 1/3.8 英寸彩色 CMOS 传感器 像素数量 : 130 万像素 物体照度 : 1.0 lux 至 100 k lux 清晰度 : 1280 × 720 帧频...
- Page 52 CMOS-740HD كامي ر ا الرؤية الخلفية الشاملة دليل التشغيل © 2019 JVCKENWOOD Corporation...
- Page 53 إجراءات ما قبل الستخدام/ التركيب قبل حفر أي من فتحات التركيب، تح ق ّ ق دائم ً ا من المكان الذي تريد حفر تحذير الفتحات فيه. تج ن ّ ب الحفر رالمثقاب رالقرب من خط الوقود أو خط .الفرامل أو ال أ سالك الكهررائية أو ال أ جزاء المهمة ال أ خرى :لتج...
- Page 54 الملحقات التكميلية رعد تركيب الوحدة، تح ق ّ ق مما إذا كانت لمبات المكارح ومصاريح ال إ شارات .والمس ّ احات، وما إلى ذلك تعمل رشكل صحيح فع السيارة 1..) سلك الطاقة (0.6 م 1..)الكامي ر ا (0.3 م .قم رإجراء يملية التركيب رحيث ل تعوق مجال الرؤية الخلفع .قم...
- Page 55 ثب ِّ ت الكاميرا فع حامل الكاميرا راستخدام اضبط الزاوية فع وضع يسمح لك ررؤية الجزء الخلفع من السيارة أو .المصد ّ فع الجزء السفلع من الشاشة )مسمار التثبيت. (موضعان ركل جانب “KENWOOD” قم رالتركيب رحيث يظهر شعار .فع ال أ يلى مسمار ) × 5 ممM3( ّ...
- Page 56 استخدام حلقة التثبيت .ث ب ِّ ت الكامي ر ا جيد ً ا في موضعها انزع البطانة الورقية من الشريط الالصق مزدوج الجانب وألصقه تنبيه رحامل الكاميرا. رعد لصق الشريط الالصق، اضغط يلى حامل الكاميرا .رإصبعك لضمان يملية التصاق وثيق يند...
- Page 57 التوصيالت تنبيه وتوصيله رسلك طاقةON ، فقم رتقسيم السلك يندما يكون مفتاح المحرك يلى وضع التشغيلACC إذا لم يكن مفتاح محرك سيارتك يلى الوضع .الملحقات التكميلية .قبل متارعة التوصيالت، تأكد من يدم إدخال مفتاح المحرك فع قفل ال إ شعال وفصل القطب (-) للبطارية لمنع حدوث ماس كهررائع .ل...
- Page 58 المواصفات وحدة الكامي ر ا العدسة ،ز اوية يريضة ،الب ُ عد البؤري 68.1 مم 2.0 F قيمة زوايا الرؤية °180 :: أفقية °103 :: يمودية IP67 :مقاومة الماء والغبار ملو ّ ن 1/8.3 روصةCMOS مستشعر الصورة: مستشعر عدد البكسل : 3.1 ميجا...