Table des Matières

Manuels Connexes pour Velleman HQ POWER ARUZO MUSHROOM PRO VDPL300MR


Sommaire des Matières pour Velleman HQ POWER ARUZO MUSHROOM PRO VDPL300MR
-
Page 1: Table Des Matières
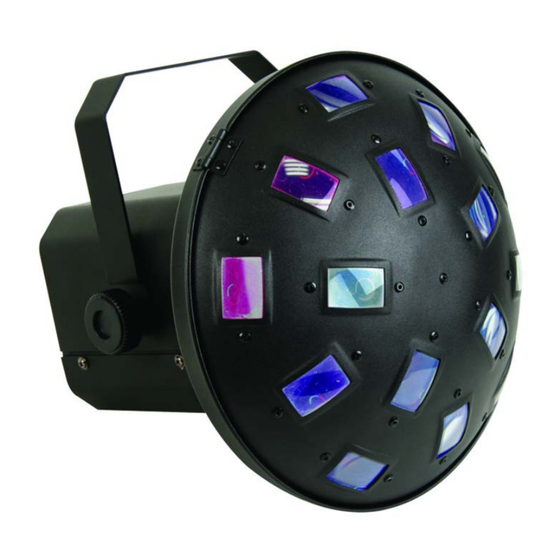
VDPL300MR ARUZO - PRO LED MUSHROOM ARUZO - PRO LEDMUSHROOM ARUZO - MUSHROOM PRO À LED ARUZO - MUSHROOM PRO CON LEDs ARUZO - PRO LED MUSHROOM 3 x 3 W R+G+B LEDs USER MANUAL GEBRUIKERSHANDLEIDING MODE D’EMPLOI MANUAL DEL USUARIO BEDIENUNGSANLEITUNG... - Page 2 VDPL300MR 14.05.2014 ©Velleman nv...
- Page 3 VDPL300MR DIP Switch Position DMX DIP SWITCH 0 = OFF 1 = ON X = OFF/ON DIP Switch Position DMX Address 14.05.2014 ©Velleman nv...
-
Page 4: Safety Instructions
• Note that damage caused by user modifications to the device is not covered by the warranty. • Keep the device away from children and unauthorised users. 3. General Guidelines Refer to the Velleman ® Service and Quality Warranty on the final pages of this manual. - Page 5 Connect an XLR cable to the female 3-pin XLR output of your controller and the other side to the male 3- pin XLR input of the projector. Multiple projectors can be linked through serial linking. The linking cable should be a two-core screened cable with XLR input and output connectors. 14.05.2014 ©Velleman nv...
- Page 6 Wedge the fuse holder on the rear panel out of its housing with a fitting screwdriver. o Remove the old fuse and replace with a new one. o Replace the fuse holder in the housing. • Please contact your HQPower™ dealer for spare parts or should you have further questions. 14.05.2014 ©Velleman nv...
-
Page 7: Technical Specifications
40°C Use this device with original accessories only. Velleman nv cannot be held responsible in the event of damage or injury resulted from (incorrect) use of this device. For more info concerning this product and the latest version of this manual, please visit our website www.hqpower.eu. -
Page 8: Gebruikershandleiding
• Schade door wijzigingen die de gebruiker heeft aangebracht aan het toestel vallen niet onder de garantie. 3. Algemene richtlijnen Raadpleeg de Velleman ® service- en kwaliteitsgarantie achteraan deze handleiding. • Deze projector is ontworpen voor professioneel gebruik op podia, in disco's, enz. U mag deze projector enkel binnenshuis gebruiken door de meegeleverde adapter aan te sluiten op een wisselspanning van 230 VAC ~ 50 Hz. -
Page 9: Installatie
Raadpleeg de afbeelding op pagina 2 van deze handleiding. DMX-ingang DIP-schakelaars voedingsingang met zekering instelknop gevoeligheid DMX-uitgang 7. Gebruik De projector start op nadat u de voedingsstekker in het stopcontact gestoken hebt. De projector heeft twee aanstuurprogramma’s: muziek- of DMX-sturing. STAND-ALONE Muzieksturing 14.05.2014 ©Velleman nv... - Page 10 → snel motor rechts → links → rechts, traag → snel 8. Onderhoud Ontkoppel van het lichtnet alvorens onderhoudswerkzaamheden uit te voeren! • Laat de projector afkoelen alvorens hem te reinigen. 14.05.2014 ©Velleman nv...
-
Page 11: Technische Specificaties
40°C Gebruik dit toestel enkel met originele accessoires. Velleman nv is niet aansprakelijk voor schade of kwetsuren bij (verkeerd) gebruik van dit toestel. Voor meer informatie over dit product en de laatste versie van deze handleiding, zie www.hqpower.eu. De informatie in deze handleiding kan te allen tijde worden gewijzigd zonder voorafgaande kennisgeving. -
Page 12: Consignes De Sécurité
• Les dommages occasionnés par des modifications à l’appareil par le client, ne tombent pas sous la garantie. 3. Directives générales Se référer à la garantie de service et de qualité Velleman ® en fin de notice. • Cet appareil a été développé pour usage professionnel dans des discothèques, des théâtres, etc. -
Page 13: Caractéristiques
Le projecteur après la connexion au réseau électrique. L’afficheur LCD [3] s’allume. Choisir le mode de pilotage avec les boutons MODE, UP et DOWN [3] à l’arrière du projecteur. Le projecteur intègre deux modes de pilotage : pilotage DMX ou par le son. POSE LIBRE Pilotage par le son 14.05.2014 ©Velleman nv... -
Page 14: Entretien
Rotation du gauche → droite, lent → rapide moteur droite → gauche → droite, lent → rapide 8. Entretien Déconnecter le projecteur du réseau électrique avant tout entretien ! • Laisser refroidir le projecteur avant le nettoyage. 14.05.2014 ©Velleman nv... -
Page 15: Spécifications Techniques
© DROITS D’AUTEUR SA Velleman est l’ayant droit des droits d’auteur pour cette notice. Tous droits mondiaux réservés. Toute reproduction, traduction, copie ou diffusion, intégrale ou partielle, du contenu de cette notice par quelque procédé ou sur tout support électronique que se soit est interdite sans l’accord préalable écrit de l’ayant droit. -
Page 16: Instrucciones De Seguridad
• No mire directamente a la fuente de luz. Esto puede causar un ataque epiléptico. • Los daños causados por modificaciones no autorizadas, no están cubiertos por la garantía. 3. Normas generales Véase la Garantía de servicio y calidad Velleman ® al final de este manual del usuario. -
Page 17: Características
Ponga el interruptor DIP n° 10 en la posición « on »; determine la dirección del foco con los interruptores DIP de n° 1 a 9. Véase la lista con las direcciones DMX. Cadena DMX en serie 14.05.2014 ©Velleman nv... - Page 18 • Reemplace sólo un fusible fundido por otro del mismo tipo (véase « Especificaciones »): o Desconecte el aparato de la red eléctrica antes de reemplazar el fusible. o Abra el portafusibles de la parte trasera del aparato con un destornillador adecuado. o Saque el fusible fundido y reemplácelo. 14.05.2014 ©Velleman nv...
- Page 19 40°C Utilice este aparato sólo con los accesorios originales. Velleman NV no será responsable de daños ni lesiones causados por un uso (indebido) de este aparato. Para más información sobre este producto, visite nuestra página web www.hqpower.eu. Se pueden modificar las especificaciones y el contenido de este manual sin previo aviso.
-
Page 20: Bedienungsanleitung
• Bei Schäden verursacht durch eigenmächtige Änderungen erlischt der Garantieanspruch. 3. Allgemeine Richtlinien Siehe Velleman® Service- und Qualitätsgarantie am Ende dieser Bedienungsanleitung. • Dieses Gerät wurde für den professionellen Einsatz auf Bühnen, in Discotheken, Theatern, usw. entworfen. Verwenden Sie das Gerät nur in Innenräumen und mit einer Wechselspannung von max. - Page 21 Das Gerät hat zwei Steuerprogramme: Musik- oder DMX-Steuerung. STAND-ALONE-MODUS Musiksteuerung Stellen Sie DIP-Schalter 1 bis 10 auf ‘off’. Das Gerät reagiert über das eingebaute Mikrofon auf die Umgebungsmusik. Regeln Sie die Empfindlichkeit mit dem Drehknopf auf der Rückseite. DMX-STEURUNG 14.05.2014 ©Velleman nv...
- Page 22 Staub verringert die Leistungen des Gerätes und kann es überhitzen. Überhitzung verringert die Lebensdauer der Lampe und erhöht die Aussicht auf mechanischen Verschleiß. Entfernen Sie angehäuften Staub in den Lüftungsschlitzen mit einem Kompressor oder einer sanften Bürste. 14.05.2014 ©Velleman nv...
-
Page 23: Technische Daten
2,4 kg max. 40°C Verwenden Sie dieses Gerät nur mit originellen Zubehörteilen. Velleman NV übernimmt keine Haftung für Schaden oder Verletzungen bei (falscher) Anwendung dieses Gerätes. Für mehr Informationen zu diesem Produkt, siehe www.hqpower.eu. Alle Änderungen ohne vorherige Ankündigung vorbehalten. - Page 24 • Velleman® can decide to replace an article with an equivalent article, or - schade ten gevolge van een commercieel, professioneel of collectief...
- Page 25 - daños causados por reparaciones o modificaciones efectuadas por una tercera persona sin la autorización explícita de Velleman®; - se calcula gastos de transporte de y a Velleman® si el aparato ya no está cubierto por la garantía. Made in PRC •...