Hansgrohe Croma Showerpipe 27169 1 Série Instructions De Montage / Mode D'emploi / Garantie
Masquer les pouces
Voir aussi pour Croma Showerpipe 27169 1 Série:
- Mode d'emploi (32 pages) ,
- Instructions de montage / mode d'emploi / garantie (28 pages)

Manuels Connexes pour Hansgrohe Croma Showerpipe 27169 1 Série


Sommaire des Matières pour Hansgrohe Croma Showerpipe 27169 1 Série
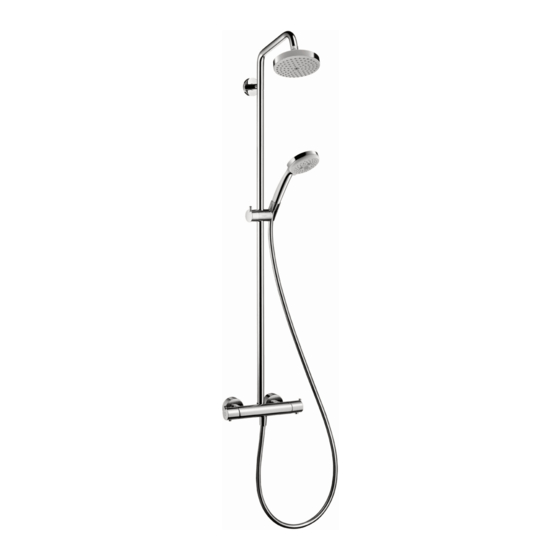
- Page 1 EN Installation / User Instructions / Warranty FR Instructions de montage / Mode d'emploi / Garantie ES Instrucciones de montaje / Manejo / Garantía Croma Showerpipe 27169xx1...
-
Page 2: Technical Information
145 PSI Recommended hot water temp. 120° - 140° F* Max. hot water temp 176°F* Flow rate - showerhead 2.0 GPM max. Flow rate - handshower 1.75 GPM max. *Please know and follow all applicable local plumbing codes when setting the temperature on the water heater. Installation Considerations • This showerpipe is for use with shower heads rated at 1.75 GPM (6.6 l/min) or higher. • For best results, Hansgrohe recommends that this unit be installed by a licensed, professional plumber. • Please read over these instructions thoroughly before beginning installation. Make sure that you have all tools and supplies needed to complete the installation. • The installation dimensions shown in this installation instruction are ideal for people of approximately 6' in height. The dimensions can be changed if required. In this case, the minimum ceiling height of 91¾" from the standing surface, and all other measurements, must be changed. • The installer must ensure that the entire area of the wall to which the mounting plate is to be mounted, Tools Required / Outiles Utiles / is flat (no protruding grout joints or tiles). He should... -
Page 3: Données Techniques
À prendre en considération pour Consideraciones para la instalación l’installation • Este producto debe ser utilizado sólo con alcachofas de la ducha valoradas en 1,75 GPM (6,6 L/min) o • Ce produit devrait être seulement utilisé avec les pom- más. mes de douche évaluées à 1,75 GPM (6,6 l/min) ou plus. • Para obtener mejores resultados, la instalación debe estar a cargo de un plomero profesional matriculado. • Pour de meilleurs résultats, Hansgrohe recommande que ce produit soit installé par un plombier profession- • Antes de comenzar la instalación, lea estas instruc- nel licencié. ciones detenidamente. Asegúrese de tener las her- ramientas y los insumos necesarios para completar la • Veuillez lire attentivement ces instructions avant de instalación. procéder à l’installation. Assurez-vous de disposer de tous les outils et du matériel nécessaires pour • Las medidas indicadas en las instrucciones de montaje l’installation. resultan ideales para personas de 1800 mm de altura, por lo que deberán ajustarse siempre que sea nece-... - Page 4 14⅝" 5⅜" 11⅞" 14⅛" ⅞" 2" 3⅝" 3¼" G½ 5⅞" 3⅞" 11⅛" 4¾"...
-
Page 5: Installation Suggestion
Installation Suggestion 13¾" 4"... - Page 6 English Installation The showerpipe must be installed with showerpipe rough set 16181181 (not included). To insure correct operation of the thermostatic mixing valve, the hot supply must be on the left and the cold supply must be on the right. Turn the water off at the main. Remove the spacing jig, nuts, and plugs. Confirm that the nipples are level in all planes and are parallel to each other. Mark a point on each nipple ¾" from the surface of the finished wall Carefully cut the nipple at this point. ¾ "...
- Page 7 Français Español Installation Instalación Le showerpipe doit être installé avec l’ensemble de El showerpipe debe ser instalado con un juego de pièce intérieure pour tuyau de douche 16181181 piezas interiores del tubo de ducha 16181181 (no (non inclus). incluido). Pour vous assurer que le mélangeur Para que la válvula mezcladora thermostatique fonctionne correcte- termostática funcione correctamente, ment, installez la conduite d’eau el suministro de agua caliente debe chaude à gauche et la conduite d’eau estar a la izquierda y el de agua fría froide à...
- Page 8 English Seal the wall around the nipples with waterproof sealant. Install the escutcheon mounting plates. ¾ " Wrap the nipples with plumbers' tape. Install the stops. Lightly lubricate the o-rings on the mounting plates using white plumbers' grease. Install the escutcheons. ⅞" " 5 ⅞...
- Page 9 Français Español Scellez le mur autour des raccords fi- Selle la pared alrededor de los niples letés à l'aide d'un agent d’étanchéité. con un sellador impermeable. Installez les plaques de montage pour les écussons. Instale las piezas de montaje para los escudos. Enveloppez les raccords filetés avec du ruban de Envuelva los niples con cinta de plomero. plombier. Installez les boitiers de service. Instale las válvulas. Lubrifiez les joints toriques. Lubriquez las juntas. Installez les écussons. Instale los escudos.
- Page 10 English Install the mixer. 30 mm Tighten the nuts Install the riser on the mixer. Install the mounting piece on the shower arm. Install the shower arm on the riser.
- Page 11 Français Español Installez le mélangeur thermostatique. Instale la mezcladora termostática. Serrez les écrous. Apriete las tuercas. Installez la tuyau sur le mélangeur. Instale el tubo sobre la mezcladora termostática. Installez la plaque de montage sur le bras de Instale la pieza de montaje sobre el brazo de ducha. douche. Instale el brazo de ducha sobre el tubo. Installez le bras de douche sur le tuyau.
- Page 12 English Make sure that the riser is level. Mark the positions of the screw holes. Remove the riser.
- Page 13 Français Español Veillez à ce que la tuyau soit au niveau. Verifique que el tubo quede nivelada. Marquez les positions des trous de vissage. Marque las posiciones de los orificios para tornillos. Enlevez la tuyau. Quite el tubo.
- Page 14 English Remove the mounting piece. Drill the screw holes. ¼" / 6 mm Install the anchors. Seal the wall around the anchors us- ing waterproof sealant. Failure to seal the wall may result in water damage.
- Page 15 Français Español Enlevez la plaque de montage. Quite la pieza de montaje. Percez les trous. Perfore los orificios para tornillos. Installez les chevilles. Instale los pernos de anclaje. Scellez le mur autour des chevilles à Selle la pared alrededor de los l'aide d'un agent d'étanchéité. pernos de anclaje con un sellador impermeable. Si le mur n’est pas scellé, l’eau pourrait éventuellement causer des Si no se sella la pared, pueden pro- dommages.
- Page 16 English Install the mounting piece and the mounting piece seal. If the tile does not go all the way up the wall, install the mounting piece with the tile spacer. 95239xx0 Install the riser on the mixer. Tighten the screw. Do not over-tighten the screw. Over-tightening the screw may result 3 mm in product damage.
- Page 17 Français Español Installez la plaque de montage. Instale la pieza de montaje. Si les carreaux ne couvrent pas la surface jusqu’au Si el azulejo no va hasta arriba de la pared, instale plafond, installez la plaque de montage avec le la placa de montaje con el disco que coincida con disque adaptateur. el azulejo. Installez le tuyau. Instale el tubo. Serrez le vis. Apriete el tornillo. Ne serrez pas les vis excessivement. No apriete el tornillo excesivamente.
- Page 18 English Install the showerhead. Do not over-tighten the showerhead. 17 mm Place the hose washer in the short hose end connection. Connect this end of the hose to the mixer. Place the screen washer in the long hose end connection. Install the handshower on this end of the hose. Rest the handshower in the holder.
- Page 19 Français Español Installez le pomme de douche. Instale la ducha cabezal. Ne serrez pas le pomme de douche No apriete la ducha cabezal excessivement. excesivamente. Placez la rondelle de tuyau en caoutchouc noir dans Coloque la arandela de la manguera en un extremo l’une des extrémités du tuyau. de esta. Vissez cette extrémité du tuyau à la sortie pour Enrosque este extremo a la salida de la ducha de douchette sur la valve. mano. Placez le tamis dans l’autre extrémité du tuyau. Vissez Coloque la arandela de filtro en el otro extremo y cette extrémité à la douchette. conéctelo a la ducha de mano. Placez la douchette dans son support. Coloque la ducha de mano en el soporte.
- Page 20 Set the High Temperature Limit Stop (optional) / Réglage de la butée limite d’eau chaude (en option) / Ajuste el tope de límite de alta temperatura (opcional)
- Page 21 Replacement Parts / Pièces détachées / Repuestos 96179000 95137xx0 95239xx0 95688000 95692xx0 88649000 15x2.5 04342xx0 96770xx0 97651xx0 04083xx0 98340xx0 94246000 15x2.5 98913000 12x2 98915xx0 17x1.5 98916000 98341xx1 96737000 98282000 96922000 96157xx0 14x2 98913000 28276xx3 97980000 98283000 98916000 xx = Colors / Couleurs / Acabados 00 = Chrome 98915xx0 82 = Brushed Nickel...
- Page 22 User Instructions / Instructions de service / Manejo 100°F function lever levier palanca Intense Pulsating Full Turbo Massage...
- Page 23 Cleaning / Nettoyage / Limpieza scale remover détartrant desincrustante > 1 min...
- Page 24 Cleaning / Nettoyage / Limpieza scale remover détartrant desincrustante > 1 min...
- Page 25 Check Valve Maintenance / Entretien / Mantenimiento 3 mm 30 mm 10 mm...
- Page 26 Check Valve Maintenance / Entretien / Mantenimiento 3 mm 10 mm 30 mm 17 Nm...
-
Page 27: Dépannage
Troubleshooting Fault Cause Remedy Insufficient water - Supply pressure inadequate - Check water pressure (If a pump has been installed check to see if the pump is working). - Filters are dirty (96922000) - Clean filters in front of the mixer and on the thermo cartridge - Shower filter seal dirty - Clean filter seal between shower and hose Crossflow: hot water being - Check valves dirty or worn - Clean check valves, replace if necessary forced into cold water pipe, or vice versa, when mixer is closed Spout temperature does not - Thermostat has not been adjusted - Adjust thermostat correspond with temperature - Hot water temperature too low - Increase hot water temperature to 120 ºF to 140 ºF Temperature regulation not - thermo cartridge dirty or worn - Replace thermo cartridge possible - hot and cold supplies are - NOT A PRODUCT DEFECT: correct the reversed plumbing Instantaneous heater didn't - Filters are dirty - Clean the filter / exchange filter work with thermostat - Check valve(s) dirty or worn - Replace check valves Dépannage... -
Page 28: Localización De Fallas
Localización de fallas Problema Causa Solución Sale poca agua - presión insuficiente - comprobar presión - filtro de la ducha sucio - limpiar filtro entre flexo y ducha (96922000) (96922000) - filtro de la ducha sucio - limpiar/cambiar filtros entre flexo y ducha Flujo de agua cruzada agua - válvula antirretorno sucia o pierde - limpiar / cambiar válvula caliente entra en la tubería del agua fría o al revés Temperatura del agua no - termostato no ha sido ajustado - ajustar termostato corresponde a lo marcado - Temperatura del agua demasiado - aumentar temperatura del agua baja no hay caliente a 42º - 65º C. No es posible regular la - termoelemento calcificadat - cambiar termoelemento temperatura Calentador instantáneo no se - filtro de la ducha sucio - limpiar/cambiar filtros enciende en combinación con - válvula anti-retorno cerrada - cambiar válvula anti-retorno el termostato... -
Page 29: Important
• Damage to the product caused by improper care or the use of improper cleaning agents is not covered by the warranty. • If a component of the product is damaged, replace it, as there is risk of injury. Conseil de nettoyage pour les produits Hansgrohe De nos jours le sanitaire moderne, la robinetterie et les douchettes se composent de matériaux très différents pour satisfaire à la demande concernant le design et la fonctionnalité. Pour éviter les détériorations et les réclamations, aussi bien pour l’utilisation que pour le nettoyage prochain, certains critères seront à prendre en considération. -
Page 30: Indications Importantes
• Les deteriorations imputables à un mauvais entretien ne peuvent être pris en considération par notre garantie. • Par l’action d’un nettoyant sur les revêtements déjà endommagé il se produit une aggravation des dégâts. Recomendación de limpieza para los productos de Hansgrohe Hoy en día, las griferías de baño y de cocina así como duchas modernas se componen de materiales muy distintos para satisfacer las exigencias del mercado respecto al diseño y la funcionalidad. Para evitar daños y reclamaciones hay que tener en cuenta ciertos aspectos tanto en el uso como en su limpieza. Para el cuidado de las griferías y las duchas en principio hay que seguir lo siguiente: • Usar sólo detergentes previstos específicamente para este campo de aplicación. - Page 31 WHAT IS COVERED BY THE WARRANTY The warranty covers only your Hansgrohe manufactured product. Hansgrohe warrants this product against defects in material or workmanship as follows: Hansgrohe will replace at no charge for parts only or, at its option, replace any product or part of the product that proves defective because of improper workmanship and/or material, under normal installation, use, service and maintenance. If Hansgrohe is unable to provide a replacement and repair is not practical or cannot be made in timely fashion, Hansgrohe may elect to refund the purchase price in exchange for the return of the product. LENGTH OF WARRANTY Replacement or repaired parts of products will be covered for the term of this warranty, as stated in the following two sentences. If you are a consumer who purchased the product for use primarily for personal, family or household purposes, this warranty extends for as long as you own the product and the home in which the product is originally installed. If you purchased the product for use primarily for any other purpose, including, without limitation, a commercial purpose, this warranty extends only (i) for 1 year, with respect to Hansgrohe & Commercial products, and (ii) for 5 years, with respect to Axor products. THIS WARRANTY DOES NOT COVER, AND HANSGROHE WILL NOT PAY FOR: A. Conditions, malfunctions or damage not resulting from defects in material or workmanship. B. Conditions, malfunctions or damage resulting from (1) normal wear and tear, improper installation, improper maintenance, misuse, abuse, negligence, accident or alteration; (2) the use of abrasive or caustic cleaning agents or “no- rinse” cleaning products, or the use of the product in any manner contrary to the product instructions; or (3) conditions in the home such as excessive water pressure or corrosion. C.Labor and other expenses for disconnection, deinstallation, or return of the product for warranty service (including but not limited to proper packaging and shipping costs), or for installation or reinstallation of the product. D. Accessories, connected materials and products, or related products not manufactured by Hansgrohe. E. Any Hansgrohe or Axor product sold for display purposes. F. Rubbed Bronze finish is subject to a 3-year limited warranty. Chrome and all PVD finishes are covered by the limited lifetime warranty. G. Hansgrohe Water Filtration System is subject to a 1-year limited warranty. Warranty does not include replacement filters.
- Page 32 NEITHER ASSUMES NOR AUTHORIZES ANY PERSON TO CREATE FOR IT ANY OTHER OBLIGATION OR LIABILITY IN CONNECTION WITH THIS PRODUCT. HANSGROHE SHALL NOT BE LIABLE TO PURCHASER OR ANY OTHER PERSON FOR ANY INCIDENTAL, SPECIAL OR CONSEQUENTIAL DAMAGES, ARISING OUT OF BREACH OF THIS WARRANTY OR ANY IMPLIED WARRANTY (INCLUDING BUT NOT LIMITED TO ANY IMPLIED WARRANTY OF MERCHANTABILITY).