Table des Matières
Publicité
Les langues disponibles
Les langues disponibles
Liens rapides
D Inhalator
Gebrauchsanweisung .............. 2 – 9
G Nebuliser
Instructions for use ...............10 –16
F Inhalateur
Mode d'emploi ...................... 17 – 24
E Inhalador
Manual de instrucciones ...... 25 – 32
I Inalatore
Istruzioni per l'uso ................ 33 – 40
Beurer GmbH
Tel.: +49 (0)731 / 39 89 -144
www.beurer.com
Söflinger Str. 218
•
Fax: +49 (0)731 / 39 89 - 255
•
Mail: kd@beurer.de
•
T Inhalatör
Kullanım kılavuzu ...................41– 47
r Ингалятор
Инструкция по
применению ......................... 48 – 56
Q Inhalator
Instrukcja obsługi ................. 57 – 64
Electromagnetic Compatibility
Information
89077 Ulm, Germany
•
IH 25/1
................................. 65 – 66
0483
Publicité
Chapitres
Table des Matières
Dépannage

Manuels Connexes pour Beurer IH 25/1

Sommaire des Matières pour Beurer IH 25/1
- Page 1 IH 25/1 D Inhalator T Inhalatör Gebrauchsanweisung ....2 – 9 Kullanım kılavuzu ....41– 47 G Nebuliser r Ингалятор Instructions for use ....10 –16 Инструкция по применению ......48 – 56 F Inhalateur Mode d’emploi ...... 17 – 24 Q Inhalator Instrukcja obsługi ....
-
Page 2: Table Des Matières
Bitte lesen Sie diese Gebrauchsanweisung aufmerk- sam durch, bewahren Sie sie für späteren Gebrauch Hersteller auf, machen Sie sie anderen Benutzern zugänglich und beachten Sie die Hinweise. Mit freundlicher Empfehlung Ihr Beurer-Team Seriennummer Anwendungsbereich Geschützt gegen Fremdkörper ≥12,5 mm IP 21 und gegen senkrechtes Tropfwasser Dieser Inhalator ist ein Inhalationsgerät zur Verneb-... -
Page 3: Warn-Und Sicherheitshinweise
Art von Schmerz oder Krankheit deshalb immer service oder Händler in Verbindung. zunächst Ihren Arzt. • Der IH 25/1 Inhalator darf nur mit dafür passenden • Bei gesundheitlichen Bedenken irgendwelcher Art Beurer Verneblern und mit entsprechendem Beurer konsultieren Sie Ihren Hausarzt! Zubehör betrieben werden. -
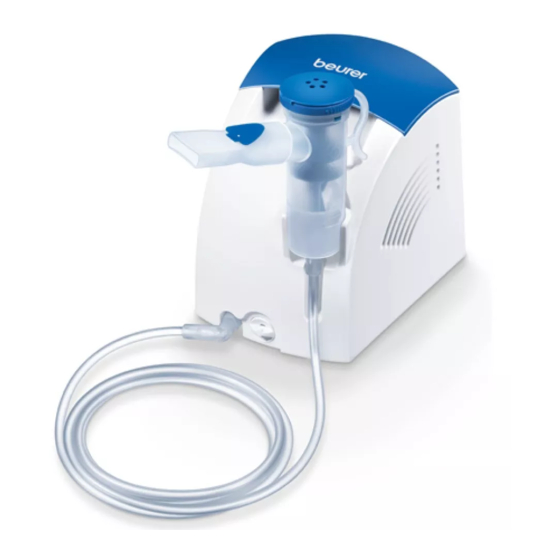
Page 4: Geräte- Und Zubehör Beschreibung
4. Geräte- und Zubehör- abschaltet. Sollte dies geschehen gehen Sie bitte folgendermaßen vor: beschreibung – Schalten Sie das Gerät aus. Übersicht Inhalator – Ziehen Sie den Netzstecker. – Warten Sie mind. 30 Minuten bis das Gerät voll- ständig abgekühlt ist. –... -
Page 5: Inbetriebnahme
5. Inbetriebnahme Hinweis Aufstellen • Achten Sie darauf, dass sich eine Steckdose in der Entnehmen Sie das Gerät der Verpackung. Nähe des Aufstellplatzes befindet. Stellen Sie es auf einer ebenen Fläche auf. • Verlegen Sie das Netzkabel so, dass niemand darü- Achten Sie darauf, dass die Lüftungsschlitze frei sind. -
Page 6: Filterwechsel
3. Zubehör mit Vernebler verbinden Achtung • Vernebler [8] mit gewünschtem Zubehör (Mundstück • Versuchen Sie nicht, den gebrauchten Filter zu rei- [11], Nasenstück [12], Erwachsenenmaske [13] oder nigen und wieder zu verwenden! Kindermaske [14]) verbinden. • Benutzen Sie ausschließlich den Original-Filter des •... - Page 7 • Achten Sie auf ausreichende Trocknung nach jeder Wasser auf das Gerät spritzen. Das Gerät darf nur im Reinigung, Desinfektion. Eine Restfeuchtigkeit bzw. vollständig trockenen Zustand betrieben werden. Restnässe kann ein erhöhtes Risiko für Keimwachs- • Sprühen Sie keine Flüssigkeit in die Lüftungsschlitze! tum darstellen.
-
Page 8: Entsorgen
Trocknung Probleme/ Mögliche Ursache/Behebung • Legen Sie die Einzelteile auf eine trockene, saubere Fragen und saugfähige Unterlage und lassen Sie sie voll- Der Vernebler 4. Ungeeignete Medikamentenflüssig- ständig trocknen (mindestens 4 Stunden). erzeugt kein keit zum Vernebeln eingefüllt (z.B. oder zu wenig zu dickflüssig). -
Page 9: Technische Angaben
Vernebler, Druckluft- Die Garantie ist innerhalb eines Zeitraumes von 3 Jah- schlauch, Filter, Nasenstück) ren ab Kaufdatum gegenüber der Beurer GmbH, Söf- linger Straße 218, 89077 Ulm, Deutschland, geltend Hinweis zu machen. Der Kunde hat im Garantiefall das Recht zur Reparatur der Ware bei unserem eigenen oder bei Bei Verwendung des Gerätes außerhalb der Spezifi-... -
Page 10: Included In Delivery
IP 21 or greater than 12.5 mm in diameter and With kind regards against vertically falling drops of water Your Beurer team Area of application 3. Safety information and warnings This nebuliser is a device used for the nebulisation Warning of liquids and liquid medication (aerosols) and for the treatment of the upper and lower respiratory tract. -
Page 11: Important
• In acute emergencies, first aid takes priority. • The IH 25/1 nebuliser must only be used with suit- • Apart from the medication, use only distilled water or able Beurer atomisers and with the appropriate a saline solution in the unit. -
Page 12: Description Of Device And Accessories
Overview of atomiser and accessories • This unit is not intended for commercial or clinical use, but only for individual, private household use! Before using the unit for the first time Important • Before you use the unit for the first time, remove all packaging materials. -
Page 13: Mains Connection
• Connect the other end of the hose [7] to the hose 1. Filling the atomiser connector [4] on the nebuliser by lightly turning it. • Open the lid of the atomiser [8]. • Fill with an isotonic saline solution or pour the medication directly into the atomiser [8]. -
Page 14: Changing The Filter
6. Clean the device • Ensure that all parts are properly dried following all cleaning and disinfection. Residual moisture or water For information about this, see “Cleaning and disinfec- droplets can result in an increased risk of bacterial tion” on page 14. growth. -
Page 15: Disposal
bacterial growth and to ensure effective therapeutic ant agents in the quantities recommended by the use, this moisture must always be removed. To remove manufacturer. moisture from the hose, proceed as follows: Storage • Remove the hose [7] from the atomiser [8]. •... -
Page 16: Technical Specifications
Problem/ Possible Cause/Remedy Question What special 1. In babies, the mask should cover the steps should mouth and nose to guarantee effec- be taken for tive inhalation. babies and 2. In children, the mask should also children? cover the mouth and nose. Nebulisa- tion next to a sleeping person is not suitable because insufficient medicine reaches the lungs. -
Page 17: Eléments Fournis
à la disposition des autres utilisateurs et suivez les consignes qui y figurent. Fabricant Sincères salutations, Marche votre équipe Beurer Arrêt Domaine d’application Numéro de série Cet inhalateur est un appareil servant à la nébulisation Protection contre les corps solides de liquides et de médicaments liquides (aérosols) et... -
Page 18: Consignes D'avertissement Et De Sécurité
• En cas de doutes de quelque nature que ce soit votre service après-vente ou votre revendeur. concernant votre santé, consultez votre médecin • L’inhalateur IH 25/1 ne peut être utilisé qu’avec des traitant. nébuliseurs Beurer et accessoires Beurer adaptés. - Page 19 4. Description de l’appareil et des • L’appareil dispose en outre d’une protection ther- mique qui désactive l’inhalateur en cas de surtempé- accessoires rature. En pareil cas, veuillez procéder comme suit : Aperçu de l’inhalateur – Arrêtez l’appareil. – Débranchez la fiche secteur. –...
-
Page 20: Mise En Service Installation
5. Mise en service • Pour le raccordement au secteur, enfoncez la fiche complètement dans la prise de courant. Installation Remarque Retirez l’appareil de l’emballage. Placez-le sur une surface plane. • Veillez à ce qu’une prise de courant se trouve à proxi- Veillez à... -
Page 21: Changement Du Filtre
2. Fermeture du nébuliseur Attention • Fermez le couvercle du nébuliseur [8]. • N’essayez pas de nettoyer et de réutiliser le filtre 3. Raccordement des accessoires au nébuliseur usagé ! • Relier le nébuliseur [8] à l’accessoire souhaité (em- • Utilisez exclusivement le filtre d’origine du fabricant, bout buccal [11], embout nasal [12], masque pour votre inhalateur risquant autrement d’être endom- adulte [13] ou masque pour enfant [14]). -
Page 22: Nettoyage
• Veillez à bien sécher le nébuliseur et les accessoires • Ne vaporisez aucun liquide dans les ouvertures après chaque nettoyage ou désinfection. L’humidité d’aération ! La pénétration de liquides peut occa- résiduelle peut fortement favoriser la prolifération de sionner un endommagement du circuit électrique et bactéries. -
Page 23: Mise Au Rebut
Séchage Problèmes/ Cause possible/solution • Disposez les pièces sur un support sec, propre questions et absorbant et laissez-les sécher entièrement (au Le nébuliseur 3. Tenez le nébuliseur en position moins 4 heures). ne laisse verticale. pas passer 4. Le liquide médicamenteux rempli Résistance des matériaux d’aérosol ou est inapproprié... -
Page 24: Caractéristiques Techniques
Références pour l’achat ultérieur de certaines Problèmes/ Cause possible/solution pièces questions Le nébuliseur C’est impératif, du point de vue de Désignation Matériau doit-il être l’hygiène. Stoppeur de nébulisation 162.819 utilisé par Yearpack (contient Embout PP/ PVC 601.03 une seule buccalm Masque pour personne ? adulte, Masque pour enfant, 11. -
Page 25: Presentación
Encendido Atentamente, Apagado Su equipo Beurer Número de serie Campo de aplicación Protegido contra cuerpos extraños IP 21 ≥12,5 mm y contra goteo vertical de agua Este inhalador es un aparato que sirve para nebulizar líquidos y medicamentos líquidos (aerosoles) y para... -
Page 26: Indicaciones De Advertencia Y De Seguridad
Cliente o el distribuidor. • Ante cualquier duda acerca de los efectos sobre la • El inhalador IH 25/1 sólo debe utilizarse con los ne- salud, consulte a su médico de cabecera. bulizadores Beurer adecuados y con los accesorios •... -
Page 27: Descripción De Los Aparatos Y Los Accesorios
4. Descripción de los aparatos y tamiento. Si esto ocurriera, proceda de la siguiente forma: los accesorios – Desconecte el aparato. Vista general del inhalador – Extraiga el enchufe de red. – Espere al menos 30 min hasta que el aparato se haya enfriado por completo. -
Page 28: Puesta En Marcha
5. Puesta en marcha • Introduzca el enchufe por completo en la toma de corriente para establecer la conexión eléctrica. Colocación Retire el aparato del embalaje. Colóquelo sobre una Aviso superficie plana. • Asegúrese de que haya una toma de corriente cerca Asegúrese de que las rendijas de ventilación estén del lugar donde se colocará... -
Page 29: Cambio De Filtro
3. Unir los accesorios con el nebulizador no podría garantizarse una terapia con la suficiente eficacia. • Acople en el nebulizador [8] los accesorios deseados • No utilice nunca el aparato sin filtro. (boquilla [11], aplicador para nariz [12], mascarilla de adulto [13] o mascarilla infantil [14]). - Page 30 Preparación formación de gérmenes y garantizar una terapia co- rrecta, resulta imprescindible eliminar la humedad. Para • Directamente después de cada tratamiento, se tie- ello proceda de la siguiente manera: nen que limpiar de restos de medicamento e impu- • Extraiga el tubo flexible [7] del nebulizador [8]. rezas todas las piezas del nebulizador [8] así...
-
Page 31: Almacenamiento
de plástico. Con el tiempo, esto puede conducir a un Problemas/ Posibles causas/solución cambio en el aerosol y, en consecuencia, perjudicar preguntas también la eficacia de la terapia. De ahí que reco- La expulsión Tubo flexible doblado, filtro obstruido, mendemos que se cambie el nebulizador a lo sumo es demasiado demasiada solución de inhalación después de un año. -
Page 32: Características Técnicas
11. Características técnicas Aviso Dimensiones En caso de no utilizar el aparato de acuerdo con las (An x Al x Pr) 166 x 141 x 148 mm especificaciones, no se garantiza un funcionamiento Peso 1,4 kg correcto. Presión de trabajo aprox. -
Page 33: Presentazione
Numero di serie Cordiali saluti Protetto contro la penetrazione di corpi Il Beurer Team IP 21 solidi ≥12,5 mm e contro la caduta verti- Campo di impiego cale di gocce d‘acqua Questo inalatore è... -
Page 34: Avvertenze E Indicazioni Di Sicurezza
• L’utilizzo di questo apparecchio non sostituisce il contattare il rivenditore o il servizio clienti. parere diretto o un trattamento del medico. Quindi, al • L’inalatore IH 25/1 deve essere fatto funzionare manifestarsi di qualsiasi dolore o malattia, consultare esclusivamente con gli adeguati nebulizzatori Beu- innanzitutto un medico. -
Page 35: Descrizione Dell'apparecchio E Degli Accessori
4. Descrizione dell’apparecchio e – Staccare la spina. – Attendere 30 minuti fino a che l’apparecchio non degli accessori si sia completamente raffreddato. Inalatore – Riaccendere l’apparecchio e verificare che non emetta rumori anomali. Qualora questo non si ve- rifichi, è possibile utilizzare nuovamente l’apparec- chio, in caso contrario rivolgersi al servizio clienti indicato. -
Page 36: Messa In Funzione
5. Messa in funzione Avvertenza Posizionamento • Assicurarsi che ci sia una presa di corrente vicino a Togliere l’apparecchio dalla confezione e appoggiarlo dove si intende posizionare l’apparecchio. su una superficie piana. • Prestare attenzione alla posizione del cavo, in modo Assicurarsi che le aperture di aerazione non siano co- tale che nessuno corra il rischio di inciampare. -
Page 37: Sostituzione Del Filtro
3. Collegamento degli accessori al nebulizzatore sere danneggiato o la terapia potrebbe non rivelarsi sufficientemente efficace. • Collegare il nebulizzatore [8] all’accessorio desiderato • Non utilizzare mai l’apparecchio senza filtro. (boccaglio [11], elemento per il naso [12], mascherina per adulti [13] o mascherina per bambini [14]). Per sostituire il filtro procedere come segue: •... - Page 38 • A tale scopo smontare il nebulizzatore [8] nei singo- • Staccare il tubo [7] dal nebulizzatore [8]. li componenti. • Lasciare il tubo collegato all’inalatore [4]. • Estrarre il boccaglio [11] dal nebuliz- • Far funzionare l’inalatore finché l’umidità non sia zatore.
-
Page 39: Smaltimento
Conservazione Problemi/ Possibile causa/rimedio • Non conservare l’apparecchio in ambienti umidi (ad domande es. il bagno) e non trasportarlo insieme ad oggetti A che cosa 1. Nel caso dei neonati, la mascheri- umidi. è necessa- na deve coprire naso e bocca per •... -
Page 40: Dati Tecnici
11. Dati tecnici Avvertenza Dimensioni (lar- L’inosservanza delle specifiche indicate non garantisce ghezza, altezza, il perfetto funzionamento del dispositivo. Ci riserviamo profondità) 166 x 141 x 148 mm la facoltà di apportare variazioni e migliorie tecniche Peso 1,4 kg per un ulteriore sviluppo del prodotto. Pressione Questo dispositivo e i relativi accessori sono fabbri- operativa... -
Page 41: Teslimat Kapsamı
12,5 mm büyüklüğünde ve buna eşit IP 21 yabancı cisimlere ve dikey bir şekilde Saygılarımızla damlayan suya karşı korumalıdır Beurer Ekibiniz Uygulama alanı 3. Uyarı ve güvenlik hatırlatmaları Bu inhalatör, sıvıların ve sıvı ilaçların (aeorosol) buhar- laştırılması için ve üst ve alt solunum yollarının tedavisi Uyarı... - Page 42 • Akut acil durumlarda ilk yardım önceliklidir. • IH 25/1 inhalatörü sadece buna uygun Beurer nebu- • İlaçların yanı sıra sadece damıtılmış su veya bir tuz lizatörler ve ilgili Beurer aksesuarı ile çalıştırılmalıdır. çözeltisi kullanınız. Diğer sıvılar inhalatör veya nebu- Yabancı...
-
Page 43: Cihaz Ve Aksesuar Açıklaması
• Bu cihaz ticari ya da klinik amaçlı kullanım için uygun Nebulizatör ve aksesuarlara genel bakış değildir; bu cihaz sadece evlerde kişisel kullanım için uygundur! İşletime almadan önce Dikkat • Cihazı kullanmadan önce her türlü ambalaj malze- mesini çıkartınız. • Cihazı toza, kire ve neme karşı koruyunuz, cihazın üstünü... -
Page 44: Kullanım
1. Nebulizatörün doldurulması • Hortumun [7] diğer ucunu hafif döndürerek inhalatör hortum bağlantısına [4] takınız. • Nebülizatörün [8] kapağını açın. • İzotonik bir sodyum klorür solüs- yonunu veya ilacı doğrudan nebü- lizatöre [8] doldurun. Aşırı doldur- mayınız! Tavsiye edilen maksimum dolum miktarı... -
Page 45: Filtre Değişimi
6. Temizliğin gerçekleştirilmesi • Yüksek risk gruplarında (örn. mukoviszidoz hastaları) gerekli hijyenik hazırlık (el bakımı, ilaç veya inhalas- Bkz. „Temizlik ve Dezenfeksiyon“ Sayfa 45. yon çözeltileri kullanımı) ile ilgili ek şartlar için lütfen 7. Filtre değişimi doktorunuza başvurunuz. • Her temizlik, dezenfeksiyon işleminden sonra yeterli Lütfen her 10 kullanımdan sonra filtreyi kontrol ediniz. -
Page 46: İmha
diğer inhalatör parçalarının hasar görmesine ve bir Malzeme dayanıklılığı fonksiyon bozukluğuna yol açabilir. • Nebulizatör ve aksesuarlar sık sık kullanıldığında ve hijyenik tekrar değerlendirmede, başka plastik parça- Yoğunlaşmış su, hortum bakımı lar gibi, belirli bir ölçüde aşınır. Bu, zaman içerisinde Çevre şartlarına göre hortumda yoğunlaşmış... -
Page 47: Teknik Veriler
Sorunlar/ Olası neden/Giderme Sorular Nebulizatörde Bu teknik nedenli ve normaldir. Nebu- inhalasyon çö- lizatör sesi önemli derecede değişti- zeltisi kalıyor. ğinde inhalasyonu sonlandırınız. Bebek ve 1. Efektif bir inhalasyon sağlamak için çocuklarda bebeklerde maske ağız ve burnu dikkat edilmesi kapatmalıdır. gerekenler 2. -
Page 48: Пояснения К Символам
следуйте указаниям, приведённым в ней. Сохра- Прибор класса защиты 2 ните инструкцию на случай возможной передачи другому пользователю. Изготовитель С наилучшими пожеланиями, Вкл. компания Beurer Выкл. Область применения Серийный № Данный ингалятор предназначен для распыления жидкостей и жидких лекарственных средств (аэро- Защищено от проникновения твердых... -
Page 49: Предостережения И Указания По Технике Безопасности
запрещено. В сомнительном случае обратитесь новные правила гигиены. в сервисную службу или к дилеру. • В отношении типа используемых лекарственных • Эксплуатация ингалятора IH 25/1 допускается средств, дозировки, частоты и длительности про- только в комбинации с подходящими распылите- цедур ингаляции всегда следуйте указаниям врача. -
Page 50: Описание Прибора И Принадлежностей
ПРЕДОХРАНИТЕЛЬ Ремонт • В приборе имеется максимальный предохрани- указание тель. Его замена должна производиться только • Ни в коем случае не открывайте и не ремонти- квалифицированным персоналом со специаль- руйте прибор, так как в этом случае не может ным допуском. быть... -
Page 51: Подготовка К Работе
Распылитель и принадлежности • Другой конец трубки [7] лёгким вращением вставьте в разъём [4] на ингаляторе. 7 Трубка-удлинитель 8 Распылитель 9 Насадка распылителя 10 Ёмкость для лекар- Подключение к сети ственных средств Прибор может подсоединяться только к сети с ука- 11 Мундштук... -
Page 52: Замена Фильтра
короткое время вместе с подключённым распы- Данные добавки часто являются вязкими и могут лителем, но без лекарственного средства. Если привести к нарушениям в работе прибора и, таким при этом из распылителя [8] будет выходить воз- образом, снизить его эффективность. При повы- дух, прибор... -
Page 53: Чистка И Дезинфекция
Чистка указание Внимание Если фильтр после снятия крышки остался в при- боре, извлеките его из прибора, напр., при помощи Перед каждой чисткой прибор нужно выключить, пинцета или другого подобного инструмента. отсоединить от сети и дать ему остыть. Распылитель, а также использованные принад- 2. -
Page 54: Утилизация
Дезинфекция условия хранения Для дезинфекции распылителя и принадлежно- • Не храните прибор во влажных помещениях стей в точности соблюдайте приведённые ниже (напр., в ванной) и не перевозите его вместе с действия. Все отдельные детали рекомендуется влажными предметами. дезинфицировать ежедневно после последнего •... -
Page 55: Технические Данные
11. Технические данные Неисправно- Возможная причина/ сти/вопросы способ устранения Размеры (ВxШxГ) 166 x 141 x 148 мм Раствор для Это обусловлено техническими Масса 1,4 кг ингаляции особенностями и следует считать Рабочее давление ок. 1,0 бар остается в нормальным явлением. Прекращайте распылителе. -
Page 56: Гарантия
12. Гарантия указание Мы предоставляем гарантию на дефекты материа- В случае применения прибора за пределами пара- лов и изготовления этого прибора на срок 24 меся- метров спецификации не может быть гарантиро- ца со дня продажи через розничную сеть. вана правильность действия! Оставляем за собой Гарантия... -
Page 57: Zakres Dostawy
Część stosowana typu BF Szanowni Klienci, Dziękujemy, że wybrali Państwo produkt z naszego asor- Przeczytać instrukcję obsługi tymentu. Firma Beurer oferuje dokładnie przetestowane produkty wysokiej jakości przeznaczone do pomiaru cię- Urządzenie klasy ochronnej 2 żaru, ciśnienia, temperatury i tętna, a także przyrządy do Producent łagodnej terapii, masażu, inhalacji i ogrzewania. - Page 58 • W razie jakichkolwiek obaw o zdrowie należy skon- przedstawicielem handlowym. sultować się z lekarzem pierwszego kontaktu! • Inhalator IH 25/1 należy stosować wyłącznie z pasu- • W przypadku stosowania nebulizatora należy prze- jącym nebulizatorem oraz odpowiednimi akcesoriami strzegać ogólnych zasad higieny.
-
Page 59: Opis Urządzenia I Akcesoriów
4. Opis urządzenia i akcesoriów – Odczekać przynajmniej 30 minut, aż urządzenie całkowicie ostygnie. Budowa inhalatora – Następnie ponownie włączyć urządzenie, zwrócić przy tym uwagę, czy odgłosy pracy nie są niena- turalne. Jeśli nie, można ponownie zastosować urządzenie. W przeciwnym razie należy zwrócić się... -
Page 60: Uruchomienie
5. Uruchomienie Wskazówka Ustawianie • Należy dopilnować, aby gniazdo sieciowe znajdo- Wyjąć urządzenie z opakowania. Ustawić na równej wało się w pobliżu miejsca ustawienia urządzenia. powierzchni. Zwrócić uwagę, aby szczeliny wentyla- • Przewód zasilający należy położyć w taki sposób, cyjne nie były zasłonięte. aby nikt nie mógł... -
Page 61: Wymiana Filtra
• Przed rozpoczęciem terapii nebulizator zdjąć do góry Sposób wymiany filtra: z uchwytu [6]. Uwaga • Włączyć inhalator za pomocą włącznika/wyłącznika • Najpierw wyłączyć urządzenie i odłączyć je od sieci. [2]. • Poczekać, aż urządzenie ostygnie. • Wydostawanie się rozpylonego płynu z nebulizatora oznacza prawidłowe działanie urządzenia. - Page 62 • W tym celu rozłóż nebulizator [8] na części. • Przewód powietrzny [7] odłączyć od nebulizatora [8]. • Zdjąć ustnik [11] z nebulizatora. • Przewód pozostawić włożony od strony inhalato- • W tym celu odkręć wkład nebulizatora ra [4]. [9] w kierunku przeciwnym do kierun- •...
-
Page 63: Utylizacja
• Przy wyborze środków czyszczących i dezynfe- Problemy/ Możliwa przyczyna/ kujących należy przestrzegać następującej reguły: Pytania Sposób usunięcia stosować wyłącznie łagodne środki czyszczące lub Jakich lekarstw Należy skonsultować się z lekarzem! dezynfekujące i dozować je zgodnie ze wskazówka- można używać Zasadniczo można inhalować... -
Page 64: Dane Techniczne
11. Dane techniczne Urządzenie i akcesoria są zgodne z europejskimi nor- mami EN60601-1 i EN60601-1-2 oraz EN13544-1 i Wymiary podlegają szczególnym przepisom odnośnie elektro- (szer. x wys. x gł.) 166 x 141 x 148 mm magnetycznej zgodności. Należy pamiętać, że prze- Ciężar 1,4 kg nośne i mobilne urządzenia komunikacyjne HF mogą... -
Page 65: Electromagnetic Compatibility Information
Table 1 Guidance and manufacturer’s declaration – electromagnetic emissions The IH 25/1 is intended for use in the electromagnetic environment specified below. The customer or the user of the IH 25/1 should assure that it is used in such an environment. - Page 66 Recommended separation distances between portable and mobile RF communications equipment and the IH 25/1 The IH 25/1 is intended for use in an electromagnetic environment in which radiated RF disturbances are controlled. The customer or the user of the IH 25/1 can help prevent electromagnetic interference by maintaining a minimum distance between portable and mobile RF communications equipment (transmitters) and the IH 25/1 as recommended below, according to the maximum output power of the commu- nications equipment.