Table des Matières
Publicité
Les langues disponibles
Les langues disponibles
Liens rapides
D Diagnose-Waage
Gebrauchsanweisung ............ 2 –13
G Diagnostic scale
Instructions for use .............. 14 – 24
F Pèse-personne impédancemétre
Mode d'emploi ...................... 25 – 37
E Báscula para diagnóstico
Manual de instrucciones ...... 38 – 49
I Bilancia diagnostica
Istruzioni per l'uso ................ 50 – 61
Beurer GmbH
Tel.: +49 (0)731 / 39 89 -144
www.beurer.de
Söfl inger Str. 218
•
Fax: +49 (0)731 / 39 89 - 255
•
Mail: kd@beurer.de
•
BF 100
T Diyagnoz terazisi
Kullanım kılavuzu .................. 62 – 72
r Диагностические весы
Инструкция по
применению ......................... 73 – 86
Q Waga diagnostyczna
Instrukcja obsługi ................. 97 – 98
89077 Ulm, Germany
•
Body Complete
Publicité
Chapitres
Table des Matières

Manuels Connexes pour Beurer BF 100


Sommaire des Matières pour Beurer BF 100
- Page 1 BF 100 Body Complete D Diagnose-Waage T Diyagnoz terazisi Gebrauchsanweisung .... 2 –13 Kullanım kılavuzu ....62 – 72 G Diagnostic scale r Диагностические весы Instructions for use ....14 – 24 Инструкция по применению ......73 – 86 F Pèse-personne impédancemétre Q Waga diagnostyczna Mode d’emploi ......
-
Page 2: Table Des Matières
Sie sie anderen Benutzern zugänglich und Warnung Warnhinweis auf Verletzungsge- beachten Sie die Hinweise. fahren oder Gefahren für Ihre Ge- Mit freundlicher Empfehlung sundheit. Ihr Beurer-Team Achtung Sicherheitshinweis auf mögliche 1. Kennenlernen Schäden am Gerät/Zubehör. Funktionen des Gerätes Mit dieser Diagnose-Waage leisten Sie einen entschei- Hinweis Hinweis auf wichtige Informationen. -
Page 3: Sicherheitshinweise
3. Sicherheitshinweise • Im Auslieferungszustand ist die Waage auf die Ein- heiten „cm“ und „kg“ eingestellt. Zum Einstellen der Bitte lesen Sie diese Gebrauchsanweisung aufmerk- Einheiten beachten Sie bitte die Information im Ka- sam durch, bewahren Sie sie für späteren Gebrauch pitel „Einstellung“. -
Page 4: Inbetriebnahme
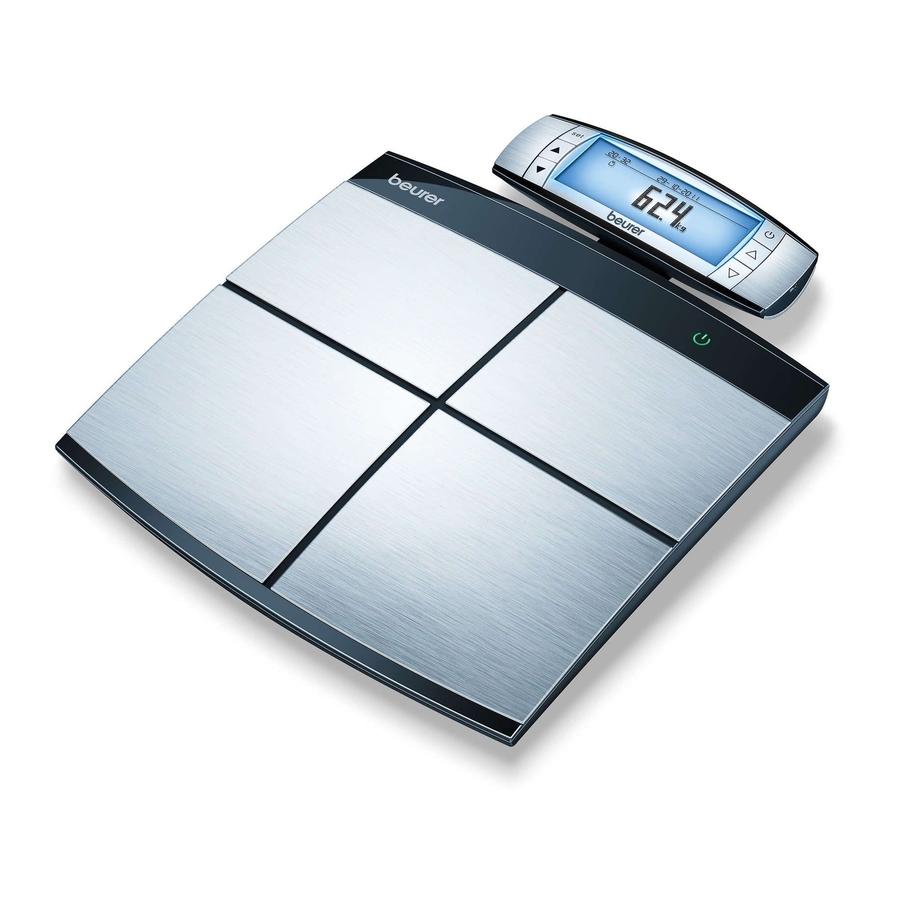
Bedienteil mit Display Waage 3 x AA Zeigt die Waage bzw. das Bedienteil keine Funktion, so entfernen Sie die Batterien komplett und setzen Sie 5 Kontakt-Elektroden, linke Hand sie erneut ein. 6 Kontakt-Elektroden, rechte Hand Hinweise zum Batteriewechsel, siehe Seite 12. 7 set Einstelltaste, Eingaben bestätigen Menü: Auf-Taste Waage aufstellen... -
Page 5: Informationen
• Bohren Sie mit einem 6-mm-Bohrer 2 Löcher ca. unbedenklichen und ungefährlichen Strom eine Bestim- 40 mm tief in einem Abstand von 36 mm waagerecht mung von Körperanteilen ermöglicht. Mit dieser Mes- nebeneinander in die Wand. sung des elektrischen Widerstandes (Impedanz) und •... -
Page 6: Einstellung
vorgenommen werden. Völlig trockene oder stark Anschließend zeigt das Display die gewählten Einstel- verhornte Fußsohlen können zu unbefriedigenden lungen in einer Übersicht an. Ergebnissen führen, da diese eine zu geringe Leitfä- Datum, Uhrzeit einstellen higkeit aufweisen. • Drücken Sie im Standby-Modus (Uhrzeit und Datum •... -
Page 7: Displayanzeigen
Aktivitätsgrade 10. Bedienung Bei der Auswahl des Aktivitätsgrades ist die mittel- und Gewicht messen langfristige Betrachtung entscheidend. 1. Waage einschalten Erst nachdem alle Parameter eingegeben wurden, kön- • Drücken Sie die Taste [ ] am Bedienteil. nen nun auch Körperfett und die weiteren Werte er- Es erscheint 0.0 kg im Dis- mittelt werden. - Page 8 geben. Im „GAST“-Modus werden die Benutzerdaten Analyse der Messwerte nach erfolgter und Messwerte nicht gespeichert. Sie haben die Mög- Messung lichkeit, den „GAST“-Modus ein- bzw. auszuschalten, Grafische Darstellung siehe Seite 6. Gewicht • Drücken Sie die Menü-Taste [ ] am Bedienteil, um •...
- Page 9 Muskel Kcal Kalorienverbrauch • Schalten Sie mit der Taste [ ] zur detaillierten • Drücken Sie die Taste [ ] am Bedienteil, um zu Kcal Darstellung der Muskelmasse. zu schalten. Der theoretisch berechnete Grundum- satz BMR sowie Aktivitätsumsatz AMR werden in Kcal dargestellt.
-
Page 10: Ergebnisse Bewerten
den, die noch unterhalb der angegebenen Richtwerte • Wählen Sie mit den Tasten [ ] „Ja“ und bestä- liegen. Bitte beachten Sie jedoch, dass bei extrem nied- tigen Sie die Abfrage mit der Taste [SET]. Falls Sie rigen Werten Gesundheitsgefahren bestehen können. nichts löschen möchten, bestätigen Sie „Nein“... -
Page 11: Knochenmasse
Der Aktivitätsumsatz (AMR = Active Metabolic Rate) ist die Energiemenge, die der Körper im aktiven Zustand Alter wenig normal viel pro Tag verbraucht. Der Energieverbrauch eines Men- 30 – 39 <33% 33 – 38 % >38 % schen steigt mit zunehmender körperlicher Aktivität an 40 –... -
Page 12: Messwerte Zu Einem Pc Übertragen / Healthmanager / Easyfit
Trainingsanalyse in Verbindung mit Beurer Pulsuhren. Cd = Batterie enthält Cadmium, Ablauf: Hg = Batterie enthält Quecksilber. • Download und Installation der Beurer Software fin- Im Interesse des Umweltschutzes darf die Waage ein- den Sie im Downloadbereich unter schließlich der Batterien am Ende ihrer Lebensdauer http://www.beurer.com... -
Page 13: Technische Angaben
Polung. Die Garantie ist innerhalb eines Zeitraumes von 5 Jah- eingelegt. ren ab Kaufdatum gegenüber der Beurer GmbH, Söf- linger Straße 218, 89077 Ulm, Deutschland, geltend zu Falsche Gewichtsmessung machen. Der Kunde hat im Garantiefall das Recht zur Mögliche Fehler Behebung... -
Page 14: About The Device
With kind regards Note Note on important information. Your Beurer team 3. Safety notes 1. About the device Please read these instructions for use carefully and Functions of the unit keep them for later use, be sure to make them ac-... -
Page 15: General Notes
• Do not press the buttons using excessive force or Safety notes with pointed objects. • Do not expose the scale to high temperatures or • The scales must not be used by persons strong electromagnetic fields (e.g. mobile phones). with medical implants (e.g. -
Page 16: Initial Use
Analysis with control unit Slide out the tray (on the rear of the scale) as shown to place the control unit on the scale. The tray contains a Note magnet that fixes the control unit to the scale. Hold with both hands to ensure good contact with the electrodes (5) and (6) on the front and rear. -
Page 17: Information
Adjusting the angle Please be aware that values obtained from the diag- nostic scale represent only an approximation of actual The control unit can be pivoted on the wall holder, al- analytical medical data. Only a specialist physician can lowing you to adjust the angle. A locking device pre- accurately determine body fat, body water, muscle per- vents the control unit from being removed from the wall centage and bone structure using medical procedures... -
Page 18: Setting
8. Setting • Now you can enter the following settings: User data Parameters Enter your personal information before using the scale. male , female Setting the unit Height 100 to 250 cm (3‘ 03“ to 8‘ 02“) • From standby mode (time and date displayed), press Date of birth year, month, day the [SET] button. -
Page 19: Operation
4 Menu • Press the [SET] button or wait 3 seconds. The meas- Overview of current measurement urement screen is shown on the display. Trend Detailed display of body fat, muscle percent- age of upper/lower body Saved measurements 1 – 30 Average values If you activate the “guest”... - Page 20 For the analysis, see “Analysing results” on page 21. Muscle When the unit is switched off, the measurement is • Use the [ ] buttons to switch to the detailed saved automatically. view of muscle mass. If several measurements are taken on one day, only the last measurement is saved.
-
Page 21: Power-Saving Mode
Calorie consumption to delete anything, select “NO” and confirm with the Kcal [SET] button. • Press the [ ] button on the control unit to switch to the kcal screen. The theoretically calculated basal Switching off the scale (standby mode) metabolic rate (BMR) and active metabolic rate •... -
Page 22: Important
Body water percentage Bone mass The body water percentage is normally within the fol- Like the rest of our body, our bones are subject to the lowing ranges: natural development, degeneration and ageing pro- cesses. Bone mass increases rapidly in childhood and reaches its maximum between 30 and 40 years of age. -
Page 23: Transferring Measurements To A Pc - Healthmanager / Easyfit
Cd = battery contains cadmium, Process: Hg = battery contains mercury. • You will find the Beurer software download and instal- For environmental reasons, do not dispose of the scale lation in the download area at http://www.beurer.com with the batteries in the household waste at the end of its useful life. -
Page 24: What If There Are Problems
Observe the local regulations for material disposal. Possible errors Remedy Dispose of the unit in accordance with EC Di- Cordless connec- Reinsert the batteries for the rective 2002/96/EC–WEEE (Waste Electrical tion between scale scale and the control unit. Main- and Electronic Equipment). and control unit is tain a larger distance from the If you have any questions, please contact the local au-... -
Page 25: Familiarisation Avec L'appareil
Voici les symboles utilisés dans la notice d’utilisation. Sincères salutations, Avertissement Ce symbole vous avertit des Votre équipe Beurer risques de blessures ou des dangers pour votre santé. 1. Familiarisation avec l’appareil... -
Page 26: Consignes De Sécurité
3. Consignes de sécurité informations du chapitre « Réglage » pour régler les unités. Lisez attentivement cette notice, conservez-la pour • Placez le pèse-personne sur un sol plan et stable ; un usage ultérieur, mettez-la également à la dispo- une surface ferme est la condition préalable à une sition des autres utilisateurs et suivez les consignes mesure exacte. -
Page 27: Mise En Service
Unité de commande avec afficheur Pèse-personne 3 x AA Si le pèse-personne ou l’unité de commande n’indique aucune fonction, veuillez retirer toutes les piles et insé- Electrodes de contact, main gauche rer des piles neuves. Electrodes de contact, main droite Remarques pour le changement de piles, voir page 35. -
Page 28: Informations
• A l’aide d’un foret de 6 mm, percez dans le mur 2 7. Informations trous d’env. 40 mm de profondeur, selon un entraxe Principe de mesure de 36 mm, horizontalement l’un à côté de l’autre. Ce pèse-personne fonctionne selon le principe d’ana- •... -
Page 29: Conseils Généraux
Conseils généraux • Sélectionnez avec les touches de réglage [ ] le symbole des unités (kg, lb, st) et confirmez avec la • Pesez-vous, si possible, à la même heure (de pré- touche [SET]. férence le matin), après la selle, à jeun et nu(e) afin •... -
Page 30: Niveaux D'activité
Données de Valeurs de réglage 4 Menu l’utilisateur Aperçu de la mesure actuelle Affichage de la tendance Niveau d’activité 1 à 5 Représentation détaillée de la graisse corpo- Poids cible réglable, en kg (pour représen- relle, du taux de masse musculaire dans la tation de la courbe graphique) partie supérieure / inférieure du corps •... - Page 31 2. Diagnostic 3. Résultat • Après la mise en marche, sélectionnez votre utilisa- La vue d’ensemble est affichée. teur 1 – 10 en pressant la touche de droite [ ]. A cet égard, presser le cas échéant de façon répétée sur la touche.
-
Page 32: Appel De La Mémoire Des Valeurs Mesurées À Partir Du Mode Veille
Valeurs moyennes Partie supérieure / partie inférieure du corps • Pressez la touche [ ] sur l’unité de commande pour Graisse corporelle accéder à la Moyenne. • Pressez la touche [ ] sur l’unité de commande pour L’ensemble des valeur moyennes à partir des mesures accéder à... -
Page 33: Extinction Du Pèse-Personne (Mode Veille)
tez pas supprimer l’utilisateur, sélectionnez « Non » Homme et confirmez avec la touche [SET]. Toutes les valeurs et tous les réglages enregistrés Faible Normal Elevé Obésité de cet utilisateur sont supprimés. 10 –14 <11 % 11–16 % 16,1– 21 % >21,1 % 15 –19 <12 % 12 –17 %... -
Page 34: Masse Osseuse
périeur aux données de référence en raison d’un taux de certains facteurs (poids, taille, âge, sexe). Aucune de graisse corporelle inférieur et d’un taux de masse directive ni recommandation n’existent en la matière. musculaire supérieur. Attention Le taux de masse hydrique déterminé sur ce pèse-per- sonne ne permet pas de tirer de conclusions d’ordre ne confondez pas la masse osseuse et la densité... -
Page 35: Transfert Des Valeurs Mesurées Vers Un Pc / Healthmanager / Easyfit
Gestion de la santé en association avec les tensio- consommatrice, la législation vous impose de resti- mètres et lecteurs de glycémie sanguine Beurer. tuer les piles usagées. Vous pouvez déposer les piles usagées dans les points de collecte locaux réservés EasyFit :... -
Page 36: Que Faire En Cas De Problèmes
Respectez les réglementations locales en matière d’éli- Pas de mesure possible mination de matériaux. Causes possibles Remède Eliminez l’appareil conformément à la directive d’erreurs européenne 2002/96/CE-WEEE (Waste Electri- L’unité de com- Enclencher tout d’abord l’unité cal and Electronic Equipment) relative aux ap- mande n’a pas été... -
Page 37: Caractéristiques Techniques
17. Caractéristiques techniques Dimensions du pèse-personne 330 x 330 x 41 mm Piles du pèse-personne 3 x 1,5 V type AA Piles de l’unité de commande 3 x 1,5 V type AA Radiotransmission 433 MHz Plage de mesure 5 kg à 150 kg Incréments d’affichage poids, masse osseuse 100 g... -
Page 38: Introducción
Advertencia Nota de advertencia sobre Atentamente, peligro de lesiones o riesgo- Su equipo Beurer para su salud. 1. Introducción Atención Indicación de seguridad sobre Funciones del aparato posibles daños en el aparato/ accesorios. -
Page 39: Indicaciones De Seguridad
3. Indicaciones de seguridad • Proteja el dispositivo frente a los golpes, la hume- dad, el polvo, los productos químicos, los cambios Lea atentamente estas instrucciones de uso, consérve- bruscos de temperatura y la proximidad a las fuen- las para su posterior utilización, póngalas a disposición tes de calor (hornos, radiadores). -
Page 40: Puesta En Marcha
Panel de mando con pantalla Báscula 3 x AA Si la báscula o el panel de mando no muestra ningu- na función, retire las pilas por completo y colóquelas Electrodos de contacto, mano izquierda de nuevo. Electrodos de contacto, mano derecha Para consultar las indicaciones relativas al cambio de 7 set Tecla de ajuste, confirmar las entradas pilas, véase la página 48. -
Page 41: Información
• Con una broca de 6 mm, taladre en la pared 2 orifi- 7. Información cios de aprox. 40 mm de profundidad a una distan- El principio de medición cia horizontal de 36 mm entre sí. Esta báscula funciona de acuerdo con el principio del •... -
Page 42: Configuración
Consejos generales • Seleccione con las teclas de ajuste [ ] si desea activar o desactivar el modo „INVITADO“ y confirme • Intente pesarse siempre a la misma hora (mejor por con la tecla [SET]. la mañana) tras haber estado en el servicio, en ayu- A continuación, la pantalla muestra los ajustes selec- nas y sin ropa para obtener resultados comparables. -
Page 43: Indicaciones En Pantalla
Una vez introducidos todos los datos, la báscula está 10. Manejo preparada para realizar la medición. Si no hace nada Medición del peso más, la báscula se apaga. 1. Encendido de la báscula Actividad • Pulse la tecla [ ] del panel de mando. En la pantalla se muestra En la selección de la actividad es importante la obser- 0.0 kg. - Page 44 de usuario ni los valores de medición. El modo Invitado Análisis de los valores tras realizar una se puede activar o desactivar, véase la página 42. medición Representación gráfica • Ahora colóquese descalzo sobre la báscula y sujete Peso firmemente el panel de mando en las manos. (Si el •...
- Page 45 Masa muscular Consumo de calorías Kcal • Pulse la tecla [ ] para cambiar a la representa- • Pulse la tecla [ ] del panel de mando para cambiar ción detallada de la masa muscular. a Kcal. La tasa de metabolismo basal BMR así como la tasa de metabolismo activo AMR teóricas se re- presentan en Kcal.
-
Page 46: Desconexión De La Báscula (Modo Standby)
3. Borrado de todos los valores de la memoria de un usuario • Acceda a la memoria de valores „Mem“ y pulse la Edad Poca Normal Mucha Excesiva tecla [SET] del panel de mando durante aprox. 3 se- 50 – 59 <21 % 21–... - Page 47 sus funciones básicas (p. ej., si se está todo el día en la cama). Este valor depende básicamente del peso, la estatura y la edad. En la báscula de diagnóstico se Edad Poca Normal Mucha muestra en la unidad kcal/día y se calcula según la re- 30 –...
-
Page 48: Transferencia De Los Valores De Medición A Un Ordenador / Healthmanager / Easyfit
Secuencia: al final de su vida útil. La eliminación se puede efec- • En el área de descargas de http://www.beurer.com tuar a través del punto de recogida correspondiente podrá descargar e instalar el software de Beurer. -
Page 49: Características Técnicas
Medición de peso incorrecta Indicación Causa Reparación en pantalla Posible fallo Reparación ERROR_ La resistencia eléc- Repetir la medi- La báscula tiene un Justo antes de realizar la CONTACTO trica entre los elec- ción descalzo. punto cero incorrecto. medición, active la báscula trodos y la planta En caso necesa- con el pie para que se ilumi-... -
Page 50: Spiegazione Dei Simboli
Attenzione Segnalazione di rischi di possibili chiunque utilizza l’apparecchio. Rispettare le istruzioni. danni all’apparecchio. Cordiali saluti Avvertenza Indicazione di importanti informa- Il Beurer Team zioni. 1. Introduzione 3. Norme di sicurezza Funzioni dell’apparecchio Leggere attentamente questo manuale d’uso, conser-... -
Page 51: Descrizione Dell'apparecchio
es pacemaker), in quanto se ne potrebbe pregiudi- • Non premere i tasti né con troppa forza, né utilizzan- care il funzionamento. do oggetti appuntiti. • Non utilizzare durante la gravidanza. • Non esporre la bilancia a temperature elevate o a •... -
Page 52: Messa In Funzione
Analisi con pannello di comando Collocazione della bilancia Collocare la bilancia su una superficie piana e stabile. Avvertenza Una superficie stabile è indispensabile per una cor- Tenere il pannello di comando con retta pesatura. due mani per garantire il contatto 6. -
Page 53: Informazioni
Le ossa e i tessuti adiposi, viceversa, presentano una Appoggiare prima contro la parete il pannello di debole conduttività poiché l’elevato grado di resisten- comando posto sul supporto a parete, poi spingerlo za delle cellule del tessuto adiposo e delle ossa impe- verso il basso per facilitarne l’innesto. -
Page 54: Impostazioni
piedi secche o con notevoli duroni possono portare Impostazione di data e ora a risultati insoddisfacenti, perché la loro conduttività • In modalità standby (ora e data inseriti) premere il è troppo bassa. tasto [SET]. • Durante la pesatura restare dritti e immobili. •... -
Page 55: Indicatori Sul Display
Gradi di attività 10. Funzionamento Nella scelta del grado di attività occorre considerare il Misurazione del peso medio-lungo periodo. 1. Accensione della bilancia Dopo che tutti i parametri sono stati inseriti, la bilancia • Premere il tasto [ ] sul pannello di comando. può... - Page 56 tente. Nella MODALITÀ OSPITE i dati dell’utente e i valori Analisi dei valori a seguito di una misura- misurati non vengono memorizzati. È possibile attiva re/ zione disattivare la MODALITÀ OSPITE; vedere pagina 54. Rappresentazione grafica Peso • Salire ora a piedi nudi sulla bilancia e tenere saldamen- te in mano il pannello di comando.
- Page 57 Muscolatura Consumo di calorie Kcal • Azionare mediante il tasto [ , ] per avere una rap- • Premere il tasto [ ] sul pannello di comando, per presentazione dettagliata della massa muscolare. attivare Kcal. Il metabolismo basale BMR e quello di attività...
-
Page 58: Valutazione Dei Risultati
3. Eliminazione di tutti i valori memorizzati di un utente • Richiamare la memoria dei valori misurati “Mem“ e Età bassa normale alta molto alta premere il tasto [SET] sul pannello di comando per 60 – 69 <22 % 22 – 27 % 27,1–... -
Page 59: Massa Ossea
Donna Il metabolismo di attività (AMR = active metabolic rate) è il fabbisogno energetico quotidiano del corpo in con- dizioni di attività. Il consumo di energia di un essere Età bassa normale alta umano cresce con l’aumentare dell’attività fisica; que- 10 –14 <36% 36 –... -
Page 60: Trasmissione Dei Valori Misurati Su Un Pc / Healthmanager / Easyfit
Hg = la batteria contenente mercurio. Procedura: Per rispetto dell’ambiente la bilancia, batterie incluse, • Per scaricare e installare il software Beurer, accedere non deve essere gettata tra i normali rifiuti domestici all‘area download del sito http://www.beurer.com al termine della sua vita utile. Lo smaltimento va effet- •... -
Page 61: Dati Tecnici
Misurazione del peso non corretta Display Causa Rimedio CAMPO MISURA La misurazione Ripetere la misura- Possibili errori Rimedio BIA è terminata zione a piedi nudi, La bilancia non è tarata Prima della misurazione atti- positivamente event. inumidi- sullo 0 in modo corretto. vare la bilancia appoggiando ma la percentua- re leggermente la... -
Page 62: Tanıtım
Dikkat Cihazla/aksesuarlarıyla ilgili olası ha- içinde verilen bilgi ve uyarılara dikkat ediniz. sarlara yönelik güvenlik uyarıları. Saygılarımızla Önemli bilgilere yönelik notlar. Beurer Ekibiniz 1. Tanıtım 3. Güvenlik Uyarıları Cihazın fonksiyonları Lütfen bu kullanma kılavuzunu itinayla okuduktan sonra, ileride yine kullanmak üzere saklayınız. Cihazı kullanan Bu baskül sağlığınıza önemli katkı... -
Page 63: Genel Uyarılar
• Baskülü yüksek sıcaklıklara veya ciddi elektromanyetik Güvenlik Uyarıları alanlara (örn. cep telefonları) maruz bırakmayınız. • Onarım işleri yalnız müşteri hizmetleri veya yetkili satı- • Baskül, tıbbi implant kullanan kişilerce (ör- cılar tarafından yapılabilir. Şikayette bulunmadan önce neğin kalp pili) kullanılmamalıdır. Aksi tak- pilleri kontrol edin ve gerekliyse değiştiriniz. -
Page 64: Çalıştırma
Kontrol ünitesi ile analiz Kontrol ünitesini üzerine yerleştirebilmek için şarj ale- tini (baskülün arka tarafındaki) gösterilen şekilde dışa- rıya doğru itiniz. Şarj aleti, kontrol ünitesini basküle sa- bitleyen bir mıknatıs içermektedir. (5) ve (6) numaralı elektrotların ön ve arka tarafa güvenli bir şekilde bağ- lanabilmeleri için cihaz iki elle tutul- malıdır. -
Page 65: Bilgiler
• Kontrol ünitesini tam olarak tutucunun üzerine itiniz. Dijital baskül tarafından belirlenen değerler, tıbbi ve Kontrol ünitesinin paralel konumda ve sağlam bir şe- gerçek analiz değerlerine yaklaşık değerlerdir. Yalnız kilde tutucunun üzerindeki yerine oturup oturmadığını uzman doktorlar tıbbi yöntemler (örneğin bilgisayarlı kontrol ediniz. -
Page 66: Ayar
8. Ayar • Şimdi aşağıdaki ayarlamaları yapabilirsiniz: Kullanıcı verileri Ayar değerleri Baskülünüzü kullanmadan önce lütfen verilerinizi gi- Cinsiyet Erkek , Kadın riniz. 100 ile 250 cm arasında Cihazın ayarlanması (3‘-03“ ile 8‘-02“ arasında) • Bekleme modunda (saat ve tarih görüntülenir) [SET] Doğum günü... -
Page 67: Kullanım
4 Menü 2. Diyagnoz Güncel ölçüme ilişkin genel bakış • Cihaz çalıştırıldıktan sonra 1 – 10 arası bir kullanıcıyı Eğilim göstergesi sağ tuşa [ ] basarak seçiniz. Bunun için tuşa gere- Üst gövdeye/alt gövdeye ilişkin ayrıntılandırıl- kirse tekrar basınız. mış yağ oranı ve kas kütlesi görüntüsü •... - Page 68 3. Sonuç Üst gövde, alt gövde Genel bakış görüntülenir. Yağ • Üst/alt gövdeye ilişkin ayrıntılı görünüme ulaşmak için kontrol ünitesindeki [ ] tuşuna basınız. Tüm gövde ve üst gövde/alt gövde olarak ayrılmış şe- kilde vücuttaki yağ oranına ilişkin güncel ölçüm sonu- cu görüntülenir.
-
Page 69: Sonuçların Değerlendirilmesi
Kalori tüketimi 3. Kullanıcıya ilişkin tüm hafıza değerlerinin silin- Kcal • Kontrol ünitesindeki [ ] tuşuna basarak Kcal de- mesi ğerlerine ulaşabilirsiniz. Teorik olarak hesaplanan ba- • „Mem“ ölçüm değeri hafızasını çağırınız ve tüm de- zal metabolik hız BMR ve aktif metabolik hız AMR ğerleri silmek için kontrol ünitesindeki [SET] tuşuna değerleri Kcal olarak görüntülenir. - Page 70 Kadın Çok Yaş Düşük Normal Yüksek Yaş Düşük Normal Yüksek yüksek 10 –14 <36% 36 – 43 % >43 % 60 – 69 <22 % 22 – 27 % 27,1– 32 % >32,1 % 15 –19 <35% 35 – 41 % >41 % 70 –100 <23 %...
-
Page 71: Ölçüm Değerlerinin Pc'ye Aktarılması / Healthmanager / Easyfit
Sistem gereksinimleri: Windows 7, Windows Vista, Windows XP SP3 Zehirli madde içeren pillerde aşağıdaki HealthManager: işaret mevcuttur: Beurer tansiyon ve kan şekeri ölçme aletleriyle sağ- Pb = Pil kurşun içermektedir, lık yönetimi. Cd = Pil kadmiyum içermektedir, EasyFit: Hg = Pil cıva içermektedir. -
Page 72: Problemle Karşılaşılması Durumunda Ne Yapılmalıdır
Malzemelerin atılması sırasında yerel yönetmeliklere Olası Hatalar Giderme uyunuz. Baskül ve kontrol Basküle ve kontrol ünitesine iliş- Cihaza ilişkin imha etme işlemini Elektrikli ve ünitesi arasındaki kin pilleri yeniden yerleştiriniz. Elektronik Eski Cihazlar AB Yönergesi 2002/96/ radyo sinyali bağlan- Aşağıdaki elektromanyetik kay- EC –... -
Page 73: Для Ознакомления
• Диаграмма веса и жировой массы. инструкцию на случай возможной передачи дру- • Отображение последних 30 измерений для 10 че- гому пользователю. ловек. С наилучшими пожеланиями, • Функция однократной быстрой диагностики для компания Beurer гостей. • Дата и время в режиме ожидания. -
Page 74: Пояснения К Символам
2. Пояснения к символам • Если одна из батареек разрядилась, наденьте за- щитные перчатки и почистите батарейный отсек В инструкции по применению используются сле- сухой салфеткой. дующие символы. • Батарейки могут содержать токсичные вещества, вредные для здоровья и окружающей среды. Предосте- Предупреждает... -
Page 75: Описание Прибора
4. Описание прибора Оценка при помощи пульта управления Обзор Указание Удерживание двумя руками обе- спечивает надёжный контакт с электродами (5) и (6) на передней и задней сторонах. 5. Подготовка к 1 Ножные электроды, левая нога работе 2 Пульт управления с дисплеем Установка... -
Page 76: Монтаж Пульта Управления
6. Монтаж пульта управления Сначала подведите пульт управления к стене Установка пульта управления над настенным держателем, после чего сдвиньте Пульт управления можно по выбору держать в руке, пульт управления вниз, чтобы облегчить зацепле- установить на ровную устойчивую поверхность или ние. прикрепить... -
Page 77: Настройка
сти) позволяет определить жировую массу тела и • Важно при измерении: Определение жировой другие параметры. массы (нижняя часть тела) обязательно нужно Мышечная ткань и жидкость имеют хорошую элек- выполнять босиком. При этом подошвы стоп трическую проводимость и, соответственно, низкое должны быть слегка влажными. Если подошвы сопротивление. - Page 78 • Выберите с помощью установочных кнопок [ Данные пользователя Значения ] единицы измерения (кг, фунт, стоун) и под- Степень физической от 1 до 5 твердите кнопкой [SET]. активности • Выберите с помощью установочных кнопок [ Желательный вес регулируется, в кг (для ] способ...
-
Page 79: Показания На Дисплее
9. Показания на дисплее Если пульт управления удерживается в руках, Обзор его вес (300 г) автоматически вычитается из об- щей суммы. После успешно выполненного измерения его ре- зультат отображается примерно на 10 секунд. Весы автоматически выключаются через несколь- ко секунд после освобождения контактных поверх- 1 Время, дата, пользователь... - Page 80 троде, а остальные пальцы прижимали задние Необходимо определить желательный вес, что- электроды. бы можно было отобразить график веса тела, см. странице 78. Желательный вес можно изменить в любой момент. Жировая масса • С помощью кнопки [ , ] переключитесь на гра- фик...
-
Page 81: Экономичный Режим
мяти (03-03), например, третья = последняя ячейка Удаление данных памяти из трёх заполненных ячеек. 1. Удаление пользователя со всеми настройка- ми и сохранёнными результатами • После включения выберите свои персональные данные нажатием кнопки [ При необходимости нажмите кнопку несколько раз и подтвердите нажатием [SET]. •... -
Page 82: Оценка Результатов
11. Оценка результатов Женщины Жировая масса тела Значения жировой массы тела отображаются на очень дисплее и оцениваются с помощью гистограммы. Возраст плохо хорошо хорошо В следующих таблицах приведены нормативные 10 –100 <45 % 45 – 60 % >60 % значения жировой массы тела в % (за более под- робной... - Page 83 При правильном питании (особенно кальций и ви- длительного времени восполнение энергии больше, тамин D) и регулярной физической активности Вы чем рассчитанное значение для жизненной актив- можете противостоять этому снижению. ности (AMR), организм получает избыток энергии, При правильном построении мышечного корсета который...
-
Page 84: Healthmanager / Easyfit
приёмные пункты по месту жительства, занимаю- щиеся сбором такого вида отходов. Выполнение: • Для загрузки и установки программного обеспе- Указание чения Beurer пройдите в раздел загрузок на сайте http://www.beurer.com Эти знаки предупреждают о наличии в • Восстановите соединение USB. батарейках следующих токсичных ве- ществ:... -
Page 85: Технические Данные
Дисплейное Причина Устранение Возможные ошибки Устранение сообщение Пульт управления Уменьшите расстояние MEMORY_FULL Сохранены 30 Передайте резуль- расположен слишком между весами и пультом измерений. таты измерений далеко от весов. управления, максимальное на ПК, см. страни- расстояние - 2 метра. цу 84. Батарейки... -
Page 86: Гарантия
18. Гарантия Мы предоставляем гарантию на дефекты материа- лов и изготовления на срок 36 месяцев со дня про- дажи через розничную сеть. Гарантия не распространяется: – на случаи ущерба, вызванного неправильным ис- пользованием, – на быстроизнашивающиеся части (батарейки), – на дефекты, о которых покупатель знал в момент покупки, –... -
Page 87: Informacje O Urządzeniu
śniowej dla górnej i dolnej połowy ciała z podaniem Dziękujemy, że wybrali Państwo produkt z naszego pomiarów cząstkowych. asortymentu. Firma Beurer oferuje dokładnie przete- • Prezentacja pomiarów ciężaru ciała i zawartości stowane produkty wysokiej jakości przeznaczone do tkanki tłuszczowej w formie diagramu. -
Page 88: Wskazówki Dotyczące Bezpieczeństwa
3. Wskazówki dotyczące • Maksymalne obciążenie wagi wynosi 150 kg (330 lb, 24 St). bezpieczeństwa • Waga ustawiona jest fabrycznie na jednostki „cm” Instrukcję obsługi należy uważnie przeczytać i prze- i „kg”. Jak zmienić ustawienie jednostek, podano w strzegać zawartych w niej wskazówek. rozdziale „Ustawienia“. -
Page 89: Uruchomienie
Panel obsługi z wyświetlaczem Waga 3 x AA Jeśli waga lub panel obsługi nie działają, należy wyjąć baterie i ponownie włożyć. Wskazówki dotyczące wy- Elektrody kontaktowe, lewa ręka miany baterii, patrz strona 97. Elektrody kontaktowe, prawa ręka 7 set Przycisk sterujący, potwierdzanie wprowa- Ustawianie wagi dzonych ustawień... -
Page 90: Informacje
• Włożyć kołki. Pomiar oporu elektrycznego (impedancja) i podanie • Przykręcić uchwyt ścienny za pomocą obu śrub. stałych lub indywidualnych wartości (wiek, wzrost, Sprawdzić stabilność montażu. płeć, stopień aktywności fizycznej) umożliwia zmie- • Wsunąć panel obsługi w uchwyt w taki sposób, aby rzenie zawartości tłuszczu, wody, tkanki mięśniowej i prowadnice uchwytu ściennego były ustawione rów- masy kostnej w organizmie. -
Page 91: Ustawienia
• Podczas pomiaru należy stać prosto i nie poruszać Ustawianie daty, godziny się. • Nacisnąć w trybie standby (wyświetlacz wskazuje • Po dużym wysiłku fizycznym należy odczekać kilka godzinę oraz datę) przycisk [SET]. godzin. • Za pomocą przycisku sterującego [ ] wybrać... -
Page 92: Wyświetlacz
Stopień aktywności fizycznej 10. Obsługa Wybór stopnia aktywności fizycznej zależy w głównej Pomiar ciężaru ciała mierze od okresu (średni lub długi), na jaki jest pla- 1. Włączanie wagi nowany. • Nacisnąć przycisk [ ] na panelu obsługi. Dopiero po wprowadzeniu wszystkich parametrów Na wyświetlaczu pojawia można dokonać... - Page 93 nie są zapisywane dane użytkownika ani pomiary. Ist- Analiza wartości uzyskanych podczas nieje możliwość włączenia lub wyłączenia trybu gościa, pomiaru patrz strona 91. Prezentacja graficzna Ciężar ciała • Stanąć boso na wagę o mocno trzymać w rękach panel obsługi. (Jeśli panel obsługi jest trzymany w •...
- Page 94 Mięśnie Zużycie kalorii Kcal • Za pomocą przycisku [ ] przejść do szczegó- • Nacisnąć przycisk [ ] na pulpicie obsługi, aby łowej prezentacji masy mięśniowej. przejść do kcal. Na wyświetlaczu pojawią się wyni- ki teoretycznych obliczeń podstawowej przemiany materii BMR oraz czynnej przemiany materii AMR w kcal.
-
Page 95: Ocena Wyników
3. Kasowanie wszystkich zapisanych wartości użytkownika • Wywołać pamięć pomiarów naciskać przez ok. 3 se- bardzo kundy przycisk [SET] na panelu obsługi, aby skaso- Wiek mało w normie dużo dużo wać wszystkie wartości. 30 – 39 <19 % 19 – 24 % 24,1–... -
Page 96: Masa Kostna
Pomiar tkanki mięśniowej wyciągać wniosków dotyczących zmian w kościach i twardości kości (np. osteoporoza). Procentowa zawartość tkanki mięśniowej mieści się zazwyczaj w przedziale: Mężczyzna Podstawowa przemiana materii (BMR = Basal Metabo- lic Rate) oznacza ilość energii, jaką zużywa organizm w stanie spoczynku do utrzymania podstawowych funk- cji życiowych (np. -
Page 97: Przesyłanie Mierzonych Wartości Do Komputera Pc / Healthmanager / Easyfit
Na bateriach zawierających szkodliwe sub- Proces: stancje zamieszczone są następujące ozna- • Pliki do pobrania i instalacji oprogramowania firmy czenia: Beurer znajdują się w sekcji pobierania na stronie Pb = bateria zawiera ołów, http://www.beurer.com Cd = bateria zawiera kadm, • Tworzenie połączenia USB. -
Page 98: Co Robić W Przypadku Problemów
16. Co robić w przypadku Błąd Rozwiązanie problemów? Panel obsługi jest zbyt Zmniejszyć odległość mię- oddalony od wagi. dzy wagą a panelem obsługi, Jeśli w trakcie pomiaru waga wykaże błąd, na wyświe- maksymalny odstęp wynosi tlaczu pojawiają się następujące wskazania. 2 metry.